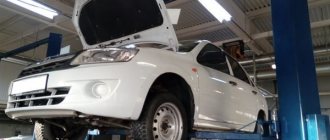
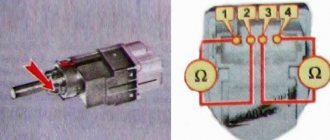
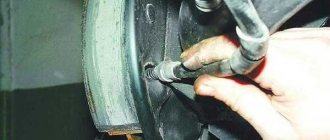
We will show you how to remove and replace the brake pedal sensor in a Lada Granta car. Carry out diagnostics for error P0504. It is located under the brake pedal, near the steering column. In order to remove the sensor, it is necessary to disconnect the wire block. In the picture you see two antennae on the sides:
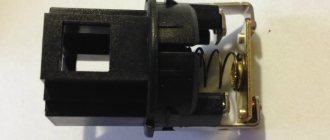
You need to press them and pull out the block with wires. Next, use a 19mm wrench, unscrew the locknut a little, then tighten it by hand. You can install a new sensor or diagnose and repair the old one. For convenience, its contacts are indicated by numbers. When it is in the free position, contacts 1 and 4 should be open, and contacts 2 and 3 should be closed. When we press the button, everything will be the other way around, contacts 1 and 4 will be closed, and 2 and 3 will be open. If this does not happen, then our button is faulty.
Installation occurs in the reverse order, adjust so that the pedal presses the button and releases it with a small stroke.
Video of removing and replacing the brake pedal sensor in Lada Granta, error P0504:
Backup video on how to remove and replace the brake pedal sensor in Lada Granta (error P0504):
If error P0504 indicates a malfunction of the brake pedal sensor, a check will light up on the panel; you can remove it using the on-board computer, which many Granta owners have installed, or simply disconnect the terminal from the battery for 20 seconds.
Problems that can arise with the brake pedal sensor in the Lada Granta have long ceased to be classified as news. It is this unpleasant circumstance that becomes the main reason for the appearance of error code “P0504”. This sensor can cause a lot of inconvenience to the owner, and mileage does not have any effect on its performance.
The price of the issue is equal to the amount of 180 rubles. for a new part. Why is a fee charged, and not a free replacement with the fact of repair indicated in the service book? The waiting period for spare parts to arrive is more than 4 days, since they are never in stock.
The annoying frequency of the “Check” symbol lighting up prompts the owner to go to a service center or make adjustments himself by tightening the corresponding bolts. This procedure aims to reduce the force of contact between the button and the pedal surface. If you “dig deeper,” then you can hardly get by with just one adjustment action, since the most common occurrence of error P0504 occurs when parking with the automatic transmission lever activated in position “D.”
How to check the handbrake switch
If, when putting Kalina on the handbrake, the red indicator lamp (P) does not light up on the dashboard, most likely the handbrake limit switch is faulty and needs to be replaced.
Although this problem does not happen often, it does occur for some owners. So let’s look at the procedure for replacing this part below, in detail with photographs. First, we raise the lever up so that it does not interfere with us. Then unscrew the three screws with a Phillips screwdriver that secure the plastic cover:
After that, we remove this cover by simply moving it back, and now we have access to all the necessary construction:
Now you can directly begin removing the “frog” or the so-called Kalina handbrake limit switch; here you will need to unscrew just one small screw, again with a Phillips screwdriver, only with a slightly smaller blade:
After the bolt has been unscrewed, you can remove the end switch from its seat, turning it a little, since it is curved. Now we bend the plastic latch and disconnect the plug with the power wires, as shown in the photo below:
That's all the work is, we buy a new limit switch and put it in place in the reverse order, as you can see for yourself, all this is done quite simply and will take no more than 10 minutes at most. If you have any questions, I will be happy to answer in the comments, write and discuss!
One day the handbrake light stopped burning. I thought the light bulb itself had burned out, but no. It was in vain that I pulled out the instrument dial. Although it was not in vain, I found loose screws, tightened them, it became quieter in the cabin. I checked the limit switch on the handle. It didn’t come off. it sits tight. How can I check it for a break? And in general, does anyone know the reason?
Checking the brake fluid level
It would seem what hydraulics can have to do with the indicator of the handbrake indicator. However, one of the most common reasons for the constant glow of the light is precisely that there is not enough brake fluid in the hydraulic, that is, working system.
In order to check its level, you should do the following:
- The machine must be parked on a level surface. When the engine is cold, open the hood.
- We are looking for the hydraulic brake master cylinder. It is located in the rear of the engine compartment on the driver's side. We need a plastic white reservoir located above the cylinder. Cars manufactured before 1980 may have a metal cylinder. In this case, you will have to remove its cover to check the fluid level.
- Most reservoirs have marks indicating the minimum and maximum fluid levels. If it is approximately in the middle of these marks, then there is enough liquid.
- If necessary, liquid should be added to the tank. This must be done very carefully, as the substance is toxic and can cause corrosion of metal surfaces.
- Close the reservoir with a lid and lower the hood.
If the fluid level in the reservoir was significantly below the minimum mark, you should check the brake pads to see if they are worn out. Then the fluid will flow out of the pipes and flow to the brake calipers. As a result, fluid will quickly leak out of the system, and its level will not be enough for the normal functioning of the hydraulic system. This is one of the reasons why the handbrake light may be constantly on.
FakeHeader
Comments 19
Hello, problem with vibration, did you solve it somehow or how?
I will also take a closer look at the advice. My handbrake light hasn't come on since I bought the car (it seems to have burned out)
The handbrake is paralleled with the brake level. close the contacts on the chip that is on the barrel plug. If it lights up, it means it's just the handbrake chain.
More likely + doesn't come. Or the light bulb on the panel has burned out or come off.
The light bulb is ok, I've already checked it.
Look along the path which terminal of the chip is coming and which is going out. Either + does not reach or minus does not go out.
Well, this is again drawing out the whole scale. Then sometime at your leisure.
The same principle is there. When the ignition is turned on, + comes to the light bulb. And the outgoing wire is divided into two: one goes to the handbrake limit switch and the second to the brake fluid level sensor. And from there to the masses. Since neither this nor that burns. It's somewhere out there. And you can see it visually there. Which contacts does the chip go to? If + comes and there is no access to ground through the handbrake and brake fluid reservoir. We look at the flail after the light bulb. If not + look at the circuit to the light bulb. And of course, don’t forget to ring the tracks on the board, you never know if there’s a crack.
+ comes to her? When the ignition is on?
It's pretty painstaking to check.
It was easier for me, the light bulb burned out.
I put the Vedashka tube under the rug and spray it. I massage it in the area of the button. and the grandmother whispered. enough for half a year
It didn’t help me. I just sprayed it with contact cleaner.
Yes, try another trick like checking the light bulb - with the ignition on, press the rubber knob of the cap on the brake fluid reservoir and ask someone to see if the light on the dash lights up. If it lights up, you will already know that you are not getting minus from the limit switch parking brake handles.
We're sorry, but the requests coming from your IP address appear to be automated. For this reason, we are forced to temporarily block access to the site.
Possible reasons why the handbrake light is on: opinions of car owners
- Changed the hubs. “The light in my car blinked sometimes. At first I decided that the problem was with the pads. But later I remembered - I replaced the pads not so long ago. I checked the brake, everything is fine. And then I thought about why the problem could arise? I didn’t think of anything and stopped worrying. The indicator continued to flash periodically... As a result, the right hub bearing began to make noise, after a while it began to hum so loudly that the sound simply made my head split. I first purchased one hub. Then I thought that it would be better to change both parts at once - or rather, this should be done. I bought a second one, changed it, and the problems all disappeared: no noise, no blinking light.”
- Got a good technician! “The handbrake light would come on from time to time while driving. Quite often this happened after bouncing on the pit. I went and bought a brake fluid. And I found a specialist right at the dealership. He then flooded it. He also climbed under the handbrake and said that perhaps the microphone at the lever was acting up (it seems like this happens sometimes). Take the train and watch. But the problem disappeared after filling the brake fluid. The handbrake no longer lights up. By the way, I met an excellent specialist and looked for the problem for free, with pleasure and without showing off.”
Why did it happen so?
Perhaps the automatic requests do not belong to you, but to another user accessing the network from the same IP address as you. You need to enter the characters into the form once, after which we will remember you and be able to distinguish you from other users exiting from this IP. In this case, the page with the captcha will not bother you for quite a long time.
You may have add-ons installed in your browser that can make automatic search requests. In this case, we recommend that you disable them.
It is also possible that your computer is infected with a virus program that is using it to collect information. Maybe you should check your system for viruses.
If you have any problems or would like our support team, please use the feedback form.
Source
How to change the brake sensor on a grant
Problems that can arise with the brake pedal sensor in the Lada Granta have long ceased to be classified as news. It is this unpleasant circumstance that becomes the main reason for the appearance of error code “P0504”. This sensor can cause a lot of inconvenience to the owner, and mileage does not have any effect on its performance.
The price of the issue is equal to the amount of 180 rubles. for a new part. Why is a fee charged, and not a free replacement with the fact of repair indicated in the service book? The waiting period for spare parts to arrive is more than 4 days, since they are never in stock.
The annoying frequency of the “Check” symbol lighting up prompts the owner to go to a service center or make adjustments himself by tightening the corresponding bolts. This procedure aims to reduce the force of contact between the button and the pedal surface. If you “dig deeper,” then you can hardly get by with just one adjustment action, since the most common occurrence of error P0504 occurs when parking with the automatic transmission lever activated in position “D.”
The obvious symptom factor can be identified with the moment when the Lada Granta does not want to start from the key fob. As a temporary solution, you can apply short-term pressure on the brake pedal. The car will start, but error P0504 does not disappear from the ECU memory.
If such “inadequate” operation of the sensor occurs, then this jeopardizes the safety of machine operation. Many owners have noted the fact that the BC freezes, as a result of which the car begins to twitch or may even stall in the middle of traffic, and error P0504 is shown.
Review of Manufacturer Prices
| Name/article | Price, rub.) |
| Limit switch with cap 1118-3710199 | from 160 |
| 11190-3710200 | —/— |
| Rubber cap 11190-371020600 | from 35 |
| 104035756 | from 175 |
| Dello 3094705636N0 | —/— |
| Hans Pries 104035756 | —/— |
| 11190-371020000 | —/— |
*prices are current as of 10/07/18.
The service life of factory rubber caps is limited, only 1.5 - 2 years. The reason lies in the low quality of materials. In winter, drivers often encounter freezing of the limit switch and hardening of the rubber cap. As a result, lighting activation is delayed. The central lock often blocks the doors due to unstable operation of the limit switch. There are several ways to troubleshoot the problem, which we will discuss below.
What are the reasons that cause sensor failure?
A detailed examination of the essence of the problem that arose, when error code 0504 appeared, will allow us to determine the list of reasons. This refers to the disassembly of the ill-fated sensor in the LADA Granta car. Three clips serve as an obstacle to this noble procedure, preventing the component from being easily disassembled. After overcoming this “barrier”, it becomes possible to observe the real reasons that caused the breakdown:
- deformation of the smaller (of 2) springs located on the rod;
- different heights of the contacts of the designated sensor;
- poor material (steel) used for the manufacture of terminals;
- presence of play on the floating contact element.
“Ringing” can be used as the initial stage of diagnosis. Each of the contacts must be subjected to this action separately, and then in pairs (“2nd” with “3rd”). The experience of LADA Granta owners indicates the presence of a dull tone during ringing, which confirms the malfunction of the contact group. Serviceable contacts are characterized by a distinct ringing “squeak”.
How to replace the sensor?
If you have received error code 0504, to perform this simple procedure you will need to provide access to the pedal bracket on the Lada Granta, on which our “ill-fated” sensor is actually present, or rather, above the pedal assembly. A well-carried out replacement will guarantee long-term operation.
- Remove the negative terminal from the battery terminal.
- We press out the plastic retainer (use a screwdriver).
- Next, remove the block with wires.
- Turn the sensor in a clockwise direction.
- We remove the faulty part.
We install the new component on a Lada Granta car in the reverse order. Don’t forget to first release the pedal to be able to insert the new product into its socket. We turn the component against the direction of the arrow until the corresponding click appears.
conclusions
If you often experience this error, then the brake pedal sensor is to blame. You should get a new element in the store (or contact an official dealer, since this malfunction is a warranty case if the car’s warranty has not yet expired), since on the automotive goods market this spare part costs about 200 rubles. And install it in a certified service center, an official dealer, or if you have a certain skill, you can perform the operations yourself.
About alternative sensor options
Since domestic “devices” for the Lada Granta car are not able to prevent an unpleasant situation, it is possible to use other devices that act as analogues. Such a component could be a brake light switch from Volkswagen, or more precisely: “FACET 7.1126”. This switch is slightly more expensive than the “native” one (560 rubles) and has the following features:
- four contacts;
- threaded leg with a similar diameter of 12 mm.
To successfully install the indicated analogue, you will need to acquire an adapter for the terminals.
Owners of LADA cars with an electronic gas pedal may encounter error P0504 (mismatch of brake pedal sensors). Along with it, malfunctions in the engine may appear (stalls, speed fluctuates, does not start, etc.). Most often the cause is the brake pedal position sensor (brake light sensor or frog).
The brake pedal position sensor and brake light switch are mounted in one housing. Most often, the cause of its malfunction is a broken spring. In this case, you can repair the sensor yourself by replacing the spring with a new one. Or replace the sensor with a new one.
Reviews
| № | Positive |
| 1. | Kirill: I knew about the problem of freezing tips initially when I bought the machine. I immediately bought silicone grease and lubricated it on the inside once a quarter. It's been a year now that I haven't had any problems. |
| 2. | Vasily: after the first winter the sensor jammed several times. I took the cap off, cleaned it, and lubed it. Works properly, no comments. What happened is also my fault, since I did not carry out preventive measures in a timely manner. |
| 3. | Konstantin: I bought Grant at a dealership six months ago, the activation sensor works properly, the light comes on without delay, and an indicator lights up on the dashboard. |
| 4. | Ignat: a year has passed since the purchase, I have not made any investments, there are no comments on the mechanisms. Once there was a malfunction of the sensor. Moisture got inside, after drying the defect was eliminated. |
| 5. | Sergey: I agree with the majority of positive reviews, the limit switch works properly, the workmanship is good. Every month I lubricate the rubber tip with silicone. |
| 6. | Vladimir: It’s been the second year since I bought the car, I haven’t made any investments other than scheduled maintenance. I heard about the “disease” of the sensors on Grant, but I can’t confirm it. |
| 7. | Ivan: once in the winter the limit switch jammed, I didn’t buy a new one, I cleaned the old one. It still works fine. |
| Negative | |
| 1. | Victor: I can’t speak positively about the activation sensor, since this is the second time in a year that I change it at a service station. The doors of the Lada Granta locked themselves twice. |
| 2. | Vyacheslav: after the winter the sensor jammed, the doors were locked, the keys remained in the cabin. I called a service station technician to open it. |
| 3. | Alexey: I can’t recommend factory door activation sensors, as their quality is poor. Comrades advised installing from Opel, they say that the diameter is identical. |
Conclusion Limit switches on a car should always be in good working order. Provided proper maintenance and lubrication, the service life is at least two years. It is necessary to regularly analyze the condition of the limit switches in order to notice and prevent malfunctions in time. You should also adhere to the operating instructions.
| Video – Granta Liftback – Refinement of door switches | Video - Lada Granta - door switches freeze? 3 solutions to the problem. |
How to remove and install
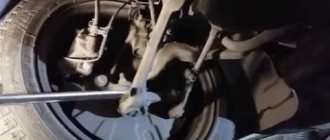
Disconnect the negative terminal of the battery. Move the driver's seat as far back as possible, lift the steering column up, and remove the carpet. The sensor is located near the brake pedal, to remove it you need to remove the block with wires (by snapping the latches), and then:
- (Priora, Kalina, Granta, Niva 4x4) loosen the lock nut and unscrew the sensor.
- (Largus, Vesta, XRAY) turn the sensor counterclockwise 90 degrees and remove it from the bracket.
Installation of the brake pedal sensor is carried out in reverse order. Adjust it if necessary. We tighten the sensor until the pedal goes down. Then turn it out a little (counterclockwise 90 degrees) and secure with a lock nut. It should be so that when the brake pedal is released, the switch rod is completely “recessed”, and when the pedal is pressed, the rod should completely come out of the switch body. The process of removing and installing the sensor is also shown in the video:
Where is the trunk limit switch of the Lada Granta Liftback
The trunk lid activation sensor is located on the left side, closer to the lamp. However, it is installed only in the “Lux” configuration. Rubber plugs are inserted into “Standard” and “Norma”.
In order to prevent sudden activation of the central locking and door locking, owners optionally install sensors. Considering the simplicity of the procedure, you can do this either independently or by contacting a service station for help from specialists. After installing the trunk end switch into the seat, we lay and connect the electrical wiring. “Plus” is powered from the side lights of the lamp, “minus” can be from the body or on the block with wires. Black with a white stripe is “minus”, red is “plus”.
In the Luxury package, the sensor is built into the trunk lid lock by default. When the lid is closed, the sensor automatically turns off the power from the light.
Removing and repairing the brake pedal position sensor
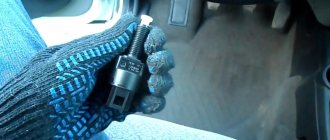
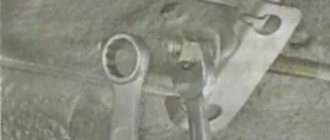
1. To diagnose the problem, it is necessary to remove the brake pedal sensor. This is done using the key at “19”. Move the driver's seat back and find the desired sensor. Then loosen the nut, turn off the power and remove the brake pedal sensor.
2. Then we disassemble it. Disassembly is quite simple; the sensor consists of two parts and is held on by latches. There is a spring inside the sensor, which most often causes a malfunction.
3. Replacing a spring with a suitable size and number of turns in most cases solves the problem. Also look at the condition of the contacts; there should be no oxides on them, and they should not be burnt.
4. After repairing the brake pedal position sensor, assemble it in the reverse order. And we install it in place.
5. Next, you need to adjust the sensor; for this there are two nuts on it at the top and bottom. The top one adjusts the gap, which determines the correct stroke of the button. The challenge is to find the “sweet spot” and adjust the gap so that the button moves freely.
6. Now that the Grant brake pedal sensor has been repaired, installed and adjusted, you can check its operation, but before that you should reset the error.
7. Then we start the engine and let it run, it may take about 10-15 minutes, if during this time the ECU does not generate an error, then the repair was not in vain. If the error appears again, it means something is wrong with the sensor, or it is incorrectly adjusted. If after all the manipulations you still have not managed to solve the problem with error P0504, most likely you will have to buy a new brake pedal position sensor and install it.
Source
DIY electric parking brake
Many brands are starting to install so-called electronic “handbrake” (or hand brakes) on their cars, which are needed to lock the car in place. Probably everyone knows that previously they were mostly mechanical, on cables (pulled the lever and the car locked), but now they are abandoning this in favor of more advanced solutions. So how do these electronic options work, how to use them, and what are their pros and cons? Let's figure it out, and for the lazy - at the end you can watch the video version...
Progress has come here too, no more brute force, just press a “button” and the car stands rooted to the spot - it won’t roll away anywhere. Moreover, the shutdown occurs automatically when the car begins to move forward. Let's get a little more detailed