Failure of the stove motor on a classic is one of the common problems of the heating and ventilation system. But, more often than not, car enthusiasts are faced with the fact that the fan motor starts to whistle, squeak, and there is a hum and other strange sounds.
In these cases, it is possible to restore normal operation of the motor for a while. To do this, you should disassemble the engine, wash it from dirt, dust and lubricate the bushings and other rubbing parts with graphite lubricant. Litol-24 lubricant is suitable for bearings.
Note: the heater motor on bearings is more reliable and less noisy compared to a motor on bushings.
You should also make sure that the impeller does not touch the housing (casing). If necessary, sharpen the blades slightly.
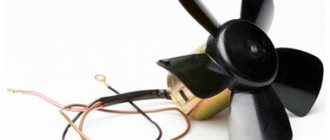
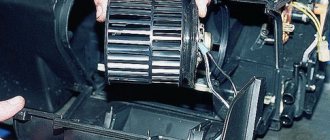
Stove motor with impeller VAZ 2101-2107, Oka, Niva
What to do if the stove motor does not work (does not turn on, the blades do not spin)?
Possible causes of malfunctions and ways to eliminate them:
- The wires are damaged, oxidized or their tips are loose.
Crimp the terminals, strip the ends, replace faulty wires.
Clean the commutator or replace the motor.
Heater fan motor does not work at low speeds
- An additional resistor has burned out, its wires are damaged or their tips are not tightly attached.
Replace the resistor, crimp the terminals, strip the ends, replace faulty wires.
Heater fan motor armature rotates slowly
- The collector is dirty or oxidized.
Clean the commutator or replace the motor.
Replace the heater fan motor.
How to make the stove heat in a VAZ: Video
General diagram of the electrical equipment of the VAZ 2104 carburetor
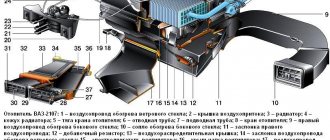
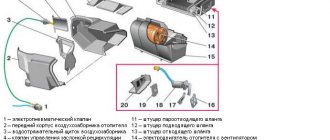
Electrical diagram of a VAZ-21043 car with instrument panel 2107: 1 - headlights; 2 — side direction indicators; 3 - battery; 4 — starter activation relay; 5 — carburetor electro-pneumatic valve; 6 — carburetor microswitch; 7 - generator 37.3701; 8 — gearmotors for headlight cleaners*; 9 — electric motor of the engine cooling system fan; 10 — fan motor activation sensor; 11 — sound signals; 12 — ignition distributor; 13 — spark plugs; 14 — starter; 15 — coolant temperature indicator sensor; 16 — engine compartment lamp; 17 — oil pressure warning lamp sensor; 18 — ignition coil; 19 — brake fluid level sensor; 20 — windshield wiper gearmotor; 21 — carburetor electro-pneumatic valve control unit; 22 — electric motor of the headlight washer pump*; 23 — electric motor of the windshield washer pump; 24 — reverse light switch; 25 — brake light switch; 26 — relay-breaker for alarm and direction indicators; 27 — windshield wiper relay; 28 — mounting block; 29 — lamp switches on the front door pillars; 30 — lamp switches on the rear door pillars; 31 — diode for checking the serviceability of the brake fluid level warning lamp; 32 — lampshades; 33 — parking brake warning lamp switch; 34 — brake fluid level warning lamp; 35 — indicator lamp panel; 36 — plug socket for a portable lamp**; 37 — glove box lighting lamp; 38 — rear window cleaner and washer switch; 39 — alarm switch; 40 — three-lever switch; 41 — ignition switch; 42 — ignition relay; 43—econometer; 44 — instrument cluster; 45 — carburetor air damper warning lamp switch; 46 — battery charge indicator lamp; 47 — control lamp for the carburetor air damper; 48 — turn signal indicator lamp; 49 — speedometer; 50 — fuel reserve warning lamp; 51 — fuel level indicator; 52 — instrument lighting regulator; 53 — clock; 54 — cigarette lighter; 55 - fog light circuit fuse; 56 — heater fan electric motor; 57 — additional resistor of the heater electric motor; 58 — electric motor of the rear window washer pump; 59 — rear fog light switch with control lamp; 60 — heater fan switch; 61 — switch for heated rear window with control lamp; 62 — external lighting switch; 63 - voltmeter; 64 — indicator lamp for external lighting; 65 — control lamp for high beam headlights; 66 — oil pressure warning lamp; 67 — parking brake warning lamp; 68 — tachometer; 69 — coolant temperature indicator; 70 — rear lights; 71 — pads for connecting to the rear window heating element; 72 — sensor for level indicator and fuel reserve; 73 — courtesy lamp for the rear part of the cabin; 74 — license plate lights; 75 — rear window wiper gear motor. The order of conditional numbering of plugs in the blocks: a - headlight units, headlight and rear window cleaners, windshield wiper relay breaker, carburetor electro-pneumatic valve control unit; b — mounting block, three-lever switch and instrument cluster; c — relay-interrupter for alarm and direction indicators; d — rear lights (pin numbering in order from top to bottom).
How much does a new heater motor cost?
Motors are usually sold assembled with or without an impeller. In the Moscow region (Moscow city and region), the price for a new heater motor on a bearing with an impeller for VAZ 2101-07, OKA, VAZ 2121 NIVA cars is about 500-600 rubles. Without an impeller - 100 rubles cheaper.
Characteristics of the stove fan electric motor:
- Nominal voltage 12 V
- Rated power 20 W
- Maximum current 5.0 A
- Rated speed 3000 min -1
- Weight 0.85 kg.
Used on the following cars: VAZ 2101. 2107, 2121 Niva, 1111 Oka.
A few more tips:
It is advisable to check the operation of the motor directly in the store. Be sure to keep your receipt after purchase.
There were even funny cases of selling defective products, when the stove motor turned in the opposite direction, and people complained about poor fan operation, and all the wires (ground and other terminals) were connected correctly.
The problem was that the assemblers at the factory had mixed up the wires by soldering them to other brushes. Therefore, nowadays you shouldn’t be surprised by anything, not even by a stove motor with a fan that blows in the other direction!
It is quite simple to understand that the heater fan on a VAZ 2107 does not work: you need to start the car and turn the switch responsible for the operation of the cabin heater. If the characteristic sounds from the fan operation do not appear, it means that the spare part needs to be repaired or replaced. Many owners of this car model face this problem. As a rule, you can find the cause of the breakdown and fix it yourself. It happens that the heater fan on a VAZ 2110 does not work only at some speeds. In this case, it is worth checking the functionality of the additional resistor or heating intensity toggle switch.
Reasons for fan failure
If the stove fan does not work on a VAZ 2107, you will have to check six elements that could have failed. Most often, this part stops functioning due to a blown fuse. This type of malfunction is considered the simplest, but it is quite problematic to fix. The fact is that replacing a blown fuse is not difficult: even a novice car enthusiast can cope with this task. However, the failure of the fuse is often caused by a short circuit, which is difficult to detect, because you will have to check the entire electrical circuit responsible for the operation of the car's interior heater. On the VAZ 2107, the fuse marked F7 is responsible for the operation of the stove. This element has a power of thirty amperes. If this fuse fails, you will notice that the glove compartment light and the cigarette lighter have stopped working along with the stove.
Contacts of the heater fan speed switch are burnt out
You checked the fuse and saw that it was intact. Let's dig further. Now we take and remove the gear shift button from the panel and disconnect the wires from it. Afterwards, we reliably connect one end of the indicator light to ground, and alternately insert the other end into the removed terminals of the wires disconnected from the button. The ignition must be on!
If the light does not light up, then power is not supplied to the speed switch and the mounting block is most likely faulty.
If the light comes on when testing one of the contacts, it means either the button or something else is faulty. How to find out? Very simple! To do this, we make a jumper from a regular wire, from the contact, during the test of which the indicator light came on, to one of the other two contacts. The stove motor will work if the button is faulty. If the motor does not work, then it is the motor that is faulty.
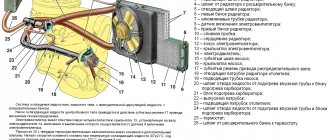
How the stove 2107 works
So, the heating system of the VAZ 2107 includes:
- heater;
- fan;
- heater control unit;
From the outside, air enters through the air intake into the casing of the air intake chamber. The camera is located in the engine compartment (in the area under the windshield). The air is then redirected to the heater, where moisture condensation occurs.
An important element is the heater radiator on the VAZ 2107, which heats up due to the circulation of coolant (coolant) in the engine cooling system. In this case, the air temperature changes due to the opening and closing of a special tap (VAZ heater tap), which reduces or increases the flow of heated coolant entering the heater radiator.
By the way, if the car is moving at high speed, the heating system can supply air to the cabin even when the VAZ 2107 heater fan is turned off. The fact is that the air flow from outside is capable of creating pressure in the air supply box, due to which heated air penetrates into the cabin.
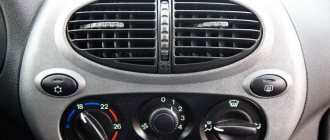
The heating system itself is simple. Air ducts can direct heated air to the feet, the driver, the windshield and side windows, etc. You can control the stove, change the temperature, and select the blowing direction using the knobs on the dashboard.
The handle at the top is responsible for adjusting the position of the heater tap. By moving the handle as far as possible to the left, the tap closes completely, and to the right will mean full opening.
The middle handle changes the position of the air supply cover, which allows you to adjust the intensity of the hot air supply. The handle on the bottom allows you to control the dampers of the heated glass air ducts. If you move the handle to the right, the air flow goes to the side windows, while the left position allows you to blow the windshield.
Poor windshield airflow
One of the problems with the ventilation and heating systems of VAZ models is poor airflow through the windshield. Many owners, complaining about design flaws, try to make modifications or turn to service center specialists for help. However, in most cases, if the windshield blows poorly, the problem is not some kind of defect, but a simple adjustment.
As practice shows, weak windshield airflow is primarily caused by the damper. More precisely, all the problems are due to the fact that the damper control cable has become loose or has fallen off the lever. It just needs to be pulled up or put in place.
Adjusting the windshield defogger system
As we said above, in order to ensure normal airflow on the windshield of Kalina or another VAZ model, you must first check the tension of the damper control cable. To do this, you will first have to remove the left screen of the dashboard, having first unscrewed all the mounting bolts.
If you see that the cable tension is not enough to completely close the damper, you need to shorten it a little. We will need an awl and wire cutters. First you need to remove the bracket. Along its edges there are semicircular cutouts, into one of which we insert an awl and carefully remove the tip from the end of the cable. Then, using wire cutters, we bite off one turn, and then twist the remaining part. After this, we thread the end of the cable back.
To make sure that the actions are correct, we test the operation of the windshield blower. Turn on the stove and control the airflow. If the air flow is weak and cold, you can repeat the procedure and bite off another turn of the cable tip.
After completing the cable tension adjustment, install the panel in the reverse order.
Modification of the windshield blowing system of VAZ-2113 (2114, 2115)
Almost every Samara owner complains about uneven airflow in the cabin. This is primarily expressed by the fact that hot air flows from the central air ducts (from the dashboard) to the windshield, and a cold flow comes from the side nozzles. This situation manifests itself most clearly when the heater temperature decreases when the control lever is moved to the left.
As a rule, service centers do not solve this problem. Masters claim that this is the operating principle of the system. However, you can fix everything yourself.
First, we dismantle the torpedo cover, which is installed on the left. Not far from the gas pedal there is a throttle control cable secured with a bracket. The clamp should be loosened and the cable pulled down. Then we fasten the bracket and move the right damper control lever to the left all the way, and the left one to the right all the way. In this case, a warm flow from the side air ducts will be supplied to the windshield.
However, the desired control of the temperature of the windshield blower flow will not be implemented in all modes. When the lever is moved to the left, cold air will still flow in a certain position. This is due to the fact that the lever controls both the damper and the heater valve. The damper, in turn, allows access to cold air flow.
To prevent this from happening, you should disconnect the cable that controls the damper. To do this, first remove the torpedo cover on the right and find the engine that controls the temperature. Two cables are connected to it. We select the cable located to the right and tighten it so that the damper moves to the maximum heating position. After this, we bend the cable at the attachment point. Now the damper will always be in this position. The cable should be cut off with wire cutters, leaving 15 mm. Otherwise, the extra length will interfere with the movement of the engine. After such modification, a flow of warm air will flow into all air ducts, and the temperature will be smoothly regulated in any position of the lever.
Poor airflow on the windshield of a VAZ-2107
The disadvantages of the ventilation and heating system of the VAZ-2107 are known to every owner. Many craftsmen install a more powerful motor instead of a standard electric motor, which is used in the ventilation and heating system of the VAZ-2108. However, this modification is ineffective.
To achieve the desired result, experts recommend completely redoing the standard stove, installing not only the 08 electric motor, but the “snail” assembly. To do this, it is necessary to change the lower part of the stove so that a snail can be mounted into it. However, this procedure is quite complex and time-consuming. If you wish, you can find a detailed description on the Internet of how to modify the VAZ-2107 windshield blower with your own hands.
Modification of the VAZ 2107 stove: heater tuning
Although the design of the VAZ 2107 stove is simple, however, the design is not without drawbacks. For this reason, many owners modify the VAZ 2107 stove with their own hands or carry out repairs, change worn out elements, etc.
As a rule, the list of improvements includes improvements in terms of increasing the tightness of air ducts (often in those places where there are connections). This solution makes it possible to achieve more efficient heating of the interior space and blowing of the windows.
Replacing it with the VAZ 2108 version, which already has bearings, solves this problem too. To replace the VAZ 2107 stove fan, you need to prepare a fuse, a resistor and a speed switch. The parts fit from the Niva and Kalina models.
To remove the fan you need two screwdrivers (flat and Phillips), a 7 and 10 wrench, and pliers. To get to the fan, the instrument panel, shelf, and glove box are removed. Then, using key 7, loosen the casing of the air damper adjustment cable. Next, the cable loop is thrown off the lever.
Now, using key 10, the nut securing the heater body is unscrewed, after which the air ducts (left and right) are removed from the heater body with a flat screwdriver. Then, using the same flat screwdriver, you need to remove the latches that secure the fan.
Next you need to disconnect the wire terminals, remove the fan from the stove body, and remove the impeller. Taking into account the fact that the fan from the VAZ 2108 is slightly larger in size, changes are being made to the design of the stove.
Replacing only the motor requires making an additional hole in the grille through which hot air passes down. If you do not make a hole, the electric motor housing will rest against the grille.
The main thing is to take into account when reassembling and installing that the air is taken from outside and not from the passenger compartment. Also, if air does not flow into the “sleeves” or the stove blows under the panel, you should check the fastenings of the air ducts. It often happens that the air duct simply does not fit into place, is clogged with foam rubber, etc.
The air ducts themselves are also being improved. This is done by making additional holes in the stove body, into which several plumbing hoses are then inserted. If these hoses are connected to the side air ducts, as well as the bottom ones, then this will create a more powerful flow of warm air when blowing the legs or windows.
Reasons for poor performance of windshield blower
First you need to figure out why this function does not work well. This can happen due to acquired faults or congenital defects of the car. The problem is that getting to the real cause can be very difficult due to the number of common fault patterns. There are several dozen main factors that affect the quality of airflow in the cabin.
But in most situations, you should pay attention to the following points:
- the front panel is not installed correctly after dismantling it, in which case the holes in it will not coincide with the holes in the air supply system, which will lead to problems;
- after installing the alarm, many people encounter this problem, this is due to the fact that errors were made during assembly, the air ducts did not match properly;
- problems may be associated with incorrect switching of climate control modes; the “glass” mode does not turn on due to a loose or stretched adjustment cable;
- the malfunction may be hidden in the blower fan unit, as well as in the stove system; the adjustment curtains are often bent or otherwise deformed;
- The cause of the malfunction may also be poor performance of the fan itself, its low rotation speed or incorrect shape of the blades of the device.
These are basic problems that most often occur with poor glass blowing. We can also add that clogged air ducts or improperly assembled climate control also turn out to be a problem for the car. You can use a variety of ways to solve these problems, but in most cases you can’t fix anything with your own hands. It is better to use the services of the service and get a professional solution to your problems.
The VAZ 2107 stove does not work: reasons
Taking into account the fact that there can be quite a lot of heater malfunctions, we will consider the main ones below:
- First of all, air in the cooling system causes the stove to not work. In this case, it is important to remove the air plug, that is, to perform high-quality de-airing of the engine cooling system.
- The heater may not work well because the radiator of the VAZ 2107 heater is clogged. As a result, the coolant does not circulate well through the heater system, and the air warms up poorly. It turns out that when the heater on a VAZ 2107 does not work completely, that is, it blows, but the air is cold, this often indicates that the radiator is completely clogged and needs to be washed or replaced. To quickly determine this, you need to feel the pipes. If the inlet pipe is warm and the outlet pipe is cold, then the problem is obvious.
- It also happens that the heater valve is open, but no coolant is supplied to the radiator. This usually happens because scale and dirt have accumulated in the system, and the tap is clogged. To solve the problem, the faucet must be removed for cleaning or replacement.
How to identify the problem and fix it
There are several reasons why the furnace blows cold air or does not work at all. In this case, you must proceed as follows:
- Check the faucet to see if it opens.
- Is the cold air damper capable of closing?
- With the car running, check the heater (heater radiator) for heating.
Radiator replacement
If the problem is in the radiator and it needs to be replaced, then proceed as follows:
- Drain the liquid.
- We unscrew the two clamps from the engine compartment, which are located on the radiator pipes. We remove the hoses.
- Unscrew and remove the fasteners on the rubber seal.
- We dismantle the radio panel and the cable fasteners on the heater valve drive. To do this job you will need a 7 key.
- Next, use a screwdriver to remove 4 spring clips from the fan casing. The casing drops down and slides to the left, after which the radiator can be pulled out.
- Now you can carefully examine the radiator, revive it or replace it with a new one. Assembly is carried out in the reverse order and does not involve any difficulties.
A broken radiator is a common cause of a non-functioning stove.
Restoring glass blowing
The stove that is installed on the VAZ-2107 has some design features, due to which the left pipe often does not blow the glass well enough. To put up with such an inconvenience in winter is difficult. Therefore, it is worth working to eliminate this problem. You must proceed according to the following scheme:
- We remove the deflector from the pipe by prying one of its sides with a screwdriver.
- The deflector body is held on the torpedo using small antennae. We put our hand inside and pull it out.
- The 50mm fan from the computer must be placed in the center of the dismantled case and marked in the appropriate places.
- In the plastic case, using a utility knife, hacksaw or sharp knife, cuts are made at the marks.
- The plastic easily breaks off along the line of cuts and an opening is obtained into which the fan is installed. It should fit snugly in place.
- We return the insides of the deflector to their place. The internal blades will not be able to rotate at full speed due to the changes made.
Other minor faults
Finding and fixing minor problems on your own is a handy skill for any car enthusiast.
After such actions it will be easy to determine the causes of the breakdown. And they can be as follows:
If the faucet is working properly, but the heater heats up only at high engine speeds and under such conditions begins to blow warm air, then the fault should be looked for in the pump or a coolant leak. To find a leak, you must carefully examine the required area of the cabin. If leaks are found, it is necessary to replace the hoses, tighten or install new clamps
Do not neglect the cap on the expansion tank. Tightness is the main condition under which the heater can function normally. Leaks can also occur due to rusting of the radiator, taps and other elements of the heating system
In this case, it is enough to simply replace the necessary part and enjoy a comfortable ride. The tightness can be checked in another simple way. Turn on the engine and wait 10 minutes. During this time, the expansion tank should warm up. If this does not happen, then we can talk about the lack of pressure that is necessary to supply antifreeze or antifreeze to the heater stove. If you notice that the car gets very hot when standing in a traffic jam, then you can talk about the lack of necessary pressure.
The stove can become clogged with various debris and become coated from the inside with oxides of various substances. In this case, it is necessary to clean out the debris and clean the system.
The car owner must be prepared for minor problems and be able to quickly fix them. For example, with the onset of winter, many VAZ-2107 owners’ stoves do not heat up and it is not always convenient to run to specialists with this problem.
Repair of VAZ 2107 stove
First of all, it is important to immediately identify the breakdown. If the problem is a leaking pipe, faucet or air lock, this problem can be solved quickly.
If the cause is the heater radiator or other hard-to-reach elements, then a larger amount of work is expected, that is, you need to separately study the instructions on how to remove the VAZ 2107 heater and how to replace the VAZ 2107 heater. Let's look at methods for eliminating common faults.
- If the problem is with the faucet, it is optimal to immediately replace it with a new one. To do this, a pipe is disconnected under the hood that goes to the tap. To prevent some of the coolant from pouring into the engine compartment after removal, a container is placed under the pipe. Then the storage shelf is removed, then, using wrench 10, the nuts securing the faucet to the stove body are unscrewed. Now the tap can be removed from the studs and a new one installed.
As a rule, the heater tap needs to be changed if it gets stuck, etc. In this case, it is better to install a ceramic faucet instead of a standard metal one. Such a faucet, unlike its factory counterpart, does not become sour, scale does not accumulate on the ceramics, and corrosion does not occur. As a result, even if the tap is closed for a long time (for example, from spring to autumn), after opening it, full functionality remains.
- Radiator malfunctions are more serious failures. If the heater radiator is leaking or clogged, it must be removed. The same can be said about the stove fan, motor, etc. To carry out such repairs, you need to know how to remove the 2107 stove.
Step-by-step instructions for replacing the radiator
What should I do to get the stove working again? First of all, replace or repair the radiator; to do this, follow these steps step by step:
- Drain the coolant into a container.
- Unscrew the 2 clamps located on the pipes of the old device from the engine compartment and remove the hoses.
- Unscrew the rubber seal retainer and then remove it completely.
- The interior of the VAZ-2107 will also have to work. Remove the panel where the radio is located, using a screwdriver or a 7mm wrench, unscrew the fastening element of the heater valve drive cable.
- Don't put the screwdriver down; you'll still need it to remove the spring-shaped brackets. There are four of them, the parts are located on the casing of the ventilation equipment.
- Slightly lower the cover downwards and then move it to the left.
- The radiator can now be pulled out.
- Proceed to inspect the old unit. Which product can not be changed? If there are no traces of leaks on the metal tubes, there is no corrosion. Corrosion is cleaned out, and leaking metal pipes are replaced. It happens that the heater tap lever is jammed, the point is that it no longer opens or there are problems with closing. When reinstalling radiator components, remember that good gaskets seal the fit of the parts to each other. Each gasket should be covered with silicone sealant; screw them securely, but without overtightening the fasteners.
- Rubber hoses that carry coolant along the entire path are also subject to lubrication with sealant.
- Assemble and mount the radiator exactly as indicated in the instructions, but in reverse order.
- If necessary, add antifreeze.
- All that remains is to turn on the ignition and check how tight the connection of the pipes with the hoses of the VAZ-2107 is.
What to do if the stove in the VAZ-2107 does not heat and the radiator is to blame is shown in the video: https://www.youtube.com/watch?v=gGOGR8EeHWI.
Let's sum it up
Timely diagnostics, preventive cleaning and inspection of elements of the vehicle’s heating system is a guarantee of high-quality operation of the stove. Experts recommend checking the heating system on the VAZ-2107 at least twice a year - in autumn and spring. Any driver can handle preventive cleaning and adjustments of the stove on his own; to do this, you just need to understand the structure of the heating and ventilation system of the cabin and the principle of its operation. The easiest way to do this is to always have a visual instruction manual for your car nearby.
Don’t put off any further work to improve the functioning of your car’s heating system. Proper care will ensure uninterrupted operation of the heater and a comfortable temperature in the interior at any time of the year.
Sources
- https://avtocity365.ru/ustrojstvo-i-ekspluatatsiya-avtomobilya/pechka-vaz-2107/
- https://FB.ru/article/302372/sistema-otopleniya-vaz–ustroystvo-prichinyi-neispravnosti
- https://vsepoedem.com/story/osobennosti-pechki-vaz-2107
- https://7-vaz.ru/ustrojstvo/pechka-vaz-2107.html
- https://semerkavaz.ru/raznoe/pechka-vaz-2107/
- https://remam.ru/vozdsys/shema-i-ustrojstvo-pechki-vaz-2107.html
[collapse]
Heat does not flow inside the cabin due to several reasons:
- The thermostat has become unusable. If the thermostat is faulty, cold air will flow into the car interior when the engine is cold. And when the internal combustion engine is warmed up, the stove will properly perform its main purpose. The thermostat cannot be repaired, so it should be replaced according to the instructions.
- An air lock, which sometimes occurs when the coolant is replaced incorrectly, can also cause ineffective operation of the car’s heating system. The solution to this problem is simple - place your “iron four-wheeled horse” on a flat area and gradually remove the resulting air plug, slowly releasing the air.
- Quite often, in car models with a fairly high mileage, the honeycombs on the radiator become clogged, which damages the heating system. The resulting scale becomes an obstacle to normal fluid circulation, so exclusively cold air enters the cabin. Careful descaling or installing a new radiator will help eliminate such problems.
A training video tutorial in the virtual space will help you find the cause of a car heater breakdown, which can be viewed by everyone at a time convenient for visitors.