Preparing to change engine oil
A prerequisite is to warm up the car - the result from the replacement will be better. We find an inspection hole or overpass, prepare replacement oil and a new filter.
What you will need for work :
- New oil;
- Container for draining waste (at least 4 liters);
- Hexagon 12 for unscrewing the drain plug;
- Oil filter puller;
- New filter;
- If you plan to replace with flushing, use a canister of flushing oil.
Working with a lift will give full access to the drain neck and filter from below.
How to change oil on an 8 valve Grant
So, the engine is warmed up to operating temperature, the car is in the pit, the tools are at hand. How to change oil without flushing:
- Open the hood, remove the oil filler cap ;
- We climb under the car: if the crankcase is covered with protection or a factory metal sheet, we dismantle it ;
- we find the drain neck on the engine, place container under it ;
- Using a 12mm hexagon (or a 17mm wrench - depending on the type of plug) we begin to unscrew the drain plug. Please note that hot waste will flow from underneath it - at the end, sharply move your hand with the plug to the side so that it does not flood;
- After removing the plug, leave the car for 5-10 minutes so that everything is glassed;
If the car does not “eat” oil and there are no obvious leaks on the internal combustion engine, about 3 liters should drain.
We climb under the car again:
- Use a puller to unscrew the oil filter . Keep in mind that it will also leak! Not much, but it will be;
- Fill the new filter halfway and wipe it around the perimeter of the seal;
Rubbing the ring will help it fit more tightly to the attachment point.
Preparing the installation site:
- We clean the place where the filter is attached from dirt, sealant residues, etc.;
- We install it in place . As soon as it starts to spin with force, tighten it three-quarters of a turn.
When tightening the filter there is a danger of overtightening. This may cause the edge to crack and oil to leak out.
- tighten the drain cap! Otherwise, new oil will drain from the engine.
- Fill with -3.2 liters;
- Close the filler neck , wait a few minutes and check the level on the dipstick - ideally the mark will be between MIN and MAX.
- According to the manual, the Granta with manual transmission includes 3.2 liters; Automatic transmission - 4.4 liters.
The oil level should be read around the indicated mark.
The last thing is to start the car . The oil pressure indicator may come on for a few seconds after starting the engine.
If it goes out, everything is fine. If not, turn off the car and check the level.
Don’t forget to check that the sensor is working - when you turn on the ignition, its indication on the panel lights up and immediately goes out.
Features of changing the oil on Lada 16 cl.
The whole process is identical to the one described above.
The only difference is that you can remove the filter on a 16-valve engine only from below after dismantling the factory (or additional) crankcase protection - if it does not have a window for such work.
Replacing the VAZ 2190 oil filter
AvtoVAZ and common sense advise changing the filter element with every oil change. To independently search and order this part online, use the following articles:
Oil filter article for Granta
How to choose a filter
One of the most popular brands of filters for Lada is Mann. Accordingly, fakes are often found. Let's look at the signs of the original part .
The reputation of a reliable brand has led to frequent counterfeits of Mann parts.
Why change the oil yourself?
Perhaps someone will ask: “Why change the oil yourself, if now most sellers offer their customers a free oil change?”
There are two reasons for this:
- Free replacement. Forget about the word "FREE" - it's advertising. In the world of commerce, nothing is done for free. When I first changed the oil “free” on my Grant, I had to buy the oil itself for 1,610 rubles. and an oil filter for 290 rubles, a total of 1900 rubles. Only when purchasing oil and filter at the same time, you could use the “free” replacement service. When the time came for the next oil change, I decided to find out the price of MAGNUM ULTRATEC 5W-40 in the spare parts store of the official LADA dealer. Imagine my surprise when I saw the price tag of 1,320 rubles on the canister. An oil filter in the same store cost 280 rubles, a total of 1600 rubles. Naturally, the store did not offer any “free” replacement. We conclude: “free oil change” is already included in the cost of oil. Want to save 300 rubles? – change the oil yourself. By the way, I recently came across a site on the Internet where MAGNUM ULTRATEC 5W-40 is being sold for 1,032 rubles. (4l). Then add the savings :)).
- Full control of the replacement process. When you change the oil yourself, you control the entire process. It is possible to evaluate the condition of the drained oil, its viscosity, and transparency. Even a simple visual inspection will help you draw preliminary conclusions about the quality of used oil. “Workouts” may be different (depending on the quality of the oil and operating conditions). Some are black, like shoe polish, and even with a “pearl” tint, indicating the presence of small metal shavings in the used oil. Such development is a very bad signal, indicating rapid engine wear. Another point that you can control when replacing it yourself is the force with which the oil filter is screwed in. After the “free” replacement, I barely unscrewed the oil filter on my Grant, and when I unscrewed it, there was a large dent on it, which formed at the moment of “tightening” the filter. In short, they tightened the filter like bolts on a wheel. What if the thread was torn off or some other problem? In general, when you change it yourself, it’s much calmer.
Procedure for changing engine oil
Below I described the procedure for changing engine oil in the Lada Granta engine, which I followed myself. Whether you follow it or not is up to you.
Warming up the engine
I would like to note that the oil change is carried out when the engine is warm. Hot oil is more liquid and flows easily from the engine walls and oil passages. If the oil is cold, then a significant part of it will remain in the engine. Therefore, be sure to warm up the engine before replacing.
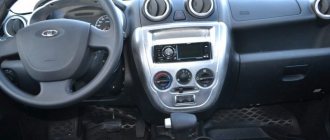
Unscrew the oil filler cap
The first thing I did was unscrew the oil filler cap to allow free air flow when draining the oil.
Why unscrew the cap? If this is not done, then when draining the used oil, a vacuum of air will be created in the engine, preventing complete draining. Why does this happen? The fact is that in modern engines there is no direct communication between the crankcase and the atmosphere.
The modern crankcase ventilation system is a separate topic, I will not go into it, I will only say that it is designed to reduce the emission of harmful substances into the atmosphere. You've probably heard about the environmental class of a car: Euro-3, Euro-4, Euro-5. I think everyone knows about them. So, a modern crankcase ventilation system is part of the environmental standard.
By the way, the Lada Granta (in my case, 2022) meets the Euro-5 environmental standard. What am I talking about? Moreover, it is better to unscrew the oil filler cap. Of course, the oil will drain with the cap screwed on, but with the cap unscrewed it will drain a little faster... In general, I unscrewed the cap, and you do as you see fit... Moreover, you still have to unscrew the cap to fill the oil, whether you do it earlier or later...
Just in case, I covered the neck hole with a clean rag so that no dirt got in there..... Let's move on.
Drain the used oil
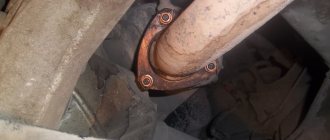
To drain the oil from the engine, just unscrew the drain plug at the bottom of the crankcase with a 17 key and place a container where the used oil will be drained. If your car has a metal engine protection (as in the image), then pay attention to the oval plug.
Removing it will give you access to the drain plug. There is no need to remove the protection itself.
So, we place the container under the oil and use a 17 key to unscrew the plug. Having slightly loosened the plug with a key, you can then unscrew it by hand. Just be careful. Stand back a little when you remove the plug to prevent hot oil from splashing on you.
Changing the oil filter
After unscrewing the plug, let the oil drain into the container. While the oil is draining, you can unscrew the oil filter and replace it with a new one.
To unscrew the oil filter, I used a chain-shaped tool with a ratchet head.
Car dealerships sell several different types of tools for unscrewing filters, but I chose the “chain” option because it seemed more reliable and versatile to me.
Before installing a new oil filter, do not forget to generously lubricate the rubber O-ring with oil - this will make tightening the filter much easier.
If this is not done, the rubber ring, in contact with the metal surface, will begin to “slow down” the process of tightening the filter. You will try to tighten it, but it will come back, as if on a spring.
General issues
Let's consider general philistine questions about Granta and butter.
How to check the oil level in Grant
We check the level classically;
- The car must be turned off for at least 5-10 minutes;
- We take out the oil dipstick, wipe it with a rag and put it back;
- We take it out and look at the light - the level should be between MIN and MAX.
The dipsticks on the Lada suffer from the fact that they are difficult to read. You may need to wipe and lower the dipstick again.
When to change the oil of a VAZ 2190
According to the regulations, replacement on the Grant is required every 15,000 kilometers. Practical experience suggests replacement every 10,000 km. mileage, or once/twice a year.
The Grants are stuffed with Rosneft from the factory. The brand has not proven itself to be reliable and of high quality.
The first replacement occurs after the new car has been broken in - after 2000 km. This is not a requirement from the factory, but common sense - change the flooded s to something normal.
Which oil to choose
Next is a table with factory recommendations for Grants.
Excerpt from the documentation for the VAZ 2190.
Changing the oil in the Lada Granta engine
I chose the synthetic oil Rosneft “MAGNUM ULTRATEC 5W-40”.
This is the oil I filled in earlier. I was quite satisfied with the performance characteristics of this oil. I drove it both in winter and summer and had no complaints. When after 15,000 km. mileage, the valve cover was removed, it turned out to be absolutely clean, without the slightest hint of plaque. If the price/quality ratio suits me, then why do I need another oil? Therefore, I decided to go with MAGNUM ULTRATEC 5W-40. Of course, if in the future there are compelling arguments in favor of a different motor oil, then I might consider a change.
Crib
- To replace, you need a 12mm hexagon , container , remover and a canister for filling;
- It is better to work on a pit or a lift (the latter will require lowering/raising the car several times);
- Do not overtighten the filter when installing;
- Before pouring a new one, check the drain plug and the installation of a new filter;
- If you removed the DPKV chip, put it back on before starting the engine;
- After replacing and starting the machine, check that the oil pressure sensor goes out.
Wondering how to service your car yourself? Then read other articles about working with Granta at the link.
Don't forget to add comments. We are interested in everything that we didn’t like, missed in the article and any other comments.
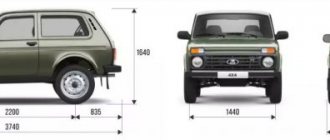
The Lada Granta car can be produced with one of two 16-valve engines - 21126 or 21127. These engines differ in the design of the intake tract. And therefore, if we talk about changing the oil, the division should be carried out not by the name of the internal combustion engine, but by which gearbox is used: manual transmission or automatic transmission.
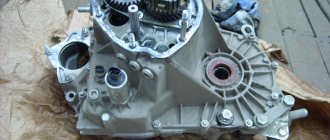
In the second case, the gearbox assembly and the engine form a single power unit. It is cooled by engine oil.
About installing a magnetic plug in the engine crankcase and gearbox on LADA
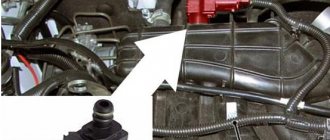
During operation of the engine and gearbox, tiny metal particles enter the oil, which appear due to the rubbing of parts against each other. A crankcase drain plug with a neodymium magnet helps collect metal debris and extends the life of the units by allowing them to operate in clean oil. Let's figure out how to make a magnetic crankcase plug for LADA cars with your own hands and whether there is any benefit from it.
The process of modifying the drain plug is shown using the example of a Lada Priora car. On other modern LADA cars (Vesta, XRAY, Largus, Granta, Kalina, Lada 4×4) all actions are performed similarly. You will find examples of work on other LADA models in the comments.
- Standard drain plug.
- Neodymium magnet N52 Ф12*10mm
Finalization
drain plug is very simple. The magnet should be secured inside the stopper. To do this, you can use epoxy glue or rivet the edges of the cork with a core.
Tests
showed that after running for 3000 km, 3-4 mm of metal dust and oil had accumulated on the magnetic plug of the engine crankcase.
It is worth noting that ready-made accessories can be found on sale. For example, for a Renault engine and gearbox, the sump plug with a magnet has the article numbers: 7703075210, 7703075348, 7903075033.
- In China on AliExpress (for LADA a plug with parameters M16X1.5 is suitable)
- In our online store (link to product)
Will you install a magnetic crankcase drain plug on your LADA car?
Let us remind you that we previously talked about other simple modifications that improve the operation of the car, for example:
Source
All replacement steps
It would seem that changing the oil in the engine would be simple - just open the neck and unscrew the drain plug. But owners of cars with a manual transmission are in for a surprise in the form of a shield covering the engine from below. The meaning of these words is clear from the photo.
Crankcase protection in Grant with manual transmission
Screws 7 are unscrewed first. To do this you need a key “10”. And for self-tapping screws, a socket wrench “8” is suitable. By the way, the number of screws is 9.
You only need to change the oil when the engine is warm. And if the filter is also replaced, the pressure sensor is turned off (see above). But first, disconnect the “Minus” terminal: taking the “10” key, loosen the fastening.
Disconnect one of the battery terminals
And it’s clear what needs to be done next. Simply, the car's network must be de-energized.
The third preparatory step will be opening the “top”, that is, the filling plug. Just unscrew it. In this case, a car with a manual transmission must be in the pit. For cars with automatic transmission, someone uses a lift.
Filler plug
There are not many steps left to complete:
- Make sure the neck is open;
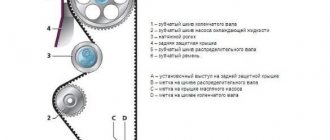
- Using a 12" spanner wrench (MKP) or a 8" hexagon wrench, loosen the drain plug (Fig. 1 and Fig. 2);
The main stage of changing the oil, fig. 3
So they begin to unscrew the filter, Fig. 4
We are preparing a new filter for installation, fig. 5
At the last stage, tighten the drain plug and pour oil through the neck. For the crankcase plug, the VAZ plant does not standardize the torque, but for the filter the value should be 40-80 N*m. We are talking about a two-fold spread, but the o-ring will still compensate for the error.
It is necessary to remember: the temperature of used oil can reach 70-80 Gy. C. Therefore, contact with the skin causes a burn! By the way, the filter cavity will be filled with cooled waste, which flows out of the housing if the filter is replaced.
Two final operations
The engine oil and maybe the filter have been changed. All that remains is to connect all the terminals, close the neck and start the engine. You need to achieve one thing - for the control lamp to go out.
Indicator related to the lubrication system
When the result is received, that is, the light does not light up, do not be lazy and check the oil level using the dipstick. Top up if necessary.
Marks on the dipstick, engine 21126 and 21127
By the way, they came up with a non-standard dipstick for 16-valve engines: instead of lines (marks), they made a notch on it.
The MIN and MAX levels correspond to the transition from a notch to a polished surface. The meaning of this is clear from the figure.
You need to add 70-100 grams of oil. In general, the volume of the lubrication system is discussed further.
Recommended volume
If the motor is aggregated “mechanically”, the lubrication system is filled with 3 and a half liters of new material. For power units with automatic transmission, the value is 4.5 liters. Now keep in mind the main thing - up to 400-500 ml of waste may remain in the crankcase. Conclusions are easy to draw.
Example: replacing the oil and filter on a VAZ-21126 internal combustion engine with automatic transmission. The new filter housing was half full (100 ml). The minimum value will then be 3900 ml: 4500 – 500 – 200 + 100. Here 200 ml is the volume of the oil filter.
It is better to calculate the volume of new oil at a minimum and then top it up. We wish you success.
List of parts and equipment
To simply change the engine oil, the owner of a car with an automatic transmission will need a core wrench. The standard size “6 edges by 8 mm” is suitable. In principle, you don’t need anything else except a flat key “10”. They unscrew the battery terminal with it.
Plug key for all trim levels with automatic transmission
For those who have a mechanical transmission, it is easier to use a set of ring wrenches. We need standard sizes 8, 10 and 12 mm. That's all.
Let us indicate how the drain plugs are designated in the AvtoVAZ catalog:
- 21120-1011061-00 – plug for equipment with automatic transmission;
- 21080-1011062-00 – washer for the plug (automatic transmission only);
- 21080-1009156-00 – option for cars with manual transmission.
The filler plug is designated by the numbers 11190-1009146-00. And the control dipstick is a part from the VAZ catalog with number 21120-1009045-00.
To unscrew the oil filter housing, use a puller. There are universal pullers on sale, and a cup puller (Renault 7711381992) is also suitable. The choice is made based on standard parameters: diameter is 76 mm, number of edges is 12.
Cup puller
If we talk about the oil filter itself, part 21080-1012005-08 was installed from the factory. This is a filter produced in the city of Livny. You can look for an imported replacement, but keep in mind that the height of the case should not be less than 70 mm. Otherwise, the oil will not cool well.
Selection of analogues
The screw plug that closes the hole in the crankcase of cars with automatic transmission is not a unique VAZ part. You can use analogues instead:
- Renault 77 03 075 348;
- Fa1 153.520.001 (for a tetrahedron rod).
If you remove the spaces from the top number, you get the designation of the traffic jam for Largus.
It will be more difficult to find a replacement for the washer. Renault, which produces part number 11026 5505R, will help here. Without a space, we again get the AvtoVAZ part designation: 110265505R - sealing ring from Lada Largus.
The VAZ plug number 21080-1009156-00 has its own long history. It appeared on Eights and is suitable for front-wheel drive Lada engines that are not equipped with an automatic transmission. A unique feature of the part is the presence of a tapered thread. Of course, it cannot be made on a lathe.