Print this article Font size 16
In fact, the VAZ 2110 handbrake is quite simple. The principle of its operation is not based on anything complicated. The mechanical drive is a cable. When the parking brake handle is pulled, the driver also tightens the cable and creates uniform tension on the wheel pads.
Handbrake
If the handbrake malfunctions, it is recommended to perform an adjustment . And if it does not help, then repairs are carried out by replacing the faulty cable. On a car like the VAZ 2110, adjusting the cable is as simple as replacing it. If this malfunction is ignored, the car may move on its own, or you, on the contrary, will not be able to move.
You don’t have to go to a car service center to solve your problem. If you have some experience, understand the essence of the handbrake, and also apply the data from the repair and operation manual for the VAZ 2110, you can do everything yourself.
How to repair a handbrake?
How can I repair a handbrake?
- Lower the device drive lever (set to the lowest position).
- Release the ends of the cables attached to the brake pad drive levers.
- Loosen the adjusting nut and locknut, remove the tension spring, completely unscrew and remove the nut and locknut.
Interesting materials:
How to access VK settings on your phone? How to access the mail ru cloud from your phone? How to log into Odnoklassniki if you forgot your password and phone number? How to access the Spam folder on your phone? How to log into the Privat24 application without a phone? How to log into Privat24 If you changed your phone number? How to access TV from your phone? How to log into VTB by phone number? How to log into WhatsApp without a phone number? How to access Google Bookmarks on your phone?
How to tighten the handbrake on a VAZ-2110
You should not ignore the condition of the handbrake and periodically check the cable tension; it is recommended to do this after every 30 thousand km. It is quite easy to identify problems with the handbrake; you need to put the car on an incline and put the handbrake on.
If the car rolls down, the parking brake does not work. This problem can be solved by replacing the handbrake, but in most cases simply adjusting or tightening the handbrake is sufficient.
AND FINALLY
The serviceability of the brake system must be monitored first of all, because your safety and the safety of the car depend on it. Moreover, such a VAZ hand brake has a simple design, and repairs do not require complex tools. Domestic cars do not have complex elements or non-standard fasteners and are repaired with the usual garage equipment of the average motorist.
Take care of your car, and it will repay you with longevity and trouble-free operation.
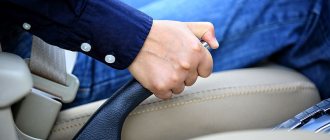
Pull the handbrake from the passenger compartment
The easiest way to fix problems with the handbrake is to pull it out of the cabin. To do this, you need to remove the protective cover that covers the handbrake, after which we will need a 10mm wrench, which should be used to tighten the tension bolt. This adjustment will allow you to slightly tighten the cable, which is convenient for slight loosening. If such manipulations do not give the desired result, it is necessary to resort to other methods of adjustment.
Without an inspection hole or overpass, adjusting the cable tension is quite problematic; in extreme cases, a jack will help adjust our handbrake. When using a jack, you must pay close attention to safety precautions; a high percentage of injuries occur precisely because motorists do not comply with safety precautions. For repairs you need the appropriate tool:
- metal brush;
- WD (universal lubricant);
- extension;
- deep head;
- pliers;
- ratchet wrench (preferably with a cardan).
You can deal with this breakdown in a few seconds. Firstly:
- put the car in the pit;
- fully lower the handbrake;
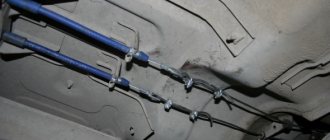
Initially, you should clean all elements of the tension mechanism from dirt, and after that you need to treat the nuts using a “wedashka”. 2 cables and a tension rod are stretched on the adjusting mechanism, and two nuts are screwed on. From the above tools we assemble a single structure, with the help of which we will tighten the handbrake. First of all, loosen the lock nut and after loosening, tighten the second nut clockwise; if you need to loosen the cable, you should twist it in the opposite direction. We tighten the adjusting nut until the handbrake cable is tensioned to the desired result. We put the head on the nut and tighten it using a ratchet wrench, that is, we tighten the rod nut clockwise. If you don't have a ratchet wrench, you can use a regular open-end wrench. At the same time, do not forget to hold the rod with pliers. There is no need to tighten the head too much; a few turns will be enough. Then you need to check how many clicks the adjustable mechanism has been tightened. Ideally there should be 2-4 clicks. But in practice, 2 to 8 clicks are considered the norm. If more than 8 clicks occur, the wheels are not blocked enough. After all the work is done, do not forget to tighten the locking nut.
An important point in this work: it should be noted that if you have already tightened the handbrake, and then want to replace the rear pads, do not forget that the cable must be loosened. If you do not loosen the cable, then it will be impossible to put the drum on the pads.
It should be noted that the parking brake should not operate with just one click. This is not a good sign, but, on the contrary, can harm our car and lead to another repair. In this case, there is a high risk of rapid breakdown and wear of the brake pads.
An article about how to independently adjust the parking brake on cars of the tenth LADA family. Checking the condition of the handbrake.
Attention! The manufacturer provided the following data on the operation of the parking brake:
- The travel of the parking brake lever when adjusting should be 2-4 clicks;
- during operation 2-8 clicks.
If the parking brake is adjusted correctly, it will hold the vehicle on a slope of up to 25%. If the lever rises above 8 clicks, then the car will not hold on the slope. If there are less than 2 clicks, the car will slow down when moving. In these cases, the parking brake must be adjusted.
1. Place the car in a pit or on an overpass.
2. Lower the handbrake lever all the way down.
3. Loosen the locknut of the tensioning device, holding the adjusting nut from turning. After this, tighten the adjusting nut until the parking brake cable is tensioned.
4. Check the operation of the handbrake: the full stroke should be 2-4 clicks.
5. After checking, tighten the equalizer locknut.
6. Check the rear wheels. They should spin evenly and without jamming. If during adjustment it was not possible to tension the cable as required, then it is necessary to replace the cable with a new one.
Malfunctions and their symptoms
Determining that a cable needs adjustment or replacement is quite simple. Signs of a faulty mechanism appear as follows:
- The handbrake is pressed effortlessly - the cable is loose, you need to tighten it.
- The mechanism does not respond to pressing the lever - the drive is torn or flew out, or the reason may be the wear of the rear pads.
- If the handbrake is stuck, the drive is damaged and needs to be replaced.
Important! The parking brake needs to be checked at least once every 30 thousand kilometers. The handbrake must always be applied.
Having taken out the main element, you can visually determine its condition. Replacement is required in the following cases:
- Up to 2% are damaged or torn.
- The cable moves with difficulty even after applying lubricant.
- The drive tips have grooves.
Replacement
There is one important condition - you will need an assistant. His task will be to pull the cable tightly, which will allow the equalizer to be installed correctly.
The sequence of work to replace the cable is as follows:
- Lower the handbrake lever as far as possible;
- Remove the brake disc from the wheel where the element is being replaced;
- Remove the muffler from the suspension cushions and the resonator from the rear suspension;
- Lower the exhaust system down;
- Remove the adjusting nut and locknut;
- Remove the equalizer;
- Now remove the cable ends from the equalizer;
- Remove the tip of the equalizer shell from the bracket, which is located on the car body;
- Bend back the brackets that secure the cable;
- Remove the rear brake pad and remove the cable end from the lever;
- Slightly loosen the nut that secures the cable holder to the rear axle;
- Remove the cable from the holder, then from the bracket, and then pull it out through the brake spike;
- Place a new cable in its new location and perform the assembly procedure, following the reverse order of the indicated processes;
- Make sure that the cables in the bracket are positioned crosswise;
- After completing the installation of the new element, adjust the handbrake.
As you can see, the task does have certain nuances, but it is not difficult at all if you have some experience and rely on the VAZ 2110 operating manual. As a rule, everything is spelled out there.
It wouldn’t hurt to supplement your skills and knowledge with video tutorials or consultation with a friend from a service station. But if you are not confident in your own abilities, you should not risk replacing the handbrake cable yourself. It is better to spend more money, but entrust the work to specialists.
The handbrake, or parking brake, is present in every car and is a necessary element of the safety system. There are times when it does not fulfill its function completely or partially. In any case, this malfunction must be eliminated as quickly as possible.
Handbrake diagram for VAZ-2112
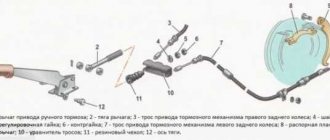
For clarity, here is a diagram of a hand brake
1 - button that fixes the handbrake lever; 2 — hand brake lever; 3 — protective cover; 4 — handbrake rod; 5 — cable equalizer; 6 — adjusting nut; 7 - lock nut; 8 - cable; 9 — protective sheath of the cable.
In this circuit we need element number 6 . It is he, and only him!
What is required for adjustment?
In order to adjust the handbrake you need a platform or lift. If there are no such devices, then you can simply hang the rear wheels on the “goats”. They can be installed under the car using a jack. It’s also worth taking two “13” keys and pliers.
- The car is installed on an overpass or “goats”.
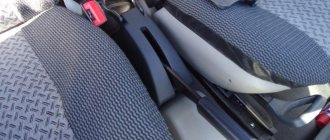
We put the handbrake at the very bottom. Do not pay attention to the scuffs of the console; we conducted an experiment with non-standard armrests. The iron fastenings of the armrest are visible. The photo shows the editorial car
What to do next if adjustment does not help?
There are situations when a car owner knows how to tighten the handbrake on a VAZ-2110 and strictly follows the algorithm, however, the manipulations he has carried out do not change the situation and the handbrake also works poorly. Most often, this problem occurs when the parking brake lever cable breaks. As practice shows, owners of old VAZ-2110 cars find themselves in this situation more often than others. You should not assume that under intense load the cable will function for too long even on newer domestic models.
The cable in a VAZ-2110 car should be changed if the tips are significantly weakened, its threads are strongly stretched and this part is difficult to move in its shell. It is worth noting that the car owner can do the work of replacing the cable on his own; you just need to have an assistant and some free time. It is very difficult to replace the cable alone.
Replacing the cable
For work you will need a 10mm open end wrench, WD-40 lubricant, a set of screwdrivers, a 13mm open end wrench and a socket wrench. An inspection hole and a jack must be present in the garage or box. Replacing the cable is carried out as follows:
- The VAZ 2110 must be removed from the parking brake - to do this, lower the handbrake all the way to the floor. It is necessary to ensure that the restraint system of the VAZ 2110 is activated;
Remove the muffler from the suspension cushions and the resonator from the rear cushion
- The next step is to remove the brake drum from both rear wheels;
- Next you will need to get to the equalizer. This is the most difficult stage; the motorist needs to dismantle the muffler and remove the resonator located in the rear of the chassis. Next, you need to move the exhaust pipe down;
- Now you will have to crawl under the car and unscrew the adjusting elements (nuts), after which the equalizer can be dismantled;
- You need to remove the tip from the control;
- Also on the car body there is a bracket on which the tip stands;
Purpose and location of the parking brake
The location of the handbrake is known to every VAZ 2110 driver - there is a lever installed between the front row seats, when pressed, braking occurs. The metal cable is a mechanical drive in this unit. By lowering the lever, the driver provides tension on the cable, which presses the rear brake pads to the wheel discs. Breakage of the lever is extremely rare, since the main load falls on the metal cable, as a result, after some time it loses the required tension.
The operation and maintenance manual for the VAZ 2110 states that at least once every six months it is necessary to carry out diagnostics of the brake system, including the parking brake. The traffic regulations have requirements for this unit - it must hold the car at a slope of 25 degrees. If the metal cable is not damaged, and the adjustment does not bring results, then the problem is in the rear brakes - this requires a full diagnosis from specialists.
Introduction
Over time, any mechanism begins to wear out greatly; quite often, car owners are faced with wear on the linings that are installed in the rear brake pads. No less often, problems arise with pulling out the drive cables, which is why the vehicle owner has to periodically adjust the handbrake stroke. The material below provides step-by-step instructions, strictly following which every car enthusiast will be able to independently tighten the parking brake lever on a VAZ-2110 car, without resorting to the help of experienced specialists and, accordingly, saving a significant amount of money. It is worth noting that adjusting the handbrake using the method described below allows you to perform an identical manipulation on almost all front-wheel drive cars that have domestic roots.
Many VAZ-2110 owners would like to know how to tighten or loosen the handbrake
The VAZ-2110 is a very common vehicle (if we consider it within Russia); experienced car enthusiasts and mechanics note the ease of pulling the handbrake in this car, as well as the ease of replacing it. Even novice drivers know how important it is to monitor the serviceability of this element of the vehicle. A malfunctioning part can cause the car to move independently. There is no need to even talk about the possible consequences, since they can be different.
The parking brake lever should be tightened immediately after detecting defects in its operation. The car owner must periodically check the system himself in order to be able to prevent troubles in time.
Pulling up the handbrake
It is likely that you just need to tighten the parking brake on the VAZ 2110 to fix the problem.
- Drive to the inspection hole, from where it is most convenient to make adjustments. Another option is a lift. You'll find something here. This way you can easily get to the necessary nodes.
- Make sure the brake lever is in its lowest position.
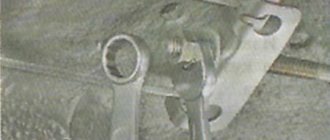
- Take two keys. You will loosen the lock nut first and tighten the adjusting nut second.
- Tighten the adjustment nut until the cable is properly tensioned.
- It is strongly recommended to hold the rod when tightening the adjustment nut with pliers.
- Now make sure that the lever makes full travel in 2-4 clicks, no more.
- If after checking everything turned out to be good and the working stroke is correct, tighten the equalizer locknut while holding the adjustment nut with a second wrench.
- Release the handbrake lever down and turn the rear wheels by hand. Rotation should occur evenly without any jamming.
- But if the adjustment did not allow the cable to be tensioned, then the element must be replaced.
Checking the effectiveness of the parking brake adjustment is also simple. You drive onto an area with a slope, put the car on the handbrake and watch the car’s reaction. If the car does not move in neutral, it means you have done a good job.
Where to start replacing
Replacing the handbrake of a VAZ 2110
First of all, replacing the cable begins with the following operations:
- lowering the handbrake lever all the way down;
- removing the brake disc of the wheel on which the replacement is being made;
- removing the muffler from the suspension cushions, and the resonator from the rear suspension;
- lowering the exhaust system;
- unscrewing the locknut and adjusting nut;
- removing the equalizer from the rod.
- remove the end of the cable being replaced from the equalizer;
- remove the tip of its shell from the bracket located on the car body;
- bend the cable fastening brackets;
- remove the rear brake pad and disconnect the cable end from the lever;
- loosen the nut that secures the cable holder to the rear axle;
- remove the cable first from the holder, then from the bracket, and finally from the brake cleat.
The work ends with the new cable being installed in place in the reverse order to its removal. In this case, it is worth paying attention to the location of the cables in the bracket - it should be crosswise. After installing the part, be sure to adjust the handbrake. Now, knowing how to adjust the handbrake of his car and replace its cable with his own hands, the car enthusiast can avoid contacting a service station, and thus save his money, since the cost of repairs is not low. If instructions for performing all this work are not enough, it is quite easy to find on the Internet both photos and videos showing these processes in great detail.
Adjustment
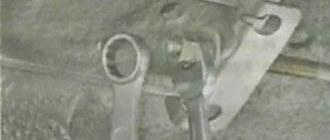
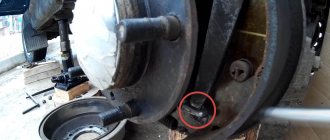
Tightening a cable is much easier than replacing it. The VAZ 2110 must be placed on a jack. The handbrake must be locked, after which you should find the adjusting bolt and nut - the work is done using two “13” keys.
Twist the nut until the cable is taut
The nut must be tightened until the rear wheelset stops moving. Next, you need to tighten the locknut. After this, you need to return the car to its original position, unlock it and check its operation.
Possible causes of failure and phased replacement
Before starting repairs (replacement), it is recommended to find out the reason why the handbrake does not work. The fact is that in case of some breakdowns, when the handbrake does not work, its complete replacement may not be necessary.
The main and most common root cause why the working mechanism fails is wear of the brake unit.
A cable extends from the handbrake lever, which stretches to a mechanism that activates the brake assembly. Despite the fact that the cable is constantly subjected to heavy loads, its rupture is extremely rare. Often the cable jumps off or wear (grinding) of the tips in the drum occurs. Brake pad wear or drum brake wear may also occur.
The steel fibers of the parking brake can stretch during intensive use, which makes it difficult for them to move in the shell, and the device fails.
Replacing the handbrake cable on a VAZ 2110 is not difficult, but for convenience it is better to call an assistant.
Next you should do the following:
- The vehicle must be released from the parking brake. To do this, you need to lower the handbrake to the floor to the maximum (all the way).
- Remove the wheel brake drum.
- Removing the muffler and resonator from the rear cushions.
- Removing the equalizer. After the exhaust pipe is moved to the side, you need to crawl under the car and unscrew the adjusting nut and locknut. After unscrewing, the equalizer can be removed from the rod. You need to clean the handbrake rod of the VAZ 2110 with a brush.
- Removing the cable end from the control.
- The handbrake cable is attached to the car using special brackets. They need to be bent.
- Removing the rear brake pads and disconnecting the cable end.
- There are nuts on the rear axle beam that secure the handbrake. They need to be loosened and the cable pulled out of the device holder.
The work on removing the VAZ parking brake cable has been completed. Before installing a new cable, it is recommended to clean all fastening points from dirt and rust. To do this, you can use special products that are sold in car dealerships, or use acetic acid. When working with any chemicals, you need to be very careful and follow all safety rules. To put a new cable in place, all the steps listed above are carried out in reverse order. It is worth paying attention: in the bracket that is located under the bottom of the body, the cables are installed crosswise.
If the parking brake warning light on the dashboard does not light up, you will need to check the fuse. It may be necessary to replace the handbrake switch on the VAZ 2110.