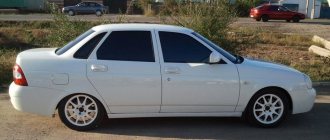
The Priora rolled off the production line for the first time in March 2007 and is still in production. They wanted to discontinue the model, but at the last moment they decided not to do so. Throughout its history, Priora has undergone one restyling and a lot of technical improvements. The only thing that the development engineers of the Lada Priora did not get to is the front suspension. Let's look at its design, typical faults and repair methods.
Standard front suspension design
The VAZ-2110 was used as a prototype for the Lada Priora. The suspension system as a whole remained without major changes. The engineers simply installed different types of springs and different shock absorbers.
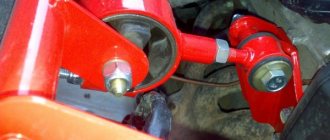
The front suspension of the VAZ Priora is an independent type, telescopic. It is based on shock absorber struts and barrel springs. The Priora suspension is also distinguished by the presence of lower arms equipped with braces. There are also anti-roll bars.
Racks – hydraulic, shock-absorbing. Their lower part is attached to the steering knuckle with two bolts. The top bolt has a special feature. With its help you can adjust the wheel alignment. A spring is mounted on the rack, as well as a special polyurethane compression stroke buffer. There is also an upper strut support along with a bearing. This part is attached to the body using nuts. Thanks to the elastic material, this support significantly reduces vibrations and allows the stand to swing at the moment of operation.
A bearing is mounted into this support. It allows the shock absorber strut to turn simultaneously with the steered wheels. The steering knuckle and the front suspension arm (Priora Hatchback is also equipped) are connected to each other through a ball joint. Braking as well as traction force is transmitted through longitudinal braces, which are secured through a silent block to the lever and the front support of the cross members.
There are washers at the junction of the supports, braces and levers. They are designed to adjust the angle of inclination of the rotation axes. The steering knuckle has a sealed bearing inside. A hub is installed inside the element. Next, the bearing is securely tightened with a nut and has no adjustments.
Supports for LADA Priora VAZ 2170-2172
The power circuit of the support SS20 Master for LADA Priora cars provides for the separation of loads from the weight of the car and from the shock absorbers. The loads from the rod of the shock absorber struts and bump stops are taken by the support damper, and the weight of the car is taken through the spring cup by a thrust bearing. This load sharing allows for high reliability, as with all SS20 supports.
The support body has a bend at an angle of 90°, which acts as a stiffener. This design creates increased bending resistance of the support body, as well as the plane of contact of its body with the body shell when it is installed on the car. This protects the body shell from extrusion (deformation of the contact plane), which is more likely when operating with supports of a standard design.
The support is equipped with a more reliable rubber-coated thrust bearing SS20. The SS20 bearing races are rubber-lined on the outside, up to 5 mm thick, which further increases the vibration isolation of the body from the suspension. In addition, the SS20 bearing has an increased load capacity compared to the standard one. The design of the SS20 support bearing provides reliable protection from dirt, as it has a rubber sealing collar similar to an oil seal.
Scheme of operation of the SS20 support for LADA Priora.
In area A, the rubber works in compression, in area B - in shear, in area C - in compression and tension, which ensures vibration absorption.
The X-shaped damper is blocked from being pulled out during critical impacts and ensures reliable operation of the rubber element. The reliability of the damper is increased thanks to a unique and specially developed rubber compound formulation.
The upper limiting cup of the SS20 support for the Lada Priora smoothly comes into operation due to the presence of 12-slot fins in the upper part of the damper, in contrast to the 8 slots of the standard support. This provides better vibration damping when the wheel moves down when it hits potholes and a softer perception of road irregularities, which reduces the load on the shock absorbers and increases their service life.
Note!
- The support SS20 Master for VAZ 2170 cars is equipped with an upper limiting cup SS20.
- For support SS20 for VAZ 2170 cars, the lower limit cup is not installed.
- When installing SS20 Master supports for VAZ 2170 cars, the geometric parameters of the suspension ( Castor angle and transverse angle of inclination of the strut
) do not change, that is, they remain standard and comply with the requirements of the vehicle manufacturer.
Marking
Check out the alternative support option for the Lada Priora GOLD series and the ShS sports supports for a more rigid suspension characteristic of the VAZ 2170.
Noise or knocking
A knock in the front suspension (Priora station wagon also suffers from this), as well as a characteristic noise, is one of the signs of a malfunction. All owners of domestic cars of this family have repeatedly encountered this. Chassis maintenance specialists claim that in this case, strut malfunctions are possible. Also, during operation, the bolts that secure the stabilizer bar to the car body loosen.
Another noise may be associated with wear of the bar itself or the cushions. In the case of struts, to get rid of the nasty knocking, you only need to replace the worn shock absorbers. If the fastener is loose, it should be tightened. If the cushions fail, they should be replaced. It is not expensive. Now there are any spare parts for Priora on sale.
The knocking noise can also be caused by a loose fastening on which the upper support is installed to the body. Experts recommend tightening the support nuts. Another cause of noise is a worn rubber element in the strut support. You need to purchase a new part and install it. Then the characteristic noise will disappear.
If the silent blocks on the levers, braces or struts wear out, the suspension will also knock. These parts need to be replaced. Other faults include worn ball joints, broken or deformed springs, worn compression buffers, and unbalanced wheels.
Replacing the Lower Engine Mount of a Priora
replacement
engine
cushions on the previous one
Welcome! Engine mounts. they are placed differently on all cars and the number of pieces varies, some have only two and some have only two. 4 pieces (this is a VAZ model, for SUVs with large engines, the number of pillows, thanks to which they strengthen the engine, is much more or the same, but they are simply huge in size), thanks to these pillows the engine does not vibrate much, and most importantly, vibration is not transmitted on the body of the Car, as it is felt in some old Lada, on the cushions of which Zina is already hardened, and instead of vibrating, they rock the car itself and its engine.
The note! To carry out repair work to replace tool pads, you will need the smallest set of tools required: for this you will need a jack, a wrench and connecting heads, as well as an extension. It is recommended to stock up!
Result:
Where are the engine mounts? There are four of them in 16-valve engines (the largest, by the way, is 8 valves, mostly equipped with 3 airbags or just 2 lower ones), the two most important in any engine. These are the same lower mounts that the engine sits on. and one more (optional) on top and one more (optional) on the bottom, we will not show a photo of all the pillows as one photo will not work, we will have to take several at once, when you read the article, you will have all the pillows, you will read and find out where it is.
When do I need to change my engine mount? They change from time to time and only due to their own aging (the rubber gets old and starts to slow down the engine and therefore shakes), there are isolated cases when the cushion needs to be replaced due to deformation, and this happens when the engine hits the road very hard or falls into a deep hole through which, in addition to airbags, windshields sometimes explode.
VAZ Prior replacement of engine stand (cushion) “Technologies of the future”
a priority
with power steering, without air conditioning.
supports
(cushions) and ICE rods (guitars) are ordered from Technology.
Front engine support. Engine mount. right bottom bracket; 15 Replacing the oil scraper. VAZ 2112. Lada Priora Engine VAZ 2170 Replacing the bearing Support for the lower engine mount support. Breeding.
Removing the front support Power supply. Replacing the lower engine mount for Nissan Qashqai. VAZ-2112. Engine mount for Lada Priora (VAZ 2170, 2171, 2172). Front Engine Mount
. VAZ 2112. Replacement of the lower engine mount of Chevrolet Lacetti. Breeding. VAZ, VAZ 2110.
How to replace engine support cushions on a VAZ 2170-VAZ 2172?
The note! In this article, we will only cover the process of replacing additional pillows if you are also going to change the main ones (and the basic ones are usually lower), and then study the article called: " replacing
below
Engine Mount
Tens ” and then describes the entire replacement process!
Replacement extra below pillow:
This support is easy to remove, first you need to remove the crankcase from the bottom of the car and then you will have full access to the below support (Cushion), it is attached to one bolt and to the bolt that comes with a nut, to remove a regular bolt you just need take a wrench and then unscrew it completely, but in order to remove the bolt. When delivering a nut, you need to hold two wrenches and hold the nut with one wrench (or vice versa with a bolt) and the other. bolt (or vice versa, a nut), and after this operation the support can be removed from the machine.
The note! The same bolt that comes with the nut is marked with an arrow and is located in the right corner of the photo just above, the new support (Cushion) is installed in the reverse order of removal, during installation you will need to press on the engine with your hand so that the holes connect and the bolts can be turn, and therefore secure the pillow yourself!
Replacement Additional top cushion:
This pad is also not easy to remove, it is secured in the same way on one bolt with a rotating nut (this nut is indicated by a green arrow in the small photo and most importantly, when you unscrew the bolt, do not lose this nut, be sure to save it) and on the other bolt , but only at the end of which the normal nut is screwed in (the approximate position of this nut is indicated by a blue arrow and a red bolt is shown), when these two bolts are removed, you can remove the top support and replace it with a new one.
Additional video: If you suddenly want to understand what kind of airbags are usually installed on 16-valve cars of the tenth family and the Priory family, and if you suddenly wonder how they can be distinguished from each other, watch the video below:
The note! Always remember one thing, remove several engine mounting mounts at once, I do not recommend it under any circumstances (only if you are not removing it), otherwise, when all the mounts are removed, the engine simply will have nothing to attach to the body, except that if one pad is removed and you decide to remove the other one so that you can put them both in, we also do not recommend doing this, so it will be more difficult to combine the pads from the bolt hole later, it is best to change them one by one and move them immediately after replacing the others if this is the case and they need to be replaced!
Fluid leak from shock absorbers
Owners of Priora cars often encounter this problem. The front suspension is leaking. This happens due to a worn or failed rod seal. Also, scuffs may form on the element during operation and the chrome layer may be damaged. A leak occurs due to damage or shrinkage of the sealing rings on the housing. The solution to these problems is to replace the element in the assembly.
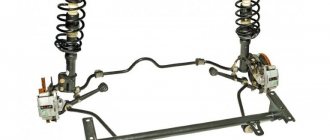
What does the Priora front suspension diagram look like?
The structure of the part is shown in detail in the figure, where the following components are indicated in the kit:
- rounded fist;
- eccentric type bolt;
- strut responsible for shock absorption;
- lever arm;
- a rod suitable for the stabilizer;
- a bracket fixing a cushion related to the stabilizer bar;
- a stand that fits the stabilizer bar;
- transverse suspension component;
- ball type support;
- stretching;
- spring device;
- rod nut;
- a detail limiting the rebound stroke of the support located in the upper part;
- support placed at the top;
- bearing;
- silent blocks;
- a gasket created specifically for a spring device;
- spring cup at the top;
- an element limiting the compression movements of the upper support;
- compression motion buffer;
- case for protection.
Selection of racks
The front suspension (Lada Priora station wagon included) is no less important than the engine or transmission. The suspension dampens vibrations that are transmitted to the body from the road through the wheels. The chassis must provide stability to the vehicle when driving at high speeds.
If the suspension is too soft, the car will drive fine in a straight line, but there will be significant roll when entering a turn. In the case when it is very rigid, there will be no roll when turning, but there is no smooth ride.
How to replace an engine mount on a Priora
Types of supports
The Lada Priora has 4 airbags installed on the left and right of the engine, as well as in the front and rear. It should be noted that only engines with 16 valves have 4 supports, while in an 8-valve engine there are only 3 supports.
Right
The right (upper) support is located near the gas distribution mechanism (GRM). Designed to connect the engine to the car body via rubber, to cushion it and dampen vibrations. This support also limits the longitudinal movement of the engine in the engine compartment.
Left
The left support (lower) is installed between the gearbox and the car body. It serves in the same way as the right one to dampen engine vibrations during its operation, as well as to limit its longitudinal movements during movement or work.
Top bar (guitar)
The top support is shaped like a guitar, also called a rod. This support is designed to fix the engine and prevent its lateral movements. Made from metal and rubber. This pillow was produced in several versions from a metal body (on new Prior models) and metal (on older versions).
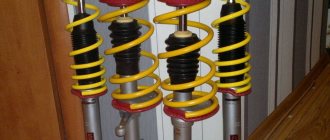
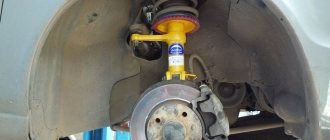
Chassis SS20
These spare parts for domestic and foreign cars are produced under the “System Technologies” brand. These racks have become so popular due to their high quality. For Priora, the manufacturer offers 4 product options that differ in hardness. Which stands are better? They need to be selected according to your driving style. The softest ones are the “Standard” series racks. Rear shock absorbers from the same series are also offered.
A reinforced version is offered to increase the load capacity. Next are the “Comfort” racks. According to reviews from many car owners, this is the best option. They are stiffer than the Standard, but the suspension works equally well on bad and good roads.
The “Highway” kit is suitable for those who like stiff suspension and high speed. With these racks you can drive on bad roads, but it will be uncomfortable. “Sport” is the toughest option from this manufacturer for Priora cars. A front suspension of this type is not very suitable for the city, but for sports competitions it is just right.
Frequent front suspension malfunctions
Maintenance and repair of the front suspension in Priora involves identifying the exact cause of the breakdown:
- If there is extraneous noise or a distinct thud is heard, the struts may need to be replaced. Check the tightness of the bolts securing the stabilizer hoses, tighten if necessary. If the cushions are worn out, replace them with new ones. If the supports at the top of the suspension strut are loosened to the body, tighten them. Assess the condition of the rubber component of the strut mount, ball joint, spring device, and compression motion buffer. If they are damaged or defective, replace them. Alternatively, check the wheels for imbalance.
- Liquid may leak from the strut, for one reason - the rod seal has worn out and collapsed. This will be indicated by the appearance of burrs on the rod, damage to the chrome surface, and mechanical defects in the sealing ring located on the strut body. Replace the old telescopic stand with a new one.
- If the suspension in the Priora breaks, you will have to replace the spring device and telescopic strut.
- It has become difficult to drive the car, it constantly skids to the side - it’s time to check the air pressure in the tires and normalize it. If the wheel alignment angles leave much to be desired, perform a wheel alignment. It may be necessary to replace the rubber lining in the suspension mounts or springs.
Which stands are better?
It is difficult to answer this question. Although manufacturers have quality certificates, very often spare parts for the chassis cannot provide the declared comfort of movement and the specified service life. Reviews also do not allow us to understand which is better. It all depends on the preferences of the car owner. Today, Priora is equipped with air suspension.
You can make this system yourself or contact a service station. This solution shows itself very well in terms of comfort and reliability.
Required tools and materials for replacement
To replace ball joints on a Priora with your own hands, you will need the tools from the list below.
Table - Tools and materials required to replace the ball joint.
| Name | Note |
| Jack | To lift the car |
| Mount | Can be replaced with a durable rod |
| Hammer | Medium size |
| Spanners | "at 17", "at 19" |
| Socket head | TORX E12 |
| Vorotok | Preferably with a ratchet |
| Balloon wrench | For mounting and removing the wheel |
| Grease | Special for CV joints or graphite |
| Penetrating lubricant | For example, WD-40 |
| Rags and wire brush | To clean dirt |
| prop | It is prohibited to carry out repair work on a vehicle that is only supported by a jack. |
A set of tools needed to replace the ball joint
Description of design
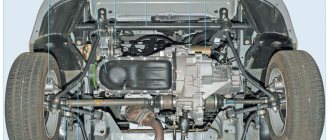
The front suspension is independent, MacPherson type with telescopic hydraulic shock absorbers, helical barrel springs, wishbones with braces and a stabilizer bar. The basis of the suspension is a telescopic shock absorber strut, which allows the front wheels to move up and down when driving over uneven surfaces and at the same time dampen body vibrations.
Front suspension : 1 — steering knuckle; 2 - eccentric bolt; 3 — shock absorber strut; 4 — lever; 5 — stabilizer bar; 6 — mounting bracket for the stabilizer bar cushion; 7 — stabilizer bar strut; 8 — cross member of the front suspension; 9 — ball joint; 10 - stretching
A bracket for attaching the strut to the steering knuckle is welded to the lower part of the strut body, and a spring support cup is welded to the middle part.
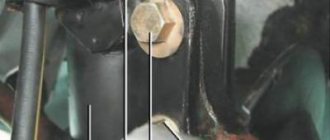
The lower part of the strut is secured with two bolts and nuts to the steering knuckle. The top bolt that goes through the hole in the strut bracket has an eccentric collar and an eccentric washer. By turning this bolt, the camber angle of the front wheel is adjusted. The telescopic strut is equipped with a helical barrel spring, a polyurethane foam compression stroke buffer, and an upper strut support assembly with a bearing. Shock absorber strut parts : 1 - telescopic strut;
2 - spring; 3 — rod nut; 4 — rebound limiter of the upper support; 5 — upper support; 6 — bearing; 7 — upper spring cup; 8 — spring gasket; 9 — compression stroke limiter of the upper support; 10 — compression progress buffer; 11 — protective cover. The upper support is secured with three self-locking nuts to the body mudguard cup. Due to its elasticity, the support allows the strut to swing during suspension movements and dampens high-frequency vibrations of the body. Its design differs significantly from the design of the supports used on cars of the VAZ-2108 and VAZ-2110 families. Now, instead of a pressed-in thrust bearing, a steel bushing is installed, vulcanized to the rubber mass of the support, which eliminates backlash and extraneous sounds.
Front suspension elements : 1 — ball joint; 2 - hub; 3 — hub bearing nut; 4 — protective cap; 5 — hub bearing; 6 — steering knuckle; 7 - nut; 8 — front wheel brake disc; 9 — brake mechanism shield; 10 — eccentric (adjusting) bolt; 11 — rotary lever; 12 — front suspension spring; 13 — shock absorber rod; 14 — upper spring cup; 15 — upper support of the shock absorber strut; 16 — shock absorber rod nut; 17 — bearing of the upper support of the shock absorber strut; 18 — spring gasket; 19 — front suspension compression buffer; 20 — protective casing; 21 — rack body; 22 — bracket for mounting the anti-roll bar cushion; 23 — front suspension stretch; 24 — front wheel drive shaft; 25 — anti-roll bar; 26 — stabilizer bar; 27 — front suspension arm
The thrust ball bearing used in automobiles has a larger diameter and a different design and is located between the upper support and the spring. Under the weight of the front of the car, the bearing is in a compressed position, which eliminated all gaps and knocks. The contact area of the balls with the raceways has increased significantly, and consequently, the durability of the bearing has increased. When the wheels turn, the strut housing rotates along with the spring, but in the new design the shock absorber rod remains stationary and the connection between the rod and the shock absorber guide bushing wears out less. A telescopic hydraulic shock absorber is installed in the strut housing. The lower part of the steering knuckle is connected to the suspension arm through a ball joint. The support is attached to the steering knuckle with two bolts (the holes in the steering knuckle are not through). When unscrewing these bolts, be careful: with significant force they often break, so before disassembling, tap their heads in the axial direction. The ball joint pin is secured to the lower arm with a self-locking nut. The support is covered with a rubber-metal cover. Braking and traction forces when the car is moving are perceived by longitudinal braces connected through silent blocks to levers and brackets welded to the cross member of the front suspension. At the connection points (at both ends of the brace) washers are installed to adjust the longitudinal inclination of the wheel turning axis. The front suspension cross member is attached to the body with six bolts. The steering knuckle is equipped with a double-row angular contact ball bearing of a closed type, which is secured in the knuckle with two retaining rings. The wheel hub is installed in the inner rings of the bearing with interference fit. The inner rings of the bearing are tightened (through the hub) by a nut on the shank of the outer wheel drive joint housing. In operation, the bearing is not adjustable and does not require replenishment of lubricant. The wheel hub nuts are the same, with right-hand threads. The anti-roll bar is a spring steel bar. In its middle part there is a bend above the pipe of the additional muffler of the exhaust gas system. Both ends of the stabilizer bar are connected to the lower suspension arms through struts with rubber and rubber-metal hinges. The rod in its middle part is attached to the body with brackets through rubber pads. Checking and adjusting wheel alignment angles should be carried out in accordance with the maintenance regulations, as well as after repairing the body or suspension. When the vehicle is in running order, the wheel alignment angles must be within the following limits: – the longitudinal inclination angle of the turning axis is 0°42'±30'; – camber angle 0°30'±30'; – camber angle 0°10'±30'.
How to replace an engine mount on a Priora
Design and purpose of tens engine mounts
Over the years, vast practical experience has been accumulated on the topic of how to change engine mounts on a VAZ 2110, and videos of repair processes can also be found in abundance.
However, few people pay attention to the features of the part. And, it must be said, it is in vain, because such knowledge will help to accurately determine the source of vibration and purchase the necessary spare part for repair. The main purpose of the engine support is to reduce the level of vibration transmitted from the power unit to the car body. The rubber-metal structure consists of a steel base with a thick rubber cushion. The device has proven itself well, since it is quite reliable and is worth the money.
The eight-valve Lada 2110 engines are attached to the body at three points: right, left and rear. The side supports connect the body to the engine block through through holes. The rear support is attached with two bolts to the gearbox, and two nuts to the body. The importance of this damper part is very significant - it prevents longitudinal vibrations of the internal combustion engine during braking and acceleration.
When should you change the power unit mounts on a VAZ 2110: signs and reasons
Before you change the engine mounts of a VAZ 2110 car and watch a video of this process, you need to study the signs that indicate a breakdown of the rubber-metal mounts. The main symptoms characterizing problems with damper units:
- Vibrations transmitted to the steering wheel and pedal unit when idling.
- Extraneous noise in the cabin when moving on an uneven surface.
- A characteristic knocking sound in the engine compartment during acceleration and braking.
When drawing conclusions after your observations, you should not confuse vibrations on the steering wheel during braking, which are associated with defects in the brake discs or pads. To be more convincing, you need to open the hood and inspect the power unit supports. If you place your palm on a running internal combustion engine, you can feel changes in its operation.
Many years of experience in operating the Lada 2110 allows us to assert that the reasons for the failure of damper cushions are the following factors:
- Deformation phenomena on the rubber support due to mechanical and temperature influences, as well as due to exhausted service life.
- Cracking and delamination of rubber from exposure to chemically active components.
- Loss of elasticity caused by temperature changes.
Premature failure of the damper support can be caused by the owner’s excessive enthusiasm for such extreme techniques as sudden starts and emergency braking. Suspension parts are already subject to serious stress while driving, and a sporty driving style further increases the risk of their failure.
We repair competently: how to change the damper mounts of a VAZ 2110 engine and video of work processes
Replacing the right damper support
Before changing the right engine mount of a VAZ 2110 car following the video example, you should install wheel chocks and also disconnect the negative terminal from the battery. The further process is carried out according to the following scheme:
- Loosen the generator fasteners with a 13mm wrench and remove the belt drive.
- Loosen the tensioner bolt.
- Jack up the right side of the car.
- Using a 15mm wrench, unscrew the nut securing the support.
- Using a 13mm wrench, unscrew the two bolts securing the support to the bracket.
- Using a 17mm socket, unscrew the three bolts securing the bracket to the right side member.
- Remove the bracket and install the new support in the reverse order.
Replacing the left damper support
The procedure for changing the engine damper on the left side of the car is performed in the following order:
- Remove the car crankcase protection.
- Place a jack under the car in the area of the gearbox, place a wooden beam and lift the car, removing the load from the support.
- Using a 15mm socket and a wrench, unscrew the support pin fasteners.
Replacing the rear damper mount
Reading how to change the rear engine mounts on a VAZ 2110 and watching the video is half the battle. It is important to strictly adhere to the order of repair work:
- Remove the engine crankcase protection.
- Using a 17mm socket, unscrew the two nuts securing the support to the car body.
- Using two 19mm wrenches, unscrew the two bolts securing the gearbox and remove the support.
- Clamp the removed bracket in a vice and use a 19mm wrench to unscrew the bolt securing the support.
- Remove the bolt and install a new rubber support in the bracket.
- Assembly of the unit is performed in the reverse order while maintaining the perpendicularity of the mating planes.
Based on practical experience, it can be argued that the process of replacing the damper supports of the power unit on the “ten” is not particularly difficult. Usually, after repair, vibrations disappear, but if everything remains unchanged, then the solution to the problem may lie in a different plane. It makes sense then to look for a problem in the suspension or in the CV joint components.
Greetings, car enthusiast on the RtiIvaz.ru blog! In today's video we'll look at the process of replacing the upper engine mount on a Priora 16-valve engine. Please meet the author of the video, Yuri Fedorov, changing his “guitar”.
The support itself was previously purchased, an excursion was made to the Internet for advice on replacement, and now the upper mount of the Priora engine is being replaced with your own hands.
Before starting the replacement, the “guitar” itself, which is to be replaced, is shown in close-up, so that it is clear that there is nowhere else to pull and it is no longer safe to operate the car with such a support. It can be seen that the inside of the rubber cushion was simply torn into several parts and the Priora engine began to have free movement in space.
To work, you will need a wrench and a socket - x 15. It is not possible to adapt a large wrench with a head, since the tubes located nearby get in the way. Let’s use a “ratchet” and a more compact head at x 15. To strengthen it, we put a spanner on the handle of the ratchet and used it as a lever, which ultimately helped, we managed to tear the bolt from its stuck place, and then it began to unscrew more or less freely.
The nut on the second mounting point of the rubber cushion was unscrewed with an adjustable wrench. Actually, they set it off, and then it went on easily, almost by hand. After unscrewing the nut, remove the fastening bolt itself and pull out the support.
It is clearly visible in the video that the inner, vulcanized part of the rubber is cracked and almost separated from the central part where the fastening bolt passes.
We install a new support in the brackets and insert the fastening bolts.
When tightening the far bolt of the support (towards the engine compartment shield), a small pad came out. The bolt was not completely centered in the nut and did not go quite along the thread, moving the nut itself from its place of fastening. The nut is fixed with the help of cast tendrils that hold it by the edges. The nut turned in the tendrils and began to spin.
The fastening nut is square and had to be fixed with improvised means in order to unscrew the bolt that was not threaded. The bolt was eventually turned out, the nut was passed several times along the threads of the bolt with lubricant so that it would not bite when tightened.
Turning the nut over to the other side, where the thread remains, fixed it. The bolt was precisely centered on the nut, and everything was tightened, creating a reliable connection.
At this point, Yuri Fedorovich finished showing and telling the video how to change the “guitar”. Subscribe!
The power unit (engine and gearbox) is mounted on two rubber cushions at the front and rear, mounted through brackets on the Lada Priora engine and gearbox housing. These supports are designed to transfer the weight of the VAZ 2172 power unit to the body and limit its longitudinal movements. On the right and left there are supports with rods that limit the lateral movements of the power unit.
- Lada Priora powertrain suspension
- 1 – bracket on the right side member of the body
- 2 – lower pillow limiter
- 3 – upper support cushion
- 4 – upper pillow limiter
- 5 – pillow fastening nut
- 6 – spacer washer
- 7 – support fastening nut
- 8 – front support bracket
- 9 – left support rod
- 10 – left support bracket
- 11 – rear support cushion
- 12 – nut with washer
- 13 – rear support bracket
- 14 – bracket for the right lower support
- 15 – right support rod
Power unit suspension parts.
You will need: keys “13”, “15”, “17”, a jack or similar lifting mechanism.
1. Hang the front part of Priora on supports or lift the car on a lift.
2. Remove the engine splash guard (see “Removing and installing the engine splash guard”).
3. Before removing the rear support cushion of the power unit, install a jack or hydraulic stand under the Lada Priora gearbox housing.
4. To replace the rear support cushion, use a 15mm wrench to unscrew the nut securing the support to the bracket.
5. Remove the upper cushion stop.
6. Using a 13mm wrench, unscrew the two bolts securing the rear support cushion to the body of the Lada Priora.