Note: control and adjustment itself are carried out with the vehicle equipped (full fuel tank, tools, spare wheel).
1. Check and, if necessary, adjust the air pressure in the tires to normal (see here)
2. Place the car opposite the wall (screen), at a distance of 3 m. Place a weight simulating the driver’s weight on the front left seat. Mark the screen as shown in the figure. The central longitudinal axis of the car should follow the 0 mark on the wall. Distance A between vertical marks 1 and 2 should be equal to the distance between the left and right low beam headlight lamps. Lightly rock the vehicle laterally to allow the suspension springs to self-adjust.
3. Determine the distance h: it is equal to the distance from the center of the headlight to the ground.
4. Set the headlight level control on the dashboard (if equipped) to the position corresponding to the load of a car with one driver. (usually this is position 0 - see here)
5. Turn on low beam. (see here)
6. When adjusting one headlight, the second headlight should either be turned off or covered with suitable material.
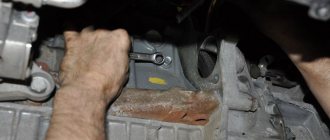
7. By rotating the adjusting screw responsible for the horizontal angle, adjust the position of the light spot on the wall horizontally. (view of the left headlight from the engine compartment)
8.Also rotating the second screw responsible for the vertical, adjust the direction of the set vertically.
9. The headlights are considered adjusted when the upper boundary of the left half of each light spot coincides with the horizontal line 4, and the vertical lines 1 and 2 pass through the intersection points E1 and E2 of the horizontal and inclined sections of the light spots. (i.e. the “tick” of the light spot should start from lines 1 and 2)
10. Adjust the second headlight in the same way.
Adjusting the fog lights
To complete the work, you will need a horizontal platform next to a flat vertical surface (for example, near the wall of a house) or a sheet of plywood (thick cardboard) measuring about 2 × 1 m. A tape measure 10 m long, a sheet of cardboard (to cover one headlight), as well as an assistant or a load weighing about 75 kg.
We install a fully fueled and equipped (spare wheel, tool, jack) car on a flat horizontal platform perpendicular to the selected vertical surface, so that the distance from it to the center of the headlight is 5 m. You can install a sheet of plywood measuring 2 × 1 m in front of the car, subject to the following requirements: same conditions.
The assistant sits in the driver’s seat (or we place the load), after which we vigorously rock the car to self-install the suspension.
We mark the screen according to the figure.
Screen marking diagram for adjusting the light of fog lights: A - vertical line indicating the location of the left fog light lamp; B - vertical line indicating the location of the right fog lamp lamp; B - horizontal line indicating the location of the fog lamps; G - line indicating the height of the upper horizontal line of the light boundary; O - center line; I is the distance between the centers of the fog lamps, h is the distance from the surface of the plate on which the car is installed to the fog lamps
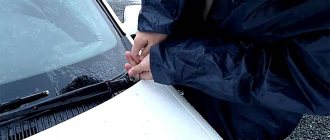
Turn on the fog lights and cover the right one with a sheet of cardboard.
Through the hole in the bumper with a long Phillips screwdriver.
. rotate the screw of the left headlight, moving its light in the vertical plane, and bring its upper horizontal border to line G.
We similarly check and, if necessary, adjust the right fog lamp.
If you cannot adjust the direction of the light, check the installation of the headlight and lamp, and maybe the bumper. The fog lamp itself may be faulty; in this case, replace it.
Video
When to adjust headlights
The manufacturer recommends checking the correct formation of the light beam of the head optics no earlier than after 60 thousand kilometers. The car has just left the assembly line with optimal headlight settings.
Tail light connector
But the position of the reflectors may change as a result of replacing lamps or other parts, dismantling optics, getting the car into an accident, tuning the car and suspension. In this case, the settings are checked and adjusted.
What tools will you need?
Adjusting bolt on headlight
In addition to the tool, you need to find a flat area with a wall. On the latter, markings are applied, consisting of vertical and horizontal lines, relative to which it will be necessary to adjust the position of the light spot.
Low beam adjustment
Low beam adjustment
Adjusting the fog lights
Adjusting the fog lights
Procedure for checking PTF:
- Place the car at a distance of 5 m from a vertical surface with markings.
- An assistant is placed in the driver's seat or a load weighing 75 kg is placed.
- Turn on the lights, covering one of them with cardboard or covering it with a rag.
- Check the position of the light spot with the applied markings.
- Repeat the procedure for the second lantern.
If the light spot is located incorrectly, the PTF is adjusted. Alternately turning the adjustment screws, set the lights to the optimal position. If it is necessary to raise the light spot higher, but the fastener travel is not enough, check the tightness of the fog lamp and bumper.
Cost of working in a car service
Fog lights act as additional lighting in poor visibility conditions. In accordance with the current regulations, they are not mandatory and are not provided for all versions of Lada cars.
Adjusting the PTF is similar to adjusting the low beam. The only peculiarity: the car must be moved at a distance of 5 meters from the perpendicular plane.
1. In addition to the already drawn lines, you need to draw another horizontal one at a height of 100 mm from the road level.
2. Turn on the PTF and alternately close the left or right headlight.
3. We check that the upper edge of the light beam of the PTF corresponds to the drawn line.
4. If it deviates up or down, we adjust the direction of the headlight with the adjusting screw. It is located below the PTF lamp in the front bumper.
If the adjustment fails, you need to check whether the headlight or lamp is installed correctly, and also check the bumper fastening.
Where is the adjustment mechanism located?
In cars of the Lada Vesta, Granta, Priora and Kalina families, the adjustment mechanism is installed directly on the back side of the headlight unit.
Mounting location
Diagnostics of device health
This is done by analogy with the Priora, but on the devices of the Lada Vesta there is no button that needs to be held.
Diagnostic instructions:
- Press your finger simultaneously on the two buttons on the right switch under the steering wheel.
- Turn on the ignition.
- All indicators and lights on the devices should light up, the arrows will deviate to the maximum position and move back.
- Then press the top button of the same switch. This turns on the “Soft” mode. On the right is the firmware version of the electronic unit.
How to adjust the sensitivity of the rain sensor
On the front side of the sensor there are two indicators and a button for quickly changing the operating mode. There are modes: rain\snow\standard. The rain sensor also has automatic level adjustment (to adjust to different glass, tinting, lighting). When turned on, the sensor shows the current sensitivity:
- Low sensitivity - 1 indicator flash.
- Average sensitivity - 2-3 flashes
- High sensitivity - 4 flashes.
To change it, press and hold the button for 3 seconds. This will be followed by a number of flashes indicating the current sensitivity. We continue to hold the button until a series of flashes follows. Release the button when the desired level is reached. An example of a rain sensor operating at a minimum level:
Have you ever had to install a rain sensor on your Lada car? What feedback can you give about his work? Let us remind you that the website presents other useful improvements, for example, replacing the washer nozzles with fan nozzles or installing a rear view camera washer.
Review of Manufacturer Prices
| Name / catalog article | Price in rubles |
| Lada / VAZ 285356725 (original) | From 2000 |
| Fram 2458753 (analogues) | From 2000 |
| Otex 3697412 (analogues) | From 2000 |
| * prices are current as of 05/01/2019 | |
Conclusion
The process of replacing a rain sensor yourself is not at all difficult, but it requires care on the part of the repairman. Do not violate the manufacturer's regulations. When laying the wiring, be extremely careful not to damage the insulating layer. A short circuit to ground will damage the digital controller.
Sequence of actions for self-adjusting headlights on a Lada Vesta
Adjusting the headlights of the Lada Vesta:
Electric corrector
Adjusting the low beam on the Lada Vesta is completed.
Conclusion
Adjusting the headlights on a Lada Vesta with your own hands will take no more than half an hour of free time. The task can be done even by an inexperienced driver without the skills and abilities to maintain equipment. If you encounter any difficulties with setting up, replacing, or adjusting, contact a service station or workshop to provide qualified assistance.
Price of standard headlights
A standard headlamp assembly will cost approximately 12 thousand rubles/piece. The LED version of alternative optics will require around 15 thousand rubles. A set of LEDs for self-installation costs about 3,000 rubles; xenon can be found for 2,000 rubles. Converting removed optics to use xenon in lenses will cost everyone about 13 thousand rubles. Final part. Today, on the Lada 2180 you can purchase both standard new optics and alternative ones that meet all accepted standards. Do you want to save money, but are not satisfied with the quality of light? Give the front optics for conversion to xenon/led to specialists responsible for the quality of work.
A little about the multimedia radio
The music system works without problems, nothing slows down. People ask how to make the screen display the climate control and door opening. To do this, you need to buy a special device and connect to it. Then the display will show the operating parameters of the climate system and doors.
The steering wheel was covered with braid, which was ordered from a well-known online store. We bought the seat covers there.
Read your car's manual often, it contains interesting things. Rarely does anyone look at this useful book. Subscribe to the channel, write what you would like to know about. Good luck to everyone on the roads!
Reviews
| № | Positive |
| 1. | Vitaly, 39 years old, Moscow, owner of Lada Vesta: I’ve had the car for two years, there are no special problems with it. I eliminate minor defects and shortcomings on my own. I'm pleased with the quality of the light; the fog lights also illuminate the road well. |
| 2. | Gennady, 42 years old, St. Petersburg: I use Lada Vesta to travel to and from work, sometimes out of town on weekends. The model is good, the assembly is good, the first domestic car of high quality. |
| 3. | Vladislav, 45 years old, Omsk: the optics malfunctioned several times, after diagnostics the standard corrector was replaced. There were no more problems. The mechanism operates as usual. |
| 4. | Kirill, 35 years old, Taganrog: I haven’t had any problems with the light, but I change fuses often. I don’t know what this is connected with, I need to visit a service station. Most likely there is a problem with the generator. |
| 5. | Valentin, 26 years old, Samara: my positive review of the Lada Vesta model, which I purchased six months ago. The build quality is better than Prioras, Kalinas, Grants. The fit of parts is above average. |
| 6. | Alexander, 42 years old, Sverdlovsk: the quality of lighting is good, no complaints. I plan to install additional fog lights soon. |
| 7. | Negative |
| 8. | Vasily, 38 years old, Uralsk: from the moment I bought the car, problems with optics began, contact periodically disappears, there is no sharpness in the light beam. The service station master said that this was a defect in the headlight unit. |
| 9. | Ivan, 37 years old, Krasnogvardeysk: I bought a Lada Vesta second-hand, the car is in good condition, but problems with electronics and optics are obvious. You need to contact a workshop for preventive maintenance. |
| 10. | Vitaly, 31 years old, Voronezh: my negative review of the Lada Vesta car. Such a high price, but the quality of workmanship and assembly does not match. Something needs to be constantly improved, eliminated, purchased. |
| 11. | Sergey, 34 years old, Vorkuta: the car is a year and a half old, and during this time it was serviced twice unscheduled at a service station. He eliminated manufacturer's defects in detail. |
Instrument cluster. Signal lamps
The instrument cluster includes:
1 – tachometer. Shows the engine crankshaft speed (x1000 min-1). The presence of the tachometer needle in the red scale area warns of increased engine speed. To prevent damage to the engine, its maximum speed is limited by the electronic engine management system software.
Above approximately 6200 min-1 the fuel supply will be limited. Possible interruptions in engine operation and jolts in the movement of the vehicle are not a malfunction. When the rotation speed decreases, the fuel supply will resume. Also, do not allow the engine to operate when starting off or while driving at an engine speed below 800 min-1.
ATTENTION!
It is prohibited to operate the engine in a dangerous mode (at engine crankshaft speeds above 6200 min-1 and below 800 min-1).
2 – indicator “Pedal adjustment” (see section “Operation of the vehicle”).
3 – “Seat belt” indicator (see section “Airbag system”).
4 – indicator “Airbag system malfunction” (see section “Airbags”).
5 – reserve.
6 – indicator “Brake failure” (see section “Driving a car”, “Braking and parking”).
7 – indicator “Unclosed trunk” (see section “Body and interior”).
8 – indicator “Hood not closed” (see section “Body and interior”).
9 – speedometer, shows the vehicle speed (km/h).
10 – “Hazard Alarm” indicator.
11 – indicator “Doors not closed” (see section “Body and Interior”).
12 – indicator “Cruise control” (see section “Operation of the vehicle”).
13 – indicator “Speed limiter” (see section “Operation of the vehicle”).
14 – indicator and indicator “Coolant temperature” (section “Engine overheating”). Operating a vehicle with a faulty warning light is prohibited. When the operating temperature of the coolant is exceeded (more than 115°C), the indicator lights up red constantly, and a short-term intermittent buzzer sounds. Do not allow the engine to operate in overheating mode.
Activation of functions via ELM327 and Ddt4all software
ps the article will be updated as new features appear.
What secret functions of LADA do you know?
By closely reading the articles of the owners on Drive (for which special thanks and respect to them), as well as communicating with news leaders in my city, I was able to activate for myself and my friends several functions that were useful in my opinion.
To do this, you need an Android smartphone, an ELM327 adapter version 1.5 (it will not work correctly with version 2.1), as well as the minimum required intelligence in order to be aware of what you will do and take responsibility for your actions. In other words, you will do everything further at your own peril and risk, and only you will be responsible for your actions.
Looking ahead, I will say that I tested all the software and scripts, links to which I will post below, on at least 5 machines, including mine, without any negative consequences.
Vesta can activate/deactivate the following functions, which are initially deactivated and are not available to the owner by standard means. In particular, these are the functions:
1) Disable/enable the mode of automatic activation of the rear wiper when reverse gear is engaged, if the front wiper was turned on for several minutes before that. For certain reasons that do not require explanation, this option is not available to owners of the Vesta sedan. It is enabled by default. I personally disabled this function to check the operation and turned it back on, because... I am completely satisfied with its presence. But I turned it off to a sufficient number of acquaintances at their request.
2) Enable/disable a short-term sound signal when arming/disarming using the buttons of the standard key fob. Noticed disadvantages: the beep will sound when you press the arm/disarm button again. I note that for owners of Volga signals the sound will be short but loud.
Absolute pressure and air temperature sensor
DBP and DTV are designed to determine the pressure in the intake receiver and its temperature. Directly participates in the formation of the fuel mixture by measuring air parameters and transmitting them to the controller.
VII – from yourself, the main beam of the headlights is turned on if the external lighting switch is in the position (low/high beam headlights), or, in an optional version, in the “AUTO” position (automatic control). Fixed position.
Rice. 16. Control rings on the switch lever: 1 – External lighting control ring. 2 – Fog light control ring.
To turn on the external lighting, turn the external lighting control ring 1, which has fixed positions:
0 – disabled. Fixed position;
– side lights are on. Fixed position;
– low/high beam headlights are on (depending on the position of the light signaling switch lever). Fixed position;
To turn on the fog lights, turn the fog light control ring 2: – off. Fixed position; – the rear fog lights are on.
Switching on is possible only when the side lights or low beam headlights are on. Fixed position (if the “Auto” function is available, the position is not fixed);
– front fog lights are switched on (optional). Switching on is possible only when the side lights or low beam headlights are on. The position is fixed (if the “Auto” function is available, the position is not fixed).
To turn on the high beam headlights for a long time with the automatic external lighting control system turned on, you must move the switch to position VII “high beam headlights on”.
“AUTO” (optional) – the automatic control system for external lighting is turned on. Fixed position.
The automatic control system for external lighting works only when the ignition is turned on from the light sensor. The light sensor is combined with a rain sensor and is located on the windshield behind the rear view mirror.
The automatic control system for external lighting turns on and off the side lights and low beam headlights depending on the level of external light. For example, at dusk, as well as when entering a tunnel or garage. The side lights and low beam headlights will automatically turn off when the ambient light increases.
The inclusion of external lighting by the automatic control system does not relieve the driver of responsibility for compliance with safety requirements and traffic regulations.
In this mode, when the engine is running, the low beam headlights will operate based on signals from the rain and light sensor.
In the version with the “AUTO” function, the lights will be turned off some time after the ignition is turned off. To be able to turn on the side lights for a long time at night, with the ignition off and the driver's door open, move the external lighting control ring from the “off” position to the “side lights on” position.
To avoid discharging the battery when stopping and parking the vehicle with the engine turned off, do not leave external lighting devices (headlights and flashlights) on unnecessarily. When the driver's door is opened to exit the vehicle, an audible signal sounds to warn the driver that the lights are still on. Turn them off when leaving the car for a long time.
Turning light system
In a variant version, LADA Vesta cars are equipped with a turning light function.
This function is activated when the low beam is on and is implemented by automatically turning on the fog lights in the following cases:
– when the turn signal is turned on (the PTF on the turning side turns on);
– when the steering wheel deviates/turns from the straight-line position (on the side corresponding to the rotation of the steering wheel).
The turn signal lamps must turn off automatically when the turn signals are turned off and/or when the steering wheel is returned to the straight-ahead position;
– when turning on the taillight/reverse gear (both PTFs turn on simultaneously, regardless of the position of the steering wheel or turn signal).
In this case, the turn lights should turn off when the taillight/reverse gears are turned off.
Turning lights must not be activated when the vehicle speed exceeds 40 km/h.
Recommendations
To avoid damaging the lights when cleaning, do not use aggressive or abrasive cleaners or chemical thinners.
To avoid clouding of the lenses and scratches on the surface, never wipe off dried dirt; first moisten the surface of the lens with water, use a soft rag or sponge for cleaning, and do not use sharp objects to remove ice from the lenses.
Do not turn on lights with heavily soiled lenses or covered with opaque materials. Severe contamination of lighting devices can be determined visually, the presence of a layer of dirt or snow, which does not allow you to clearly see through the lamp diffuser or other parts.
When replacing lamps, use only the types recommended in this manual.
Failure to comply with these recommendations may lead to destruction in the form of cracking or melting of the diffuser due to its overheating.
While the vehicle is moving, if visibility of the road surface deteriorates, it is necessary to stop and clean the lights.
Use your fog lights only for their intended purpose and remember to turn them off when not needed to avoid disturbing other road users. When environmental conditions change from very humid hot air to an environment with cold air, for example, after washing a car, during heavy rain, condensation may form on the internal surfaces of the lenses of lighting and signal devices. No special measures are required to make condensation disappear. The disappearance of condensation should occur during vehicle operation, and to speed up the process, it is recommended to turn on the appropriate lighting devices.
Video
⚠! WARNING! ⚠ Everything you do with your car, you do at your own responsibility! The author of this entry is not responsible for possible problems with the car! The recording is for informational purposes only! Before starting work, test all the wires with a multimeter and make sure that you have the same! What I did relates to the comfort package. (possibly at the start also). Before making connections, remove the battery terminal. Reading the instructions DDA-65 is mandatory! With a rain sensor everything is simple. Take a soldering iron and solder into the wires according to the diagram. One will have to be cut and connected to the ends according to the diagram.
It's more difficult with a light sensor. DRL, low beam, dimensions. Controlled by different wires. In order for the DRLs to turn off and the near side lights to turn on at the same time, we wire 3 relays.
We run to buy a five-pin relay, be sure to look at “12V” on it
There are also 4 contact relays, 2 pieces. Relay connection blocks. If necessary, wires, heat shrink, other insulators according to preference. In general, I recommend taking a closer look at the diagram. Understand what you need to buy, draw up a diagram, and go to the car market. The relay is sold in any spare parts for VAZ. Just say so, 4 contacts are two, 5 contacts are one. I found the chips in small items at the car market, and collected wires of different colors there so as not to get confused.
I mounted the DDA-65 relay right there at the steering wheel. I stretched out the cable with the relay and secured it at the bottom of the fuse block, where it belongs. I twisted and soldered all the wires. Then I isolated it. I also wrapped it with STP anti-squeak on top so it looks like it came from the factory))) I drew the button for the light sensor, but never did it. I've been traveling for a week now. No complaints! Everything works as it should! If necessary, I turn off the light sensor according to the instructions. Be sure to re-read the instructions. yadi.sk/i/gXBg6o-8sviSBA By the way, the paper instructions included in the kit will not work. Check out the email! Although it looks very difficult, it is actually not that scary. If you have any questions, ask in the comments!
Indispensable attribute
Fog lights are designed for bad weather conditions when it is difficult to drive due to reduced visibility. They increase the safety of both the passengers of the vehicle and other road users.
In bad weather, conventional headlights are of little use, since the light beam is reflected from water droplets, and creates the feeling that the car is in a spot of light, which prevents the driver from seeing where he is pointing the car. Anti-fog models - scatter light directly in front of the car, which spreads along the roadway. This happens because the beam comes out dense, wide and flat.
Choosing fog lights for Vesta
First you need to choose the headlights themselves. In this case, there are several options (price for a set of 2 units):
| Manufacturer | vendor code | Lamps included | Price, rub.) |
| FranceCar | FCR220029 | Regular | 1400 |
| Autostol63 | 261500097R | Regular | 2250 |
| Valeo | 47401 | Osram | 4200 |
| Valeo | 02539 | — | 3200 |
After purchasing headlights, you need to stock up on a number of materials:
- Brackets for mounting PTF;
- 4-pin relay;
- Headlight switch button;
- Plastic corrugation (5 meters);
- Wiring (5 meters);
- 16 amp fuse.
First you need to prepare the tools.
Only after this can you start working.
↑ Main directions of Vesta tuning
- Bumpers are made of black plastic.
- Regardless of the configuration of the Lada, the car is equipped with parts painted in the body color (bumpers, mirrors, spoilers, body kits, aerodynamic pads, etc.).
- Install lighting for interior doorways, underbody and rims of cars.
- Change the wheels to alloy ones.
- The car is repainted, the windows are tinted and airbrushed designs are applied.
Also, during the alteration, changes are made to the design of the vehicle's lighting devices. How this process occurs on Vesta will be discussed below.
Important! When tuning a car's chassis, they install an overrunning clutch on the car themselves. Installing an overrunning clutch allows you to stabilize the car’s behavior on the road, add dynamics and controllability
Characteristic symptoms of malfunctions
| Signs | Malfunctions |
| When moisture gets on the glass, the wipers do not move. | Damage to the light element DD |
| Brushes operate in the same mode, despite changing speed | Failure of the relay-breaker |
| Brushes work late | The digital controller has failed, the contact board has oxidized |
| Increased speed of windshield wiper blades | Short circuit in the on-board circuit. The relay breaker fuse has blown (No. 38) |
Useful tips, photo reports and repair manuals for VAZ cars.
On new cars, the required headlight parameters are set by the manufacturer. But during further operation, it is necessary to periodically check and adjust the lighting devices correctly. In this article we will look at how the front headlights are adjusted on the Lada Vesta. When to adjust headlights
1. After an accident, even if it was minor, the front elements of the car are damaged.
2. If, as a result of tuning or structural modification of the front suspension, the ground clearance has changed.
3. After a planned or unscheduled replacement of damaged elements or lighting devices with new ones.
4. After replacing shock absorber struts or springs.
5. If a manufacturing defect in headlights or headlamps is detected.
6. When the driver visually detects deterioration in visibility on the road with the lights on.
7. After a long trip on a rough road.
8. Before a scheduled vehicle inspection.
9. In the absence of all the above reasons, it is recommended to adjust the low and high beam of a Lada car every 50-60 thousand kilometers.
Related videos
- Steering wheel button adapter for Lada/Renault
- 24 Jun
- 328
- Steering wheel button adapter for UAZ Patriot programmed, UAZ-R
- 3 Dec 2018
- 249
- Resistive steering wheel button adapter for Lada/Renault, trainable, RE/LA-R
- 28 Nov 2018
- 627
- Steering wheel button adapter for UAZ Patriot programmed, UAZ-DIP
- 21 Nov 2018
- 214
- Steering wheel button adapter for Chevrolet, Hummer
- 9 Jul 2018
- 1208
- Steering wheel button adapter for Porsche Cayenne
- 13 Dec 2017
- 237
- Adapter of buttons on the steering wheel for Skoda Rap />Adapter of buttons on the steering wheel/Bose amplifier for Mazda 3, 6, CX7
- 17 Oct 2017
- 2370
- Show more
Any questions from those. consultations to assistance with placing an order.
Warranty on all products
Warranty for goods from 6 months to 3 years. If there is a defect, we will replace the product without any questions asked.
Secure payment methods
Pay by credit card, PayPal, bank transfer or cash upon delivery.
Delivery throughout Russia
You can choose delivery by courier, Russian Post or at a pick-up point.
We will pack it well, send it for delivery and monitor the order until delivery.
For those who are confident in their abilities
To independently install and configure fog lights, car enthusiasts will still need certain skills. Initially, you need to make sure that the car has the necessary space for this lighting element. Experienced motorists know that the distance from the end of the bumper to the headlights should be the same, and the fog lights should be located above the center of the main optics.
No matter how trivial it sounds, but first you need to buy fog lights. If you install them in specially designated areas of the car, then choose a suitable shape; if there are no such places, then any will be acceptable.
What equipment will you need:
- the headlights themselves;
- for connecting wires (they may be included in the equipment);
- a tool for inserting optics into the bumper and for installing lighting equipment;
- other means and tools that should always be at hand.
It is worth paying attention to the relay; the possibility of installing it will be indicated by specially prepared places for such illuminators. The button for turning on the fog lights in the cabin will also greatly simplify installation.
A hole in the trunk of a Lada Vesta station wagon
The trunk of the Lada Vesta station wagon pleases with its good organization of space. When designing its interior space, the company took into account the opinion of car enthusiasts. For comfortable placement, it has various niches, hooks and pockets. However, this is not the limit of possibilities. One of the Lada Vesta SW owners found another hidden place in the trunk of their car where they can store rags and other soft items. More details.
Do it yourself or contact a specialist
Sometimes the cost of installing fog lights can significantly exceed a driver's financial limit. And inside every person there is a little accountant who tries to save every penny.
Let's say right away that installing and adjusting fog lights with your own hands is quite doable. To do this, you do not need to be a particularly talented craftsman, since this work takes little time and does not require serious experience. There is even an opinion among car enthusiasts that one installation will be enough to then teach your friend this business.
Depending on the configuration of the Vesta, the foglights will be controlled differently. In the top version of the car, you can activate their operation by turning the ring on the left steering column switch. When you turn one notch, the headlights start working, and when you turn two, the front and rear lights start to work.
On new cars, the required headlight parameters are set by the manufacturer. But during further operation, it is necessary to periodically check and adjust the lighting devices correctly. In this article we will look at how the front headlights are adjusted on the Lada Vesta. When to adjust headlights
1. After an accident, even if it was minor, the front elements of the car are damaged.
2. If, as a result of tuning or structural modification of the front suspension, the ground clearance has changed.
3. After a planned or unscheduled replacement of damaged elements or lighting devices with new ones.
4. After replacing shock absorber struts or springs.
5. If a manufacturing defect in headlights or headlamps is detected.
6. When the driver visually detects deterioration in visibility on the road with the lights on.
7. After a long trip on a rough road.
8. Before a scheduled vehicle inspection.
9. In the absence of all the above reasons, it is recommended to adjust the low and high beam of a Lada car every 50-60 thousand kilometers.
Lada Vesta SW Cross Red 1.6 manual transmission › Logbook › A trifle, but nice… (Ode to rain and light sensors)
Good health to everyone! My inner writer craves creativity, and I want to write something useful, or at least about how I changed my shoes. But I’m unlikely to write something useful on the technical side, unless it’s plagiarism. The wheels are only on order, the tires are in the garage 200 km away... So that’s also a bummer. Yes, the post about the trip to the waterfalls still weighs a lot, but as they say, it’s not a hundred##t, i.e. here the muse did not visit me. But there is still an unplowed field of all sorts of things.
What do I want to say about the rain sensor
. When we bought a “white favorite” (Priora station wagon 2009), a rain sensor was a bonus for the luxury package, which was chosen because of 2 airbags. As a navigator, I insisted on this. My smart driver did not argue with the navigator, so that there would be no discord on the road). At that time, this function was a priority for me, but my husband considered it an unnecessary function. When we brought the car home in March and there was snow on the street, my husband played snowballs with the car while it warmed up. The first 40 years of childhood are the most difficult.
Then, during the operation of the car, my husband fell in love with this function. By the way, the rain sensor was adjusted very well and worked well, my subjective opinion is better than in the West. When in a new car (Prior SE station wagon blue), the cracked glass was replaced with a new heated glass, but without a rain sensor (they didn’t check it, when they took the glass, and when they noticed it was stupid to go deal with the OD). The husband was very upset. Naturally, he drives and turns on the windshield wiper and nothing seems to live... But that’s not what the story is about.
And when I was choosing a car, my rain sensor was an important function. They looked at me like... But everyone has their own cockroaches - this was my personal favorite cockroach. And all foreign cars with this function were already in luxury and... automatic. And this contradicted my MAIN cockroach - a manual gearbox. To be honest, I agreed with both my favorite cockroach and the MAIN one when I wanted to take the X-Line, but when it turned out that there was no door illumination when leaving the cabin... In general, a riot among cockroaches, led to a revolution and a return to the roots. In general, there is a sensor, yes, so far it infuriates me. But he is.
And yesterday I finally realized what this strange “light sensor” function is. Before that, I thought I was a sclerotic and I don’t remember when I turned on the headlights, but they were on, and I don’t remember how I turned them off either. With two screaming children behind you, you forget where you are going. YES, and in general you are driving in neutral gear)) (those who understand, smile). Of course, I knew that I had this function. But how does it work?
But religion did not allow me to open Google or an instruction manual. Attention: plagiarism: “The principle of operation of a light sensor or, as it is also called, a light sensor, is extremely simple. As soon as the illumination around the car falls and twilight sets in, the electronics, having detected this, automatically turns on the side lights and low beam headlights.” Very convenient, although at dusk I turn on the headlights myself, I think the DRL is weak for this time of day. This morning, when I stopped by into the forest, where it was darker, the headlights turned on and off on their own
I have auto mode on both the rain sensor (both the front glass and the rear window are cleared), and auto on the headlight mode.
All these are goodies and, one might say, excesses, but with them life is easier and driving is more comfortable.
I'm curious what your opinion is on these goodies. Did you choose them consciously or were they a pleasant bonus? Do you use it? Like ?
How to adjust headlights on Vesta manually
To begin with, you need to choose a suitable site. It must be level and adjacent to a wall, fence, gate or any other perpendicular object. A light beam will be projected onto it.
What tools will you need?
• Phillips screwdriver; • hex key 8; • cleaning rags; • a small cardboard or thick sheet of paper no smaller than A4. If you intend to replace damaged light fixtures, then also a headlight or fog lamp.
Low beam adjustment
1. We install the car on the selected site so that it occupies a strictly horizontal position.
2. To ensure safety during work, chock the wheels and apply the parking brake.
3. The front of the machine must be at a distance of 3 meters from a vertical obstacle. If a suitable object is not found, you can use a regular sheet of plywood or assemble a suitable shield from boards.
4. A person must be in the driver’s seat during adjustment. You can replace it with a sinker weighing 75 kilograms.
5. On a selected perpendicular plane in front of the car, you need to apply three vertical stripes: one in the center of the car, and two in the center of the headlights.
6. Then we draw a horizontal strip at a height corresponding to the center of the low beam lamp (indicated h in the figure).
8. Cover the left or right headlight in turn with cardboard. We look at the correspondence of the projection of the light beam to the lines drawn on the plane.
9. If there is a deviation from the center, you need to manually adjust the lighting devices using the adjusting screws. They are located immediately behind the headlight. The left screw is responsible for horizontal adjustment, the right one for vertical adjustment.
When the center of the light beam exactly matches the applied stripes, the adjustment of the headlights on the Lada Vesta is completed.
Description
Inside the central well on the standard dashboard there is a speedometer dial, where our garage brethren immediately note with satisfaction that there is an extreme figure of 200 (although in reality the Vesta SV can accelerate to 185 km/h at maximum).
At the bottom of the speedometer there is a liquid crystal display, which displays certain current data to inform the driver, which will be discussed below.
And inside the speedometer dial there are many illuminated indication icons, starting with the alarm icon and about extreme brake wear, and ending with signals about engine problems and a lack of engine lubrication.
In the left well of the tidy there is a tachometer with a gradation from 1 to 7, which means the display range is 1 - 7 thousand rpm of the engine, where after 6 thousand (and in fact it should be after 5.5 thousand) - red zone of critically dangerous speeds for the power unit.
The speedometer dial itself, or rather its lower part, is also used to display certain indication signals.
On the right side of the standard Vesta SV dashboard there is a well, which has a two-instrument combination of displaying both the current engine temperature and the current fuel level. At the same time, it should be borne in mind that the engine temperature sensor does not display the heating parameter of the engine coolant, as it was before, but the current temperature of the engine oil. This makes it possible to prevent critical overheating of certain engine components.
As for the fuel level indicator, its gradation is displayed in increments of a quarter of a tank. And the extreme versions of the standard tidy of the Lada Vesta, next to the fuel level sensor, have special icons (probably for cars used for carsharing), which show which side the fuel tank is located on.
This well also contains various indication lights to inform the driver about the operation of certain liftback systems and units (this is exactly the definition of the body design style of the restyled Lada Vesta SV).
The overall assessment of the standard instrument panel of the Lada Vesta in comparison with the instrument panels of the Kalina and even the X-Ray is, in general, an attractive and quite informative dashboard, where the backlight can be either green or orange.
As for the disadvantages of such a device, these are the uninformative, or rather, barely noticeable, intermediate gradations of the scales, especially with a quick glance at them along the way.
Adjusting the fog lights
Fog lights act as additional lighting in poor visibility conditions. In accordance with the current regulations, they are not mandatory and are not provided for all versions of Lada cars.
Adjusting the PTF is similar to adjusting the low beam. The only peculiarity: the car must be moved at a distance of 5 meters from the perpendicular plane.
1. In addition to the already drawn lines, you need to draw another horizontal one at a height of 100 mm from the road level.
2. Turn on the PTF and alternately close the left or right headlight.
3. We check that the upper edge of the light beam of the PTF corresponds to the drawn line.
4. If it deviates up or down, we adjust the direction of the headlight with the adjusting screw. It is located below the PTF lamp in the front bumper.
If the adjustment fails, you need to check whether the headlight or lamp is installed correctly, and also check the bumper fastening.
Cost of working in a car service
To adjust the headlights on a West car, a car service center will ask for 400-500 rubles. The amount is small, but you still have to spend time getting to the service and waiting for your turn.
Adjusting the headlights on the Lada Vesta itself is easy to do with your own hands. There are a lot of videos on the Internet where this process is shown in detail and step by step. Even a novice car enthusiast with no car maintenance skills can handle it. The entire process will take no more than 30 minutes.
What functions does the sensor have?
The functionality of the DS is small: activation and deactivation of low beam, instrument panel illumination when the light brightness reaches in the range from 100 to 3500 units.
How the light sensor works: while moving, the sensor constantly “scans” the visibility area, assessing the lighting brightness parameter. The microprocessor receives data from the photocell about the brightness range and decides to send a signal to activate the low beam.
In a Lada Vesta DS car, the DS is programmed to activate the BS and the dashboard backlight. If necessary, the vehicle owner can reprogram the DC to additionally use fog lights and DRLs.
You can update the firmware at any certified service station that has portable scanners. “Upgrade” does not guarantee the functionality of the equipment on its own.