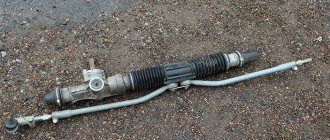
Main malfunctions and their symptoms
If the following symptoms occur, you should diagnose the steering rack:
- The steering wheel gets jammed while the car is moving, causing difficulties in steering – the steering shaft is damaged or displaced; among auto mechanics this phenomenon is called “biting”.
- A knocking sound appears in the chassis - this requires repair of the rack elements.
- The car pulling to the side, the car wobbling at high speed are signs of play in the steering mechanism. Because of this defect, it is impossible to perform a wheel alignment.
Depending on the degree of damage, the problem can be solved by repair (installation of a factory repair kit), replacement of the entire assembly, or adjustment. This material contains instructions for adjustment and repair.
Symptoms of malfunction
- Knock on rough roads. When hitting bumps, you will hear dull or ringing metallic sounds from the front of the car. This does not always happen due to wear on the steering rack; sounds can also arise from other components: ball joint, tip, wheel bearing.
- Large steering play. As the mechanism wears out, the gaps between the teeth increase, causing free play to increase. Play can also appear when the steering tips and ball joints are worn out.
- Steering wheel jamming. Most likely the cause of the problem will be the steering rack. Most often this occurs due to damage to the anthers. Water and dirt begin to enter the mechanism body. The lubricant washes out or thickens, causing the teeth to cling to each other unevenly.
A similar problem also occurs when the element is incorrectly adjusted.
Signs of breakdown
Tie rods have two main enemies.
- Dirt. PH are hinged parts, therefore, when the boot is damaged, various solid particles of debris, dust, and dirt begin to enter the mechanism. Friction occurs, parts begin to wear out faster, and moving components are destroyed.
- Bad roads. How many bumps, holes, curbs do you have to overcome every day? All these impacts negatively affect the condition of the tips - the hinge begins to actively wear out, and play occurs in the vertical direction.
If a tip is found to be faulty, it must be replaced. It is better not to do with restoration and restoration of functionality.
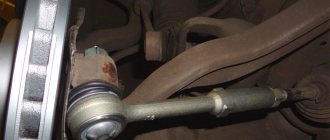
Many people are interested in the question of how you can check the steering tips and make sure they are worn out or, on the contrary, intact. It is not necessary to go to a service station and pay money for this.
To check the condition of the LV, you need to turn the wheel all the way in one direction and remove all dirt from the boot. If there are breaks or cracks in the rubber, then the part has worn out and no longer performs its functions properly. Do subject to replacement. The second wheel is checked in a similar way.
There is one more important measure that is recommended to be carried out even if there are no signs of wear on the launch vehicle. To do this, a pry bar is inserted between the steering knuckle and the rod, after which the parts are moved relative to each other
If no vertical play occurs during these manipulations, everything is fine. If it is, you will definitely have to change the component.
Briefly about the types
To be honest, already being the owner of the car, I didn’t really bother about its maintenance. But life, as they say, forced me. My father set the condition that the maintenance of the car given to me falls entirely on me, that is, my wallet. And since I could not always afford to refuel the car and buy something new for it, since the price was high, I had to do the repairs with friends, simultaneously studying instructions with photos, videos and studying the instruction manual.
Yes, now I earn a lot more, such concepts as a bearing, oil seal, boot or bushing are not new to me. But here’s the paradox: replacement of any parts, repairs and maintenance are carried out exclusively at the service station. This is what I advise you to do if we are talking about cars with electric steering or power steering. You can easily repair your Matiz without power steering with your own hands in a garage.
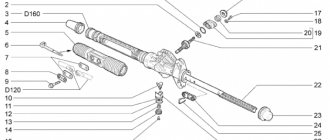
As we have already figured out with you, there are three types of steering rack (RR).
- Mechanical. The simplest among those existing. The wheels of the car turn only due to the force that you apply to the steering wheel, that is, the steering wheel. I sympathize with the owners of old Ladas, Muscovites and especially the Volga. Turning the steering wheel is one of the difficult tasks on such cars. Structurally, a mechanical RR consists of gears that operate on a similar principle to a gearbox. The system has a pair of gear devices. One is connected to the steering gear, and the second to the wheel rods. They have a specific gear ratio that helps the driver a little when cornering.
- Hydraulic. As reviews show, it is the RR with hydraulic booster that is considered the optimal and most common option. What do you think is the RR on 80% (maybe I’m exaggerating) of modern new cars? That's right, hydraulic. Thanks to the amplifier, you can easily and naturally turn the steering wheel; even minimal effort is enough to turn the car around its axis. When passing through potholes, shocks are absorbed, so driving becomes safer and more comfortable. Structurally, the gas pump consists of a pump (pump) necessary to move working fluids. When the steering wheel turns, the fluid puts pressure on the piston and rod, which are responsible for turning the wheels. If the steering wheel is in neutral, all the fluid returns back. It's noteworthy that GRRs first appeared on trucks because they were insanely difficult to drive. But soon leading automakers appreciated this development and began to use it on passenger cars.
- Electric. The ERR uses an electric motor to convert steering movement into wheel position changes. Control is carried out using sensors and an electronic control unit. The motor itself is mounted on a rack, it is built into the steering column or mounted on a shaft. There are three installation methods, which is important when dismantling and replacing the unit. But I strongly advise you not to buy a car with a motor built into the column. Why? If the PP breaks down, then the car will simply lose control. ERR is considered a system of the future, since the efficiency indicators of such a rack are the highest. They are easy to service; there is no oil seal or working fluid. They have a high level of savings. The electric motor responsible for the RR turns on only when the driver begins to turn the steering wheel.
When choosing a Ford Focus 2, Volkswagen Passat, Nissan Almera, Lada Granta, Toyota Corolla, Renault Logan or the same Peugeot, Citroen, Mitsubishi Lancer, do not forget to check what kind of rack is there, whether it needs replacement and how to remove this element if necessary .
Based on the reviews, you can find out what typical faults the RR has in Renault Megane, Skoda, Chevrolet Lacetti, Audi, Mazda 6, Daewoo, Hyundai, Honda, Nissan cars. Replacement on each of them is carried out according to the corresponding algorithm prescribed in the operating manual.
I realized a long time ago that the manufacturer’s instruction manual, which comes with the car when it is purchased, is the holy of holies for the car owner. Only using it you need to select new spare parts, figure out how to tighten the rack, how to tighten it or fix other faults.
Each rack has its own number, article number, according to which you can purchase a new element to replace the old one, which has outlived its time.
I don’t advise you to look for where the slats are more reliable and rely only on this criterion when buying a car. Most modern new cars have fairly reliable PP designs. They do not fail so often, but they are made much better than on our VAZ 2110, 2108, 2112 and even 2114. Kalina and Priora are not among the leaders in reliability. But the advantage of domestic cars is that you can repair them yourself.
Rail repair
Repairing the rack must begin with its adjustment. Most likely, after adjustment, all knocking will disappear. If it doesn't help, you'll have to disassemble it and change parts.
Adjustment
You can adjust the VAZ 2114 rack as follows: directly on the car or by removing it. The second method is needed after repairs. The car must be parked on a viewing hole; alternatively, a lift can be used. The adjustment is carried out as follows:
- The VAZ 2114 must be put on the parking brake, locking the rear wheels;
- Next, you should disconnect the negative terminal from the battery and lock the steering wheel;
- The manufacturer has provided a special adjusting nut with which you can quickly adjust the unit. This element is located on the mounting side of the part facing the car body;
- If adjustments are performed rarely, there will be a large layer of dirt on the adjusting nut - this must be removed with a cleaning agent. Adjustment is carried out using a special key.
If the adjustment is performed correctly, there should be no play when turning the rods. In the VAZ 2114 steering wheel itself, the play should be about 15 degrees. The steering wheel should rotate without snagging or additional effort. If the steering wheel returns to its original position on its own, then the adjustment has been completed correctly. The above work must be repeated after 500-800 kilometers.
Disassembly and replacement of parts
When all problematic fasteners are lubricated, you can begin work:
- The front part of the VAZ 2114 must be lifted and the wheels removed. After this, you will have access to the steering tips, which also need to be removed;
- Next, you need to move into the cabin and disconnect the steering shaft there. Now you need to unscrew the nuts securing it to the car body. After removing all fastening elements, the part should be moved to the side and pulled towards you;
Symptoms of a problem
The first enemy of VAZ 2114 tips is dirt. They are a hinged element, so breaking the integrity of the boot causes solid particles to enter the mechanism. Due to friction, increased wear of the part and destruction of moving elements occurs. The second “killer” is bad roads. Constant impacts from driving over bumps have an extremely bad effect on the condition of the part: the hinge wears out and vertical play occurs.
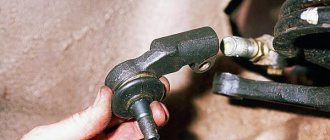
Faulty tie rod end
Defective parts must be replaced immediately.
People often ask what signs indicate that a tip needs to be changed. It is easy to check their condition. Turn the wheel all the way in one direction and carefully remove dirt from the boot. If breaks are visible or the rubber is cracked over time, the part needs to be replaced. Repeat the operation for the second wheel.
Even if there are no visible integrity problems, insert a pry bar between the rod and the steering knuckle and try to move them relative to each other. There should be no vertical play. If it is present, the part needs to be replaced.
Manufacturers and prices
There are several manufacturers on the automotive parts market that have proven themselves well. This:
- AvtoVAZ is the official supplier for conveyors, the cost of the set is 650-700 rubles.
- "Track" has about the same cost.
- FINWHALE - cost - 850-950 rubles.
- LEMFORDER – price – no more than 900 rubles per pair.
- “VIS” – 700-750 rubles per set.
These are the steering tips you can find on the VAZ-2114. The price depends on the manufacturer, the quality is almost the same for all. If you operate the car correctly and carefully, then they will serve faithfully for a guaranteed period.
Price issue
A new rail will cost you about 3 thousand rubles. The cost of service stations for replacing slats costs about 2 thousand rubles. That is, in total you will have to spend 5 thousand rubles if you entrust the work to the masters.
Repair kit
However, the rack is not difficult to repair. Most VAZ 2114 owners perform this event with their own hands. Plus a decent saving of money.
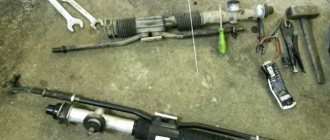
How to disassemble the steering rack of a VAZ 2114 and replace worn parts
In addition to a helper and new slats, you will also need a set of tools and materials. Be sure to include in this list:
- Set of wrenches;
- Jack;
- 17mm hex wrench;
- Balloon wrench;
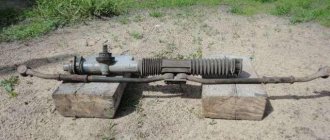
- Bricks or similar materials (to support the front of the car without wheels);
- Puller for steering rods (not necessarily needed, you can do without it);
- Dry rags;
- Litol type lubricant;
- The almighty WD40.
Now you can proceed directly to replacing the steering racks. We strongly recommend that you follow the established procedure for conducting operations.
- Place the car on a level surface. No, a simple floor in your garage is enough, it is not necessary to level it with cement.
- Apply the parking brake to keep the car from moving.
- Raise the car on a jack, place logs or bricks under the front, and then remove the wheels.
- Remove the negative cable from your battery for safety reasons. Nobody needs electric shocks today.
- On the driver's side inside the passenger compartment, near the pedal block, unscrew the locking fastening bolt of the cardan of your steering shaft.
- Remove the adsorber directly from the engine compartment. You can put it aside for now.
- Remove the cotter pins, which will allow you to then remove the mounting nuts from the tie rod ends.
- Using a rod puller, the ends are removed from the racks. If for some reason the puller is missing, it can be replaced by gentle, successive blows to the tips. Don't damage their threads just by doing this. They usually lend themselves, so many people do without pullers.
- Treat the rack clamp fixing nuts with an anti-rust agent. Now we are talking about the almighty WD40. Wait a while for the composition to be absorbed.
- Using a wrench, unscrew the fastening nuts. Processing with a Vedash should greatly simplify this task for you. There are four nuts in total.
- Remove the rack by pushing it through the passenger side, that is, the right side of your VAZ 2114.
- We recommend replacing the boot at the same time as replacing the racks. Over time and during the period of operation, the steering boots seriously wear out, so it is hardly worth trusting old boots to work with new racks.
- The tips are removed from the slats. At the same time, try to count the number of turns with which the nuts were tightened. This will allow you to fasten them back as close to precision as possible at the reassembly stage and, with peace of mind, go to the service station, where they will adjust the wheel alignment.
- Take your new rail, remove the plugs from it.
- Next, take Litol or a similar lubricating liquid into your hands and fill the body with this composition as much as possible.
- The ends are mounted back onto the rods. Try not to mix up the places of the nodes, although they are different from each other. However, as practice shows, this does not prevent many do-it-yourself repairmen from confusing them.
- The new rail is placed in its rightful place. To do this, the nuts are attached to the studs of the clamps.
- Now you will need your friend, comrade, assistant. Ask him to help guide the shaft drive gear to the seat located directly on the rack housing. The splines must line up exactly. Be sure to check this moment.
- A locking bolt is fixed on the cardan.
You can safely perform all other work in the reverse order of the dismantling described above. In this case, each thread must be treated with Litol. This event will allow you to more easily deal with disassembling the elements during subsequent repairs. Or it will be a pleasant surprise for the new owner of your VAZ 2114.
How it's done
The sequence of actions is as follows:
- Place the car on a level surface and immobilize it;
- It is better to jack up the car on the left side;
- Using open-end wrenches, unscrew the bolts securing the steering rods to the rack, having first bent the fixing plate;
- In the cabin, under the steering column, unscrew the bolt securing it to the steering gear shaft;
- Unscrew the 4 nuts securing the mechanism, and then remove the fastening clamps;
Unscrew the rack bolts
After all work, the toe angle must be adjusted.
The work on restoring the steering mechanism is not particularly difficult, but some of the operations can cause a few inconveniences, but in general it is quite possible to do everything yourself. The longevity of the operation of this mechanism in the future will depend on which manufacturer of the repair kit you have chosen.
Source
Repair of rack on VAZ 2113-VAZ 2115
Disassembly
1) First, you need to remove the rack from the car, and we recommend that you read the details of the process in the article: “Replacing the steering mechanism on a VAZ.”
Note! By the way, do not rush to start repairing the rack if you only heard a knock for the first time. The first symptoms can be removed by pulling it up; the top link to the article contains information on this topic.
2) Now on the right side, remove the support and spacer ring from the end of the rail, as shown in the first photo. Then use pliers to cut through the clamps holding the protective cover in place (see photo 2, these clamps are disposable), and then remove the cover (photo 3) from the rail. On the other side (from the end), remove another support, now metal, and the protective cap. This operation is shown in the fourth photo.
3) Next, unscrew the special. using a 17 octagonal wrench on the rack stop nut (photo 1) and remove it. There is a spring located immediately behind the nut (photo 3), remove it and put it aside. Using a screwdriver, pry up the retaining ring as shown in the last photo.
4) Next, take the rail in your hands and knock on the board. Knock the crankcase until the stop falls out of the inside, look at photo 1. Then remove the bulkhead seal (photo 2) and use a screwdriver to remove the gear boot (photo 3) and the lock washer (photo 4).
5) Proceed to removing the gear that comes complete with the bearing. It is necessary to remove it from the crankcase by unscrewing the gear bearing mounting nut (photo 1), and then remove it from the shaft (photo 2). Then, taking the mounting blade and using it as a lever for a wrench, use a 14mm wrench to grab the flat of the gear (photo 3) and, leaning the wrench on the blade, remove the gear together with the bearing from the crankcase (photo 4).
Note! By the way, you won’t be able to unscrew the gear fastening nut so easily; you will need a special wrench with a 24-inch octagonal head. Instead, you can use a head with the same size (photo below).
6) Now remove the steering rack from the crankcase by simply tilting the crankcase - the rack will fall out on its own (photo 1). Using a flat-head screwdriver, pry up the support sleeve and remove it from the crankcase (photo 2). Install the new bushing in place of the old one, after putting new damping rings on it (photo 3). During installation, make sure that their thin part is against the cut of the bushing. We put the bushing in place (photo 4). Install the bushing very carefully, making sure that the protrusions do not stick out. Be sure to cut and remove any remaining rubber damping rings.
7) Remove the retaining ring from the worm with pliers (photo 1), and then press out the ball bearing with a special puller, removing it in this way (photo 2). Next, proceed to removing the needle bearing. You will need either a special puller, or stock up on available tools: a hammer and a drill. The required drill bit diameter for a drill is 2 mm. At the end of the crankcase (photo 3), drill two holes through which you will knock out the bearing. Insert nails into the drilled holes and, hitting them with a hammer, remove the needle bearing from the crankcase (last photo).
What you need for repairs
Before starting repairs, purchase a repair kit. It can be small and include only bushings, oil seals, boots, etc. There is also a large repair kit, which also includes a rack. There are a lot of companies that produce such repair kits, so which one to choose is up to the owner to decide. But it’s better to choose a manufacturer who is an official supplier of spare parts to the car plant.
To make repairs, you won’t need much:
- Set of open-end wrenches;
- Screwdrivers;
- Rags;
- Lubrication;
- Repair kit;
How to Adjust the Steering Rack on a VAZ 2115
How to tighten the rack
VAZ control2115
?
- adjusting nut
- Technical inspection
Some motorists, especially beginners, wonder: “How to attach the steering rack
to the vase?2115? Most believe that this cannot be done without the help of other people. But you can say this with confidence. this is a complete mistake and such an adjustment is probably possible. knocking sound during operation of this mechanism, this signal must be properly explained, and AvtoVAZ 2115 also informs you about system problems that need to be fixed, and at the same time faster.
This can happen when a wheel falls into a hole or the car collides with an obstacle. The control rails are adjustable, if you call the inspection hole or jumper, the elevator is still suitable, because otherwise you will not be able to remove the protection from the motor. A flathead screwdriver will help remove the protection. After performing these manipulations, you need to get to the place on the back side of the rail where it intersects the control shaft. Next, find the adjusting nut on the body, the main thing is not to confuse it with the plug. Usually this nut is covered with a layer of dirt, and sometimes, without outside help, it is difficult to find, unfortunately, of course. It should also be clarified that the nut may end with a plastic plug installed at the factory.
How to adjust the steering rack for a VAZ 2115 |
Sorry for the quality of filming in the coming days, which I will correct. How to tighten the steering rack on a VAZ
—2115
.
If you find such a plug, you can be sure that no one has come close to the steering gear at this point. The plug must be removed to allow the adjusting nut to rotate. Tighten the nuts clockwise, but the main thing here is not to overdo it. It is necessary to be guided by the knocking force of the steering mechanism. You should check how successful Operation Zheleznodorozhny
turn sharply in both directions and if there is no noise, then everything went well. To place the plug. there is no need to return the cork as it will lose its destination.
The entire operation should take about thirty minutes if you do it yourself. At gas stations you can replace the entire steering gear as it costs more than just tightening the nut. Therefore, it is better to do it yourself if you do not have extra money. From this information we can draw a conclusion. Adjustable steering
mechanism for VAZ car2115
It is possible to carry out the entire process without assistance and spend a lot of time, but keep in mind that tightening the nut makes it difficult to turn the steering wheel.
It is better if you have an adjustment assistant who will turn the steering wheel back and forth. Some car lovers install a front guard on their car. Judging by the reviews, this thing is useful, but there are also opponents. In any case, it is up to the car owner, but it is believed that to obtain even greater effect, it is necessary to install another support along with the amplifier. This reinforcement will not affect the technical inspection, since all parts have passed the necessary certification.
Source
Post Views: 6
Why tighten the rack on a VAZ-2114
Diagnostics of the steering rack and steering mechanism
Before tightening the steering rack on a VAZ-2114, it is worth considering the prerequisites that will tell you that it’s time to repair or tighten it.
First of all, this is a backlash.
Key for eliminating play in the steering rack Eliminating play in the steering rack
In principle, AvtoVAZ guarantees a fairly long service life of the steering mechanism, namely ten years. However, we must understand that we are talking about ideal operating conditions. This assumes smooth asphalt roads, constant availability of high-quality lubrication in the rack housing and a gentle driving style.
Under normal operating conditions, this period is practically unattainable.
Unimportant roads, poor quality of spare parts and often harsh operating conditions of the car lead to the fact that the mechanism makes itself felt much earlier
The first symptoms of a faulty steering mechanism on a VAZ-2114
The first symptoms of a rack malfunction or the need for tightening are clear:
- Knocking noise under the hood in the area of the engine shield, especially when driving over uneven surfaces.
On a VAZ-2114, a knocking sound when driving through uneven sections of the road may occur due to a loose nut on the bolt that compresses the cardan clamp
Increased steering wheel play. Steering wheel rotation is too tight or too free. Leakage of lubricant through oil seals and rack casings. Sudden biting of the steering rack while driving.
The latter can be considered a glaring signal of malfunction and can lead to serious troubles while driving.
In this case, most likely, tightening the situation will not correct the situation, however, it is too early to draw conclusions, you can try to adjust it. This can be done in two ways - both on the car and with the rack removed.
Complete disassembly of the steering rack and replacement of the repair kit
In the second case, the adjustment is made after replacing the repair kit and completely repairing the mechanism. We will try to make do with little expense and simply adjust the gap in the gear-rack engagement, thereby eliminating backlash and knocking.
"Hyundai"
How is the steering rack self-adjustable on this car? Hyundai, namely its repair, will also not cause difficulties. All you need is a pit or a lift. The procedure is the same as for other cars. Some models may require a special key. But the owners also write that the knocking occurs not because of the rack, but because of the steering rods.
Hello, dear car enthusiasts! Sometimes, a feeling of “white” envy suddenly creeps in when in the manuals of foreign automakers we read the words that the service life of a worm or rack in a car’s steering rack is designed for 14-15 years.
It is calculated and... this is how it really is: the steering rack does not fail. Naturally, subject to certain conditions, such as: recommended maintenance periods for the steering rack, use of recommended and high-quality oils, and operation of the car on appropriate roads.
And, if the first two points are quite feasible on the part of the car owner, then the third, alas, for us still remains a fairy-tale dream. Therefore, today we will consider the question of how to tighten the steering rack with your own hands.
Adjusting the steering rack is a simple procedure and can be done by any driver. And it takes no more than an hour with all the preparatory activities. But first, let’s remember why and when the steering rack needs to be tightened.
Why do you need to adjust the steering rack?
From the steering rack type: pinion-rack: the driver’s force is transmitted to the wheels by means of a gear (spur or helical), which is mounted on a bearing and interacts with the gear rack.
Backlash-free engagement of the gear and rack is achieved thanks to pressure springs.
The most common malfunctions: play or knocking in the steering rack. The causes of play or knocking can be:
- The fastening of the steering rack housing, steering bipod or crankcase lever mounting bracket has become loose.
- Natural wear of the transmission pair: gear-rack.
- Failure to adjust the gearing of the transmitting pair.
- Wear of ball joints of steering rods and so on.
If the gearing in the transmission pair is incorrectly adjusted, tight rotation of the steering wheel may occur. It is in this case that adjustment of the steering rack is required, and, naturally, adding or replacing oil (lubricant) in the steering rack housing.
How to adjust the steering rack with your own hands?
I would like to immediately warn you that tightening the steering rack may not solve the problem with play. The fact is that the degree of wear of the parts of the transmission pair: gear and rack is unknown to us and you. Only an autopsy can show this. We're talking about the first lift.
If tightening the steering rack does not bring the desired result and the play or knocking does not disappear, then you need to make an appointment with a specialist. But for now, let’s call a garage buddy (you’ll need a buddy to make adjustments) and start tightening it up.
Do-it-yourself steering rack tightening
- Adjustment is made by tightening the adjusting screw. It is located in the steering mechanism (in the end cover).
- The ideal option is if you have a hole in the garage or an overpass on the territory. If not, then you can tighten the rack using jacks. Naturally, having strengthened the car after lifting on persistent “goats”.
- Before lifting the body with jacks, the front wheels are aligned evenly (straight).
- The steering play is measured by a play meter (there are electronic ones, and there are also primitive old play meters). GOST of the Russian Federation states that steering play cannot exceed 10 degrees.
- We tighten the adjusting screw slowly, systematically checking the steering wheel travel and the presence of play or knocking in the column.
- If you think the problem has been solved, then conduct a road test. If during the movement, after tightening, you feel the “heaviness” of the steering wheel, then the adjusting screw will have to be slightly loosened.
The task of adjusting the steering rack is considered completed if: the play or knocking noise has disappeared, and the steering wheel freely returns to the center position.
Self-tightening of the steering rack on a VAZ-2114
In most cases, all work to tighten the play comes down to adjusting the steering wheel and selecting the play in the engagement. If the wear of parts is significant, then major repairs and installation of new spare parts cannot be avoided. The easiest way to check this is to tighten the steering wheel without removing it from the vehicle.
To adjust the rack, you need a special key, which is inserted into the adjustment nut located on the steering mechanism housing. It is possible to make a key yourself, but it is better to purchase it, since its cost is low, and you can find it in almost any spare parts store. Having your own wrench in your arsenal will make adjustments easier, and will be essential when disassembling the rack.
Adjusting the steering rack on a VAZ-2114: instructions for action
- The car is installed on an overpass or lift. You can, of course, adjust from the hood side, but in this case you will have to work almost blindly.
- The mudguard and crankcase protection are removed from the bottom of the engine.
- The steering rack is cleaned of dirt and visually inspected. There should be no traces of leaked lubricant on it, and no damage on the anthers.
- You should check that the rack is tightly attached to the engine shield; the steering rods at the point of attachment to the rack should not have any play.
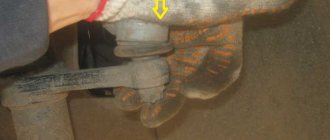
- Next, you need to find the steering rack adjustment nut and clean it of dirt. There is a plastic plug installed on it that needs to be removed.
- Using a special wrench, tighten the adjusting nut. In some cases, it is fixed with a core, so after adjustment you need to return the lock to its original position.
- The adjustment is made by tightening the nut all the way, after which the presence of play on the steering wheel is checked. If you need to exert a lot of force when turning the steering wheel, you need to loosen the nut a few degrees.
- After the nut is adjusted, it must be fixed to avoid spontaneous unscrewing.
After the play has been selected, it is necessary to make a test drive and make sure that the steering mechanism is working properly. If the steering wheel rotates freely and there is no play, the adjustment can be considered complete. If turning the steering wheel is uncomfortable, you need to loosen the nut a few degrees counterclockwise.
Replacement Guide
By performing the replacement procedure step by step, as described below, you will be able to quickly and easily dismantle the old part and install the new part. To do this, follow these steps:
- Place the machine on level ground.
- Lock the rear wheels and tighten the handbrake.
- Using a screw stand and a jack, raise the front of the car.
- Remove the front wheels.
- Unsplit the slats.
- Remove the fingers from the cone joint.
- Remove the bolts that secure the tie rods to the rack.
- Unscrew the bolt that secures the steering cardan.
- Remove the steering mechanism assembly.
- Place grease into the new rack, put on the boot and install it on the car instead of the dismantled one.
After installation, reassemble the entire assembly. Tighten the bolts. After the installation is completed, all that remains is to check how well the rail is fastened. You can ensure reliable fastening after approximately 300 km. If you continue to hear extraneous sounds in the area of the rack, this probably indicates the need to tighten the fasteners. Once installed, a new rail usually does not need to be replaced for a long time. The average service life of such a part is 100,000 km of vehicle mileage. Therefore, you definitely won’t have to change it often in your VAZ-2114 if you drive carefully and carefully avoid potholes on the roads.
Replacing the rack on a VAZ 2114 does not require special skills, just a certain dexterity, because many parts need to be unscrewed in very hard-to-reach places, where the presence of at least a ratchet is simply necessary.
Repair
To perform the repair, you will still have to disassemble the steering wheel. You can see detailed instructions in the material on replacing the steering rack.
Replacement process
Let's move on directly to the repair procedure.
- Remove the rail from its seat.
- Remove the thrust nut with a 17mm hexagon.
- Remove the thrust nut, remove the retaining ring, spring, and rack stop.
- First, the gear shaft boot is removed, after which you can easily get to the locking ring.
- Remove the nut that holds the gear bearing in place. Be prepared for the fact that it will be quite difficult to unscrew it; use some force. This is fine. It's worse if it practically doesn't hold on.
- The drive gear shaft is pressed out.
- The rail is removed from the housing.
- Next, remove the support sleeve, lubricate it and put it in place. It may take some effort to push it back.
- Replace all bearings present in the assembly. Some are difficult to extract, while others are almost impossible. But it needs to be done. If you cannot remove it at all, then cut the bearing with a chisel and remove it with pliers.
- Examine the condition of all surfaces, parts, and assemblies for any defects or damage.
- If you notice faulty elements, replace them using a repair kit.
- The design will have quite a lot of moving elements. Each of them must be lubricated with high-quality lubricant. Litol will perform well here.
- Reassemble by following the reverse disassembly sequence.
- You will definitely need help for reassembly. Therefore, agree in advance with a friend or someone else who can help you in this matter.
- Place the repaired rail in place and attach its fasteners.
- A rack is inserted into the spitz. This is where you will need an assistant. It is almost impossible to do this yourself.
- Use a chisel to loosen the clamps.
- Tighten all mounting bolts in place.
After assembling the unit, be sure to check it in action. Please note that after this you cannot operate the car in the previous mode. First, be sure to stop by a car service center where an alignment will be performed. Only after this can the repair of the unit be considered complete.
If you notice typical signs of a rack malfunction, do not delay repairing or replacing it. This can lead to tragic consequences when, at the most inopportune moment, the steering wheel stops responding to your efforts and you lose control of the situation. This is not an attempt to scare you, but a simple fact of life.
What could be causing the problem?
Let's look at each of the signs and what can cause them to appear. It should be noted that some problems, for example knocking, may not be related to the mechanism itself.
1. So, the free play on the steering wheel has increased, that is, it dangles more; the increased travel can additionally manifest itself in the appearance of a beating in the steering wheel when braking.
This problem may be associated with loosening of the ball pins to the stabilizer strut, increased clearance in the ball joints, or increased clearance between the rack and pinion.
- If play is detected in the steering wheel, first of all you should inspect the steering ball joints. It rarely happens, but it is possible that the nuts securing the tips have become loose and the pin has begun to come out of the seat, causing a significant gap to form at the mounting point. Fixing such a malfunction is simple, just tighten the nuts.
- Ball end wear is much more common, resulting in a gap between the pin and the body. This problem can be eliminated by changing the tips.
- Play in the steering wheel can be formed due to an increase in the gap between the rack and pinion. During the operation of this mechanism, these elements gradually wear out, and the gap between them increases. Repairing this problem comes down to an adjustment that just requires tightening the adjusting stop nut correctly.
2. A knock in this mechanism can be caused by play in the tips, an increased gap between the rack and gear, as well as loosening of the mechanism itself.
- As for the tips and rack clearance, the repair of the mechanism is indicated above, that is, just tighten the thrust nut and that’s it.
- Regarding the loosening of the fastening, it is enough just to tighten the nuts securing the clamps that hold the mechanism, and the problem will be solved.
3. Stiff rotation of the steering wheel can be due to damage to the support bearing of the shock absorber strut (the case when a problem with the suspension affects the steering mechanism), damage to the rack bushing, wedging of the steering tips, wedging of the steering gear bearings.
- In the case of a worn support bearing, the repair boils down to removing the support and replacing the bearing.
- If the reason for the tight rotation is the support bushing, then you need to put a new one in place of the damaged one, and lubricate the mechanism itself.
- If there are problems with the tips, they should be checked and replaced if necessary. The same applies to drive bearings.
Adjusting the wheel alignment with a caliper
It should be noted that after repairing many faults, adjustment of the wheel position (wheel alignment angles) will be required.
Step-by-step instructions for disassembling and assembling the steering rack of a VAZ 2115
1) At the very beginning of the operation, you will need to remove the rack from the car; you can learn more about how to do this in the article entitled: “Replacing the steering mechanism on a VAZ.”
2) Now, on the right side (end) of the slats, remove the support and spacer ring as shown in the first photo, immediately after this, use pliers to cut through the clamps that hold the protective cover in one place (see photo 2, these clamps are disposable), then remove the cover itself (see photo 3) from the rail, then on the other side (from the end) remove another support (Metal this time) and the protective cap, you can see this whole operation in the fourth photo.
3) Next, you will need to unscrew the same rack stop nut (see photo 1) with the same special key with an octagonal head of 17 (see photo 1) and remove it after unscrewing, immediately behind this nut there will be a spring (see photo 3), its You also need to remove it and put it aside, and use a screwdriver to pick up the retaining ring as shown in the last photo.
4) Next, take the rack in your hands and tap it on any board (knock with the crankcase until the stop falls out of the inside of it, see photo 1 for more details), then remove the O-ring of the front panel as shown in photo 2 , then take a screwdriver in your hands and use it to remove the gear boot (photo 3) and the lock washer (photo 4).
5) Then proceed to removing the gear that comes assembled with the bearing from the crankcase, it will need to be removed, to do this, first unscrew the nut securing the bearing of this gear (see photo 1) and then remove it from the shaft (Photo 2 shows), then you will need to take a mounting blade and use it as a lever for a wrench, that is, use a 14mm wrench to grab the flat of the gear (see photo 3) and, leaning the wrench on this blade, remove the gear together with the bearing from the crankcase (photo 4).
Note!
6) Now you will need to remove the steering rack itself from the crankcase, to do this, simply tilt the crankcase and the rack itself will fall out (see photo 1), then use a flat screwdriver to pry up the support sleeve and remove it from the crankcase as shown in photo 2, instead of this sleeve you will need to install a new bushing in this place, but before installing a new one, put new damping rings on it (see photo 3, when installing, make sure that their thin part is against the cut of the bushing) and then install the bushing in its place (see photo 4, carefully install the bushing and make sure that the protrusions do not stick out, everything should be clear and don’t forget to cut the rubber damping rings and remove their parts from the bushing).
7) Let's move on, now remove the retaining ring from the worm with pliers (see photo 1), then use a special puller to press out the ball bearing and thereby remove it (see photo 2), then proceed to removing the needle bearing, you will need either a special a puller, or you can stock up on improvised means, namely a hammer and a drill, with a drill whose drill diameter will be 2 mm, you will need to drill two holes at the end of the crankcase (As shown in photo 3) through which you will knock out the bearing, after After drilling, insert nails into both holes and hitting them with a hammer, remove the needle bearing from the crankcase as shown in the last photo.
Assembly: The entire mechanism is assembled in the reverse order of disassembly, but it is only important to know some points, namely wash the inside of the steering gear housing, in addition, lubricate the teeth at the rack itself as shown in the photo below with FIOL-1 grease, lubricate other teeth with the same grease at the worm (It is also called a drive gear, it is still assembled with a bearing) and lubricate both bearings with it, and fill the cavity above the drive gear bearing nut with UNIOL-1 grease and then assemble the entire mechanism in the reverse order
Disassembly
If you decide to carry out maintenance yourself, then you should disassemble it in order:
- We cut off or bite through the plastic clamps that are located on the sides of the protective casing. We remove it and inspect it for breaks or cracks.
- The side protective caps are also attached to the clamps. We carry out a similar procedure and remove them.
- Unscrew the adjusting screw with a 17 octagonal wrench.
- Then we take out the sealing and retaining ring, the spring and the stop. We check the emphasis for scuffs and other damage, since its condition directly affects its performance.
- Now we need to remove the steering gear boot. It sits tightly on the body and does not have any special fastenings.
- We take out the lock washer and unscrew the bearing nut. Then remove the o-rings. After the steering shaft.
- We check the condition of the bearing. In case of wear, we knock it down using an extension or a gentle blow with a hammer. We press in the new bearing using a yew or a press.
- Then we check the condition of the needle bearing. We take it out with a screwdriver, carefully lifting it up.
- We take the rail itself out of the body. We clean off the old grease and inspect the condition.
- The last step is to remove the bushing. To do this, use a screwdriver to move it from its seat and after that it can be easily removed.
At this point, the disassembly and inspection of elements for damage is completed and you can begin reassembling the mechanism. The video shows a do-it-yourself repair of a VAZ 2114 steering rack:
Steering rack diagnostics
The following factors will signal a part failure:
- The steering wheel has to be turned with more effort than before.
- When the wheels are pointing straight, there is play (free play) when turning the steering wheel.
- As mentioned above, knocking noises are heard from the front when cornering.
Such problems are not always associated with a broken rack. For a complete diagnosis, the part must be removed (the process will be described in more detail below).
After removal, the mechanism should be installed in the middle position (from the gear axis to the end of 87 mm). Afterwards you need to give a load of 500 N. Then the optimal distance is 84 mm.
The movement of the mechanism, measured through the relative movement of the pressure punch, is allowed no more than 0.12 mm.
Replacement
To work, in addition to the machine itself and new tips, you will need the following tools:
- Jack;
- A set of keys;
- Puller;
- Hammer and pry bar;
- Liquid key (WD 40, brake fluid);
- Calipers;
- Pliers.
Securely secure the vehicle before starting work. Place it on the handbrake and install wheel chocks under the wheels. A few hours before repairs, be sure to treat the threaded connections with a liquid wrench. The work is carried out in the following order:
- The car is raised on a jack. It is advisable to use a stand. This will prevent the car from falling. The wheel is removed;
- The steering wheel turns all the way to the other side. That is, if we are working on the left side, we need to turn the steering wheel to the right;
- The nut securing the tip is cottered. The cotter pin is pulled out and the nut is unscrewed with a “19” wrench;
- Using a puller, press out the lever pin. If you don’t have a puller, you can do this using a pry bar and a hammer;
- The length of the tip is measured with a caliper. This will avoid a trip to the service center to set the wheel angles;
- We unscrew the lock nut “27”, while holding the coupling itself with the key “24”. Often these elements stick. In this case, you need to carefully tap them with a hammer;
- Unscrew the tip. To do this, it is rotated counterclockwise;
- Lubricate the threads of the new tip with lithol and screw it on;
- We set the previously measured distance;
- We press the finger onto the lever, lubricate it, and tighten the nut. After which, the connection must be pinned.
It is advisable to check the wheel alignment. If you have measured the distance correctly, then you will not have any problems with this indicator. On the other hand, replacement is carried out in a similar way.
Steering rack bulkhead
To rebuild the steering rack of VAZ models, you need to acquire the following parts:
- Bearings.
- Bushings.
- Washers.
- Nuts.
Repair kit for steering rack
These elements can be bought as a set, it will be cheaper. If the shaft needs to be replaced, the cost will be higher. In order to qualitatively sort out the mechanism in question, it is additionally necessary to prepare lubricants FIOL-1 and UNIOL-1.
Bulkhead process:
- Wash the inside of the crankcase.
- Lubricate the support sleeve and install.
- Replace the bearings (pre-lubricate) with new ones.
- Lubricate the teeth of the rack and worm with FIOL-1.
- Then treat the cavity above the drive gear bearing nut with another lubricant.
Treating rack parts with lubricant
After these steps, you need to assemble the mechanism.
We repair it ourselves
To get started, you will need a set of tools and repair kits.
Be sure to include the following in your list of tools and materials:
- Repair kit for one of three configurations (more about them below);
- Bearings;
- Lubrication;
- Set of keys and screwdrivers.
Selecting a repair kit
Spare parts
As for repair kits, the standard minimum set includes four elements:
- Washers;
- Nuts;
- Bearings;
- Bushings made of fluoroplastic.
But is it enough for your specific steering rack situation? Let's try to understand the purpose and configuration of each of the three types of repair kits.
- The cheapest repair kit, the contents of which you are already familiar with, allows you to solve the most minor problems that have arisen with your slats.
- The middle kit additionally includes other bearings and shafts. Designed for more serious repair work.
- The most expensive repair kit may consist of whole new slats, that is, it involves not a repair, but a simple replacement of units.
When choosing a repair kit, it is important to make sure that it is suitable not just for repairing steering racks, but also for your specific VAZ 2114 car. Plus, it is important to know which rack is currently on the car. If this is not an original part, which happens quite often, then the repair kit for the “fourteenth” model will no longer be suitable. You need a kit that matches the vehicle the steering system part was taken from.
Adjustment
The adjustment is performed in this way: you can remove the rack from the vehicle or adjust it on it. The first method is used after repairing the machine, before installation. To simply adjust the rack, the work is done directly on the machine.
To carry out the work, you must have a 17 mm universal octagon and an adjustable wrench. All work related to troubleshooting is carried out on a lift or inspection pit:
- First, the car must be put on the handbrake, some kind of support must be placed on the rear wheels;
- Then you need to lock the steering wheel and turn off the power to the car’s on-board network (remove the negative terminal from the battery);
- Then you need to find the nut with which the steering rack is adjusted. It is located on the opposite side, facing the body, of the rack mounting side. Sometimes it is mistaken for another part;
- First you should wash the bottom of the car. In this case, use a suitable device (Kärcher, for example). This is done in order to clean the nut from a layer of dirt. After cleaning the part from contamination, a wrench is inserted into it to tighten the rack and its position is adjusted. The tool rotates clockwise.
Let's move on to adjustments
What is its meaning?
YES, everything is simple, this connector (nut) begins to tighten the bushings, which actually compress and compensate for wear. That means you can still drive for a while! Personally, after the facelift, I drove another 10,000 kilometers and then simply sold the car.
Where to carry out the work?
To be honest, each car (brand) is unique, for example, on many foreign cars the nut is visible from above, on others it is at the bottom (that is, the “head” looks down), in our VAZs it is also at the bottom. So - preferably a pit or lifts, or, in extreme cases, jacks - just be careful, the car must be well secured.
How to tighten up?
- We take a key (special or not - individually), select the connector, for example on our VAZ 2113, 2114, 2115 this can also be done by turning the wheels to the right all the way. And on the left side we begin to look for the connector.
- It will have a protective cap, usually made of rubber, remove it.
- We insert the key and make about ¼ of a turn no more, that is, 25% of the circumference.
- We get into the car and try to turn the steering wheel, if they move normally, there are no clamps or “biting”, then we try to drive the car.
- If the backlash is gone, then we leave it that way. We put the protective cap back in place; if the play remains but has decreased, then you need to tighten it more - again it adds about 25% of the circumference. And we repeat the procedure. We need to ensure that there is no backlash! On my VAZ 2114, ¼ turn of the key was enough.
Another thing I would like to note is that you shouldn’t tighten it too much when the steering wheel turns too hard! IT IS IMPORTANT! After all, you will simply kill your bushings, they will wear out very quickly - the steering wheel should turn exactly as before, the effort should increase by no more than 10%. The steering wheel just became tighter, but not heavy.
If the knocking goes away, it means that the whole problem was in the rack, you will ride a little more time, perhaps enough for 20,000 kilometers, but in fact the knocking is already a bell for repairs.
That's all the instructions, now watch the useful video instructions for our VAZ.