The service life of outer tie rod joints, also called tie rod ends, greatly depends on their original quality, driving style and smoothness of the road surface. In any case, these consumables have to be changed quite often, since the slightest play in the hinges is unacceptable. In addition to the sound, this has an extremely negative impact on the durability of the tires and the overall safety of driving.
The replacement procedure is quite simple and can be done independently, without the use of complex specialized equipment.
Checking the condition of parts
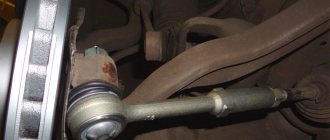
The presence of play in the connection must be checked during each maintenance of the machine. To do this, it is quite enough, with the suspension loaded with the weight of the car, to forcefully shake the steering rod with one hand and hold it on the tip with the other hand. If there is wear, you can clearly feel the play of the ball pin.
You can use a lever (mount), but there is a danger of mistaking the normal play of the spring-loaded pin for wear. Diagnostics by rocking the wheel has the same potential for errors; in this case, play will be selected in other parts and masking knocks will occur.
Installation procedure
- We measure the length of the old rod. You need to measure between the center of the bushing hole of the inner end of the rod and the center of the ball pin hole plug.
- We make the new rod the same length as the old one.
- Reinstall the rod in reverse order.
- Tighten the locknuts of the adjusting sleeve to a torque of 121–149.4 N·m (12.3–15.2 kgf·m).
- Tighten and cotter the bolt securing the rod end pin to a torque of 27.1–33.4 N·m (2.8–3.4 kgf·m).
- We bend the edges of the locking plate.
- We put the protective screen in place.
- After the work is completed, a wheel alignment needs to be done.
Working method
You need to do the following:
1. Hang up the car and remove the wheel, not forgetting to install a reliable safety stand.
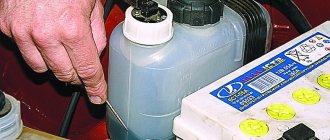
2. Clean the parts with a wire brush and spray the joints with a penetrating fluid such as WD-40 or equivalent. These are mixtures of white spirit with anti-corrosion and lubricating additives.
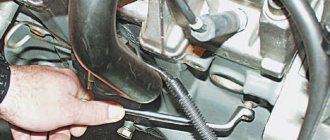
3. Loosen the nut securing the pin and the locking connection of the toe adjustment unit. One turn is enough. It is better to go through the thread of the pin nut several times until it rotates freely.
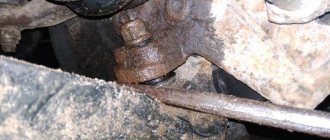
4. Install the puller onto the ball joint. Pullers come in different designs; it is most convenient to use a device in the form of a wedge fork; a couple of strong blows to its end are enough. The screw puller does not always cope on its own; it needs help with a sharp blow of a hammer on the bipod of the steering knuckle.
5. In the absence of a puller, you can create tension in the connection using the same pry bar, and then apply sharp blows to the edge of the bipod. The finger will detach with a characteristic click. All that remains is to unscrew the threaded end of the rod and install a new one.
The disadvantage of such a simple replacement is the need to immediately carry out operations to adjust the wheel alignment angles, as they say, wheel alignment. We must remember that replacing the tip does not affect the camber in any way, only the toe-in of the wheels changes.
If you approach the work carefully, have a sufficiently large caliper or tape measure, and understand the principles of toe adjustment, then additional costs can be avoided.
To do this, you need to perform the following operations with the highest possible accuracy:
1. Before starting to loosen the nuts, make two marks. The first should be located exactly in the center of the circle of the back of the ball joint. There are usually ring stampings or rolling. Their center must be calculated, at least using a caliper. In the found center, it is advisable to make a small depression with a light blow of a sharp core. Carefully check to see if there is any slight shift of the mark from the center. Repeat the procedure on a new tip.
2. On the steering rod, from the inside of the threaded connection, apply an annular mark lying exactly in a plane perpendicular to the axis of the rod. Smooth and neat.
3. Using a caliper or tape measure, measure and record the distance between the applied marks.
After installing the new tip, rotate the adjusting connection to achieve the same result. Lock the threads.
Despite the possibility of preserving the previously existing toe angles in this way, it will still be safer and calmer to visit the stand. The toe-in angle is quite accessible for measuring in a garage yourself; you can find various techniques in numerous tips from home craftsmen for repairing their own cars.
DIY rod puller
Many car owners, faced with the procedure of replacing steering linkages, begin to think about how to make a steering wheel end remover with their own hands. Of course, this device is very necessary, since it greatly simplifies the procedure for dismantling the rod. You can purchase a ready-made device, but it’s better to spend a few hours and make it yourself from scrap materials that are probably available in every garage.
The need to invent such devices arises during steering repairs, when there is an urgent need to remove a faulty rod, but there is simply no suitable tool. There is one more prerequisite for independent production. It is worth considering that a do-it-yourself steering wheel end puller will have a reliable design and will last longer than the factory one. In addition, you can choose the most optimal version of its implementation.
How can a puller make the process of removing steering linkages easier?
This is one of the main questions of interest to most motorists who have (or will have) to use this device. Alas, not everyone knows about the existence of such a device, which significantly extends the service life of the steering. In the absence of this tool, you have to use a hammer to dismantle the steering rods, and this will negatively affect the functioning of the entire system. Hitting with a hammer causes the rack to vibrate, causing its balance to be disrupted.
The barbaric method of dismantling the tips using a hammer takes a lot of effort and time. With this device, everything can be done in a matter of minutes. Thus, the work process is simplified and damage to parts is completely eliminated.
Tools and materials
To manufacture the device, you will need the following tools (the list is approximate and depends solely on the design and features of the puller):
- vice;
- taps and dies;
- welding machine;
- drill;
- Bulgarian.
For the device, you need to select suitable strong iron, several bolts and nuts. We will describe common puller designs that are popular among car owners when making them themselves. Note that in terms of functionality they are no different from factory devices, and even surpass them in many ways.
This design is considered the easiest to manufacture. The principle of its operation is based on the famous proverb “they knock out a wedge with a wedge.” A wedge-shaped puller is a thin plate of durable metal, which is thicker on one side. On the narrow side of the device there is a special groove for the finger.
Removing the pins of the steering tips using a wedge is carried out as follows: the thin side of the puller is hammered into the gap between the tip hinge and the steering knuckle with hammer blows. As the tool advances, the tie rod end will gradually release until the vengeance is completely pulled out of the ear. A wedge-shaped puller can be made from any durable metal sheet by drilling or grinding a groove for a finger in it.
Screw design
It is quite difficult to make a homemade puller of this type, since for this you need to have at least minimal knowledge and skills in welding, and, accordingly, special equipment. The principle of its operation is based on squeezing the pin out of its seat by the force created during the rotation of the bolt located inside the cylinder, one side of which has a cutout along its entire length.
You can make this device like this:
- In a metal rectangle with a wall thickness of 2-4 mm, it is necessary to make a cutout no more than 30 mm wide along the entire length of the side. Then process its edges to completely remove burrs and sand them.
- You need to cut a rectangle from a strong iron plate and drill a notch in it so that it completely coincides with the cutout on its side.
- The manufactured part is connected by welding to the end part of the rectangle.
- The next part of the puller will also require a strong iron plate, at least 5 mm thick.
- A circle is cut out of it, a hole is drilled in the middle, after which a thread is cut into it using a tap.
- This part should be welded to the free end of the cylinder.
- We select a bolt suitable for the diameter of the hole and screw it in. The device is ready for use.
With the bottom side with the groove made, the puller is fixed to the end of the rod so that the bolt is on top of the pin and presses on it when tightened. Due to the force created, it will easily leave its seat.
Source: https://crast.ru/instrumenty/semnik-tjag-svoimi-rukami
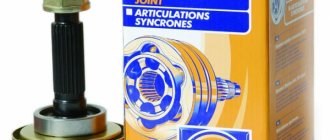
What are the best steering tips for the VAZ 2114
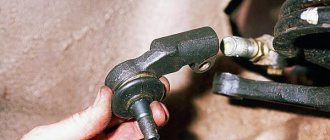
Tie rod ends are steering control elements that are present on every modern car. The VAZ 2114 model was no exception.
The purpose of the tie rod ends is to provide a connection between the linkage and the steering knuckle of your car's wheel. When the tips move, the steering rack rods move, turning the wheel. In essence, steering tips provide the ability to make maneuvers, turns, and change the direction of movement of the car.
Element appearance
Required Tools
To replace the steering tip, you must prepare the following tools and accessories:
- jack;
- a wheel wrench for unscrewing the wheel mounting bolts;
- hammer;
- crowbar or pry bar;
- metal brush for cleaning parts;
- WD-40 lubricant;
- calipers;
- set of heads and open-end wrenches;
- graphite lubricant.
Experienced motorists carry this set of tools in the trunk; it can come in handy on the road.
Signs of breakdown
Tie rods have two main enemies.
- Dirt. PH are hinged parts, therefore, when the boot is damaged, various solid particles of debris, dust, and dirt begin to enter the mechanism. Friction occurs, parts begin to wear out faster, and moving components are destroyed.
- Bad roads. How many bumps, holes, curbs do you have to overcome every day? All these impacts negatively affect the condition of the tips - the hinge begins to actively wear out, and play occurs in the vertical direction.
If a tip is found to be faulty, it must be replaced. It is better not to do with restoration and restoration of functionality.
Many people are interested in the question of how you can check the steering tips and make sure they are worn out or, on the contrary, intact. It is not necessary to go to a service station and pay money for this.
To check the condition of the LV, you need to turn the wheel all the way in one direction and remove all dirt from the boot. If there are breaks or cracks in the rubber, then the part has worn out and no longer performs its functions properly. Do subject to replacement. The second wheel is checked in a similar way.
There is one more important measure that is recommended to be carried out even if there are no signs of wear on the launch vehicle. To do this, a pry bar is inserted between the steering knuckle and the rod, after which the parts are moved relative to each other. If no vertical play occurs during these manipulations, everything is fine. If it is, you will definitely have to change the component.
Suzuki Grand Vitara immobilizer problems
Good morning/afternoon/night, dear subscribers and readers of my car stories. On the agenda of the day, a story about a rather atypical case with a 2013 Suzuki Grand Vitara. A client contacted me with a complaint that while driving in the yard, the car stalled and stopped starting. After some time the car started again, but the problem reappeared. Looking for floating faults is such a pleasure, but if you look only for minor faults you will not gain experience. So let's get started.
Based on the input data, we analyze the situation. The car stalled while driving and the customer claims that after trying to start it again, he noticed that the immobilizer light began to flash. In my experience while driving, the immobilizer cannot block and turn off the engine for safety reasons. Let's say you are driving along the highway and then problems arise with the immobilizer and the car stalls. In my experience, cars with immobilizer problems did not stall while driving, but let’s return to the car. Arriving at the car, I begin diagnostics with fault codes. I connect through an adapter that controls the voltage and notice a strange thing: the voltage shows 3 volts. I connect the launch and the voltage becomes 12 volts and somehow I gave up on it. I go to immo and see an error
P0620 - GENERATOR CONTROL CIRCUIT
p1623 - UNREGISTERED TRANSPONDER
Strange. While the device was connected, the car started and everything was ok, but as soon as I disconnect the launch, the car stops starting. Selling him the device and leaving was the worst idea.