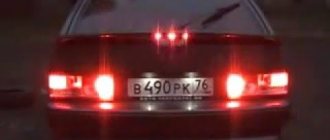
Rear lights on VAZ 2114 do not light up
When both side light bulbs on one side of a car, left or right, fail, the reason is always clear. The fact is that the safety block contains one fuse responsible for each side. It is necessary to replace the corresponding fuse and the problem will be eliminated.
At the same time, there is a constant discussion on the Internet on forums about whether the front lights on a VAZ 2114 don’t light up or why the rear lights on a VAZ 2114 don’t light up. Quite a lot of opinions and different experiences are expressed. If we summarize all this, we can draw the following conclusions.
The side lights of the rear hemisphere are located in the rear light block, in which a generally recognized disease is constant oxidation and corrosion of the contact groups. For preventive purposes, it is necessary to constantly monitor this board.
The same is possible on the contacts of the front headlights. Nevertheless, from practice there are cases when, when checking the performance of light bulbs, it turned out that they burned out on both sides at the same time (maybe one by one, but the driver did not notice this in time). At the same time, the amateur master checks everything, just not the light bulbs, claiming that the probability of simultaneous failure of the lamps is absolutely minimal. But auto electricians first check the lamp and contact.
Like all not new cars that have been removed from the production line a long time ago, second-generation Samaras are subject to minor breakdowns over the years, which, among other things, affect lighting devices. For this reason, many drivers are faced with the fact that the rear lights on their VAZ 2114 do not light up, which can lead to dangerous situations on the road if the problem is not solved in time.
Tips for motorists
According to these Rules of the Road, on any moving vehicle, including the VAZ-2114, the headlights must be turned on, along with which the side lights must also be turned on. In addition, they must be turned on when the car is stopped or parked on the road in the dark and in conditions of insufficient visibility. Therefore, they must always be in good working order.
The electrical circuit of the side lights of the VAZ-2114 is not so complicated and, if desired, any self-respecting driver will be able to find a malfunction associated with the failure of its operation. To do this, you need to know that terminal No. 1 of the side light switch is always supplied with positive voltage from the battery, bypassing the ignition switch. If the side light switch key is in the on position, then electric current flows to two fuses F10 (7.5A) and F11 (7.5A), which respectively protect the electrical circuits of the left (F10) and right (F11) side lights. The further path of the current lies to relay K4 (lamp health monitoring relay), and then to the front and rear side lamps.
When only one of the side light bulbs does not light, then we check whether it has burnt out. If it burns out, then we replace it with a new one of similar power, but if it is intact, then we will have to look at the condition of the contacts of the cartridge in which it is inserted. In the rear lights, due to moisture getting into them, oxidation is possible, both of the tracks and the pads through which voltage is transmitted to the terminals of the side light lamp.
Another reason why the headlight lamp does not light up may be the lack of voltage at the corresponding terminals of the rear light blocks or headlight blocks. Then, using a tester, you will have to ring the corresponding wires:
- The right front marker does not light up (check the yellow wire from terminal No. 4 of the headlight to terminal No. 8, block X6 of the mounting block);
- The right rear light does not light up (check the yellow wire from the right rear light block to terminal No. 9, block X9 of the mounting block);
- the left front marker does not light up (check the yellow-black wire from terminal No. 4 of the headlight to terminal No. 10, block X6 of the mounting block);
- the left rear light does not light up (check the yellow-black wire from the right rear light block to terminal No. 17, block X9 of the mounting block);
One or all vehicle license plate lamps do not light up
The design of any car provides lamps for illuminating the rear registration number. These low-power bulbs turn on together with the side lights and are designed to ensure the readability of the vehicle’s license plate at night. At the same time, there are no lamps for illuminating the front license plate. It’s good when all the car’s devices are working as normal, but we are interested in the question of which motorist will be fined for non-working license plate lamps.
Let’s say right away that if a lamp burns out while driving, but the owner is physically unable to control the operation of the rear light devices from the passenger compartment, this will not be a reason for not bringing the driver to administrative responsibility. Therefore, there is no particular point in proving to the traffic police inspector that the malfunction appeared two minutes ago.
Installation, connection and adjustment of PTF
Depending on the type of fog lights, installation may be simpler or more complex. It is easier to install PTF where there are already places for installation and are simply covered with plugs. If there are no such places, then they will need to be cut or drilled. In the case of VAZ, some owners also sometimes change the entire bumper (for example, from 2115 with holes for PTF).
If we talk about connection, according to traffic regulations, fog lights should only be turned on together with the side lights. The PTFs themselves must be connected via a relay, suitable wires must be used, and there must be a fuse in the circuit. If you have certain skills, you can install the PTF yourself in a regular garage.
As for adjusting the PTF, this option is not provided on many cars. In the case where headlight adjustment is required on non-adjustable PTFs due to the fact that the fog lights are blinding or do not shine on the road, special gaskets are used to change the tilt angles, overlays are installed, etc. By the way, to adjust the light, you need a special stand, with the help of which you can adjust the low and high beam, as well as the PTF.
What lamps are in the dimensions of the VAZ 2114
The standard equipment of VAZ 2114 cars includes installation of the following lamps in the dimensions and front/rear headlights:
- Front dimensions – W5W;
- Stop lights/side lights – P21/5W.
Recently, users are increasingly replacing standard light bulbs in the dimensions of the VAZ 2114 with LED ones, since they have a much longer resource, consume less energy and shine with a beautiful color. In order for the diodes to produce spectacular side lights with a bluish tint, weak 1-5 diode lamps are not suitable. It is better to use 12-15 diodes.
They will give a bright white glow in the daytime, and in the dark this glow will be blue-white. It is advisable to replace all side lights, or at least the front or rear lights on both sides, with such lamps at the same time. In this case, the car looks organic, and the difference in the shades of the glow of the dimensions will not mislead other road users.
Electrical Problems
#1 msdancer
- Users
- 1 messages
- 0 thanks
- Car: vaz 21053
- Top
- Answer
- Quote
- Insert nickname or quote
#2 Brigadier
- City of Odessa, Ukraine
- Car: VAZ 210700-20
- Top
- Answer
- Quote
- Insert nickname or quote
#3 auto electrician_52
Lord of the spark / Honorary comedian of the club
- City of vases, vases,
- Top
- Answer
- Quote
- Insert nickname or quote
#4 SYAVA58
- Car: VAZ2107
- Top
- Answer
- Quote
- Insert nickname or quote
#5 LADAlub
- Moscow city
- Car: LADA 21043, VAZ 2101
- Top
- Answer
- Quote
- Insert nickname or quote
#6 Toxa
- City of Domodedovo
- Car: VAZ 2114
- Top
- Answer
- Quote
- Insert nickname or quote
#7 Vitaliy2008
- Protection against spam bots: 730
- City of Gatchina Len. region
- Car: BMW 730 i burned out after a crooked repair, sold VAZ 21043 sold, BMW X3 E83 2005 I'm driving now
American forum question = answer Jewish forum question = question Russian forum question = you listen for two days what a moron you are and then maybe they will answer Ancient Chinese wisdom says: “NI SY!”, which means: “Be serene, like a lotus flower at the foot of the temple of truth »
- Top
- Answer
- Quote
- Insert nickname or quote
Design of the rear lights of the VAZ 2114
In order to carry out repairs, diagnose and eliminate emerging problems, it is necessary to understand the design and diagram of the rear lights of the VAZ 2114. The rear light design consists of three main elements: - the rear cover; — boards with fasteners, connections for connecting light bulbs; — external decorative cover, light diffuser.
Wiring diagram for components (lamps): 1. direction indicators; 2. overall glow; 3. signaling (brake lights); 4. foglights; 5. designations for reversing.
Causes of breakdowns
The most common reasons for node failure:
- the narrowest point in the entire structure is the elastic board;
- in second place, banal burnout or mechanical damage to light bulbs;
- the third reason is a problem with the fuse or relay;
- oxidation of contacts;
- broken wiring.
First of all, it makes sense to check those elements that do not require removing the entire headlight (for example, fuses, relays). Then check the quality of the connections, the presence of oxidation and the voltage supply level to the illuminator. The last step is to disassemble the taillight, remove and inspect the board.
How to make a diode ring
In order to make a taillight based on a diode ring, you will need the epoxy-based adhesive mentioned in this article. The basis for creating a lighting device will be the diode rings themselves or the LED strip. The headlight housing will be made from large or small reflectors, which are quite easy to find on the market if desired. You will also, of course, need paint (you can choose based on your personal aesthetic preferences). Most often, to work with VAZ 2114 cars, a coloring agent with a chrome-plated tint is used.
To make a lighting device, follow this algorithm:
- first of all, mount the diode rings in tin cylinders prepared in advance (as a rule, cans left over from drinks or food are used);
- in jars - carefully cut out the holes so that they look like wells. In this case, there should be two wells: external and internal. If, for example, a jar is suitable for an external well, then the internal one can be simply and cheaply made from a painted half-liter plastic glass;
- install one standard Soviet-made reflector in each internal well. They, among other things, must create illumination in accordance with the standard scheme: orange conductors, white reversing lights, red fog lights. After this, a large reflector may contain a certain number of elements that will look quite advantageous inside the module. The entire remaining space can be decorated with an LED ring;
- install diode ring reflectors. At the same time, in order for their adhesion to the body to be normal, you will need fixing ribs made of a substance such as epoxylin;
- glass can be equipped with additional surfaces, also secured with epoxylin.
If this algorithm is performed correctly, tuning the VAZ 2114 can be considered complete.
Why does the right rear light on the VAZ 2109 not light up?
Best site news
Any car, according to today's standards of traffic regulations, must be equipped with a certain set of lights of various colors and sizes. This includes brake lights, low beam and high beam headlights. But the most interesting are the dimensions:
- Front right and left;
- Likewise the rear ones.
Tail lights
The engineers positioned them so that they could be seen from any side, that is, from each side of the car. Their purpose is to notify drivers about the presence of a car in a particular place with constantly burning yellow lights. In addition, side lights must be turned on along with low beam headlights when driving according to today's traffic rules. Accordingly, their absence entails the imposition of a fine, so it is necessary to monitor the condition of the dimensions regularly, and repair breakdowns in a timely manner. Let's figure out why the dimensions of the VAZ 2114 do not work and how this issue can be resolved in any case.
Technical device
In some situations it happens that the rear dimensions of the VAZ 2114, in other cases only the front ones, but their structure and operating principle are identical. The side lights are located in the turn signal housing, while the front and rear lights find a place in the headlight housing in the same area. There is a special button for the side lights, which allows you to control them; next to it are the headlight switches and. When the driver touches this button and turns them on, at the same time the corresponding light on the dashboard lights up, which will not allow the driver to forget about the action taken.
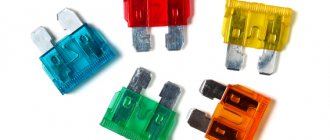
Circuit breakers
To protect against voltage surges and other influences on the electrical component, more lights are included in the circuit along with the light bulbs and the button. At the moment of overvoltage, it burns out, but due to this everything else in the circuit remains intact. He found a place in the engine compartment, where in the VAZ 2114 he found a place for a whole fuse block for all electrical networks in the car.
Since all of them have markings, we can easily find the parts that we need: F10 is responsible for the safety of the lamps on the left side of the car, and F11 for the right. Thus, in the event of a failure of one half, for example, when the rear left indicator does not light up, the right side of the car will remain operational and will do its job. And if the size fuse blows, then replacing it is, in principle, quite simple - this is considered the simplest malfunction of this kind.
Diagram and location of fuses on the VAZ 2114 (also on 2113 and 2115)
Malfunctions and their elimination (rear and front dimensions)
Now we just have to figure out why such problems occur and how to solve them, for example, how to replace a side lamp on a VAZ 2114 in any part of the car. So, first of all, let’s figure out why the lights don’t light up and what reasons there could be for this:
- No voltage on headlights;
- The lamps are burnt out;
- The fuse has blown;
- The fuse box has failed;
- The button to turn on the lights is broken.
So, now we need to understand each specific option in more detail, for example, why the left rear light does not light up. The first and most logical reason is that the lamp simply expired and burned out, just as happens with ordinary household light bulbs. Now it needs to be replaced; this is done in the same way in all parts of the car:
- First you need to find where the collar guard is located from the inside and remove the protective cover; on the VAZ 2114 it is clearly written on it how this is done. Everything will come out together with the base;
- Now you need to find the size in the base and carefully pull it out;
- We take out the lamp, it is simply inserted here with a latch;
- We insert the new one so that it clicks and assemble everything in the reverse order.
As for the fuses, if the rear right indicator light does not light, then in order to do without special tools and diagnose the cause, you just need to replace the suspicious fuse with a new one and see if the situation improves. If the lamps light up, then it was the problem, but if not, then you will have to look for the cause further.
PRICES OF COMPONENTS
There is also a separate section for prices for all the parts that may be needed when repairing this part of the car, because if the side lights on a VAZ 2114 or the fuses have blown, they will still have to be replaced with new ones. In any case, all the components are quite cheap, all we might need:
- Marker lamp;
- Fuse;
- Power button;
- A whole fuse block.
Today, an ordinary white light bulb costs up to 30 rubles; of course, the price depends on the individual pricing policy of a particular seller. Individual fuses can be selected for up to 50 rubles, unless, of course, you want to install a higher quality option. Button, if you look for exactly the same one as the original one, you will have to pay up to 300 rubles. In some situations, more serious problems may arise and you will have to change the entire unit, this is quite an expensive proposition, together with all the wires it will cost up to 1000 rubles.
Based on this, we can say that you need to carefully monitor your car and try to avoid any serious malfunctions; if something breaks, fix it right away, don’t start it.
Article 2: How to correctly replace the fine fuel filter on a VAZ 2114
Possible causes of malfunction
1. The lamp is faulty. The most common reason why the rear lights on a VAZ 2114 do not light up is that the lamp in the lamp has burned out. This diagnostic sign is relevant if only one gauge does not work. In this case, it is enough to replace the burnt out lamp. 2. The fuse has blown In the case when several dimensions fail at the same time, the reason for this may be problems in the mounting block, to be more precise, in fuse F10. The breakdown of this fuse often leads to the fact that the dimensions of the VAZ 2114 do not light up. In this case, there may also be problems with the lighting of the interior and license plate lights, as well as the dashboard. 3. The contacts are faulty or oxidized. To exclude this cause, you will have to check the entire fuse box. In particular, you should carefully inspect the bus terminals leading to the fuse and relay box. It happens that they oxidize or become detached and therefore make poor contact. Here you will need to disconnect the contacts, clean them and connect them. If after this the rear lights of the VAZ 2114 or 2109 still do not light up or if there is a problem with the front lights, you will need to check the contacts on the headlight unit. Maybe the contacts have oxidized there. 4. The power button has stopped working. The reason why the rear lights of a VAZ 2114 or 2109 do not work may be a completely typical problem: a breakdown of the switch (button) itself. If everything is fine with the button, you should check whether the wire is oxidized. Otherwise, the contact will need to be cleaned. 5. The size fuse is on. If the fuse is constantly burning, it is possible that there is a poor contact in the fuse box or a wire is shorted somewhere. In this case, you should check it: connect a 12 Volt light bulb to its contact (via + and -). If the lamp lights up, it means there is a short circuit somewhere. To find it, you will have to turn off all devices operating in conjunction with this fuse one by one. To do this, you will have to check the wires going to the license plate illumination on the trunk roof. Usually these contacts are frayed and shorted. Another weak point, which is why the dimensions of the VAZ 2114 or 2109 do not work, may be in the cable located at the driver’s left foot on the back side of the wing under the mat. By disconnecting this cable, the license plate and interior lamp lighting are also disconnected. If after disconnecting the loop the lamp on the fuse goes out, it means there is a short circuit in this loop. In this case, you will need to inspect the entire wiring circuit in this node.
Replacement process
The rear lights are attached to the body of a VAZ 21099, 2108 or 2109 car using 4 nuts. To dismantle the lighting system you will need:
The operating algorithm is as follows:
- To access the nuts, remove the 21099 luggage rack at the appropriate location (if the rack is installed).
- Disconnect the power plug that is attached to the board.
- Unscrew the 4 nuts using a wrench.
- When removing the last nut, hold the taillight outside to prevent it from falling and breaking.
- After removing all 4 nuts, remove the light.
When installing a new headlight on the rear of model 21099, do not forget to connect the wiring to ground, which is attached to one of the studs.
In such cases, the ride becomes quiet, calm and relaxed, but how everything changes when at least one light bulb burns out. This causes inconvenience and emergency situations, and you can also get a fine from a road service employee.
The dimensions on the VAZ 2109 do not light up, then look for the reason in the wiring. Even experienced drivers recommend carefully checking the functionality of all devices and components before leaving. The nine is no exception, in which optics can often fail for various reasons, including:
The rear lights (headlights) of the VAZ 2108, VAZ 2109, VAZ 21099 have the following bulbs: 1) Brake lights. 2) Dimensions. 3) Reverse. 4) Turns. 5) Fog lamp.
Rear light board for VAZ 2108, VAZ 2109, VAZ 21099
A wiring harness goes from the mounting block to the rear lights. The purpose of each individual wire in the harness can be understood by its color: 1) Brake lights - red 2) Dimensions - yellow 3) Reverse - green. 4) Turns - blue. 5) Fog light - orange-black.
We remove the connector from the rear light board of VAZ 2108, VAZ 2109, VAZ 21099
Naturally, you need to understand that if the car VAZ 2108, VAZ 2109, VAZ 21099 is old and there are a lot of people doing the wiring, then the color match of the wire to its purpose may be violated. That is, the red wire can be converted not to brake lights, but, for example, to dimensions. But in general this is a very important point: the developers of the VAZ 2108, VAZ 2109, VAZ 21099 specifically marked the functional purpose of the wires with a certain color to make it easier to use.
Flashlight board VAZ 2108, VAZ 2109, VAZ 21099
If some light signal in the taillight of a VAZ 2108, VAZ 2109, VAZ 21099 does not work, then before climbing into the mounting block and opening the electrical circuit, we check the following: 1) The reliability of fastening the mass of the taillight to the body of the VAZ 2108, VAZ 2109, VAZ 21099.2)
We check the reliability of fastening the wire connector to the headlight. 3) Integrity of the light bulb 4) Quality of contact between the light bulb and the flashlight board. It often happens that everything is intact, the light bulb and the mass are good, and 12 Volts come to the light bulb, but it does not light. The reason is poor contact between the light bulb and the board. In this case, you need to clean both the light bulb base and the area on the lantern with fine sandpaper.
As one smart person said: “Electrics is the science of contacts.” To disassemble the rear light of a VAZ 2108, VAZ 2109, VAZ 21099, first remove the protective plastic cover. Then disconnect the black wire of the flashlight from ground. Then we remove the connector from the flashlight board and remove the board itself with the bulbs from the headlight housing. If it is necessary to replace the headlight itself, then unscrew the remaining bolts securing the headlight to the car frame and remove it.
Dimensions of VAZ 2114
The side light signals on second-generation Samaras, which include the VAZ 2114, are located in accordance with the regulations in front and behind the car, two lights on each side of the car, closer to the edge, next to the turn signals.
- The front side lights are white, the rear lights are red. The front ones are located in the headlight block, the rear ones are located in the taillight block.
- The side lights are turned on and off by pressing the “side light switch” key, which is installed in the exterior lighting switch block. The keys are located in the central part of the instrument panel above the on-board computer display. When the side lights are turned on and the side light bulbs come on, a green indicator lamp lights up on the button.
- There is a side light fuse installed in the side light circuit. It is located in the mounting block located in the engine compartment under the hood. There are two fuses, one for each side of the side lights. Fuse F10 is located in the circuit of the left side dimensions, it also controls the operation of the warning lamp on the instrument panel, fuse F11 is the right side dimensions.
Lighting devices
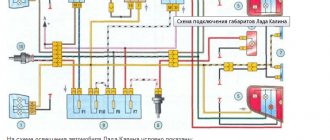
7.18. Scheme for switching on headlights and fog lights: 1 – block headlights; 2 – mounting block; 3 – headlight switch; 4 – ignition switch; 5 – external lighting switch (fragment); 6 – fog lamps in the internal rear lights; 7 – fog light switch with control lamp; 8 – indicator lamp for high beam headlights in the instrument cluster; K8 – headlight high beam relay; K9 – relay for low beam headlights; A - the order of conditional numbering of plugs in the headlight block; B - to power supplies
To turn on the headlights, relays of type 90-3747-11 or 904.3747-10 are used, installed in the mounting block. The same relays are used to turn on the sound signal, heated rear window and the electric motor of the engine cooling fan.
The relay switching voltage at a temperature of (23 ±5) °C is no more than 8 V, and the winding resistance is (85 ±8.5) Ohm.
The headlight switching circuit is shown in Figure 7.18. The high and low beam headlights are switched on using auxiliary relays K8 and K9. The control voltage to the relay windings is supplied from the headlight switch 3 if the right button of the external lighting switch 5 is pressed.
Regardless of the position of the switch keys 5, you can briefly turn on the high beam headlights by pulling the headlight switch lever 3 towards you. In this case, voltage is supplied to contact “30” of switch 3 from contact “30” of ignition switch 4.
7.19. Scheme for switching on fog lights: 1 – fog lights; 2 – relay for turning on fog lights; 3 – mounting block; 4 – switch for fog lights with a control lamp (on the left) and a backlight lamp (on the right); 5 – external lighting switch (fragment); A - to power supplies; B - to the instrument lighting regulator
On cars in a variant version, fog lights can be installed in the front bumpers. The diagram for switching on fog lights is shown in Figure 7.19. The headlights are turned on by switch 4 using auxiliary relay 2 type 113.3747-10 installed in the engine compartment on the left mudguard. The fog lights can only be turned on if the exterior lighting is switched on with switch 5.
7.21. Scheme for switching on direction indicators and hazard warning lights: 1 – direction indicator lamps in the headlights; 2 – mounting block; 3 – ignition switch; 4 – alarm switch; 5 – side direction indicators; 6 – direction indicator lamps in the external rear lights; 7 – instrument cluster with turn signal indicator lamps; 8 – direction indicator switch; K2 – relay-interrupter for direction indicators and hazard warning lights; A - to power supplies
The diagram for switching on the direction indicators and hazard warning lights is shown in Figure 7.21. The turn indicators on the right or left side are turned on by switch 8. In emergency mode, switch 4 turns on all turn indicators. The blinking of the lamps is ensured by the relay-breaker K2 in the mounting block.
The domestic car VAZ 2114 (Samara-2) is built on the VAZ 21093 platform and is an improved version of it. The interior features a new instrument panel, a new steering wheel, an adjustable steering column, power windows and a new heater. All diagrams are taken from open sources and are intended to help in self-repair of the electrical equipment of this car. Enlarge images by clicking. The VAZ 2114 fuse box is located in the passenger compartment under the dashboard. When checking the electrical circuit of a VAZ-2114 car, you cannot check the serviceability of the circuits for a “spark” - this can lead to burnout of the current-carrying paths of the mounting block.
How to Change the Dimensions Light Bulb on a VAZ 2110
Installation, repair and replacement of front and rear dimensions of the VAZ 2110
The SDA clearly states that it is not possible to drive in the dark or in poor visibility conditions without the dimensions included on both the front and rear of the vehicle. Today we will look at how the dimensions are placed on the VAZ 2110, what could be the cause of the breakdown, and how to fix them.
Vas 2110 with markers and DRLs
Business date, meeting
The front dimensions are called headlights and are found in the headlights in front of the car on either side of it. They are extreme on the sides of the lighting system and their name comes from the fact that they show the size of the car and the width of oncoming cars.
Various options for side and daytime lights
The rear dimensions are designed for the same mission. for you to move on. This is especially true when overtaking if you don't want someone who didn't make the real size hit your Swallow.
Adjustable position of rear lights
This is an important tip: if you suddenly have to go at any cost and you get burned, the flask cannot be replaced with a new one in the left dimension, due to its absence, do not be lazy and move it to the right. And we will tell you how to do this.
READ How to Start a BMW If the Battery is Dead
device
Headlights (front dimensions) are part of the headlight. The rear dimensions are part of the rear light of the VAZ 2110, this is one of its sections. Nearby are the rear fog lights, tail lights, turn signal, reflector, brake light and size.
Causes of breakdowns
There can be many reasons for malfunctions. The most common is that the lamps are on, which naturally prevents the side lights from turning on. Particularly unreliable in this regard are the lamps brought to us from the Middle Kingdom.
Detailed description of the submersible lamp High beam, rotation and dimensions
Do it yourself.
REPLACING HEADLIGHT BLANKS BASED ON VAZ 2110, 2111, 2112
REPLACING TUBERS
Front side lights VAZ 2110
, 2111, 2112. REPLACEMENT OF LAMP
OVERALL DIMENSIONS
OF LADA.
Although they attract more than the “democratic” price, and at any wholesale outlet, you cannot encounter them. Therefore, it may be worth mentioning the saying that we are not such rich people that we buy cheap things twice.
READ Change Timing Belt on Ford Focus 2
Good branded light bulbs will last several times longer, and you won't have to change them forever.
Bulb Dimensions
Sometimes the dimensions “blink” or the instrument panel lights flash when they turn on the parking lights. Many blame this size on the relay but can't find it. The VAZ 2110 carburetor does not have a side relay, there is only a relay for high and low beams.
For a vehicle with an injection relay, locate all fuses in the mounting block. Moreover, if the relays light up one after the other, you should immediately contact an electrician as this indicates a short circuit somewhere in the circuit and therefore a burnt out vehicle.
Mounting block and relays and fuses
Never, under any circumstances, replace a blown fuse with a larger one, or one that is not a “fault” at all.
Repair
As already mentioned, it is prohibited to move the car in the evening or at night unless it is on fire. parking lights so we will look for the cause and then fix it.
If you are sure the electrical paths are working, first make sure the bulbs haven't burned out. And if they need replacement, do it.
READ How to Change the CV Joint Boot on a Renault Logan
For the headlight, the replacement procedure is as follows:
- Open the lid;
- Disconnect the battery, or better yet, remove it. We're talking about electricity, which is dangerous;
- From the engine compartment, take the lamp with your hand, disconnect the wires going directly to the lamp from the unit;
- Remove the rubber cover;
- Move the lock to the side by unhooking the spring using the hook;
- Take this flask;
- We replace it with a new one and put everything back together.
When replacing, make sure the main lights are on.
Rear marker lamps on the VAZ 2110 are installed as follows:
- Turn off the car;
- Remove the contact part from the body side (open) the epiphany with the lamps. To do this, press the latches;
- Take this flask, replace it with a new one.
Remember that bare hands cannot touch the halogen lamp. Replace gloves. The fact is that when you touch the light bulb there will be dark spots. Moreover, this has been proven. This bulb burns out much faster.
1.9. Replacing light bulbs
| GENERAL INFORMATION |
Low and high beam bulbs
Low and high beam bulbs, as well as side lights, are accessible from the engine compartment.
| EXECUTION ORDER |
| 1. Remove the housing from the rear of the headlight by turning it counterclockwise. |
| 2. Disconnect the electrical connector (B). |
| 3. Remove the light bulb mounting spring (A). |
| 4. Turn the bulb holder counterclockwise and remove it from the headlight. |
| 5. Replace the light bulb. |
| 6. Insert the light bulb holder into the headlight socket and secure it by turning it all the way to the right. |
| 7. Install the mounting spring and wire connector. |
| 8. Check that the light bulb is functioning correctly. |
| 9. Attach the housing to the back of the headlight. |
| Warning Do not touch the glass part of light bulbs, especially halogen ones, with your fingers. Otherwise, before installing the light bulb in the socket, it should be washed with an alcohol solution. |
parking lights
| EXECUTION ORDER |
| 1. Remove the housing from the rear of the headlight. |
| 2. Remove the bulb holder (under the low and high beam bulb holder). |
| 3. Replace the light bulb. |
| 4. Insert the holder into the slot. |
| 5. Make sure the light bulb socket is securely seated. |
| 6. Check the installation and operation of the light bulb. |
| 7. Attach the housing to the back of the headlight. |
High beam headlight bulbs
Some vehicle versions are equipped with high beam headlights with halogen bulbs.
| EXECUTION ORDER |
| 1. Remove the cover mounting bracket (A) and remove the headlight cover. |
| 2. Compress the spring (B) securing the light bulb and move it away. Remove the bulb (C). |
| 3. Disconnect the wire connector. |
| 4. Connect the new bulb to the electrical connector and insert it into the headlight. |
| 5. Install the light bulb mounting spring. |
| 6. Install the cover and mounting bracket. |
Front direction indicators
| EXECUTION ORDER |
| 1. From the rear side of the bumper, move the fastening clip outwards. |
| 2. Remove the front turn signal bulb from the bumper; on the Ghia version, the front turn signal bulb is held by a lever located under the upper bumper mount, which must be pushed outward to remove the bulb. |
| 3. Turn the front turn signal bulb holder to the left and remove it. |
| 4. Press the light bulb, turn it to the left and remove it. |
| 5. Install the new bulb in the holder by turning it to the right, and then secure the turn signal, performing the above steps in reverse order. |
Back light
The tail light bulbs are located in a holder assembly accessible from inside the trunk.
| EXECUTION ORDER |
| CARS WITH BERLIN AND SEDAN BODIES |
| 1. Remove the holder assembly by moving the fastening stopper located at the end of this assembly. |
| 2. Each holder assembly contains four light bulbs: brake light (1), reverse light (2), parking light and rear fog light (3), and rear turn signal light (4). |
| 3. Press the bulb to be replaced, rotate it and remove it from the holder assembly. |
| 4. Install the new bulb into the holder assembly, rotate it, and then press the holder assembly until the mount lock locks. |
| CARS WITH COMBI BODY |
| 1. After opening the trunk, use a screwdriver to turn the fastening stopper and remove the rear light housing. |
| 2. Push back the mounting plates of the holder assembly (A) and remove it. Each holder assembly contains five light bulbs: reverse light bulb (1), tail light bulb (2), rear turn signal light bulb (3), rear fog light bulb (4), brake warning light bulb (5). |
| 3. Press the bulb to be replaced, rotate it and remove it from the holder assembly. |
| 4. Install the new bulb into the holder assembly, rotate it, and then secure the holder assembly. |
License plate light
EXECUTION ORDER
1
Using a thin screwdriver, carefully remove the license plate light assembly from its socket in the rear bumper. 2. Turn to the left and remove the bulb holder. 3. Replace the light bulb that is pressed into the holder
Replace the light bulb that is pressed into the holder.
4. Install the holder and secure the license plate lamp assembly in the rear bumper.
Trunk lighting
In some versions of the Berlin and Sedan body types, there is a trunk light bulb.
EXECUTION ORDER
1
Using a screwdriver, carefully remove the light bulb cover. 2. Turning the socket counterclockwise, remove it from the lamp shade, and then remove the light bulb from it. Interior lighting lamps
Interior lamps
| EXECUTION ORDER |
| 1. By setting the switch to the middle position (lamp off). |
| 2. Using a screwdriver, remove the light bulb socket and then remove the light bulb. |
Xenonshop.ru › Blog › What kind of LED lamps will there be? Deprivation of rights or fine?
More and more motorists are becoming victims of inappropriate police response to LED headlights. On the Internet you can find a lot of stories where a driver was deprived of his license for using LEDs.
, and there are also other examples when drivers were only fined for LED lamps
for small amounts.
Most often, traffic police officers frighten motorists with the serious responsibility for installing LEDs - this is due to the fact that the meaning and technical features of LED lamps are not precisely spelled out in the Technical Regulations, therefore, against this background, the police often try to manipulate drivers for their own benefit.
The police operate with the following example when imprisoned for LEDs:
You have a car equipped with standard halogen light bulbs. Accordingly, the headlights themselves (reflectors) are designed to work with halogen lamps. The driver purchases LED lamps with a similar base and installs them in the headlight.
In this case, there is a violation of paragraph 3.1 of the list of faults and conditions
, in which the operation of vehicles is prohibited:
The number, type, color, location and operating mode of external lighting devices does not meet the requirements of the vehicle design.
There is language in this proposal that refers to a “mode of operation” that does not meet the requirements. But the operating mode of the LED lamps themselves is not specified anywhere.
Next, police officers who want to take away licenses for LEDs will definitely mention Part 3 of Article 12.5 of the Code of Administrative Offenses
, which reads:
Driving a vehicle on the front of which are installed lighting devices with red lights or red reflective devices, as well as lighting devices, the color of the lights and the mode of operation of which do not comply with the requirements of the Basic Regulations for the admission of vehicles to operation and the duties of safety officials road traffic, entails deprivation of the right to drive vehicles for a period of six months to one year with confiscation of the specified devices and accessories.
Thus, the police justify the decision to deprive drivers of LEDs for 6-12 months, but in the same excerpt we also encounter a vague wording about “non-conforming operating mode.”
Why don't the police have the right to deprive people of their licenses for LEDs?
We remind you that at present there are simply no specific requirements defining the conditions for the use of LED lamps in headlights. Speaking of operating modes, at the moment only xenon is regulated in this direction.
And since there are no requirements, the previously mentioned “operating mode” cannot be violated, therefore the maximum penalty for installing LED lamps should come from Part 1 of Article 12.5 of the Code of Administrative Offenses
(for changing the design of the vehicle):
Driving a vehicle in the presence of malfunctions or conditions under which, in accordance with the Basic Provisions for the admission of vehicles to operation and the duties of officials to ensure road safety, operation of the vehicle is prohibited, with the exception of malfunctions and conditions specified in parts 2 - 7 of this article , entails a warning or the imposition of an administrative fine in the amount of five hundred rubles.
Additionally, it is important to note that international standards do not provide for personal labeling for LED lamps. Moreover, car manufacturers equate LED lamps with halogen, therefore such lamps, like halogen, are marked with the Latin letter H
It is in headlights with HR markings
,HC
,
HCR
can be found with standard installed LEDs.
The instrument panel backlight has disappeared, what should I do?
Therefore, it is worth understanding that if the instrument panel does not light up, then this problem must be eliminated immediately, but not all car enthusiasts are capable of this.
It is worth understanding that if the backlight disappears, then the problem lies somewhere in the electrical circuits. This is where you need to look for the problem. This will require design knowledge of the vehicle's on-board circuit, a tester and related tools, such as electrical tape, a soldering iron or more. Of course, it is not always possible to eliminate the problem locally, and faulty products have to be replaced completely.
Causes of malfunction
Where does the problem lie? As mentioned earlier, it is worth looking for problems in electrical circuits. Let's look at the main locations where problems may be hiding:
- Fuse.
- Backlight bulbs and their electrical circuit.
- Wiring.
- There is a fault in the fuse box.
- Damage to the board.
Solutions
So, when all the main reasons are, so to speak, “in the face,” you can try to determine the exact location of the breakdown, and also fix it yourself. As always, it is worth noting that if a motorist does not know the design of the car or is not confident in his abilities, then it is recommended to contact a specialist car service center.
Fuse
General view of a blown fuse
This is where you should start troubleshooting. To find out which fuse is responsible for the instrument lighting, as well as its location in the mounting block, you should refer to the technical documentation. Also, on the fuse cover it is written which element should be checked. If the fuse is found and replaced, but the problem does not go away, then you should look for the source in another place.
Light bulbs
Recently, it has become fashionable to install LED lighting for the VAZ dashboard with your own hands. However, not all car enthusiasts correctly connect it to the on-board network. This can cause the light to go out at the most inopportune moment. So, it’s worth checking the contacts of the entire backlight circuit.
The same applies to standard incandescent light bulbs that come with the car from the factory. Thus, a break or burnout of one of the light elements can lead to the fact that the entire backlight stops working. If you run the tester through the entire circuit, you can easily find an open circuit.
Wiring
So, a broken wire can cause the dashboard lights to stop receiving power and therefore not light up.
In order to eliminate the malfunction, you need to use a multimeter to test all the wires that are responsible for the car’s instrument panel lighting. So, any, even insignificant, wire that breaks can cause the light in the dashboard to go out.
Oxidized contacts in the mounting block.
Accordingly, there will be no contact, and not only will the light in the instrument panel not light up, but the other indicators located here may also not work. To fix the problem, you will have to disconnect the wire block on the fuse block and the parting panel itself. After this, clean the contact group and connect everything back. If everything worked, then the reason was found.
Safety block
Thus, burnout can occur directly in the branches of the block itself or in the mounting socket. To eliminate the malfunction, you will have to remove the part from the car and check it sequentially using a tester.
Many auto mechanics do diagnostics directly without removing the safety block. But only professionals can do this, but the average car enthusiast will have to remove the product. If, after all, the mounting block “died”, then the element will have to be replaced, since it is almost impossible to repair it.
Check the contact group of fuses for malfunction.
The board is damaged
Repair and diagnostic operations of the dashboard board.
There is only one way out - replacement, but many car enthusiasts manage to resurrect such elements using a soldering iron. Although, as practice shows, in 50% of cases it does not last long.
The main reason for board burning is a short circuit. In this case, often the place where the wiring is connected and the most vulnerable point – the backlight – is on fire. If incandescent lamps are installed, they will be dark or black, but the LED backlight burns out in the places where the solder is connected to the board.
Troubleshooting steps
When the instrument panel on a VAZ2114 does not work, you need to determine the reasons for its failure, and, if necessary, remove the unit in order to check or replace light bulbs, fuses, or clean the contact board.
To perform this procedure, you will need screwdrivers, figured and regular, two keys 8 and 21. Next, perform the following steps:
- 3 self-tapping screws are unscrewed, the trim is removed, the protrusion that is located at the bottom, which is removed from the body bracket.
- Now the 5 screws in the right panel of the console are unscrewed and the screen is removed.
- After this, the negative terminal is removed from the battery, the wiring harness block is disconnected from the cigarette lighter.
- The handle is removed from the lever. The mounting of the electric fan of the heating unit is disconnected.
- Now we move on to unscrewing the bolts that secure the steering wheel block brackets. The light guide, lamp sockets, and the decorative panel insert are removed.
- You can remove the hydraulic corrector illumination lamp using a 21 cm wrench.
- At the last stage, the screws of the lower and upper rows are unscrewed and the instrument panel is completely removed.
If necessary, the light bulbs in the VAZ 2114 dashboard are replaced, and the failed ones are replaced with new ones. The presence of oxidized areas, which are rubbed with WD-40 liquid, is also checked, and the contacts are treated. If, for example, the battery charging lamp is dimly lit, then the reason for the poor connection of the lamp contacts with the board is the condition of the cartridges for carbon deposits; damaged ones are replaced with new ones.
Replacing light bulbs in the dashboard of a VAZ 2114
If the instrument panel is faulty, and all the parts, lighting, radio, show high performance, then the reason is in the fuse box, which needs to be checked and, if necessary, replaced.
You cannot replace the fuse box with home-made products or other units with increased current strength; this may result in damage to the electrical system, cause serious malfunctions in the system, and lead to a vehicle fire. To remove this unit, you need to use special plastic tweezers.
Self-diagnosis of car lighting devices
There are several situations in which you can determine that optics need diagnostics:
- The turns do not flash, but light up. Such a malfunction indicates the failure of the relay, in particular, we are talking about its electromagnetic component. The electromagnet itself could close in one of the positions, as a result of which it cannot return to its initial state.
- The turning lights flash very quickly or very slowly. In this case, the problem may lie not only in the relay. In some cases, this type of malfunction occurs when the driver uses inappropriate lighting sources. So when purchasing new light bulbs, you need to make sure that they correspond to the rating set by the car manufacturer.
- The optics don't work at all. That is, the turning light bulbs do not flicker, and the corresponding indicators on the dashboard also do not light up. In addition, there are no characteristic clicks that appear when turning on the turning lights. With such symptoms, there can be many reasons for the problem; we will tell you more about their diagnosis below (the author of the video is the Steel Horse channel).
As for diagnostics, it is performed in several stages:
- First of all, you need to make sure that all sensors and indicators on the device are working. If they do not function, then it is necessary to diagnose the safety devices.
- If all devices are operating in normal mode, then you next need to turn on the light alarm button and diagnose all light sources in the headlights. That is, check the front, rear, and side (if any) lights.
- If the alarm does not function when activated, you need to check the functionality of the relay, and also check the power supply at the terminals. To do this, remove the relay from its mounting location, and then, using a test light, connect one of its contacts to the installation site (to the positive), and the other to the car body or battery. There is no need to turn on the ignition. If there is no power, then most likely the reason lies in a failed safety device, a broken hazard warning button, or a damaged electrical circuit. Also, the essence of the problem may lie in poor contact in the connecting plugs.
- If there is a plus on the contacts, then try shorting the two relay terminals using copper wiring. If all electrical circuits, as well as the connection plugs, are working properly, then all turn signals should light up. In this case, the fault must be looked for in the relay.
- If the lights do not light up after the steps you have performed, then most likely the cause of the malfunction lies in the emergency light control button. However, in practice this happens quite rarely; there is often a short circuit in the circuit. By the way, it is a short circuit that can lead to a breakdown of the relay, therefore, before replacing the failed element, you need to eliminate the short circuit.
- If the emergency signal is functioning, this indicates that the safety devices and relays are working; accordingly, you need to start diagnosing the button itself. First of all, you need to diagnose the positive terminal, as in the case of checking the relay, while the ignition, as well as the hazard warning button, must be activated. If the diagnostics showed that there is no plus, this indicates that the button itself needs to be checked in more detail. Remove it from its seat and check the connection circuit. If there is no power, then you need to look for a break in the wiring from the tidy to the button itself. If there is power, then it will be necessary to short-circuit the terminals at the installation site, the ignition does not turn off, after which the direction indicators must be activated (on either side). When the lighting sources are turned on, the control button must be replaced, but if there is no power, then you need to check the power in the emergency relay. If there is no power, the problem most likely lies in a break in the connecting electrical circuit from the control key to the block with safety devices.
The rear lights of the VAZ 2114 do not light up: reasons, do-it-yourself repairs
When driving at night or in fog, side lights are indispensable, especially if they are located at the rear. When moving or while parked, they show other motorists where your vehicle is. If the rear lights on a VAZ-2114 car do not light up, then it will not be difficult to do the repair yourself. To do this, just find out the reason and follow the instructions below, or watch the video.
Characteristics of side lights VAZ-2114
VAZ-2114 belongs to the Samara modification of the second generation. The side lights in them are located, in accordance with technical regulations, at the edge of the front and rear parts of the body, next to the turn signals. These lamps are included in the headlight units.
- Unlike the front side lights, the rear ones are painted red.
- The button to turn on these headlights is located in the exterior lighting control unit. It is located in the center of the dashboard above the on-board computer. If the dimensions are turned on, the green light on the switch lights up.
In the engine compartment under the hood of the car there is a mounting block with fuses. If your lights only on the left or right side do not work, then most likely one of the fuses has failed. The easiest way to notice a malfunction is element F10, since it is responsible not only for the operation of the right side of the side lights, but also for the warning lamp to perform its duties.
If the lights refuse to work on the left side, then fuse F11 must be replaced.
see also
Comments 29
Please tell me the dimensions do not work anywhere, only on the instrument panel the low beam works and the license plate light works. The fuses are intact and the track is also what could it be
Jumper in the fuse block. It is also called the “side light fault monitoring relay.” Try changing it, it will probably go away!
No power to the chip(
Replace the relay in the black box
the front ones are “parallelized”. Roughly speaking, the right is powered from the left. The branching of the wires occurs in the mounting block.
PARALLELED BUT SEPARATED RELAYS
I have one relay, one fuse)
THE PROBLEM WITH THE REAR WAS SOLVED BY REPLACING THE HEADLIGHTS WITH OSVAR (later we will tell you in detail about the replacement and obstacles on the way), BUT THE FRONT STILL DOESN’T BURN (
I had this kind of garbage today, the fuse seemed to be intact, I changed it and everything worked
Is there power to the fuses?
Hello. The symptoms look like a mounting block. If the fuse is intact, then it is. You need to take it off, open it and look. Fourteen have this disease.
Hello) yes, I’ve already encountered www.drive2.ru/l/9719498/, my installer was constantly flooding before, in the end it oxidized and I had to install a new one, I don’t think the reason should lie in the new one
if the bulbs and previous ones are intact, then the relay for monitoring the health of the bulbs remains, located in the mounting block under the hood in the air intake compartment on the left. This relay is also called a centipede. Either it died or contact was lost.
I'll try to change it tomorrow, thanks
you can pull out this relay, turn on the dimensions and place jumpers one by one and check whether the dimensions will light up. jumper from pin 7 to 8 - left front, from 7 to 1 - left rear. jumper from 10 to 11 - right front, from 10 to 9 - right rear. Jumper 4 and 5 + pressed stop - brake lights. if everything burns like that, then the relay is to blame, it’s in the firebox
Thank you, your advice helped me) I disassembled the entire mounting block, but the reason is just over there)
In the mounting block, remove and reinsert the lamp health monitoring relay (which is the largest), the contacts there often oxidize. If this does not help, you need to replace the lamp health monitoring relay.
Pulling it out and inserting it didn’t help, I’ll try to replace it tomorrow, there are no other options yet, thanks
trick, the board is most likely the same garbage, I changed it to OSVAR
But if 2 dimensions fail at the same time, then the front and rear left ones, and even the license plate illumination, then the problem lies in the mounting block. Namely, in fuse F10, which is responsible for the left dimensions, interior lighting, license plate lighting, and panel lighting. But keep in mind that fuse F10 is directly responsible for the left dimensions; if others do not work for you, then look for the corresponding fuse in the article Fuses.
We analyze the fuse block, namely the blocks of all tires to the fuse and relay block. Most often they oxidize, become detached, and make poor contact. We clean the contacts and connect them well. Don’t forget about the contact group on the headlight block; perhaps the contacts there have also oxidized.
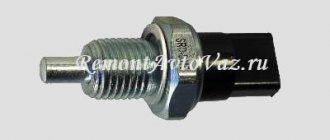
How to check the functionality of the frog?
The instrument panel illumination of the VAZ 2114 does not light up
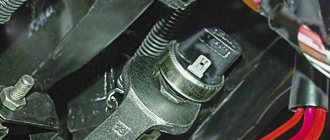
The contacts from the sensor are removed and clamped together, after which the ignition is turned on. If there is light, then you need to replace the sensor. And if not, then the problem is in the circuit, but the frog is fine.
When the reverse lamp does not light up, it is often necessary to replace the old sensor with a new one.
What should be done:
- place the car on the overpass;
- install the handbrake;
- remove protection;
- remove the contacts of the old sensor;
- place the container and remove the frog;
- Unscrew the faulty device and replace it with a new one.
Then let it sit for a while and check the oil in the gearbox. Fill it up to the required level and put the entire structure back together.
Attention, the price of a new sensor is within 250 rubles. The next option, if the reverse light does not light up on a VAZ 2114, then the problem is in the light bulb
To replace it, you need to disconnect the wire block, remove the plastic contact panel from the flashlight, while squeezing the side fixing elements
The next option is if the reverse light does not light up on a VAZ 2114, then the problem is in the light bulb. To replace it, you need to disconnect the wiring block, remove the plastic contact panel from the flashlight, while squeezing the side fixing elements.
We rotate the light bulb counterclockwise and, pressing slightly on the socket, remove it. Now we install a new one, check the contacts and put the entire unit back together.
We visually assess the condition of the wiring; if necessary, we strip the wires, check for breaks using the ringing method, and check the contacts on the headlight film.
Why aren't the reverse lights on yet?
A blown fuse is a common cause, which means you need to know exactly where they are located and how they change.
The products are located in the fuse box, which can be found under the steering wheel on the left side. It can be easily removed with just one touch of your hand. There is no need to unscrew anything.
When the reverse light does not light, you need to check the condition of the fuses. How to do this? You can visually look at the fuses and determine the breakdown - the integrity of the middle part.
But the burnt jumper is not always so clearly visible, so you need to turn on the dimensions and, without removing the fuses, check the voltage; if one end is on and the other is not, the device is faulty.
To replace the product, you don’t need tools, just take tweezers, remove the old unit and install a working one.
Key conclusions and recommendations from professionals
You can find out where the VAZ 2114 reverse sensor is located very simply by looking up at the gearbox, and if the driver cannot get under the car, then the hood opens and thus the condition of the frog is checked.
To completely verify that the brake gearbox is damaged, you need to turn the wheels to the left and look at the gearbox from the driver’s side. There is a protection with contacts inside on the side, remove it, close the contacts on the DZH and turn on the ignition. When everything is in order, a white light appears.
If not, then use a tester to measure the voltage on ground and on the orange wire that comes from the frog. If voltage is present, then we check the flashlight board itself and clean the contacts.
There is also a chance that the contact between the frog and the fuse block has “frozen”; you need to find it and check its condition.
This is why the reverse light on the VAZ 2114 does not light up, as you can see, there can be many reasons, and for the motorist it is important to carefully check the integrity of all frog mechanisms, identify the malfunction and repair the functionality of the lighting.
Have a nice journey, good fellow travelers and a smooth road!
Checking and replacing the contact panel and DZH
In order to remove the panel you need to do the following:
- Open the trunk.
- Remove all contents from it that may interfere with the repair.
- Remove decorative trim.
- Remove the plastic casing.
- Remove the back panel.
- Disconnect the studs securing the reverse sensor.
Reverse light board VAZ 2114
To remove the sensor itself and replace it, you need to proceed in this order:
- disconnect the minus from the battery;
- remove the sensor protection;
- disconnect the contacts of the wires suitable for the DZH;
- place an oil container under the sensor;
- Unscrew the sensor using a 22mm wrench;
- remove the old sensor and insert a new one;
- wipe the box from traces of leaked oil;
- perform assembly in the same sequence and in reverse order;
- if too much oil has leaked out, it should be replenished to the required level (the level itself should be checked immediately after replacing the sensor in order to avoid the gearbox operating when the oil level is low).
Reverse sensor VAZ 2114
You can check the sensor quite simply - you just need to close its contacts and turn on the ignition. If the rear white light comes on, then the sensor is working and the problem lies in the electrical network. If the light does not light up, it means the auxiliary switch is broken and needs to be replaced with a new one (how to do this was described above)
If the frog turns out to be in good condition, then you should check the continuity of all wires suitable for the sensor and headlights, and also check the condition of the contacts of the lamps and sockets (if they are oxidized, you need to clean them or wipe them with WD-40). It is also necessary to check the serviceability of the reversing lamp fuses located in the common fuse block.
Location of DHZ VAZ 2114
If, even with a working sensor, light bulbs and wiring, the reverse gear of the VAZ 2114 still does not light up, the reason may lie in a burnt-out contact located on the headlight film. This kind of malfunction is very common on VAZ cars. In order to solve it, you can either modify the contact group on the board yourself, or simply replace the board with a new one.
How to troubleshoot?
The instrument panel illumination on the VAZ-2114 has disappeared: it does not light up
The most common reasons that the brake light on the VAZ 2114 does not work are the following factors:
- Fuse failure.
- Broken wires in one of the sections of the circuit.
- Limit switch faulty.
- Bulbs burn out.
- Oxidation of contacts in lamp sockets.
- Damage to the contact board.
The most common and at the same time the most easily removable of the above reasons is a blown fuse. To identify such a malfunction, you need to examine the fuse box. A 10-amp fuse F3 is responsible for the brake lights, which also protects the ignition switch, computer and interior lighting.
Malfunctions in the operation of the latter may also indicate a malfunction of the stop fuse (and in this case, troubleshooting should begin with the block). If it turns out that the fuse has blown, then you should replace it with a new, similar one.
VAZ 2114 fuse box
The problem may also be in the fuse block itself - sometimes the tracks on its printed circuit boards burn out or the contact legs oxidize. In order to check its serviceability, it is enough to measure the voltage at the contacts of the newly installed fuse.
Another common reason why the brakes of the VAZ 2114 do not light up is a malfunction of the limit switch that turns on the signals. It is located on the brake pedal bracket and is always in working order, regardless of whether the car engine is turned on or not.
It works automatically when you press the pedal. In order to check its serviceability, it is enough to see whether the power supply is suitable for its contacts (on one of the contacts the presence of power must be constant). In addition, if you press the pedal and thus turn on the limit switch, you can measure the voltage at its connectors.
Limit switch
If there is no current at the switch contacts, you should check the wire going to the limit switch from the fuse box. If the test shows that the wire is faulty (there is a break), then it should be replaced with a new one and the test repeated.
Otherwise (if everything is in order with the wire), you should disconnect it (as well as the other wire suitable for the second connector) from the switch and connect directly. If after such an operation the brake light works, then the limit switch itself has failed and should be replaced.
Brake light wires