An on-board computer is a device that can increasingly be found not only in foreign, but also in domestic cars. The Lada Granta in the “Norma” and “Lux” trim levels is no exception (owners of a car in the “Standard” trim level can buy it additionally, although the price is quite high). It gives the user many amenities that make driving and monitoring the car’s performance much more comfortable. Today we’ll talk about what the on-board computer is that comes with the Lada Granta, and we’ll look at the errors that the user may encounter.
On-board computer STATE x1-g for Lada Granta
An on-board computer is a device that can increasingly be found not only in foreign, but also in domestic cars. The Lada Granta in the “Norma” and “Lux” trim levels is no exception (owners of a car in the “Standard” trim level can buy it additionally, although the price is quite high). It gives the user many amenities that make driving and monitoring the car’s performance much more comfortable. Today we’ll talk about what the on-board computer is that comes with the Lada Granta, and we’ll look at the errors that the user may encounter.
"Multitronics" - is it a universal alternative?
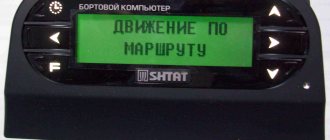
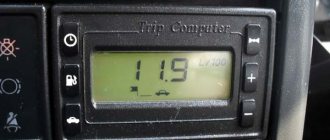
Thanks to the ability to be fixed in different places on the panel, the Multitronics on-board controller is able to act as a serious competitor to the State. Having a 32-bit processor in its arsenal, this device processes and displays information with enviable speed and clarity. This allows the car to be under the watchful control of the “pilot”, since the computer has the following convenient functions:
- a large number of protocols for diagnosing systems, including in advanced mode;
- the ability to transfer and save statistical data on the movement of a car to a medium on a personal computer;
- voice option;
- parking radars, etc.
The entire specified list of functionality that a standard computer has has been added to the optional list of “Multitronics”. The latter are favorably positioned due to the simplicity of setup manipulations and the ease of “communication” with the interface. This causes a higher cost for these devices compared to the price of a standard computer.
Initially, it was only possible to buy an on-board computer for the LADA Granta in the official sales network of AvtoVAZ.” Since sales of LADA Granta started in 2011, the devices discussed here were unavailable to consumers for some time. This fact caused a slight decrease in the popularity of the AvtoVAZ model.
But now the situation is radically different, since the availability of such a thing as an on-board computer for LADA Granta is unconditional. You can purchase the device both in the dealer network and from individual trading entities that sell auto products for this purpose.
What device is used on the VAZ 2190
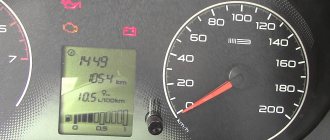
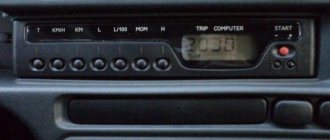
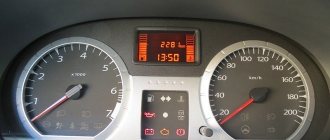
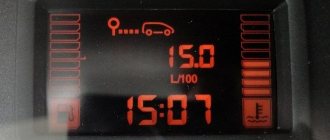
The Lada Granta is equipped with a standard on-board computer, called “State X1 M”, which works thanks to the E-Gas system. The main element of the device is a trip computer with an output to the display. It displays indicators such as:
- Amount of fuel.
- The amount of mileage a car can travel on the remaining fuel.
- Travel time.
- Distance traveled.
- Fuel consumption meter.
Thanks to this, you will know exactly how long you are driving and how critically empty your tank is.
The on-board computer installed in the Lada Granta car is equipped with a diagnostic tester, which contains system diagnostic codes. In addition, thanks to it you can obtain information about the engine temperature and adjust its parameters. It also contains data on the position of the damper, the voltage in the car’s electrical network, as well as a tachometer and speedometer.
Under the hood of the Lada Grant, which is equipped with this device, there are sensors. In case of any violations, all information will be displayed on the on-board computer, which will warn you about them. In particular, you may receive warnings:
- about overheating;
- about problems in the electrical circuit;
- about speeding.
In addition, the device is equipped with a supervisor who is always ready to remind the driver that his lights or turn signals are not turned off. In addition, it will immediately give a signal if the car begins to move forward or backward on its own.
Decoding codes after diagnostics with a scanner
As stated above, if the measured characteristics do not differ from the standard ones by more than 20%, then everything is in order with the car. What are the standard parameters?
| Parameter | Meaning |
| UACC | Shows battery voltage. To understand whether there is an error in this case, it is necessary to activate all devices that consume the most voltage. Allowable voltage is from 13.9 to 14.5V. If it is less, then it is necessary to check individual circuits of the network. |
| THR | Throttle position parameter. As a rule, if it is faulty, the driver will know about it without diagnostics, since the car will move jerkily and the engine power will constantly drop. Press the gas pedal without starting the engine, but turning on the ignition. The TPS readings should gradually increase to 90% (or slightly less). If everything is so, then the sensor is working; if not, it needs to be replaced. |
| FREQ | Crank pulley rotation speed parameter. The rotation speed is up to 840 rpm. If this sensor fails, the operation of the motor will be impossible. |
| AIR | Mass air flow parameter. It should not exceed 12 kg/hour. Start the engine and press the gas pedal so that the number of revolutions increases to 5 thousand per minute. In this case, the parameter should increase to approximately 250 kg/hour. Naturally, if the device is working properly, then the indicator will be like this. |
| UOZ | Represents the ignition timing angle. It should change in the range from 6 to 15 degrees. |
| INJ | This parameter bk represents the duration of the injection pulse (the time required to open each injector so that gasoline enters the cylinder). Ideally, this parameter should be between 3 and 5 milliseconds when driving at neutral speed. If the readings obtained during diagnostics are much higher, then, most likely, the injectors are already clogged and need to be cleaned. Or this indicates low gasoline pressure as a result of a clogged gasoline filter or pump. Press down the gas pedal sharply. The injection time should increase to 20 ms. Ideally, accurate diagnosis of injectors is only possible using a test bench. |
| FSM | Idle speed sensor performance indicator. Ideally, this parameter should not exceed 50-60. If you press the gas pedal sharply, it can increase to 160-180. |
| ALAM 1 | Indicates the voltage level recorded on the oxygen level monitoring device. When the car engine is warmed up, this indicator should increase from 0.007 to 0.7 V. If this indicator differs, then something is wrong with the circuit. |
| LUMS_W | This coefficient indicates the rotation of the crank pulley. Ideally, it should vary around 4 revolutions per second. If it is slightly larger, then this already indicates a misfire in the engine cylinders. This means that you should pay attention to checking the spark plugs (whether they are working, filled or not), as well as the condition of the high-voltage wires. |
| QT | Gasoline consumption coefficient. With the engine running and idling, it should not exceed 0.9 liters per hour. |
New Lada: Why does the car jerk when driving at low speeds?
Basic device errors
Setting up such an on-board computer is not something extremely difficult; detailed instructions are always attached to it. If some points are not clear to you, you can always find a video of this process. At the same time, the device can also upset you with an error, despite the fact that there is not always time to look for instructions. Here's an example of a few common device errors you may encounter along the way:
- P0030, 0031, 0032. Errors in the oxygen sensor before the heater. In this case, the on-board computer checks for an open circuit, as well as a possible short circuit to the ground or to the on-board network, respectively;
- P0036, 0037, 0038. In this case, you will be signaled by a sensor located behind the heater. The description of the errors is similar to the previous ones;
- P0112.0113. Intake air temperature sensor signal. In this case, we are talking about too low or high signal, respectively;
- P0116, 0117, 0118. Alert from the coolant temperature sensor. The code signals either that the signal is out of range, or that the readings are too low or too high;
- P0122, 0123. In this case, throttle valve sensor No. 1 signals you, notifying you that the signal level is too high or low.
These and other errors must be indicated in the instructions, so try to always have it with you if you do not know them by heart (which is highly unlikely due to their large number). With the manual at hand, you can always determine which error code means what. Thanks to them, you can always quickly identify a particular malfunction in your car, quickly fix it and continue on your way with minimal delay.
Error codes/test for instrument cluster (Kalina/Priora)
- The ignition is turned off. Battery included.
- Press the “Reset” control button and, holding it pressed, turn on the ignition. All positions of the familiar areas (segments) should light up on the LCD—LCD control.
- Press any of the control buttons. The LCD should display the program version (Ver 1.0).
- Press any of the control buttons. The following error codes (if any) should be displayed on the positions of the first and second lines of the LCD.
- Press the “Reset” control button and hold it for no more than 3 seconds. (maybe a typo, I need more than 3c). Error codes should clear to zero.
- Press any of the control buttons. All positions of the familiar areas (segments) should light up on the LCD—LCD control.
Error codes:
- 2-increased voltage of the on-board network;
- 3-fuel level sensor error (if a break in the sensor circuit is detected within 20s);
- 4-error of the coolant temperature sensor (if an open circuit of the sensor is detected within 20s);
- 5-outside temperature sensor error (if there are no sensor readings within 20s, indication on the LCD is “-C”);
- 6-engine overheating (the criterion for triggering the acoustic alarm has been met);
- 7-emergency oil pressure (the criterion for triggering the acoustic alarm is met);
- 8-defect of the brake system (the criterion for triggering the acoustic alarm is met);
- The 9-battery is discharged (the criterion for triggering the acoustic alarm is met);
- E-determination of an error in a data packet stored in EEPROM.
From yourself if you do not press any control buttons for about 15-30 seconds. the panel goes into working condition. “Reset” is the one that resets the daily mileage.
https://www.youtube.com/watch?v=ECQG0rilKNc
Let us remind you that you can read engine errors without the help of specialists; you just need to install an on-board computer.
Installing the on-board computer STATE X1-G on the Lada Granta: three methods
The “simplest” on-board computer for the Lada Granta is the BC STATE X1-G. It is compatible with ITELMA M74, M75 units, as well as BOSCH ME17.9.7. The connection is made to the OBD connector, which is located in the cabin. No additional power is required. We will look at how to install it, as well as how to update the firmware. Sometimes you need to update it immediately to get compatibility with a new car. Therefore, read the review carefully.
All functions of BC STATE in one video.
Transmission malfunctions
| Code | Description of the error |
| P0717 | In this case, the BC reports incorrect operation of the turbine speed control device. |
| P0706, P0705 | The on-board computer reports the absence of a signal or several simultaneous signals coming from the automatic transmission selector. |
| P0720 | A failure of the output signal speed control device has been registered. |
| P0973, P0974 | BK detected an open circuit or short circuit in the wiring of the gearbox on/off solenoid. |
| P0962, P0963 | The motorist is notified of an open circuit or incorrect signal coming from the transmission pressure control solenoid. |
Two methods for installing the on-board computer
On the Lada Granta, installation of the STATE on-board computer is carried out in two ways. In the first case, the BC is fixed on the central panel, in the second - on the lining of the floor tunnel. The BC housing is installed instead of the plug (see photo).
Torpedo and tunnel, two options
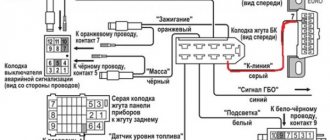
The wiring harness that comes with the kit must connect the OBD connector (see photo) to the computer connector. First, find the required connector, then disconnect the battery.
What's above the tunnel on the right?
To perform the last action you will need a key “10”. You only need to disconnect the minus terminal.
Before installation
First, let's check whether our BC turns on and whether it is compatible with the machine. We carry out the standard connection, and then connect the battery. The on-board computer on the Lada Grant will show the firmware version.
Here is version “027”
Note that the version display time is limited to two seconds.
In “new” firmware (“019” and newer), you can find out the software version like this: press the right BC button, “scroll through” all the functions, reach the inscription “dro”, press the button for a long time.
The point is that “old” versions are not compatible with new equipment: firmware “026” is not suitable for the 27th engine, etc. Check operation: select “function 2” (degrees Celsius), wait for the readings to appear. Typically, if incompatible, “minus 40” is displayed.
Computer in the tunnel
To mount the BC into the tunnel, unscrew the two screws located on the right side of the casing. You will also need to remove the lever cover.
Remove the casing using a screwdriver
In the version with automatic transmission, more actions are required. Here you need to unscrew two screws on the right and left, and then remove the handbrake trim (3 screws). When it is removed, unscrew the screw holding the limit switch. And then the screw on the casing is unscrewed through the hole in the end switch.
Everything is ready for installation of the BC
When the lever niche is open, you can reach the plug, which replaces the button. The plug can be easily removed.
A wire is pulled from the button hole to the corner of the casing. Wires are tied to the wire and pulled out. The terminal block should protrude 2-3 cm from the hole. Make all connections: the computer to the “white” terminal block, and the “black” terminal block to the OBD connector.
At the last step, the BC module is installed in the niche. But first you need to secure the casing. We looked at how to install an on-board computer on a Lada Granta with any “box”.
Installing an on-board computer on a “torpedo”
To install the BC on the dashboard, you do not need to unscrew anything. We simply dismantle the plug and extend the wire to the corner of the tunnel. Then a tourniquet is tied to the wire, and so on.
The wiring harness goes under the dashboard
All actions are illustrated in the photo.
For those who cannot cope with the task, we recommend doing this: you need to open the glove compartment, empty it completely, and then unclip the two stops on the back wall. Then the entire structure “opens”, and through the appeared slot the plugs are reached by hand.
When connecting the harness provided in the kit, it is almost impossible to make a mistake - all connectors are made asymmetrical. It's a pity that the wiring cannot be completely hidden.
A couple of wires remained visible
Description
The on-board computer on the Grant is easy to select and install. This car has an OBD-2 diagnostic connector, to which the BC is connected using a standard connector (usually included in the kit). There is a model BC State x1, which are installed instead of a button plug in the panel. The connecting wires are connected to the diagnostic block (located near the front passenger's left leg). Universal on-board computers are installed on the dashboard or windshield. There are also models installed instead of a radio.
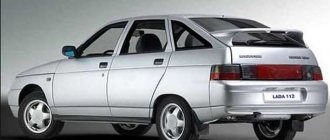
This is the best thing that has ever been created in Togliatti. Harmony, originality, budget price - this is the Lada Granta 2190. The car replaced three “classic” models - VAZ 2107, Kalina and Samara. Not a high price is the main priority of this model. To do this, the company used technology that allows you to reduce the number of parts that make up the car. For example, the front part consists of only three parts, and the instrument panel consists of 40 parts. The Lada Granta is 22 centimeters longer than the Kalina and has 5 mm less ground clearance. The car is already arousing great interest, and the queues for it are huge.
It would take a lot of time to list all the advantages of the car, but still, how can we not mention the spacious interior and beautiful modern panel from Renault Logan. There is enough space for a tall driver, there is enough space both above the head and on the sides. The seats are better in shape and design, and have an upright seating position. The same front panel now has a stylish dark color, round ventilation holes, and laconic shapes. The steering wheel contains three spokes, just like foreign cars.
The doors also acquired a more complete composition and meaningful design. The beautiful door handles finally began to resemble themselves. Large side mirrors provide good visibility, and this is very important for drivers. It will probably be interesting to many, but it was in the Lada Granta that another interior detail appeared, which had never been on VAZ cars before, these are two cup holders.
The package can be found in three versions: Standard, Norma, Luxury. The “Standard” kit contains manual windows and unpainted bumpers. And the “Norma” kit also contains an airbag for the driver, an electric tailgate, an on-board computer, and an alarm system. The “Lux” package contains full power accessories, heated mirrors, air conditioning, heated front seats, airbags, ABS+BAS. Each configuration has its own engine, all of them with a volume of 1.6 liters, but with a power of 80, 90, and 98 horsepower.
Whatever one may say, the Lada Granta is a modern car, which is distinguished by a spacious interior, a new panel, seats, and a large trunk. And although technically the car is far from perfect, it is a new and most importantly affordable product.
Multitronics in Lada Granta
State Uni Comp 620 in Lada Granta
Alternative installation option for Lada Granta
Know that the on-board computer on the Lada Granta can be installed in a non-standard way. The idea is to “hide” the wires.
Second connection diagram
Let's implement the scheme shown in the photo. Let's take the power and ground from the emergency light button, and let everything else be standard. Connect to the button wires and use T-connectors for this - they can withstand a current of 100-200 mA (which is what is required).
So we had to remove the hazard warning button and connect to two wires. Then we run the cable to the OBD connector and use the terminals included in the kit.
The wires will be invisible
The standard connector (terminal block) had to be disassembled. But how great everything looks now!
Sequence of actions when dismantling the dashboard
The reasons for disassembling and replacing the Grantback liftback dashboard are very varied: damage, installation of a new diode, etc.
- We unscrew the three mounting bolts around the perimeter. Carefully remove the assembled unit so as not to damage the contact boards, electrical wiring, and terminals;
- Remove the instrument panel mount for the Lada Granta liftback;
- To replace the tachometer/speedometer needles, you need to move the lever up a little and turn it counterclockwise.
After the final replacement and maintenance, we reassemble the structure. Self-repair of the front panel of the Grant liftback is completed.
We update the BC firmware ourselves
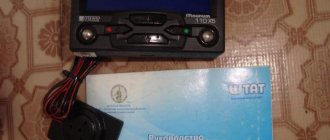
First of all, you will need to buy a USB- K- Line adapter. The software you will need is firmware, a program to install it, and a driver for the adapter. If you already have all this, assemble a diagram as in the photo.
Only three wires are used
Note that toggle switch T1 is closed “at the request” of the program itself. The rest of the time it will be open.
A computer can also act as a power source - just connect to the Molex connector. And for the BC, a terminal block removed from a computer cooler (2 pcs.) is suitable.
Update process
First, connect the adapter to the USB port. Install the driver. Make a note of which “virtual COM port” will be used. Then proceed like this:
- The program is launched for execution. Select the firmware (the “Folder” button);
- Select the COM port number (the “Port” button);
- Press the button with the lightning bolt. The message “Turn on power” will appear. On the BC press any key and then close the toggle switch.
The procedure will take a couple of minutes. A progress bar will be shown in the window.
Window of the State program under Windows
Where can I download the software?
Let's say we want to buy an on-board computer for the Lada Granta, not flash it. Go to the website and select the desired category. Then we find our BC (X1-G), click on the photo and see the product page. It will contain a link to the program and the firmware file.
The situation is more difficult with the driver. We need a USB-COM driver. If you purchased an adapter with a “BM” chip, do the following:
- Go to the manufacturer's website ();
- Open the “Drivers” tab;
- Go to the “VCP Drivers” tab;
- Select the required file (there are versions for different OSes), download it.
About energy consumption
The BC STATE model X1 G consumes 0.015 Amps when in standby mode. The rest of the time the current can reach 200 mA. In practice it is difficult to obtain a value exceeding 170-180 mA. For comparison:
- Good (expensive) signaling, standby mode - 10-15 mA;
- Conventional signaling with a key fob - 25 mA;
- Alarm in the “Disarmed” mode – 100-300 mA.
In general, our BC is quite “gluttonous”, but not as much as an alarm system.
2.5 6 votes
Article rating