On cars of the Tenth Family, a clock or computer is always installed next to the display unit. Nowadays such computers are called “on-board computers” (BC). When the ignition is turned off, the computer display shows the time, but this is not its only function! We will list all the capabilities of the on-board computer on the VAZ-2112, and the instructions supplied by VAZ will help us with this. Tables that are important during setup were copied from the instructions.
What bookmaker are we talking about? The answer is given in the video.
Why do you need an on-board computer?
In previous articles, we have already talked about what an on-board computer is, what it is needed for, and what types there are. But let me repeat myself so that you clearly understand all the advantages of having such a device, and there are probably no disadvantages, except perhaps spending money on the purchase and that’s all.
Take, for example, the STATE 115×24 model. With it in stock, you can:
- Set the radiator fan start temperature. This function is very useful, for example, in winter, when you can control the temperature of the coolant, thereby monitoring the heating of the stove radiator.
- The function of drying and warming up the spark plugs before starting the engine is very useful.
- The ECU reset and adjustment function is needed to switch to gasoline with a higher or lower octane number (from 92 to 95 and vice versa). It is also needed to reset the set parameters after a long trip with increased engine load.
- The ability to read errors allows you to monitor the condition of the car and change non-working sensors and elements in a timely manner.
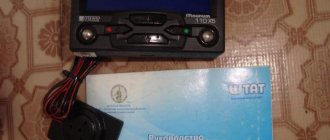
Installation instructions for on-board computer
In this article we will look at the installation process of the Prestige on-board computer with diagnostic and error reading functions.
For work we will need:
- Screwdrivers.
- The computer itself.
- Wire 1 m long.
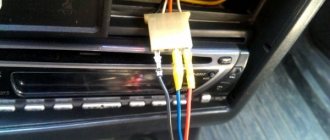
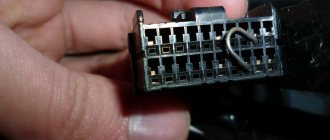
We remove the plug on the central dashboard and look for a 9-pin wiring block in it. It should be on all Samara cars. All that remains is to connect the block to the computer and that’s it, but we need to draw a K-line.
How to draw a K-line?
Scheme of the K-line
- We take our wire and install it in the second contact of our block.
- We throw the opposite end under the instrument panel down to the diagnostic block.
- Having stretched the cord, we connect it to the “M” socket if you have a Euro-2 socket, or to the 7th socket if you have a Euro-3 socket (it is very common that on Euro-3 it is installed on the car upside down, please note This)
- Now we connect the computer, insert it into its normal place and check.
For a more complete and clear idea of the work, a diagram is provided.
What to do if there is no pad for the computer under the instrument panel?
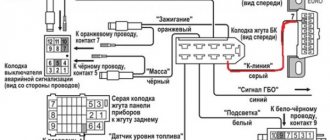
In this case, all that remains is to assemble a new block: buy a 9-pin one and run the wires to it according to the following diagram:
New block assembly diagram
- fuel consumption signal (green wire);
- ignition (orange);
- + 12 volts (red with white stripe);
- mass (black);
- speed sensor (brown);
- 6k line (most often gray or black);
- mute (green with red stripe);
- backlight (white wire, or can be taken from the size button);
- fuel level sensor (pink).
Designation of icons on the dashboard of Lada 2112
| Number in photo | Interpretation of lamps and indicators |
| 1 | Coolant temperature indicator; if the light comes on at the top of the scale, the engine has overheated. |
| 3/4 | The turn signal indicators light up simultaneously when the hazard lights are turned on. |
| 7 | Empty tank indicator; if the lamp lights up, stop at a gas station. |
| 8 | External lighting is turned on and operating normally. |
| 9 | The pressure in the brake system has dropped. It is necessary to immediately add fluid to the expansion tank of the system. |
| 10 | The high beam headlights are activated. |
| 12 | The odometer display shows non-resettable mileage. |
| 13 | The hazard warning lights are on. |
| 14 | The engine control system is damaged or not working correctly. |
| 15 | The battery is not receiving a charge. In this case, you should check the battery itself for wear and the generator set. |
| 16 | The handbrake is activated. |
| 17 | The oil pressure in the engine crankcase has dropped below normal. You should add fluid to the specified level and check the operation of the pump. |
| 18 | In a configuration with an airbag, it indicates that the squib drive is turned off. In other versions the light bulb is a backup one. |
Errors when connecting/operating the on-board computer
Error: “No connection with the controller” or “break in the K-line.”
It indicates that the K-line is not connected or a contact break has occurred. Check the wire according to the diagram described above. Most likely, the contact has come off the diagnostic block.
Error: Incorrect temperature sensor readings.
If, according to the instrument readings, your temperature outside is -40, then this indicates that a wire has broken or there is no such analyzer at all. If the sensor shows -25, but it's only -10 outside, then you need to replace it.
–> VAZ Masters / Salon / On-board control system
On-board computer block
Troubleshooting BC
Malfunctions occur with BCs of various modifications. It would be useful for the owner to know what to do in such cases. Many failures occur when the on-board computer was not installed properly. First, you need to check the reliability of the connections. Secondly, there is a high probability of accidental damage or pinching of the K-line. Multitronics itself will report this, displaying obviously incorrect data.
You can deal with the problem yourself. If it is connected to a damaged K-line, then you need to purchase a new wire for the VAZ-2111 at a car store or on the market.
It is inexpensive, and the entire replacement procedure will take no more than 60 minutes. More time will be required if the problems of the on-board computer 2110 are caused by broken contacts. It is necessary to disconnect the device after performing a visual inspection. If bent plugs are still present, you should select new ones from the store and resolder them.
Using the BC on a VAZ passenger car allows the owner to always be aware of the technical condition of the car. The device is selected based on needs. Its effectiveness depends on correct installation.
Many owners of domestically produced cars, including the VAZ-2110, are trying in every possible way to improve their cars. And if cutting off an extra coil from the rear springs or screwing a “bench” onto the trunk lid is nothing more than “collective farm tuning,” then installing an on-board computer is a completely justified step. An on-board computer is a useful tool with which you can track engine operating parameters, current and average fuel consumption, speed and other equally important information.
Algorithm for performing self-installation of an on-board computer
So:
- first you need to free the central dashboard of the car from the plug;
Connection block for on-board computer VAZ 2110
- after which, on the central dashboard you will need to find a diagnostic block of 9 contact wires;
- A 9-pin block is found on all VAZ “tens”;
- then, you need to connect the car’s on-board computer to the block.
Note. You must remember to draw the so-called K line.
Algorithm for drawing line K
So:
- It is imperative to use a pre-prepared meter wire in order to establish the appropriate connections;
Brake pads for VAZ 2110 included
- the prepared wire must be inserted into the block, and specifically into the second contact;
- the other end of the pre-prepared wire must be connected to the diagnostic block, having first pulled it under the dashboard.
Note. In order to easily install the wire, you need to temporarily turn the right side of the dashboard to one side.
- after the corresponding wire reaches the diagnostic block, it will need to be connected to the “M” socket;
- Now you can connect the on-board computer with complete confidence by installing it in the appropriate place;
- The final step is to conduct a full check of the functionality of the on-board computer.
The VAZ 2112 instrument panel does not work - reasons
If the panel suddenly stops working:
Panel backlight does not light up
There may be damage to the light activation key. It is recommended to check the corresponding fuse.
The panel is blinking
Consequence of deterioration of electrical wiring contacts. The user should inspect the supply wires for cracking or damaged insulation. The contact groups should be disconnected and cleaned of oxides and dirt. Treat the terminals with special oil.
Tidy 2112 stuck
This kind of problem is unexpected, but it occurs everywhere. As a repair, users are suggested to reset the electronic equipment. Remove the terminals from the battery and wait 15 minutes.
Possible causes of malfunction of the on-board computer and the main ways to eliminate them
One of the most common reasons is the lack of communication with the controller or line-K. What does the current error indicate and what needs to be done:
- the appearance of this error directly indicates a broken contact, or a poor connection of line-K with the additional block;
- The first thing you need to do is check line K according to the diagram;
- in most cases, the cause of this malfunction is a contact break between line-K and the diagnostic block.
Failure in temperature sensor readings
Sometimes, due to exposure to extremely low temperatures, off-board temperature sensors may fail. Typically, in this case, there are two options:
- breakage of the corresponding contacts;
- failure of the sensor itself or partial loss of functionality.
Note. Sometimes, if there is a practical need, you can install two on-board computers in a car at once, each of which will confidently occupy its own niche.
Add a commentAdd a comment We recommend readingThe VAZ 2109 instrument panel electrical circuit has differences on a high dashboardOn-board computer of the VAZ 2110 injector: disadvantages and advantagesDiagnostic block for the VAZ 2110 and its featuresVAZ 2109 diagnostic block - ease of car maintenance
On cars of the Tenth Family, a clock or computer is always installed next to the display unit. Nowadays such computers are called “on-board computers” (BC). When the ignition is turned off, the computer display shows the time, but this is not its only function! We will list all the capabilities of the on-board computer on the VAZ-2112, and the instructions supplied by VAZ will help us with this. Tables that are important during setup were copied from the instructions.
What bookmaker are we talking about? The answer is given in the video.
Types, prices
On-board devices can be divided into two large groups:
- Universal. These models can be installed on any car model. Most often they are mounted as an alternative to an interior mirror. Sometimes universal type BCs are mounted on the windshield;
- Individual. Such on-board computers are focused either on one car model or on a group of similar ones. For example, VAZ 2108, 2109, 2110 - the group is determined by the old instrument panel. These are more functional and efficient devices that use an electronic control unit and are mounted in the dashboard.
You can also distinguish injection and carburetor types. The first option has gained great popularity among motorists, so there are significantly more models on the market. As for the VAZ 2110, this car requires computers for the old type of torpedo. The most popular device manufacturers are State and Gamma. Depending on the price, the State offers a different set of features. There is even a color version of BC State. Gamma devices have a higher price, but they have less choice, since the model range is limited to functional modern devices.
Their prices are as follows:
- The cheapest State computer will cost the owner of a VAZ 2110 1200-1300 rubles; for 2500 rubles you can already purchase a more serious version with a color display and a large set of functions. The latest model of the universal device, State, costs about 5 thousand rubles.
- As for Gamma, the cheapest on-board computer here costs 3,200 rubles. The most expensive is 7,000 thousand.
In addition to these companies, there are Prestige, Orion, Multitronics and others on the market. It’s hard to say who is better and who is worse, since the functions are almost the same everywhere.
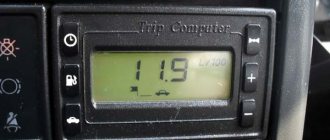
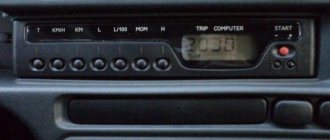
Standard on-board computer: a short tour
The appearance of the front panel is shown in the photo below. You need to remember the main keys: 1, 2, 3 and 5. All functions are divided into three groups. By pressing button 1, you can scroll through the functions of the first group. The same applies to other keys.
Standard BC for the Lada-112 hatchback
The question is, why is button 5 needed? While in any of the three groups, this button activates additional functions. By the way, their number is two.
Each group has different additional functions.
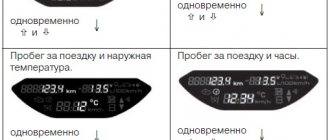
Swipe example
When the ignition is turned off, we see a clock on the display. Let's try to turn on the ignition and press key 1. The button itself can be pressed any number of times - the functions switch cyclically. Their number is three.
Function group "Time"
If you need additional functions, press button 5. We looked at how to use the standard on-board computer on a VAZ-2112, but the instructions are suitable for any “Ten”.
Operation of BC in different modes
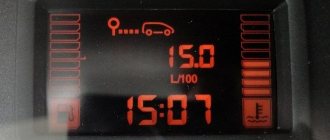
The above describes how to use BC in the “Time” mode. The “Time” group is the first, but there are two more – “Fuel”, “Path”. We provide tables for them.
Function group "Fuel"
Above is the table for buttons 2 and 5.
Function group "Path"
The functions activated by buttons 3, 5 are shown here.
Description of the buttons on the panel
| Number in photo | Purpose |
| 10 | Additional equipment control module. |
| 18 | Steering rack position regulator. |
| 19 | Hood lock drive. |
| 20 | Horn button. |
| 22 | Trunk lock actuator button. |
| 24 | Hydrocorrector of headlights. |
| 25 | Switch for turning mode and headlights. |
| 26 | External lighting switch button. |
| 27/31 | Front/rear fog light switch. |
| 33 | Button for turning on the rear window heater. |
| 34 | Instrument lighting regulator. |
| 38 | Exhaust gas recirculation switch. |
| 39 | Air conditioner control buttons. |
| 40 | Heater damper position regulator. |
| 42 | Emergency button. |
| 43 | Switch for wipers and headlight washers. |
Programming instructions
We will change different settings. We’ll also try turning on the alarm, changing the brightness of the backlight, etc. Thus, programming a computer on a VAZ-2112 also applies to operation.
Setting up the fuel level sensor
The tank initially remains empty. Turn on the “Fuel level” function (2-5) and press button 4 for more than two seconds. Next we follow the steps:
- Press button 3 for one second until a sound signal appears;
- Fill the tank with three liters of fuel. Wait 10-20 seconds and repeat step 1;
- Repeat steps 1 and 2 until 39 liters are filled.
Activate the speed warning light
By pressing button 3 we turn on the “Average speed” function. Press key 4. Then use buttons 5 and 6 to set the required numbers. Finally, press button 4.
To disable the option, use a high threshold value: 190 or 200 km/h.
Changing the backlight brightness
Let's use function 1-3 “Time with stops”. Press button 4. Use keys 5 and 6 to make adjustments. Press button 4.
Alarm
Go to the “Alarm Clock” option (an additional function in the “Clock” list). Press button 4. Next, set the hour value (keys 5 and 6), press button 4, set the minute value (keys 5 and 6). By pressing button 4, the alarm clock is activated.
An alarm clock in a car is a necessary thing
All that remains is to figure out how to turn off the alarm clock. Complete all the steps before setting the hour value, and then press button 1. The alarm should turn off!
How to set up your calendar and clock
We have reached the most difficult chapter. Let's get straight to action:
- Turn on the “Clock” or “Calendar” option (button 1 or buttons 1 and 5) ;
Clock and Calendar options - Press key 4;
- Use buttons 5 and 6 to set the hour or date;
- Press key 4;
- Use buttons 5 and 6 to set the minutes or month;
- Press key 4 again.
For a quick adjustment, follow step 1 and step 2. If you then press button 1, the clock will round up from 1:57 p.m. to 2:00 p.m. Or in other words: it was 14:05, but it will become 14:00.