Owners of popular Lada Kalina models often encounter situations when the cooling fan does not turn on. This situation forces the driver to periodically stop to allow the engine to cool down. If a malfunction occurs in frosty weather, then it has almost no effect on the functionality of the system, but in warm periods it significantly prevents the LADA Kalina from moving smoothly.
Most Lada Kalina owners are not able to independently diagnose the reasons why the cooling fan does not turn on, much less eliminate them. Tow trucks and services, as well as a switching diagram, are happy to come to their aid.
Replacing the cooling fan Lada Kalina
To replace the cooling fan, it is not necessary to go to a service station. You can do this without much difficulty on your own.
- head with ratchet or socket wrench 10;
- screwdriver with Phillips bit;
- pliers.
spanner or open-end wrench 8;
Work order
- Place the car on a level surface.
- Raise the hood, disconnect the ground wire from the battery.
- Using a 10mm wrench, unscrew the two air filter mounting bolts.
- Disconnect the mass air flow sensor connector by pressing the latch.
- Disconnect the purge valve connector located on the air filter housing.
- Using a screwdriver, unscrew the bolt of the air duct fixation clamp and remove the corrugation.
- Unscrew the 4 screws securing the air filter cover.
- Remove the cover and remove the filter element.
- Using a size 8 wrench, unscrew the nut securing the air intake and remove it.
- Using a size 10 wrench, unscrew the two nuts securing the fan casing on the right in the direction of travel of the car, and then with a size 8 wrench, unscrew the two nuts on the left.
Repair and replacement of coolant temperature sensor on Lada Priora
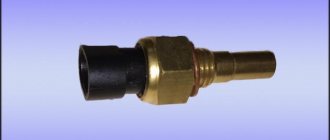
The coolant temperature sensor (CTS) in a Priora car performs the function of monitoring the thermal state of the power unit. Thanks to DTOZH, the driver always knows to what temperature the engine is warmed up and whether there is overheating in the system. You can learn more about the principle of operation, as well as replacing the controller, from this material.
Characteristics and features of DTOZH on Priora
Many motorists confuse the DTOZH with a cabin or ambient temperature sensor, but this is completely wrong. The purpose of the DTOZH is to monitor the temperature of the refrigerant in the cooling system.
There are two regulators in Lada Priora cars:
- One of them is installed on the cylinder head and its purpose is to display information about the engine temperature on the dashboard. Essentially, this is a pointer.
- The thermostat housing contains the DTOZH, which plays a more important role. This device transmits pulses to the control unit to activate the ventilation device. In addition, it plays an important role in the formation of the combustible mixture during startup of the power unit.
As for the principle of operation, it is as follows. The main regulator is located in the thermostat housing, which allows for the highest pulse accuracy. Since the DTOZH in any case comes into contact with consumables, that is, antifreeze, it instantly detects changes in temperature and sends corresponding signals to the ECU. The latter, based on the information received, adjusts the operation of the engine and changes the composition of the air-fuel mixture. If there is no or too low level of consumable fluid in the system, the controller will provide incorrect data.
Possible sensor malfunctions
If the regulator fails, this is fraught with the following problems for the car owner:
- gasoline consumption will increase;
- the volume of exhaust gas emissions into the atmosphere will increase;
- the engine may stop working and will be difficult to start;
- overall deterioration in vehicle dynamics, poor handling;
- the power unit will take much longer to warm up, since due to incorrect readings from the DTOZH the control unit may randomly turn on the fan;
- Overheating of the engine is also possible.
If we talk specifically about the reasons, then the DTOZh may be working properly. If this is the case, then the car owner needs to diagnose the wiring and contacts - it is possible that all the symptoms are associated with an open circuit or oxidation of the sensor contacts (the author of the video is the Car Design and Repair channel).
Checking the regulator for functionality
To diagnose DTOZH at home, you will need a separate container with antifreeze, as well as a thermometer that can record temperatures up to 120 degrees. Checking is carried out using a tester. In particular, you need to measure the resistance at different temperatures of the liquid (the liquid must be heated during diagnostics), and the obtained data is checked against the temperature.
At 100 degrees, the resistance of the device should be 177 ohms, at 90 degrees - 241 ohms, at 80 - 332 ohms. At an engine temperature of 0 degrees, the resistance level will be 7280 Ohms, at 40 degrees - 1459 Ohms. This data will be sufficient for diagnostics.
DIY replacement instructions
If the diagnostics showed that the DTOZH is operational, but signs of a malfunction still appear, then, as we have already said, check the quality of the regulator connection and wiring. If, as a result of the check, it turns out that the device is inoperative, then the coolant temperature sensor will need to be replaced. The replacement procedure itself is not particularly complicated; even a novice car enthusiast can handle it.
As you know, Lada Priora cars go on sale in several modifications - with an 8 or 16 valve engine. Therefore, some car owners may think that the replacement procedure will look different in both cases. But we immediately want to dispel doubts - everything will look almost identical - the thermostat housing is located in the same place on both versions of the engine. The only difference is that you will need to dismantle the line that connects the air filter element to the throttle in advance.
How to replace a fan
Having understood exactly why the cooling fan of the Lada Kalina does not work, you should replace the faulty element. With the proper skills and dexterity, you can perform the repair yourself. The tools you need to prepare are pliers, a screwdriver, wrenches 8 and 10.
First, we place the vehicle on a level surface. Then we lift the hood and disconnect the system from the battery. Using a wrench, disconnect the air filter mounts. Next, you need to disable the mass air flow sensor (just press the latch) and the purge valve, which is located on the air filter housing. Unscrew the clamp bolt and remove the corrugation.
Remove the air filter cover, remove the filter element, and dismantle the air intake. Then we proceed to attach the fan casing and disconnect the power supply to the fan. Having done everything correctly, you can dismantle the fan. We remove the electric motor and then replace it with a new element. Then we put everything back together.
Finally, it is worth checking the functionality of the device. We start the engine and then warm it up for 3-5 minutes. The fan should turn on during this time. There is no need to turn off the car as soon as the fan starts spinning - you should wait until the device turns off automatically.
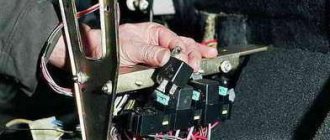
Where is the fan relay located?
To access it, follow this algorithm:
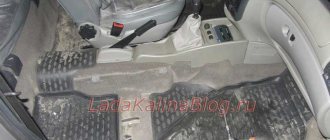
- On the interior side, we find a bolt located at the left leg of the front passenger, on the side of the center console. We unscrew it, after which it will be possible to dismantle the decorative trim.
We unscrew the bolt and gain access to the relay.
Varieties
- Where there is one relay and one cooling fan speed.
One fan relay in the diagram.
Block on LUX
This is what the additional relay block looks like on the Luxury version of the Lada Kalina.
What if the fan completely stopped working?
To determine the cause of such a malfunction, you first need to check the condition of the fuse in the electrical circuit. It can be found on the side console, near the passenger seat. It is hidden under the deflector cover. By unscrewing the screw, the cover can be easily removed and the fuse will be available for examination.
To remove the entire safety block and connected relays, the mount must be released. You can't do this without wrenches. You need to remove the unit carefully without haste, as you can damage the wires that are connected to it. Only the single fuse of the unit is responsible for the operation of the fan.
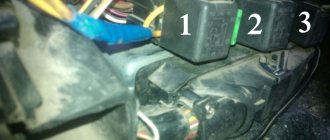
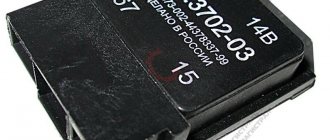
If the fuse is intact, it is necessary to check the operation of the relay that powers the fan motor. There are two such relays installed. The left one turns on low fan speed. And the one located on the right is responsible for the high speed of its operation.
Another problem that relates to the cooling fan relay is that the cooling fan continues to operate when the ignition is turned off. This may drain the battery. “Kalina” then simply won’t start. The main reason is sticking contacts. The block is exposed to antifreeze leaking from the radiator installed above the stove.
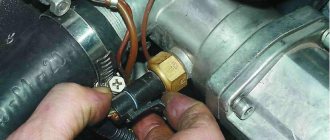
When the relays and fuses are working properly, you need to check the operation of the temperature sensor. It is he who orders the fan to start working. This sensor is located on the right side of the radiator tank.
To check its functionality, you need to remove the plug connector, take a jumper, and use it to short-circuit the connector terminals. The fan turning on indicates that the sensor is in good condition. If the fan does not react at all, then before changing the sensor, you need to check the functionality of the fan motor. To do this, the electric motor terminals must be connected to the battery contacts. The engine should start working. In case of failure, you will have to install a new electric motor.
Cooling system malfunctions
First of all, this is due to antifreeze leakage. This malfunction is clearly visible under the hood of the car. In most cases, fluid leakage from the system occurs due to:
- lack of tightness on the pipes.
- clamps are outdated;
- the heating radiator is clogged;
- The cooling radiator is broken.
The heating radiator will have to be replaced, but a large radiator can be repaired. You just need to solder the holes. But it must be remembered that it is mainly the copper radiator that is soldered. The aluminum radiator installed on Kalina is rarely repaired. It is better to immediately replace it with a new one.
In case of constant overheating of the car engine, the first place is due to malfunctions of the cooling system:
- Thermostat. To check it, you need to warm up the engine. Use your hand to touch the pipes leading to the radiator. When the top pipe is completely cold, while the bottom pipe is slightly warm, we can talk about the thermostat being stuck. In this case, the liquid moves in a small circle. There is only one way to fix the problem - you need to install a new thermostat.
- The radiator honeycombs are completely closed. A common cause of abnormal operation of the cooling system. In most cases, this happens at the beginning of summer, when poplar fluff begins to fly. To get everything back to normal, you need to clean the outside of the radiator. Sometimes such work causes certain difficulties, but this is the only way to make the system work properly. You have to do manual work.
- The fan is broken. When the heating temperature exceeds 95 degrees and the fan is silent, several parts need to be checked:
- cooling fan relay;
- electrical wiring;
- sensor
After detecting problems, a new relay and sensor are installed, and the wires are replaced.
Relay and fuse box Lada Kalina
Before replacing the fuse, the cause of the blown fuse must be determined and eliminated. To avoid failure of elements of the engine control system, do not install fuses with an increased rating or homemade ones. Sometimes the fuse thread remains intact, while its connection inside the fuse is broken. It is impossible to visually determine such a malfunction. In this case, you can assess the condition of the fuse using an ohmmeter. You will find a full description of viburnum fuses below.
Where is the Kalina relay and fuse mounting block located.
On the left side, behind the exterior lighting control panel.
1. By pulling the tab on the left side of the instrument panel, open the cover of the mounting block.
2. Here is the mounting block itself.
To get a better look at the location of the viburnum fuses, click on the image.
Purpose of viburnum fuses located in the car interior block.
Mounting block of fuses and relays: 1 - installation location of the headlight wiper relay, K1; 2 — headlight high beam relay, K7; 3 — relay for turning on the sound signal K8; 4 — relay for turning on power windows of viburnum doors, K2; 5 — installation location of the fog light relay, K9; 6 — starter relay; 7 — relay for turning on the heated rear window, K10; 8 - additional relay, K4; 9 — seat heating relay, K11; 10 — relay for turning on direction indicators and hazard warning lights, K5; 11 — installation location of the backup viburnum relay, K12; 12 — relay for turning on the windshield wiper and windshield washer, K6; 13 — tweezers for removing fuses and relays with a small housing; 14 — tweezers for removing the relay; 15 - spare fuses; 16 — installation location of the ABS fuse, F28: 17 — electric power steering fuse, F27; 18 - fuses F1-F26
Decoding the relays and fuses in the main block of the Lada Kalina.
How to select and replace a relay on Kalina
A relay in a car is used to remotely control consumers that require high currents.
For example, to activate the starter, the ignition switch contacts and its wiring will not be enough. Therefore, the lock serves only as a control device, and the relay closes the power contacts and the retractor relay circuit.
In cars of both generations, the most common 4 and 5-pin relays are used. However, two types of sizes are used here; this should be taken into account when selecting. It is better to look at the characteristics of the relay on the body and buy exactly the same one or show the required relay to an auto parts dealer. Automotive relays can vary in current strength, number and location of contacts.
To replace faulty relays and fuses on the Lada Kalina, use a special “pliers” tool, which is installed in the lower right corner. The larger ones are for relays, and the smaller ones are for fuses.
If, after replacing the fuse, it has blown again, you should not try to change it again; most likely there is a short circuit in the circuit and the car must be sent for more thorough diagnostics.
Why the cooling fan does not work on Kalina
The radiator fan is used to force cool the engine radiator when it overheats. When the car is in motion, the radiator is cooled by oncoming air flow.
At low speeds, or when the car is just standing still, the radiator is not able to cool the liquid on its own, so when it reaches a certain temperature (101-105 degrees), the sensor is triggered, thereby transmitting the corresponding signal to the controller.
The latter analyzes the received information and turns on the fan.
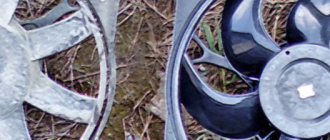
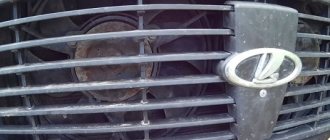
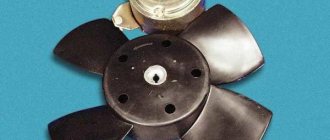
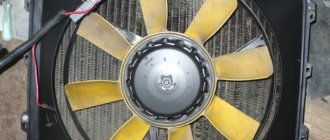
The fan itself is a structure consisting of a casing (housing) with a built-in electric motor with an impeller. The fan is attached to the inside of the cooling radiator.
How the cooling system works
This system works in conjunction with a wide variety of parts that measure:
- heating the engine oil;
- ambient temperature.
In addition, the operation of the system largely depends on a variety of electrical sensors included in the electrical circuit of the Kalina. Thanks to the joint work of all these parts, the cooling fan relay is automatically turned on on the Kalina car. Automation monitors the operation of the entire system and ensures the best cooling of the engine.
Temperature affects the movement of fluid. Kalina has two movements:
- small circle;
- big circle.
When the fluid moves in a small circle, it bypasses the radiator. At this time, the thermostat is closed. As soon as the temperature of the power unit begins to increase, the thermostat slowly opens. The path to the radiator is opened for coolant. Here it is cooled due to a powerful flow of oncoming air. If such cooling is not enough, the fan switch sensor will work, it will turn on and begin forced cooling.
How to find the reason
Start checking with the electric motor. To do this, disconnect the electrical wires from it and connect it directly to the battery, observing the polarity. If the fan does not turn on, that is the problem. If it works, you need to look for another reason.
Check all contacts on the connectors, and then the relay and fuse. They are located in an additional mounting block, which is located to the right of the instrument panel near the lower heater air duct.
The fuse (50 A) can be checked with a tester; it is better to take a relay that is known to be working and install it in the appropriate socket. If the problem is not solved, move on.
Checking the temperature sensor. To do this, warm up the engine to operating temperature, turn it off and disconnect the sensor. It is located on top of the thermostat housing. When the sensor is disabled, the controller must independently start the fan to operate continuously.
Start the engine and wait for the fan to turn on. If the coolant temperature has reached a critical value and the fan does not turn on, you need to look for a break in the electrical wiring.
Do I need to change the fan?
If you have determined that the problem is in the fan itself, or rather in its electric motor, you can try to repair it. Most often, it stops working due to failure of the brushes, or due to problems with the rotor bearings. Less often the collector becomes unusable or a break occurs in the winding.
If the fan cannot be repaired, it must be replaced.
Under no circumstances should you drive a car with a non-functioning fan. Overheating of the engine will inevitably lead to the destruction of the rubber hoses of the cooling system, gaskets, and also threatens the failure of parts of the piston group.
Causes and symptoms of fan malfunctions
To understand that the electric fan is faulty, you don’t need complex diagnostics - any car enthusiast can do it. You should start the engine and let it idle until the coolant temperature reaches a critical temperature. You can monitor the process using the temperature sensor on the instrument panel. When the arrow is close to the red zone, the sensor should give a signal to the controller, which will start the fan. You can recognize this by the characteristic noise coming from the engine compartment. If the indicator shows a critical temperature, and the fan does not start working, then there is a malfunction that needs to be corrected immediately. The fan may not work for a number of reasons:
- The electric motor is faulty. In this case, it will not rotate the impeller. Typically, on VAZ cars, the electric motor rarely fails. To check its functionality, you will need to connect it to the battery directly. To do this, you need to take two wires and connect their ends to the battery terminals and the electric fan wire block. If in this case the impeller does not rotate, then there is a malfunction of the electric motor. This part rarely requires repair. You will need to remove the assembly and replace the electric motor. The work is simple and can be done even outdoors with your own hands with a minimal set of tools.
- The temperature sensor is faulty. If the sensor fails, it cannot track the increase in coolant temperature; accordingly, the controller receives incorrect readings and the fan does not turn on when needed. To diagnose this problem, you will need to disconnect the wire plug from the sensor and short the two terminals together. If the fan operates and the impeller starts to rotate, the sensor is faulty and needs to be replaced. The procedure is complicated by the need to drain the coolant, but it is not so complicated that this problem should be addressed to a service center.
- No tension. The most common malfunction associated with an electric fan is a break in the electrical circuit in one of the sections and a lack of voltage. For diagnostics, you need to “ring” the electrical wiring and check the fuses; to work, you will need a tester (multimeter). If you do not have the skills to use a multimeter, it is advisable to contact an auto electrician.
A problem with the electric fan is also possible in another situation, when the impeller rotates constantly and the electric motor does not turn off. The electric fan may always work or start working too early, when the coolant temperature has not yet even reached operating parameters.
- The relay contacts are stuck. Sometimes situations may arise when the fan relay contacts are constantly in the “on” position, which is why the fan will start immediately after the engine starts. The relay should be replaced and tested for functionality.
- The temperature sensor is faulty. The sensor transmits elevated temperature readings to the electronic engine control unit, which causes the controller to send a signal to turn on forced cooling. Will need replacement.
- Thermostat malfunction. The cooling fan on Kalina is not equipped with an auxiliary temperature monitoring sensor. This means that only average indicators are taken into account. If the thermostat valve is stuck in the closed position, the coolant circulates only through the small circuit and cannot flow into the large circuit. The antifreeze heats up quickly and the electric fan starts to turn on very often. In this case, the liquid does not pass into a large circle, that is, there is no hot antifreeze in the radiator, the fan cools the cold radiator, and the liquid continues to heat up, which leads to overheating of the engine. The thermostat may also jam in the middle position when the valve does not open completely. This also leads to ineffective cooling - the fan will run constantly due to the fact that the antifreeze cannot cool enough. In these cases, you will need to replace the faulty thermostat; this is easy to do yourself. If you need to save time, you can entrust this procedure to the service. Replacing cooling system components is not a complex task and can easily be done independently. An exception is the replacement of the water pump, since it has a single drive with the gas distribution mechanism.
Constant operation of an electric fan is not as bad as if it did not work at all, unless the problem is related to a faulty thermostat, as it can lead to overheating and failure of the power plant.
The price of a cooling fan and the cost of replacing it
Prices for a cooling fan for the Lada Kalina (electric motor with impeller) vary between 1500-2500 rubles. Replacing this unit at a service station will cost 300-400 rubles.
When buying a new fan, pay attention to its manufacturer and catalog number. This part may have the following numbers:
- 1118-1308008;
- 1118-1300025;
- 21230-1300025-00;
- 2123-1300025 (with two engines for Kalina 2123);
- MOD285 (BM brand);
- BMMOD285 (Pilenga brand).
Some improvements to the Kalina water cooling system
Today, drivers use several methods to upgrade the cooling system. For example, the factory cooling system is completely redone. At the same time, Kalina is equipped with a completely new thermostat with six holes. Thus, the coolant temperature becomes more stable. The cabin becomes much warmer.
To reduce the likelihood of failure of the cooling system, the Lada Kalina is equipped with a special filter through which coolant is supplied.
The installation of a furnace tap is also ideal. In addition, an additional pump is installed in the fluid supply system. As a result, antifreeze will move quickly through the channels, in winter the Kalina will receive enhanced heating, and in summer the engine will never overheat.
Kolodiychuk Andrey
, especially for
Replacing the cooling fan Lada Kalina
To replace the cooling fan, it is not necessary to go to a service station. You can do this without much difficulty on your own.
- head with ratchet or socket wrench 10;
- spanner or open-end wrench 8;
- screwdriver with Phillips bit;
- pliers.
Work order
- Place the car on a level surface.
- Raise the hood, disconnect the ground wire from the battery.
- Using a 10mm wrench, unscrew the two air filter mounting bolts.
- Disconnect the mass air flow sensor connector by pressing the latch.
- Disconnect the purge valve connector located on the air filter housing.
- Using a screwdriver, unscrew the bolt of the air duct fixation clamp and remove the corrugation.
- Unscrew the 4 screws securing the air filter cover.
- Remove the cover and remove the filter element.
- Using a size 8 wrench, unscrew the nut securing the air intake and remove it.
- Using a size 10 wrench, unscrew the two nuts securing the fan casing on the right in the direction of travel of the car, and then with a size 8 wrench, unscrew the two nuts on the left.
- Disconnect the fan power connector.
- Carefully, so as not to damage the radiator fins, remove the fan along with the housing.
- Using a 10mm wrench, unscrew the 3 bolts securing the electric motor and remove it from the housing.
- Install a new electric motor with impeller in its place.
- Screw the casing assembly with the fan to the radiator.
- Connect its connector.
- Carry out the rest of the installation work in reverse order.
Modernization of Kalina SOD
The main problem of the Kalina cooling system is the formation of air locks. Today there are a number of effective ways to eliminate this defect. The reason lies in the design features of the SOD. The operation of the cooling system is based on the interconnected functioning of many parts. The use of the large and small circuits depends on the temperature of the antifreeze circulating through the system. The normal operation of the entire power plant depends on this.
You can modify the cooling system yourself or at a service center. Professionals rarely engage in all sorts of modifications, recommending replacing or repairing a particular component. This method may be more expensive, but not always more effective.
Classic ways of improvement
In order to solve the problem with the formation of air locks, you need to remove the expansion tank cap and start the engine. Then wait until the coolant temperature rises to the critical red zone until forced cooling by the fan comes into operation. After this, you need to press the gas pedal several times and turn off the engine.
If the method is ineffective, there is another method. To do this, you need to dismantle the engine protection, loosen the clamp and remove one of the tubes of the throttle body heating fitting. Then unscrew the cap of the expansion tank and, applying a rag, start blowing into it until antifreeze begins to flow from the removed pipe. In order to modify the standard cooling system, many car owners install a more efficient 6-hole thermostat, install a coolant filter and another heater faucet.
To increase circulation efficiency, an additional pump is often installed.
Other upgrade options
If the car is equipped with an electronic gas pedal, the hose that previously went to heat the throttle assembly is now looped into the cooling system. To prevent the formation of air pockets, an additional pipe with a smaller diameter is used, which is installed instead of the above hose. The hose for the air duct is placed near the thermostat; for this, a tee is used, mounted in the pipe fitting to the radiator. The second end of the pipe is connected to the steam removal hose near the expansion tank (you will need another tee).
The modification ensures a stable operating temperature of 90 degrees in urban conditions, and the stove begins to warm up at 50 degrees.
The next improvement method is to equip the steam outlet with a special hydraulic fence. To do this, a tube from a dropper is mounted in the steam removal hose, which is immersed in antifreeze at the bottom of the expansion tank. As it cools, the antifreeze is drawn into the outlet pipe, which prevents air from the cooling system. If desired, you can combine both methods.
Where are the fuses for Lada Kalina 2?
The fuse box is located near the driver's left foot. Pull the lower left corner of the cover (#1) to release the left locking point, then the middle (#2) and the two right locking points (#3 and 6). Then release the upper locking points (No. 4 and 5) and remove the cover.
Installing the fuse box cover is carried out in the following order: first snap the right fastening elements, then the lower ones, and then the upper ones. Make sure that the fastening elements of the cover are aligned exactly with the metal fasteners.
On the plastic cover of the mounting block there are symbols that indicate what each fuse (F) and relay (K) is responsible for, as well as their numbering.
Block under the hood
It is located next to the battery.
Photo - diagram
p, blockquote 23,0,0,0,0 —>
- 30A Low beam headlights or main relay, circuits protected by fuses F1 and F21 of the mounting block in the passenger compartment 50A Windshield heater
- 60A Generator
- 60A Generator
- 30/40A Heater fan (heater fuse grants)
- 50A Electromechanical power steering
- 60A ABS block