The panel is high. The car is from 2001.
Lately, the STOP sign and the red light next to it have sometimes started to light up [something like this -
A fairly common problem is that the brake lights on the VAZ 2109 do not light up. And it is difficult to call it insignificant: they send a signal to drivers driving behind that your car is braking. Thus, road users are warned, and they themselves, accordingly, reduce their speed.
I didn’t warn you, they drove you into the appropriate place - it’s your own fault. Moreover, you will have to pay not only for your car, but also for the restoration of the car that carried out the collision, since it is its owner who will be considered the injured party. And such a development of the situation in a city with heavy traffic is very likely.
Heavy traffic does not contribute to maintaining a distance of 5 m, as provided for in the traffic rules. Cars move one after another during rush hours: any carelessness can lead to an accident. Moreover, both warning lights may not work, or only one may fail - and in this case, you can consider yourself lucky, there is still a partial warning of the threat from behind.
The brake lights on the VAZ 2109 do not light up for various reasons, from the most trivial to those requiring a thoughtful and more serious examination. Methods for identifying such a malfunction and ways to eliminate it are described in our article.
Simple cases
The main thing is to notice in time that the feet have failed, before an accident occurs. The most likely and, one might say, common reasons will be the following.
- Light bulb burnout
. A simple inspection will not give results; outwardly it may seem functional. Take a new lamp that works exactly and screw it in instead of the problematic one. If it lights up, the cause has been found; - Oxidation of contacts
in the wire block, which is placed on the terminals of the board (track) of the headlamp. The actions are similar to point 2, only they are done with the block: it is removed and put on again 3-4 times. Or the contacts are cleaned manually; - Burnt out tracks
. Visible upon visual examination. There are 2 options: buy a new board and replace the damaged one or restore the existing one by soldering wiring of the appropriate thickness onto the damaged track; - The brake light sensor (the so-called “frog”) has failed. In the VAZ 2109 it is located under the brake pedal. To check, both wires are removed from the DSS and short-circuited directly with a piece of wire. If the stops work, then we go to the auto shop for a new sensor. If there is no response, we look further for the reason. O in the entire system is the most vulnerable point (except, perhaps, the light bulbs). Many VAZ owners begin their search for the cause of non-working brake lights with it.
Oxidation of contacts directly in cartridges. Detected visually. To clean, the light bulb rotates in the socket several times - the layer gets knocked down and the stops light up. To guarantee, you can unscrew the lamps and go over the contacts with fine sandpaper. In some cases, hopeless damage to contacts is detected; in this case, the cartridge itself will need to be replaced;
We looked at the simplest and most likely breakdowns. Next, brake lights that do not light up require a more serious check.
Installation and repair instructions
If you are faced with the problem of a failure of the dashboard of a VAZ 2109 vehicle, then the best option would be to replace the dashboard yourself. To properly replace, you will need instructions for dismantling and installing the shield, which are given below. To perform these steps, you only need screwdrivers - flat-head and Phillips-head. The instructions are given on the example of a low panel, but in general they are identical for other versions of instrument panels. Don't forget to disconnect the battery!
Unscrew the screws of the shield visor. Disconnect the speedometer cable. Disconnect the ecometer hose.
- First of all, you need to de-energize the system; to do this, disconnect the terminals from the battery.
- Using a Phillips screwdriver, unscrew the plastic trim around the steering wheel. You don’t have to remove it, but it is advisable to do so for greater convenience.
- You can also disconnect the steering column switches by simply unplugging the wiring harness.
- Using a Phillips screwdriver, unscrew the two small screws securing the dashboard visor and remove this element.
- After these steps, you can compress the springs and remove the electronic panel from the center console.
- The next step is to disconnect the speedometer cable. It is necessary to be very careful when dismantling so as not to damage the cable, especially if it is old. Otherwise, it will need to be replaced.
- Next, turn off the white outlet and remove the econometer hose.
- Then you should disconnect the cable for resetting the car’s daily mileage data from the speedometer.
- The final step will be to disconnect the red connector and dismantle the shield itself. A new panel is replaced and installed, after which further assembly is carried out in the reverse order.
As you can see, the procedure for replacing the instrument panel is not particularly complicated - just do everything in accordance with the instructions and there will be no problems in the further operation of the device.
Electrics
Not everyone likes to tinker with it, but if simple reasons have already been ruled out, you will have to deal with the wires.
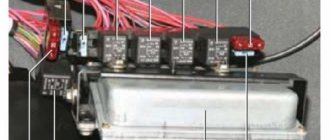
- Let's start with the fuse
. The mounting block with them is built under the hood on the steering wheel side. If you have block 17.3722, you need fuse No. 6, if 2114 - F3. We replace the burnt out one and return the whole one back; - Checking the circuit
. We look through all the wires, contacts and connections. Let's start with the positive. Pin 30 goes from the generator to the stop signals, the intermediate link is block Ш8. It is the farthest one on the left in the engine compartment, the wires are pink. Next comes the mounting block. We have already checked the fuse, so we pay attention to block Ш4 and the white wire that leads to the brake light sensor. There are no breaks - we follow the red wire to block Ш2, through the mounting block and to block Ш9. If everything is in order here, we check the red wire stretched across the entire interior to the inoperative taillight. After ringing the plus, we turn to the minus. They are represented by black wires coming from the blocks to the headlights; - The test is carried out with a test lamp, connected with one output to the current terminals, and with the second connecting it to ground. Or you can throw a long wire to the positive of the battery. All broken wiring is replaced, contacts are cleaned and tightened. If, after all the manipulations done, the brake lights on the VAZ 2109 still do not light up, then you have serious problems with the fuse assembly block. It will have to be checked completely, inside and out, since it is unknown where the breakdown occurred.
If you are friendly with an electrician, do the work yourself; if not, go to a service station, it will still be cheaper than buying a replacement: a new mounting block will cost almost 2.5 thousand rubles.
Posts 1 to 20 of 26
1 Reply from kope'ech 2008-12-19 16:58:45
- kope'ech
- User
- Offline
- Registered: 2008-11-11
- Messages: 101
- Reputation: [ 0 | 0 ]
Re: STOP light comes on
Why is this board needed at all? Those. In what cases should it light up?
2 Reply from Evil 2008-12-19 17:15:57
- Evil
- User
- Offline
- Registered: 2008-11-08
- Messages: 2,120
- Reputation: [ 6 | 0 ]
Re: STOP light comes on
As far as I remember, the stop light on the OP lights up together with the handbrake, oil and brake. liquid.
3 Reply from kope'ech 2008-12-19 17:35:41
- kope'ech
- User
- Offline
- Registered: 2008-11-11
- Messages: 101
- Reputation: [ 0 | 0 ]
Re: STOP light comes on
4 Reply from MarkuS_98rus 2008-12-19 17:51:40 (2008-12-19 22:43:57 edited by MarkuS_98rus)
- MarkuS_98rus
- User
- Offline
- Registered: 2008-11-10
- Messages: 298
- Reputation: [ 0 | 0 ]
Re: STOP light comes on
on high, the same thing lights up with one of the three lamps.
As it is written in the book, it lights up if there is insufficient brake fluid level, insufficient pressure in the engine lubrication system and if the handbrake is raised.
as Evil wrote
Everything is correct. The handbrake button may need to be replaced, it may have a short circuit, or the brake fluid level sensor may be acting up.
5 Reply from Driver 2008-12-21 06:04:20
- Driver
- User
- Offline
- Registered: 2008-12-08
- Messages: 460
- Reputation: [ 0 | 0 ]
Re: STOP light comes on
It would then light up together with another lamp (brake fluid level, oil pressure or handbrake)
6 Reply from Evil 2008-12-21 09:50:56
- Evil
- User
- Offline
- Registered: 2008-11-08
- Messages: 2,120
- Reputation: [ 6 | 0 ]
Re: STOP light comes on
It just doesn't light up. Either the one with which it should light up does not work, or there is a glitch somewhere.
7 Reply from NoVa 2008-12-21 11:40:50
- NoVa
- User
- Offline
- Registered: 2008-11-17
- Messages: 30
- Reputation: [ 0 | 0 ]
Re: STOP light comes on
And when I turn on the wipers, reverse gear, lights and something else, the voltmeter starts jumping and the battery stash lights up ((Is it supposed to be like that?
8 Reply from ZenD 2008-12-22 05:57:50 (2008-12-22 06:14:34 edited by ZenD)
- ZenD
- User
- Offline
- Registered: 2008-11-18
- Messages: 94
- Reputation: [ 0 | 0 ]
Re: STOP light comes on
And when I turn on the wipers, reverse gear, lights and something else, the voltmeter starts jumping and the battery stash lights up ((Is it supposed to be like that?
Not at all. just a bad wire connection
in general, the voltmeter on the low dashboard is powered by a fuse with headlights and wipers and something else there
It's worth worrying about the current when the light bulb burns brightly and constantly.
9 Reply from Shnaps 2009-04-14 21:25:00
- Shnaps
- User
- Offline
- Registered: 2009-02-20
- Messages: 98
- Reputation: [ 0 | 0 ]
Re: STOP light comes on
What if the STOP VP lights up dimly while driving? 97 year carburetor brakes are normal, oil seems to be too.
10 Reply from ALL777 2009-06-18 15:28:29
- ALL777
- User
- Offline
- Registered: 2009-05-26
- Messages: 37
- Reputation: [ 0 | 0 ]
Re: STOP light comes on
I have a high panel engineer. STOP is constantly on. How can this be cured?
11 Reply from vilatik 2009-06-19 02:37:26
- vilatik
- Vasochist
- Offline
- Registered: 2008-11-10
- Messages: 2,461
- Reputation: [ 8 | 0 ]
Re: STOP light comes on
Something together with the stop should burn. Look at that and see for yourself.
12 Reply from ALL777 2009-06-19 05:40:46
- ALL777
- User
- Offline
- Registered: 2009-05-26
- Messages: 37
- Reputation: [ 0 | 0 ]
Re: STOP light comes on
I've already looked at everything, all that remains is to try installing a different instrument cluster.
13 Reply from vilatik 2009-06-19 05:52:14
- vilatik
- Vasochist
- Offline
- Registered: 2008-11-10
- Messages: 2,461
- Reputation: [ 8 | 0 ]
Re: STOP light comes on
Take your time, you checked this: as it is written in the book, it lights up if there is insufficient brake fluid level, insufficient pressure in the engine lubrication system and if the handbrake is raised.
It’s not a fact that there is no brake fluid level or the handbrake is raised, maybe the sensor or limit switch is jammed.
14 Reply from barsyya 2009-06-19 06:06:48
- barsyya
- Administrator
- Offline
- Registered: 2008-11-06
- Messages: 2,179
- Reputation: [ 2 | 0 ]
Re: STOP light comes on
There is also a pad wear sensor, they installed it on luxury cars,
or the wires from them where the thread sticks out, and short to ground
15 Reply from MaZZ 2009-08-19 10:40:21 (2009-08-19 10:45:37 edited by MaZZ)
- MaZZ
- User
- Offline
- Registered: 2009-08-06
- Messages: 18
- Reputation: [ 0 | 0 ]
Re: STOP light comes on
I'll raise this thread so as not to create a new one.
21093i 2003, seems like a luxury one. The brake fluid level lamp plus STOP is on. I topped up the brake fluid a little below max, it went out, but after a couple of weeks it came on again. I start it, drive, everything is ok, but as soon as I slow down, it lights up and then stays on constantly. The level in the tank has not decreased. The sensor in the tank does not seem to be stuck, it moves easily, the float floats up. Murzilka is silent, I rummaged through the Internet (and specifically here), but there are no specifics yet.
Question: is this same lamp triggered by current from the sensor in the tank or are there other options (such as wear on the pads, although it seems like another lamp should be on then).
In the message above - “there is also a pad wear sensor, they installed it on the luxes, or the wires from them stick out where the thread is and are shorted to ground” - could this somehow be connected with my lamp?
The car brakes normally. The check engine light is constantly on, but there is no money for diagnostics and repairs yet, I constantly monitor the fluids and temperature and drive like that. Won't I kill anything in the machine?
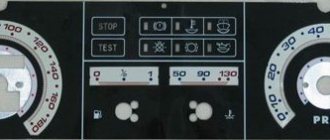
Instrument cluster
Below we present a diagram and also introduce you to the components of this unit.
| Item number | What is this |
| 1. | Speedometer |
| 2. | Daily mileage reset knob |
| 3. | Daily odometer |
| 4. | Vehicle mileage meter |
| 5. | Fuel level indicator in the tank |
| 6. | On-board control system light panel |
| 7. | TEST |
| 8. | STOP |
| 9. | Indicator lamp for breakage of brake light and dimensions |
| 10. | Indicator lamp for low brake fluid level |
| 11. | Indicator lamp for low coolant level |
| 12. | Front brake pad wear warning lamp |
| 13. | Indicator lamp for low liquid level in the washer tank |
| 14. | Indicator lamp for low oil level in the crankcase |
| 15. | Coolant temperature gauge |
| 16. | Tachometer |
| 17. | Parking brake activation warning lamp |
| 18. | Indicator lamp Check engine (Check Engine) fuel injection system |
| 19. | Indicator lamp for closing the engine air damper (carburetor) |
| 20. | Fuel reserve indicator lamp |
| 21. | Oil pressure warning lamp |
| 22. | Right turn signal lamp |
| 23. | Battery discharge warning lamp |
| 24. | Left turn signal indicator |
| 25. | Warning lamp when seat belts are not fastened |
| 26. | Indicator lamp when doors are not closed |
| 27. | Indicator lamp for activation of side optics |
| 28. | Indicator lamp when turning on the high beam |
| 29. | Warning light Check engine emissions system |
VAZ 2109 stop light
A fairly common problem is that the brake lights on the VAZ 2109 do not light up. And it is difficult to call it insignificant: they send a signal to drivers driving behind that your car is braking. Thus, road users are warned, and they themselves, accordingly, reduce their speed.
I didn’t warn you, they drove you into the appropriate place - it’s your own fault. Moreover, you will have to pay not only for your car, but also for the restoration of the car that carried out the collision, since it is its owner who will be considered the injured party. And such a development of the situation in a city with heavy traffic is very likely.
Heavy traffic does not contribute to maintaining a distance of 5 m, as provided for in the traffic rules. Cars move one after another during rush hours: any carelessness can lead to an accident. Moreover, both warning lights may not work, or only one may fail - and in this case, you can consider yourself lucky, there is still a partial warning of the threat from behind.
The brake lights on the VAZ 2109 do not light up for various reasons, from the most trivial to those requiring a thoughtful and more serious examination. Methods for identifying such a malfunction and ways to eliminate it are described in our article.
Simple cases
The main thing is to notice in time that the feet have failed, before an accident occurs. The most likely and, one might say, common reasons will be the following.
- Light bulb burnout
. A simple inspection will not give results; outwardly it may seem functional. Take a new lamp that works exactly and screw it in instead of the problematic one. If it lights up, the cause has been found; - Oxidation of contacts directly in cartridges. Detected visually. To clean, the light bulb rotates in the socket several times - the layer gets knocked down and the stops light up. To guarantee, you can unscrew the lamps and go over the contacts with fine sandpaper. In some cases, hopeless damage to contacts is detected; in this case, the cartridge itself will need to be replaced;
- Oxidation of contacts
in the wire block, which is placed on the terminals of the board (track) of the headlamp. The actions are similar to point 2, only they are done with the block: it is removed and put on again 3-4 times. Or the contacts are cleaned manually; - Burnt out tracks
. Visible upon visual examination. There are 2 options: buy a new board and replace the damaged one or restore the existing one by soldering wiring of the appropriate thickness onto the damaged track; - The brake light sensor (the so-called “frog”) has failed. In the VAZ 2109 it is located under the brake pedal. To check, both wires are removed from the DSS and short-circuited directly with a piece of wire. If the stops work, then we go to the auto shop for a new sensor. If there is no response, we look further for the reason. O in the entire system is the most vulnerable point (except, perhaps, the light bulbs). Many VAZ owners begin their search for the cause of non-working brake lights with it.
Possible faults
What malfunctions are typical for the dashboards of VAZ cars? Check out the main list after watching a video about connecting the shield from a VAZ 2110 to a “nine” (the author of the video is Garage BFS).
- The speedometer does not work. There may be several reasons for this - a broken cable, its incorrect installation or wear of the socket. You should try disconnecting the cable and reconnecting it.
- The odometer, which records the mileage of the vehicle, does not work. This problem is usually resolved by replacing the device.
- One or another indicator does not light up. Perhaps the sensor itself has failed or the light bulb has burned out.
- The instrument panel backlight does not work. This is usually due to burnt out bulbs or bad contacts. There may also be problems in the electrical circuit, but this happens rarely.
- The coolant or oil level sensor is giving incorrect information. For example, the driver is warned about a lack of engine fluid level or boiling refrigerant in the expansion tank, but in fact, with these parameters everything is normal. The problem is usually solved by replacing the sensors.
Electrics
Not everyone likes to tinker with it, but if simple reasons have already been ruled out, you will have to deal with the wires.
- Let's start with the fuse
. The mounting block with them is built under the hood on the steering wheel side. If you have block 17.3722, you need fuse No. 6, if 2114 - F3. We replace the burnt out one and return the whole one back; - Checking the circuit
. We look through all the wires, contacts and connections. Let's start with the positive. Pin 30 goes from the generator to the stop signals, the intermediate link is block Ш8. It is the farthest one on the left in the engine compartment, the wires are pink. Next comes the mounting block. We have already checked the fuse, so we pay attention to block Ш4 and the white wire that leads to the brake light sensor. There are no breaks - we follow the red wire to block Ш2, through the mounting block and to block Ш9. If everything is in order here, we check the red wire stretched across the entire interior to the inoperative taillight. After ringing the plus, we turn to the minus. They are represented by black wires coming from the blocks to the headlights; - The test is carried out with a test lamp, connected with one output to the current terminals, and with the second connecting it to ground. Or you can throw a long wire to the positive of the battery. All broken wiring is replaced, contacts are cleaned and tightened. If, after all the manipulations done, the brake lights on the VAZ 2109 still do not light up, then you have serious problems with the fuse assembly block. It will have to be checked completely, inside and out, since it is unknown where the breakdown occurred.
If you are friendly with an electrician, do the work yourself; if not, go to a service station, it will still be cheaper than buying a replacement: a new mounting block will cost almost 2.5 thousand rubles.
Either two brake light bulbs (in both headlights) or one (in one headlight) may not light up at once. Let's look at the causes of this very common malfunction on VAZ 2108, 21081, 21083, 2109, 21091, 21093, 21099 cars.
1. Check the fuse.
No. 6 for mounting block 17.3722, F3 for 2114. If it burns out, replace it with a new one. Subsequently, it will be necessary to find out the reason for the blown fuse, perhaps a small short circuit somewhere.
2. The contacts in the brake light lamp holders have oxidized.
Rotate the lamp in the socket several times to knock off the oxidized layer. To enhance the effect, you can remove the bulbs and clean the contacts with sandpaper.
3. The brake light bulbs in the headlight have burned out.
In appearance, the lamp may appear to be in good working order. Two lamps can burn out at once. Therefore, we replace the non-burning paw with a known good one and see if it burns or does not burn.
4. The contacts in the wiring block, which is placed on the terminals of the tracks on the headlight circuit board, have oxidized.
We remove and put on the block several times or clean the contacts on the board and in the block.
5. The tracks in the headlight circuit board are burnt out.
We take out the board and visually inspect the tracks. Burnt out ones can be restored by soldering wires to them.
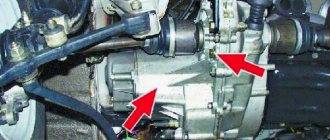
5. The brake light sensor is faulty.
It is located under the brake pedal. We remove two wires from it - white and red and connect them together with a piece of wire. The brake lights are on fire - we change the sensor, no, then we check the electrical circuits.
6. The electrical circuit of the brake lights is faulty.
It is necessary to identify an oxidized contact, a burnt-out wiring or a burnt-out connection in the mounting block. To do this quickly and efficiently, you need to know the electrical diagram for connecting brake lights.
Plus the brake lights come from output 30 of the generator to block Ш8 (the far left one in the engine compartment, pink wires) to the mounting block. Then through the fuse (No. 6, F3) in the block to block Ш4 inside the passenger compartment to the white wire going to the brake light sensor. That is, current is supplied to the sensor through the white wire. Next, from the sensor along the red wire to block Ш2 (second from the right inside the cabin) and through the mounting block to block Ш9 (the large transverse one in the cabin) to the red wire running through the entire cabin to the block of the rear left, and then the rear right headlight.
Minus - black wires coming out of the blocks to the headlights.
You can check the presence of current in the circuit elements using a test lamp - connecting one end to the terminals and the other end to ground. Or by supplying current with a separate wire from the battery positive to the elements of the electrical circuit.
Read more about finding a “break” in electrical circuits: “How to find a break in a car’s electrical wiring.”
Why does the STOP indicator light up in the instrument cluster of VAZ 2108, 2109, 21099?
The STOP indicator lighting up in the instrument cluster of VAZ 2108, 2109, 21099 vehicles with both “low” and “high” panels indicates the occurrence of critical malfunctions.
It is believed that the car cannot be operated further with such faults. You need to turn off the engine, leave the cabin and get to your destination on foot or by public transport.
Let's figure out whether this is really so, using the example of instrument cluster 2108 (“low” instrument panel) of a VAZ 21083 car.
Why does the STOP indicator light up in the instrument cluster of VAZ 2108, 2109, 21099?
There are only three reasons for the STOP sign to light up. They are easy to identify visually. since, together with the display, the malfunction indicator lamp of the system in which the problem arose will light up.
The vehicle's parking brake system (handbrake) is faulty.
The culprit for turning on the STOP sign on a VAZ 2108, 2109, 21099 car may be the limit switch (“frog”) under the handbrake lever. It is installed in the gap in the negative wire of the parking brake indicator lamp and the STOP display. While the parking brake lever is lowered, the moving contact of the limit switch is pressed and the connection with the “ground” (car body) is broken. The warning lamp and STOP display do not light up.
If the driver raises the handbrake, the movable contact (button) of the “frog” is released and pressed against the stationary one. The connection to ground is restored. The electrical circuit for turning on the warning lamp is closed. In the instrument cluster, the (P) icon and the STOP display light up in red, warning the driver that the handbrake is up, the wheels are locked and the car cannot be driven.
If the STOP indicator and the parking brake warning lamp light up when the handbrake lever is lowered or blink, the limit switch (frog) is most likely faulty or the wire from it to the combination touches ground somewhere. Therefore, you need to make sure that the wheels are actually released and drive on, despite the STOP sign that lights up.
Connection diagram of the “frog” (limit switch) of the indicator lamp for turning on the manual parking brake - handbrake on a VAZ 21093 (21083, 21099) car with a high instrument panel
Low level of brake fluid in the reservoir on the master cylinder.
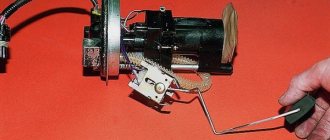
The level sensor is responsible for signaling a critical drop in the brake fluid level. It is installed in the neck of the brake fluid reservoir, connected to the brake system. Its sensitive element, the float, floats in the brake fluid, the level of which is between the min and max marks. In this case, the moving contact of the sensor is not closed with the fixed contacts. When the level of brake fluid in the reservoir drops, the float drops, and the movable contact connected to it closes two fixed ones. The warning lamp circuit in the instrument cluster closes to ground and lights up.
The driver immediately understands that the brake fluid is leaving the system for some reason (perhaps there has been a rupture or damage to the pipes, depressurization of the wheel brake cylinders) and the brakes will not work or will work, but poorly.
In such a situation, you should stop moving and deal with the problem. In some cases, everything turns out to be not so bad, since the level may drop by itself due to evaporation of the brake fluid or wear of the brake pads, in which the brake fluid from the reservoirs has gone into the wheel brake cylinders because the pistons have moved out strongly and more space has appeared in them.
If everything is fine with the brake fluid and the indicator light is on, it is worth checking the sensor itself or its electrical sensor circuit for a short to ground.
Brake fluid level sensor connection diagram
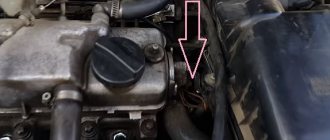
Engine oil pressure has dropped.
If the oil pressure in the engine has dropped significantly, the warning light in the form of an oil can and the STOP display will light up in red in the vehicle’s instrument cluster.
The reason for their operation may be an oil leak through a broken sump or a leaking oil seal, or rotation of the liner on the crankshaft, or a simple short to ground in the sensor wire.
Connection diagram for the oil pressure sensor in the engine of VAZ 2108, 2109, 21099 cars with a low panel
In this case, you cannot operate the car. It is necessary to check whether the wire has jumped off the pressure sensor and if not, then find out the cause of what happened in the workshop.
Thus, we have established that, indeed, if such malfunctions occur as insufficient oil pressure and depressurization of the brake system, it is best to stop driving and continue driving without the car, and subsequently figure out the cause of the problem. However, a malfunction of the handbrake can be ignored and the trip not interrupted.
Notes and additions
— On VAZ 2108, 2109, 21099 cars, a breaker relay was installed in the electrical circuit of the STOP display and when the listed malfunctions occurred, it did not just light up, but blinked along with the lamp.
More information on the topic in our VKontakte group -
Twokarburators VK , on Facebook Twokarburators FB , as well as in Odnoklassniki - Twokarburators OK
More articles on electrical equipment of VAZ 2108, 2109, 21099 cars
— Why does the oil pressure light blink and stay on at idle?
— Pinout of the instrument cluster of VAZ 2108, 2109, 21099 cars with a low panel
— Lamps for the instrument panel combination of VAZ 2108, 2109, 21099 cars
— Brake fluid is leaking, reasons
— Bleeding brakes on VAZ 2108, 2109, 21099 cars
Designation of icons on the VAZ 2109 dashboard
The indicator panel can be divided into 2 parts. The smaller half of the bulbs are mounted centrally at the top of the board. There are indicators on the bottom line of the instrument panel.
- The meaning of the light is simple - the indicator indicates that self-monitoring diagnostics of the alarms are being performed.
- Indicates that there are problems in the power plant. If the lamp is constantly on, you need to diagnose the motor.
- The brake system is in disrepair. Usually the light indicates a drop in fluid in the expansion tank or critical wear of the pads.
- Coolant level sensor lamp. If it lights up constantly, you need to add antifreeze to the system.
- The windshield washer fluid has run out.
- External lighting lamps are damaged. The thread may have burned out or the contact may have broken.
- The front brake pads are worn to the limit.
- The oil level in the engine crankcase has dropped. It may also indirectly indicate a malfunction of the oil pump.
The photo below shows the sequence of light bulbs at the bottom of the dashboard.
| Number | Purpose |
| 2 | High beam indicator. |
| 3 | External lights are turned on and operating normally. |
| 4/6 | Turn signal indicators. On some car trim levels, when the hazard lights are turned on, they light up simultaneously. |
| 5 | The battery is not charging. It is necessary to check the wear of the battery itself and the wiring of the generator. |
| 7 | The engine oil pressure has dropped below normal. It is recommended to perform diagnostics. |
| 8 | The fuel level in the tank has dropped to a critical level. You will need to refuel immediately. |
| 9 | Standard engine fault indicator. |
| 10 | The parking brake is activated. |
What do the buttons on the panel mean?
Depending on the configuration and year of the car, 2 types of devices can be installed here. The keys and controls will vary.
Below is a description of the low tidy indicators.
| Number in photo | Decoding |
| 9 | Rear window defroster switch. |
| 10 | Likewise for the stern fog lights. |
| 11 | Emergency button. |
| 12 | External optics switch. |
| 13 | Interior ventilation control module. |
| 23 | Suction |
| 24 | Sound signal. |
| 25 | Daily mileage reset drive. |
| 26 | Button for turning on the instrument lighting. |
| 27 | Headlights corrector. |
| 29 | Switch for direction indicators and headlights. |
Next there is a decoding of the controls of a more modern - high panel.
| Serial number in the photo | Description |
| 2 | Hazard warning light switch. |
| 12 | Power window switches. |
| 14 | Interior ventilation control module. |
| 18 | Suction |
| 22 | Horn switch. |
| 23 | Instrument backlight key. |
| 24 | Hydrocorrector of headlights. |
| 25 | Optionally, a button to activate the heated front seats. |
| 26/27 | Rear/front fog lights included. |
| 28 | Rear window heating activator. |
| 31 | Head optics operating mode switch. |
Instrument cluster
Today, VAZ 2109 cars that can be found on domestic roads, no matter whether they have carburetors or injectors, are equipped with three types of electronic devices. It can be a low panel, a high panel or a Europanel. Let's consider the description of each type separately.
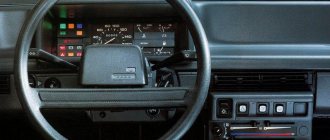
"Low" panel
Low version of the control panel
Let's start with the low version. A detailed explanation of the scheme is given in the table.
| Icon | Purpose |
| 32 | Indicates which turn signal is on. The indicator stops working after the steering wheel is turned. |
| 33 | A light lamp that turns on when the low beam is activated. |
| 34 | Lights up when the PTF - fog lights are turned on. |
| 35 | Lamp for turning on high beam headlights. |
| 36 | Notifies the driver that the rear window heating system is operating. |
| 37 | A signal alerting the motorist to the need to stop and repair a fault. |
| 38 | Speedometer. |
| 39 | A counter that records the daily mileage of a vehicle. |
| 40 | A sensor that notifies the driver about the temperature of the antifreeze in the cooling system. |
| 41 | A sensor that records the voltage level in the vehicle's on-board network. |
| 42 | An icon that lights up when the engine fluid pressure in the system is too low. |
| 43 | hazard warning lamp. |
| 44 | The diode lights up if the brake system is in emergency condition. |
| 45 | Icon for turning on the carburetor choke or choke. |
| 46 | Engaging the handbrake. |
| 47 | This element appears when the car battery is low charged. |
| 48 | Vehicle mileage counter. |
| 49 | An ecometer whose needle rises when you press the gas pedal. |
| 50 | A line that is not recommended to be crossed - the light starts to light when the gasoline level is critically low. |
| 51 | Sensor for measuring fuel level in the tank. |
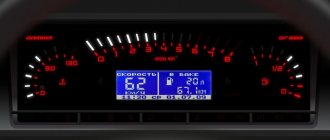
"High" panel
Instrument cluster on a high panel
Below is a high-type VAZ 2109 instrument panel with electronic backlight. Relevant for both injectors and carburetors. You will find a decoding of the circuit and combinations according to the instructions below.
| Icon | Designation |
| 42 | Speedometer, which displays the speed of the car. |
| 43 | An odometer that records the mileage of a vehicle. |
| 44 | Sensor for measuring fuel level in the tank. |
| 45 | A signal alerting the motorist to the need to stop and repair a fault. |
| 46 | Test lamp. |
| 47 | A signal alerting the motorist to the need to stop and repair a fault. |
| 48 | Lamp warning the driver about a malfunction in the operation of the signal lights. |
| 49 | A sensor that notifies the driver of a lack of antifreeze in the cooling system. |
| 50 | An indicator indicating wear of the brake pads on the front wheels. |
| 51 | The light comes on to warn the motorist about the lack of fluid in the windshield and rear window washer reservoir. |
| 52 | Indicator of lack of engine fluid pressure in the crankcase. |
| 53 | The regulator measures the antifreeze temperature level in the cooling system and displays this data on an electronic panel with backlight. |
| 54 | This icon on the high combination of the dashboard is a tachometer, demonstrating the level of engine speed of the car. |
| 55 | Additional socket. |
| 56 | A button designed to reset the daily mileage. |
| 57 | A lamp that lights up when the car's headlights are turned on. |
| 58 | Daily mileage recording sensor. |
| 59 | A diode lamp that turns on when the side lights are activated. |
| 60 | A sensor that warns the driver about an open door. |
| 61 | A lamp warning the driver that he is driving without fastened seat belts. |
| 62 | A diode indicating that the left turn signal is on. |
| 63 | This element of the combination of an electronic panel with backlight indicates the charge level in the system. |
| 64 | A diode indicating that the right turn signal is on. |
| 65 | The lamp turns on when the engine fluid pressure in the system is insufficient. |
| 66 | The diode turns on if the fuel level in the tank is critical. |
| 67 | The choke switch lamp is found only in carburetor cars. |
| 68 | This element is activated when it is necessary to diagnose the car’s engine. |
| 69 | Handbrake light. |
"Europanel"
Variant of the control panel on the VAZ Europanel
Now let's move on to considering the combination of an electronic instrument panel of the Europanel type with backlight. It should be immediately noted that the description of the components below is almost identical to the low-type electronic panel.
| Icon | Purpose |
| 42 | Indicates which turn signal is on. The indicator stops working after the steering wheel is turned in the required direction. |
| 43 | The Europanel light lamp activates when the side lights are turned on. |
| 44 | Lights up when the rear PTF - fog lights are turned on. |
| 45 | Lamp for activating high beam lights. |
| 46 | This circuit element notifies the motorist about the operation of the rear window heating system. |
| 47 | A signal alerting the motorist to the need to stop and repair a fault. |
| 48 | Speedometer, which displays the speed of the vehicle while driving. |
| 49 | A counter that records the daily mileage of a vehicle. |
| 50 | This circuit component is designed to notify the car owner about the level of antifreeze temperature in the cooling system. |
| 51 | A circuit sensor that records the voltage level in the vehicle’s on-board network. |
| 52 | An icon that lights up when the engine fluid pressure in the system is too low. |
| 53 | Hazard warning light. |
| 54 | The diode lights up if the brake system is in an emergency condition and attention needs to be paid to its diagnostics. |
| 55 | Icon for turning on the choke of a carburetor engine. |
| 56 | Engaging the handbrake. |
| 57 | This element in the diagram lights up when the car’s battery charge is too low. To avoid problems starting the engine, it is better to recharge the battery. |
| 58 | Meter of the vehicle's total mileage in kilometers. |
| 59 | An ecometer whose needle rises when you press the gas pedal. The ecometer allows you to slightly save fuel on the vehicle. |
| 60 | A line on the diagram that is not recommended to be crossed. The diode lamp is activated when the level of gasoline in the tank is critically low. To avoid stopping on the road, you should add fuel. |
| 61 | Sensor for measuring fuel level in the tank. |
Tidy 21099 injector: icon designations
There are more lights and indicators here than on the carburetor. Additional light bulbs available:
- requirement to check the engine;
- STOP light.
Tidy 21099 carburetor: designations
The decoding described at the beginning of the article can be fully used as an example for this point.
Stop light on the dash 2109
The lamp signals the driver about the presence of unexpected problems in the on-board circuits. When such an inscription is activated on the device, it is recommended to immediately go to a service station and look for the cause.
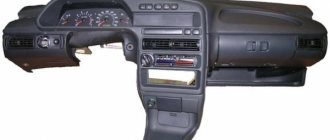
High and low panel VAZ 2109 - the difference
Depending on the year and modification of the car, two types of devices are applicable. The first is considered a low panel, used mainly on carburetor nines and modifications with an injector.
A more advanced version was brought to market in the last years of production. Here there are all the symbols used initially and several indicators of the engine fuel injection system have been added. The dashboard looks more modern, which makes it attractive to car enthusiasts.
Errors on the panel
VAZ versions of on-board computers have a self-diagnosis option, which allows you to read codes yourself without the use of additional equipment. The following is a list of common problems encountered on cars.
| Number | Decoding |
| 1 | Motor control unit malfunction. |
| 2 | The voltage in the on-board circuit is too high. Usually occurs during short circuit. |
| 3 | Fuel level sensor - open circuit or damaged wiring. |
| 4 | The antifreeze level controller is faulty. |
| 5 | The external temperature controller is faulty. |
| 6 | The engine has overheated, you should stop and let the engine cool. |
| 7 | Engine oil pressure is less than minimum. There may be two reasons for this. Loss of lubricant level or pump failure. |
| 8 | Critical voltage drop in the on-board network. |
| 9 | The battery is low. The serviceability of the generator and its mains should be checked. |
| E | EEPROM data packet error |
| 12 | The diagnostic lamp is faulty. |
| 13 | Lambda probe circuit open. |
| 14 | Increased signal coming from the antirfiz temperature sensor. |
| 15 | The coolant temperature controller is faulty. |
| 16/17 | Incorrect voltage in the on-board network. |
| 19 | DPKV refused. |
| 21 | The throttle position control is faulty. |
| 24 | The speed sensor is faulty. |
| 27/28 | The exhaust gas system sensors are sending incorrect signals. |
| 35 | Idle speed is set incorrectly. |
| 41 | The phase regulator is not working correctly. |
| 44/45 | Excessively lean or rich mixture in the cylinders. |
| 49 | Loss of tightness in engine lines. |
| 61 | Lambda probe is faulty. |
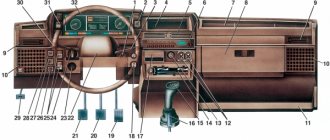
High instrument panel
According to the diagram presented below, the VAZ 2109 with a high panel has the following components.
| Item number | What is this |
| 1. | Ignition switch |
| 2. | Hazard switch |
| 3. | Windshield wiper and washer control lever |
| 4. | Radio socket |
| 5. | Central nozzles of the interior heating and ventilation system |
| 6. | On-board computer (not available on all trim levels) |
| 7. | Dashboard |
| 8. | Glove compartment lid (glove compartment) |
| 9. | Side nozzles of the interior heating and ventilation system |
| 10. | Speaker (loudspeaker) trim |
| 11. | Shelf |
| 12. | Power window switches (available on certain trim levels) |
| 13. | Cigarette lighter |
| 14. | Control panel for heating and interior ventilation system |
| 15. | Gearbox shift lever |
| 16. | Hand brake lever |
| 17. | Ashtray |
| 18. | Carburetor choke handle |
| 19. | Gas pedal |
| 20. | Brake pedal |
| 21. | Clutch |
| 22. | Horn switch (horn) |
| 23. | Instrument panel light switch |
| 24. | Headlight hydrocorrector |
| 25. | Front seat heating switch (available as standard) |
| 26. | Rear fog light switch |
| 27. | Front fog lamp switch (not available on all trim levels) |
| 28. | Rear defogger switch |
| 29. | Hood lock drive lever |
| 30. | Turn signal and light control lever |
| 31. | Outdoor optics switch |
| 32. | Instrument cluster |
In order to eliminate certain malfunctions, monitor the operating parameters of the engine and vehicle systems, it is necessary to learn how the instrument cluster with a high panel is designed when you first get acquainted with the VAZ 2109.