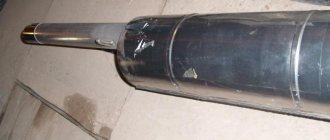
Now the time has come to replace the resonator... 85,000 km... ran... a “HOLE” was found... and it became a bit heavy! There’s already a lot of slag inside... So at the same time I decided to share my experience. WHY!
I RECOMMEND TO TAKE THE BOLTS AND SPRINGS IMMEDIATELY"""
I TOOK IT AND DON'T REGRET! TOOK IT OFF AND BROKE LIKE A STRAW!
Yes, because I encountered such a phenomenon! There are different “means”! VAZs were produced with different design features for the design of the middle part of the muffler... I have the following system:
The only difference is that they have different pipe lengths to the resonator!, and they also come with corrugation! I was a little upset that the store didn’t find one with an insert ((and as I had, BY THE WAY, the so-called 101 resonator! They come in 100, 101 and some other ones... In general! I have 101!, that is... the length of the front pipe 56 - 56.5 cm. You never know who will need this. And I also have a car))) of the transition type 21124 1.6 16v 2007 under EURO 3 with a CAT COLLECTOR and simply assembled from everything that is possible))) Well, in general, also a muffler I also bought a NEW SAMPLE))), and the only difference is that the pipe after the “can” has a slight downward bend...))) that’s the whole difference!, but honestly))) it’s needed... otherwise it scatters the exhaust onto the bumper) Don’t judge strictly for the photo) As best I could) Well, the photo report, , , , :
The work of replacing the muffler on a VAZ-2112 is not a systematic and periodic work, but is carried out only when this element fails. Noise, disconnection, burnout of its elements are the best example of this.
Video on replacing the muffler on a VAZ-2112 in a garage, do it yourself, watch:
In order to independently replace any of the muffler parts, you do not need special skills. All you need to do is strictly follow our instructions.
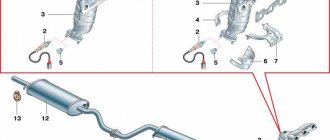
Exhaust system elements
In order to understand what the exhaust system on a VAZ-2112 is, you need to know all its elements:
Visual arrangement of exhaust system elements.
- Receiving pipe (they are also called “pants” - approx.).
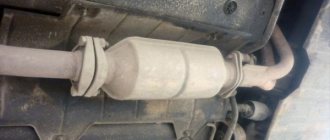
- Neutralizer.
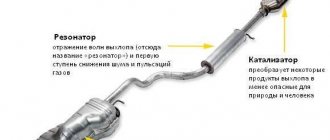
- Resonator (additional muffler - approx.).
- Main muffler.
Exhaust system breakdowns
Among the possible breakdowns in the exhaust system, the following facts can be highlighted:
- Mechanical damage to the exhaust system can be solved by welding these parts.
Crack in the gander area where exhaust gases escape
How to remove the neutralizer
The VAZ-2110 exhaust system is standard for all cars. Almost the same design is used on nines, sevens, and even foreign cars. Even a motorist with very little experience can repair all elements of the system. If you have already decided to change the resonator and muffler, then it is also advisable to install a new neutralizer. The neutralizer is necessary to dampen the vibration coming from the car engine. This is a device that mechanically separates the muffler resonator and the exhaust pipe.
Step-by-step process for replacing a muffler
Before purchasing a new muffler element from an auto store, remove the old one, as there are several varieties. For example, the middle part can be with a lambda probe, or without it, it can be short, it can be long, and accordingly the rear part will differ in size.
Depending on which element requires replacement, the order of work should be carried out strictly individually. Let's start in order.
Downpipe
Work to dismantle the “pants” should be carried out in the following order:
- We lubricate the joints of the studs and nuts with WD-40, so that in the future everything can be easily unscrewed.
Note that the downpipe is attached to the manifold with studs, not bolts. Therefore, when unscrewing, you should be extra careful so as not to break them. And if this happens, you will have to put a lot of effort into drilling them out.
- We unscrew the 6 nuts that secure it, and on the neutralizer side we loosen the spring-loaded connection.
All bolts are marked with arrows.
If there is damage, replace the spring with a new one.
The bolts on the springs between the exhaust pipe and the converter are marked with arrows.
And now close
Neutralizer
- We treat the connections with lubricant for better dismantling.
- Then we unscrew the spring-loaded bolts from the pants to the neutralizer (see above).
- We unscrew the two bolts that secure the neutralizer to the resonator.
Installing a new exhaust pipe
All work is done in reverse order. But there are several features that you definitely need to know:
- Install a new exhaust pipe.
- A new gasket needs to be installed between the exhaust manifold and the pants.
- Be sure to install a new O-ring between the neutralizer and the pants.
- Tighten the nuts on the exhaust manifold studs. Tighten them evenly in a crisscross pattern.
- Tighten the bolts that are on the spring-loaded connection to the converter.
This completes the repair of the exhaust system. The sound will be muffled as much as possible, the car will become almost silent. It is advisable to lubricate the new gasket with a CV joint type compound. This will improve the seal.
Source
conclusions
Please note that before purchasing new exhaust system parts, it is necessary to inspect it in advance. So, as soon as a visual inspection of the general condition of the exhaust system can give a complete answer to the presence of any malfunctions.
The operation of VAZ cars is often accompanied by various breakdowns and malfunctions of various parts and systems. The 2110 exhaust system is no exception, failures of which can be eliminated by replacing the muffler or other components.
Installation of a new neutralizer
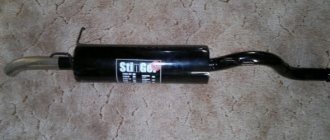
If you decide to modify your car, you can install the Stinger exhaust system on the VAZ-2110. It is more reliable and advanced than stock.
All work is carried out the same way. The neutralizer is installed as follows:
- Install the neutralizer, and then put on the bolts. This must be done very carefully, making half a turn, no more.
- When tightening, you must first tighten the bolts that secure the neutralizer to the resonator. The last to be tightened are the bolts securing the converter to the exhaust pipe.
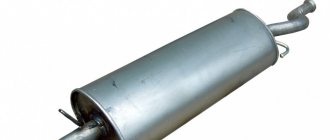
Mufflers for VAZ 2110 cars
The information contained in the operating manuals or electronic catalogs about the structure of the exhaust system of tenth-generation VAZ cars does not always correspond to reality, which causes some disagreement among car enthusiasts. The selection for cars is carried out on the basis of a specific body type: for example, in the case of front-wheel drive cars in a hatchback body, the muffler is much shorter than in models with sedan and station wagon bodies. The difference in length is explained by the length of the car body.
The parts installed on the tenth family are divided into two body types:
- Station wagon and sedan - VAZ 2110 and VAZ 2111;
- Hatchback - VAZ 2112.
Mufflers for VAZ 2110/2112 cars are classified according to body type
Classification is also carried out according to old and new models. The main difference from similar parts on the Lada Samara is that for the tenth family, subcategories play a significant role. The muffler mounts of older models are made in the form of a hook: they were produced until 2007, and then the mounts were converted to pins.
Mufflers of old and new models differ in the type of fastenings
Design
The main task of the muffler is to reduce the noise level while the car is moving and the engine is idling. The resonator, or additional muffler of the car, is an element located in the middle of the exhaust system. Its design consists of the following parts:
- frame;
- throttle;
- block;
- thermal insulation;
- perforated pipe.
Design of the exhaust system of tenth generation VAZ cars
The structure of the part itself is as follows:
- frame;
- middle obstacle;
- rear barrier;
- rear perforated pipe;
- middle perforated pipe;
- exhaust and inlet pipes.
The structure of the VAZ 2110 muffler and the direction of movement of exhaust gases in the system
The perforated tube is the main component of the direct-flow muffler design. Combustion products entering it effectively expand in its body due to perforation. This operating scheme allows you to speed up the process of removing combustion products several times. Installing such a muffler increases the level of exhaust system resistance by up to 10%, which is significantly higher than without its use.
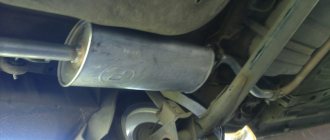
Burnouts in a small resonator
Diagram of VAZ 21099 injector 8 valves engine diagram
Repairs can be carried out independently. First of all, you need to remove the muffler resonator or other parts of the exhaust system. For simplicity and convenience of operations, such work should be carried out in a pit or on an overpass. This work can be both simple and labor-intensive, since many problems arise due to the fastenings of these parts: they were most susceptible to corrosion and stuck to each other. Experts recommend spraying the fasteners with a special liquid such as WD-40 before starting such work.
In practice, it has been proven that the use of such products gives maximum effect. A large number of these types of sealants and fiberglass fabrics are made from silicone materials; they can withstand high temperatures, some up to 1000 degrees. If you have carried out routine repairs using fiberglass, then it is advisable to start the engine after installing the resonator and warm it up for thirty minutes.
Malfunctions on VAZ cars of the tenth family
AvtoVAZ specialists conducted research, the results of which revealed that the car body, being a closed structure, has its own peak harmonics and can resonate at a certain frequency. To suppress spurious frequencies emitted by both the vehicle engine and those shielded by the body, it is necessary to use the range from 60 to 400 Hz, corresponding to medium and high engine speeds. A change in noise characteristics can be caused by making minimal changes to its design.
The most difficult noise to deal with is at low frequencies. From a technical point of view, it is impossible to combine tuning the exhaust system of a car and combating noise. You can maintain maximum power with a direct-flow muffler, and reduce the sound to a comfortable volume with a factory one.
Owners of VAZ 2110–2112 most often encounter breakdowns, burnouts and leaks in the exhaust system. Incorrectly set ignition, excessively rich mixture and pipe corrosion are the main causes of burnt out exhaust pipes. This defect is accompanied by knocks and pops, which indicate burnout of metal parts. A sign of burnout may be smoke from the exhaust pipe, indicating an overly enriched fuel mixture that is burning in the exhaust pipe.
Car muffler malfunctions can be caused by various reasons - pipe burnout, system leakage, breakdowns
The appearance of knocks on the body in the area where the muffler is located indicates mechanical defects in the part - changes in geometry, destruction of the rubber band, suspension or damper cushion. Eliminated by identifying the location of the breakdown and troubleshooting. Worn parts are replaced with new ones.
Muffler gaskets
The gas junction formed between the rear and additional mufflers is insulated using a rubber gasket or O-ring. In addition to the main function of closing the gap, it is also used to eliminate the movement of the pipes of the part relative to each other.
Rubber O-ring located between the car muffler flanges
The appearance of carbon deposits under the bottom of the car at the joints of the exhaust pipe sections indicates damage to the gasket. Ruptures of the sealing ring are accompanied by the appearance of an unpleasant smell of exhaust gases in the vehicle interior and a sharp grinding noise that occurs during operation of the power unit.
Their replacement
A damaged exhaust system sealing ring cannot be restored - it can only be replaced with a new one. The gasket can be replaced manually in a few minutes.
- The exhaust pipe flanges are secured with small bolts. Due to prolonged use, they can become covered with dirt and rust, which makes them difficult to unscrew. You can unscrew the bolts using a special tool or a grinder.
The exhaust pipe flanges are secured with bolts that need to be unscrewed
After unscrewing the bolts, the resonator pipe is carefully moved to the side
The old o-ring is removed from the resonator pipe manually or using a screwdriver
Carbon deposits from the muffler flanges are cleaned with a wire brush or sandpaper.
The new muffler gasket is installed on the flange, after which the muffler is tightened with clamps
The cermet ring adjacent to the muffler gasket is fragile, and therefore when replacing the sealing ring, care must be taken so as not to destroy the ceramic.
An exhaust manifold
The exhaust manifold is attached to the cylinder head directly with studs through a heat-resistant reinforced gasket. It is made of heat-resistant cast iron according to scheme 4-2. The collector is constantly subject to alterations from tuning studios, which replace the factory circuit with a wide variety of configurations and mounting options. It must be said that replacing the standard circuit, and especially replacing cast iron with steel, cannot bring anything good to the car.
The exhaust manifold is made of heat-resistant cast iron
Unless you are designing a narrow-profile car for competition. Moreover, for each discipline of motor sports, the exhaust manifold is configured separately and has some nuances in the design, which 90% of tuning studios have no idea about. Especially their customers. In most cases, the main focus is on the appearance of the pipe, but how it will work there is, by and large, all the same.
It must be said that the exhaust manifold is a rather important part and making it from steel, even the most heat-resistant, is a very questionable undertaking if the car will be used under normal conditions, and not just on the track or in rally raids. The collector temperature in operating mode can reach 1000 degrees. The cast iron is there for good reason and not at all to weigh down the engine structure. Any steel will burn out quite quickly under high load conditions, so before you buy an upgraded exhaust manifold made of super-Japanese steel, it would be worth thinking about the feasibility of such a replacement. Most of the top ten, thank God, do not participate in the world circuit racing championships; they simply have nothing to do there. Therefore, it would be more logical to correlate the rather modest capabilities of the VAZ 2110 engine with the level and quality of exhaust system tuning.
The exhaust manifold lasts almost forever and burns out in rare cases, and then due to a manufacturing defect. As part of improving the manifold with more effective methods, we would recommend that instead of installing thin-walled beautiful pipes of space configurations, simply pay attention to the mating of the exhaust ports of the cylinder head and the manifold holes. The fact is that the whole essence of tuning the exhaust system comes down, of course, to an amazing increase in power by reducing the resistance to exhaust gases. So it is precisely at this interface that the first additional power losses occur - at the junction of the manifold and the cylinder head. If the exhaust window and the manifold opening have even the slightest difference in size or level, parasitic vortices are formed that prevent the exhaust gases from escaping. If this is the case, after the collector you can even hang platinum direct flows with Swarovski diamonds, there will be no sense. If we are, of course, talking about saving power.
Replacement for VAZ 2110/2112
Tools required for changing on tenth generation VAZ cars:
- to remove nuts of different sizes you will need a set of sockets;
- set of ratchets for heads;
- a hammer with a round head;
- combination or standard ring wrenches;
- reciprocating saw, hacksaw or any other tool for cutting metal;
- two exhaust pipe clamps;
- penetrating type sealant and lubricant;
- canvas or latex gloves for safe work;
- protective glasses;
- jack;
- goats - with their help the car will be supported in weight;
- wheel shoes;
- new muffler.
Dismantling the old
The vehicle must be on a flat, hard surface before starting work. You can drive it out of the garage and get to work on removal.
- The handbrake lever is pulled all the way, the gear is switched to the parking position in the case of an automatic transmission or to neutral gear for a manual transmission.
Impact shield
The fender shield for the exhaust pipe of a power transformer is designed to protect the surface of an adjacent device, which is located at a distance of closer than 30 m, from oil flow: otherwise a fire may occur.
For a single transformer, a shield is not needed; it is enough to simply deflect the exhaust pipe in the required direction. Instead of a fender shield, it is allowed to provide a screen made of fire-retardant material, which is used as basalt wool, compositions based on calcium or aluminum silicates. The height and width of the part must be 300...500 mm larger than the parts of the adjacent unit. The configuration and thickness of the shield are not regulated.
Approximate prices
In Russia, a resonating device for VAZ 2109, 2110, 2112 can be purchased for an amount from 800 to 5000 rubles.
Approximate prices for VAZ resonators depending on the generation of the car:
- 2109 – from 1200 to 4600 rubles.
- 2110 – from 1100 to 2000 rubles.
- 2112 – from 1300 to 4000 rubles.
Approximate prices depending on the manufacturer:
- Walker - about 4400 rubles .
- AvtoVAZ - from 3600 rubles .
- TransMaster – from 1700 rubles .
An old auto part can be purchased for 800-1000 rubles .