Print this article Font size 16
Every driver knows that engine overheating is very bad. It can't lead to anything good. To protect the engine from overheating, cars are equipped with radiator cooling fans. And sometimes he is far from alone.
Today we’ll talk about a very important cooling element - the fan sensor. It is responsible for turning on this cooling device in a timely manner, preventing unwanted overheating.
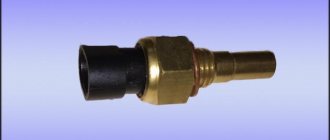
Appearance of the device and location
Causes of malfunction on the VAZ-2114
- Fan motor malfunction . The problem is resolved by replacing it with a working one;
Replacing the fan motor
Changing the fan relay
Checking for an open circuit
Changing the coolant temperature sensor
Video about replacing the fan switch sensor
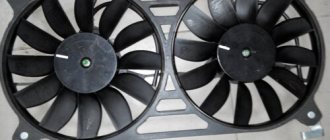
Checking the functionality of the cooling fan motor
The easiest way to check the operation of the fan is to put two straight wires on it: minus and plus.
The plus is taken from the battery, the minus from the car body. If it doesn’t work when the circuit is closed, then that’s where the problem lies. When starting the blades, we look for the problem elsewhere.
Cooling fan operation diagram
Basically, when a non-working fan is detected, several reasons are identified:
- The electric motor is burnt out, there is a break in the winding;
- Wear of carbon brushes;
- The bearing has jammed or fallen apart.
If in the last two cases the problem is solved with little effort, so to speak, the first involves replacing the electric motor.
Important! When installing wires, the main power supply to the electric motor must be disconnected.
Procedure for checking
The operation of the fan on the VAZ-2114 is connected through 2 fuses. One of them is also responsible for the sound signal. You can check it by pressing the horn. If there is no sound, replace it with a whole one. It is located in the mounting block, it is 20 ampere, marked F5.
Check and, if necessary, change fuses
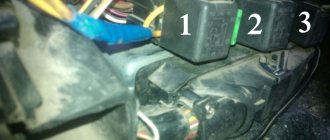
The second one is located under the dashboard, on the passenger side. Under the casing there are 3 relays with a fuse for each. The middle pair is responsible for the operation of the cooling fan. Replace the blown element with a new one (the fuse can be “ringed” with a multimeter or limited to a visual inspection. To check the functionality of the relay, you will need an ohmmeter). When checking their condition, at the same time make sure that the contacts are in normal condition, and if oxide is detected, clean them.
Important! If you find a blown fuse, you should not limit yourself to replacing it with a new one. It is imperative to find the cause of the break, since in the near future the new one will burn out again.
Checking the fan switch sensor
If the cause is not found, the next step should be to check the functionality of the fan switch sensor . It's not difficult to do this. Disconnect it and turn on the ignition, while paying attention to the fan. The rotation of the blades indicates that the cause of the problem is in the sensor.
Checking the cooling system fan switch sensor
Due to the fact that very often the sensor begins to fail, sending erroneous signals, it is recommended to check it in one more way . To do this, you will need a container with antifreeze or antifreeze, a thermometer and a multi-mert. Wires from the measuring device are connected to the sensor terminals, the threaded part of the sensor is immersed in the liquid. Heat the contents of the container to the temperature at which the fan operates (on a VAZ 2114 - 92 degrees). When the contacts close, the multimert will sound a sound signal. This means the sensor is working, if this does not happen, you can safely throw it away and buy a new one.
Healthy! Before installation, it is advisable to check the functionality of the purchased sensor in the same way.
Video about checking the cooling fan switch sensor
Final check
Having eliminated the problem, start the car engine. The fan motor should start after approximately 5 minutes of idling . If this does not happen, and the temperature has reached the desired level, diagnose the faults again.
Malfunction
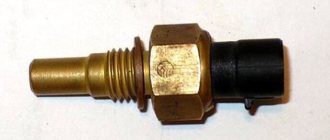
These components do not have a specific service life. They will last a long time if you follow the recommendations for using the vehicle and its systems provided by the manufacturer, follow assembly rules and buy spare parts made from high-quality materials. Spare parts are sensitive to high temperatures; this should be taken into account if the vehicle is used in hot weather conditions. If there are connection problems, then checking the sensor is not difficult - you just need to know where this device is located. It is located on the outlet pipe.
If the question arises of how to check the operation of the ventilation and what breakdowns may occur, then it will be difficult to answer.
Defects
- cracking;
- oxidation of contacts;
- broken cables;
- damage to fasteners;
- contamination of components;
- short circuit;
- microprocessor melting;
- fusion of plastic elements.
Fault indication
- continuous operation of ventilation when the engine is running;
- no fan response after the temperature rises or the air conditioner is activated;
- deterioration in vehicle controllability;
- reduction in the efficiency of the air conditioner.
Causes of failure
- influence of humidity;
- using vehicles on bad roads;
- voltage instability in the electrical network;
- low quality components;
- incorrect installation;
- violation of water tightness;
- frequent overheating.
If the fan turns on, then everything is fine.
Video about the reasons why the cooling fan on the VAZ-2114 does not turn on
Guys, it's a problem. I changed the heater valve and the fan stopped turning on. I replaced both sensors and the problem did not go away. Checked the fuses, everything is ok. I changed the relay and nothing changed. I remove the wires from the sensor and the fan works. I don’t know what to do anymore. Help me please.
Comments 31
What's so difficult about it? 2 options, either the system is airy or the lid does not hold
Thank you all, I changed all the relays, changed the plug, changed all the sensors and now it works.
After replacing the radiator I couldn't hear the fan. The engine does not warm up to those temperatures. It's autumn now and it's cold in places. This morning it was -4, in the afternoon it was only 7 and where is the fan working? Start the car for half an hour, during which time it should work a couple of times.
You're just underheating, that's all.
Is the radiator at the bottom hot? If not, then the thermostat or air plug.
The radiator is hot and the lower pipe is also hot.
a friend had a similar problem after replacing the thermostat and they also broke their head about what and how! it was exactly like yours! connected it to the computer, erased the error and everything worked!
At what temperature do you expect it to turn on?
The sensor may be g... but, when it was covered, I changed about five of them, one was defective, even the salesman in the store said I’m not the only one who brings in replacements.
I changed 3 pieces, I bought the last one right in the store
Fan motor directly 1. Life cable from the sensor to fan 2.
turn on the ignition and remove the terminal from the sensor that is on the thermostat, if it turns on, then the sensor needs to be replaced, if not, then check the fuse on the brain, it’s located in the beard, there are three of them, and three relays... one of them is responsible for the fan
I changed the relay near the brains and everything worked.
turn on the ignition and remove the terminal from the sensor that is on the thermostat, if it turns on, then the sensor needs to be replaced, if not, then check the fuse on the brain, it’s located in the beard, there are three of them, and three relays... one of them is responsible for the fan
Check the fuse again, you may not notice the break...
I start the car and after a minute the antifreeze rises from minimum to full level))))
I have 2 exhaust cylinders in approximately the same place in the head, there is a microcrack somewhere and due to the exhaust gases the car seems to heat up faster and the fan does not turn on, due to the pressure that is formed in the cooling system, and an air lock is constantly forming. That's the problem
Operating principle and temperature characteristics of the device
The operating principle of the engine cooling radiator fan switch-on sensor is based on the difference in the linear expansion of metals. When the coolant heats up, the bimetallic plate of the device changes its position. At a certain moment, the contact group closes. A signal is transmitted to turn on the fan. In some sensors, when the engine overheats, the circuit breaks.
Depending on the model, the sensors have different temperature response limits. So, to turn on the fan of the VAZ 2114-2115, a temperature of 102-105 ° C is required. The shutdown signal comes when the engine temperature drops to 85-87°C. When choosing a new sensor for his car, the car owner should focus on the old device. In the absence of the original, previous device, the necessary information can be obtained from special catalogs.
Most modern fan control systems do not have sensor limits. It does not operate in relay mode, but constantly transmits information about the engine temperature to the electronic control unit. The ECU itself sets the limits for turning the fan on and off. Changing the operating range will require brain reprogramming.
A little theory
Characteristic
Explanation
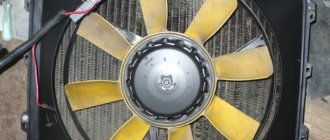
The sensor is located in the heater radiator. It is not difficult to determine that this is the one in front of you, since in the radiator it is the only element to which the wires are connected. And if you take a 30 key, then only the sensor has the appropriate fastener size.
Sensors may have different temperature limits. But for the VAZ 2114, switching on occurs at 102-105 degrees Celsius, and switching off occurs at 85-87 degrees. When choosing a new meter, focus on the one that has failed, or purchase one with an on and off indicator of 102 and 87 degrees, respectively
There is a special contact group inside the sensor. When the coolant in the radiator heats up, this group heats up and expands. When the expansion reaches a certain limit, the contacts close, they transmit a signal to the wiring and the fan turns on
Connection diagram for the fan switching sensor in injection engines
Unlike carburetor cars, where the sensor directly closes and opens the cooling fan circuit, in injection engines the device operates only with an information signal. After processing the received data, the ECU sends a control action to the fan relay installed on the radiator. The main advantage of this scheme is the possibility of emergency operation of the cooling system in the event of a loss of communication with the sensor or its failure. The ECU can also adjust the engine operating mode by influencing the injectors.
To determine where the fan switch sensor is located, you need to pay attention to the thermostat. In injection engines they are located next to each other. In some car models, wires go from the sensor to the dashboard to indicate the status of the device or to display the current coolant temperature.
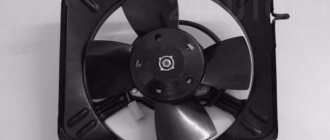
Reasons for fan failure
There are a number of reasons why the fan sensor can eventually fail other than the sensor itself. Therefore, they should first be excluded to make sure that the sensor is to blame.
Reasons for fan failure include:
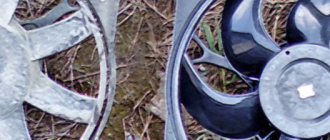
- The fan has failed. It can wear out, lose integrity, and receive mechanical damage. It will be more expensive to replace it compared to the sensor, but there is no choice.
- The chain has broken. When testing a sensor, the method of closing two of its contacts is usually used. But if the wiring circuit is damaged, this will not be possible, and due to inexperience, all the blame will be placed on the regulator.
If checking the contacts does not produce results, the fan does not respond, try connecting its contacts directly to the battery.
Checking the functionality of the sensor
Checking the functionality of the device should begin with monitoring the response temperature. To do this you will need a thermometer and a multimeter. All actions can be performed independently, without resorting to a visit to the service center. If the multimeter is equipped with a thermocouple, then there is no need for a thermometer. To check the sensor, follow the instructions below:
- Switch the multimeter to resistance measurement mode. For convenience, you can select the dialing mode;
- Immerse the threaded part of the sensor in water;
- Start gradually heating the water. You can control the temperature using a thermometer, or temporarily switching the multimeter to the thermocouple mode;
- Wait for the device to respond;
If there is a critical deviation of the response limit, the sensor must be replaced. After purchasing a new device, you must check its suitability. Defective products are very common on sale, so checking whether the sensor turns on correctly is the responsibility of every car owner.
How to check the sensor yourself?
Checking the fan switch sensor is not difficult.
- If there is a need to diagnose it, you must first find out its functions and operating principle.
- After this, you can test the system by heating the most vulnerable part of the sensor housing. To do this, you need to remove it from the radiator, carefully inspect it, check the contact pads, inspect the wires, and, if necessary, clean it.
- Next, you will need a tool that you can make yourself from a regular light bulb and battery, or use a special tester.
- Bring water to a boil, then connect the tester and sensor contacts and lower its vulnerable side into the water.
- After this, a short circuit should occur. This action will cause the lamp to ignite, or the characteristic sound signal of the tester to appear. If the device shows that the contacts closed before colliding with boiling water, then the sensor is undoubtedly faulty. The author of the video, Mechanical Technician, will tell you how to check the fan switch sensor.
Replacement with draining antifreeze
If you discover that the device is not functioning correctly or is completely inoperable, you need to replace it with a new one. To perform dismantling, you must follow the instructions:
- If the engine is hot, it must be allowed to cool;
- De-energize the vehicle ground by disconnecting the negative terminal of the battery;
- Remove the expansion tank cap;
- Remove the radiator cap;
- To prevent contamination, it is necessary to place a container under the drain hole;
- Drain the antifreeze from the radiator. There is no need to drain antifreeze from the cylinder block. To unscrew the drain plug, just a hand is enough, so no tools are needed;
- When the liquid stops flowing out, you should return the plug to its place to avoid its loss;
- Remove the terminal with wires;
- Use a wrench to carefully unscrew the sensor.
To install a new sensor you must:
- Check the condition of the copper sealing washer. In most cases, it will require replacement with a new one. Using an old gasket is fraught with antifreeze leaks;
- Screw in the new sensor, making sure that the sealing washer fits evenly;
- Connect the terminals with wires;
- Pour antifreeze into the expansion tank. If the drained antifreeze is of good quality, you can return it. Otherwise, fresh fluid must be used;
- To eliminate air pockets in the cooling system, it is necessary to purge it;
- Replace the radiator cap;
- Close the expansion tank;
- Connect the negative terminal of the battery;
- Warm up the engine until the sensor responds.
If after these steps the fan does not turn on when the required temperature is reached, it is necessary to continue troubleshooting in other possible places. Before continuing to search for a breakdown, it is advisable to read the error log from the ECU using a diagnostic scanner.
Instructions for replacing the regulator
Replacing the fan switch almost always follows the same pattern:
- We need to prepare the “ground”. In some cars, this happens as follows: you need to rid the system of cooling liquid if the fan is installed at the bottom of the radiator, or, if the system has enough, remove water from the expansion tank. If the antifreeze needs to be completely drained, then you need to open the heater tap so that there is no residue. Important: do not pour the remaining liquid onto the ground, because antifreeze is quite poisonous.
- After this, you can remove the sensor by disconnecting the connected wires. Then, using the key, you need to remove the housing and unscrew it by hand. The new fixture must be tightened by hand, then a wrench can be used to apply the finishing touches. To prevent leakage, you can use a special thread tape, which will make the connection tighter and more reliable. After this, you can restore the contacts by returning all the necessary wires to their place, and fill the system with coolant.
Price issue
In the photographs below you can see what the device looks like, as well as estimate the cost of various models.
1. DTOZH for Volvo (price - 380 rubles)
2. DTOZH 406 (price - 215 rubles)
Installing a new sensor without draining the coolant
In the injection engine of most car models, the sensor is located high in the cooling system, which allows it to be removed without a significant spill of antifreeze. To do this, you must follow the instructions below:
- Do not unscrew the sensor completely. In this case, a slight leakage of antifreeze will begin;
- Check the copper washer on the new sensor;
- Unscrew the old device with one hand and quickly bring the new one in with the other;
- After tightening the regulator, thoroughly wipe the area from any coolant drips;
- Check the quality of installation for leaks.
With this method, the car owner can significantly save time. The disadvantage of this method is the need to make a replacement quickly, which can cause difficulties for inexperienced car enthusiasts. If the circumstances are unfortunate, a large amount of antifreeze may spill from the cooling system.
Keeping all elements of the cooling system in working order will protect the engine from overheating and unpleasant consequences. It is necessary to carry out timely monitoring of the operation of the regulator, especially when the first symptoms of overheating appear. Since the work requires the presence of heated fluid, all manipulations should be performed on a cooled engine. This will protect the car owner from thermal injuries.