Added Mar 30, 2015 to Dashboards
VAZ 2170 is a fairly popular car from the domestic automobile industry. It is popular both among ordinary car enthusiasts and among professional tuners who are involved in radical improvements in all parameters: appearance, interior, driving performance.
In this article we will talk about the process of removing the instrument panel, as well as dismantling the instrument panel itself, that is, the dashboard. There is no need to explain why this may be needed: either for repairs or for tuning. By the way, regarding tuning, as an addition to this guide, we recommend that you read the article: modification of the Priora dashboard.
How to remove and install the instrument panel on Lada Priora
This article is for those who plan to independently remove and disassemble the instrument panel on a LADA Priora car.
When removing the instrument panel, you may have to cut the clamps on the wiring harnesses. Buy clamps in reserve.
In the process of removing the panel, you will need to disconnect the connectors with wires from various devices. Mark the pads relative to each other to avoid confusion when assembling the panel.
To perform work on removing the panel you will need: an 8 socket wrench, a 10 socket wrench, and a set of screwdrivers.
What lamps are installed in the Priora dashboard
Depending on the year of manufacture, Lada Priora can be equipped with both lamps with a conventional socket and with a VDO socket. To accurately determine the lamps, you must first remove the shield and determine the type of socket. The lamps in the sockets are the same, however, from the factory, the lamp mustaches are soldered to the socket and to replace the lamp, you need to unsolder or pull out the old one and install a new lamp in its place, while soldering the mustaches.
However, you can take a simpler route by purchasing ready-made lamps with sockets. Note that the lamps are installed in them without soldering the mustaches. That is, if the lamps burn out further, you simply change the lamp and that’s it.
A regular lamp socket looks like this
This is what a lamp with a VDO socket
Step-by-step instruction
1. Set the steering wheel to the lower position.
2. Next we need to remove the instrument panel trim. It is secured with four Phillips screws.
Unscrew the 2 screws on top.
In order to get to the lower mounting screws, you need to remove the plastic from the bottom of the steering wheel.
To remove, turn the three latches counterclockwise half a turn.
After turning the clamps from above, pry up the plastic with your hand and remove it.
3. Unscrew the 2 lower screws securing the instrument panel trim.
4. Using both hands, remove the cover. Let's start from the top.
Be careful not to break the latches.
Icons on the factory dashboard
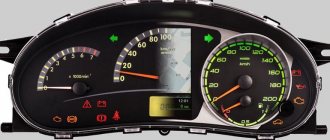
All indicators should light up like a Christmas tree for three seconds when the engine starts. If some icon remains, it means the system is signaling a breakdown. To make it easier to understand all the indicators, here is a schematic picture:
1,5,9,10 are already known scales that display the main parameters that can change. 19 – on-board computer display. Further:
- 2 – Icon indicating the operation of the braking system.
- 3 – Battery condition. If the light remains on, the battery is discharged or the charge level is too low.
- 4.7 – Doublers for direction indicators (“turn signals”).
- 6 – Oil level (indicates low level).
- 8 – Handbrake. Lights yellow when the lever is tightened.
- 11 – “Gasoline light bulb.” Lights up when there are only 10 liters left.
- 12 – Button for switching on-board computer modes.
- 13 – “Emergency”.
- 14 – Electric power steering (indicates a breakdown).
- 15 – High beam on.
- 16 – Side lights/low beam.
- 17 – Airbag condition (malfunction).
- 18 – Immobilizer (if you hear a beep and the icon itself blinks, the immobilizer is faulty).
- 20 – Seat belts not fastened.
- 21 – Unsatisfactory condition of the service brake system.
- 22 – Disabling the airbag.
- 23 – ABS malfunction.
- 24 – “Check”, “Check Engine” - engine failure.
How to remove the instrument panel on a Lada Priora yourself
So, for this we need the following tools:
- short Phillips screwdriver;
- flat screwdriver.
If you have all the tools, you can start disassembling. To do this you will need to do the following:
- Set the steering wheel to its lowest position. After this, remove the trim from the dashboard. Note that it is secured with four screws, which can be unscrewed with a regular Phillips screwdriver.
- Unscrew the two screws that are located on top. And in order to gain access to the lower screws, you need to remove the plastic at the bottom of the steering wheel. To do this, turn the 3 clamps counterclockwise by 90°. Next, pry the plastic with your hand or something else and remove it.
- Unscrew the last 2 screws that were under the plastic.
- Next, remove the cover with both hands. Note that you need to start from the top. You must be extremely careful not to break the latches.
- Remove the two screws that will hold the dashboard in place. This is done with a Phillips screwdriver.
- After this, to disassemble it, you need to pull it towards you a little. Next you need to remove the connector in the shield that goes to the dashboard. Note that it is secured with a tricky latch that needs to be pryed off with a flat screwdriver.
- Next, use the same screwdriver to pull the lock back.
- And perform the last operation - remove the instrument panel.
Is it possible to install LED lamps?
Instead of conventional dashboard lamps, some owners install LED ones. The advantage of them is that they provide brighter light and you can choose lamps of different colors. However, some LED lamps are longer than conventional lamps, so when installed in the instrument panel, they fit closer to the light filter and create a bright spot. But at the same time, the panel itself and the indicators become brighter.
Advantages of LEDs in the shield
- brighter light, allowing better illumination of devices
- Possibility of choosing lamps of different colors at will
- longer lifespan of quality LEDs
- Too bright LED lamps create glare on the panel, which does not look very good
- sometimes the panel looks too bright and distracts from movement
- The bright light of the panel can cause eye fatigue
Removing the instrument cluster of Lada Priora
Tools required : Phillips and straight screwdrivers. Before starting work, disconnect the negative terminal of the battery.
Remove the mounting block cover:
- Turn the three locks of the fuse box cover 90°.
- Unclip the latches and remove the cover.
It is not necessary to remove the steering wheel; it will be enough to install the steering column in the lowest position. Then:
- Unscrew the two lower (No. 1) and two upper (No. 2) self-tapping screws securing the dashboard trim using a Phillips screwdriver.
- Remove the dashboard trim of the Priora, removing the 3 protrusions of the trim from engagement with the panel.
- Unscrew the 2 screws securing the instrument cluster using a Phillips screwdriver.
Tilt the top of the instrument cluster toward you:
- Remove the tabs at the bottom of the instrument cluster from the grooves in the instrument panel.
- Use a flat-head screwdriver to pry off the connector with the instrument panel wires.
- Disconnect the block with wires and remove the Priora instrument panel.
Installation of the device is carried out in reverse order.
Voltmeter instead of a Priora watch
The current time is displayed on the Priora dashboard, so there is no particular need for a separate clock.
To install a voltmeter instead of a clock you will need:
- digital voltmeter with LED scale of suitable size;
- hot glue;
- file;
- knife or jigsaw;
- a piece of plexiglass or CD case;
- a piece of tint film.
To install a voltmeter in the body of a standard clock, you need to dismantle it and remove the mechanism. After this, you need to install the voltmeter panel into the case, slightly filing its corners. It is better to secure the panel to the housing with hot glue.
There is a hole in the middle of the glass for the time adjustment knob, so you need to find a replacement for it. You can cut new glass from a CD case or from a piece of plexiglass. To hide the “filling” of the voltmeter, the glass should be tinted before installation, for example, with a piece of tinting film. In this case, only the luminous LED display of the voltmeter will be visible from the outside.
Next, all that remains is to solder the wires to the voltmeter terminals and insert the voltmeter instead of the Priora clock. Connecting the wires will be discussed below.
Features of dismantling
The process will not take much time, it is quite simple, no special tools are needed, only a cross-shaped twist. But before you find out how to remove the console on a Priora, learn about some of the features of the procedure.
Disassembly always begins with removing the radio and disconnecting the wires. To remove it, press the special buttons on the sides of the device; you should hear a characteristic click. Pull the radio towards you, disconnect the wires.
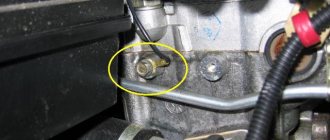
Now you need to remove the compartment in which the radio is located, after which the car owner will see two self-tapping screws, they must be unscrewed during the process of dismantling the console.
Car differences
Lada Priora and VAZ 2110 are of course identical cars, but they also have differences.
Car enthusiasts often find it difficult to decide which model to give preference to. But in any case, the Priora is a more modern car. Thus, the electric power steering gives greater comfort when driving a Lada Priora than driving a ten. In dozens, power steering was introduced only in 2006, and the VAZ-21104 immediately came from the factory with an electric power steering wheel. If someone comes across a ten with electric power steering, then know that it was installed by someone in a car service center. A feature of the Priora steering is a large amount of play in the steering wheel, which takes some getting used to. At high speed, you have to “catch the car on the road,” as it were. Therefore, many drivers at the time gave preference to the VAZ 2110, which behaves more confidently at speed. But still, when cornering and when driving in a zigzag manner, the VAZ 21104’s movement is more comfortable and confident than that of its predecessor. The Priora behaves more dynamically at speed if an appropriate brace is installed between the supports of the front struts. In this case, drivers note improved handling.
The engines of both cars are reliable and simple. The Priora's engine has superior technical characteristics, but the eight and sixteen valve units do not differ much in the traction properties of both cars. Some will say one or the other is better, but in general we can say that they are all the same.
There is a little less transmission noise in the Prior and the cabin is probably a little quieter. But most likely this is due to the fact that the developers did a good job on sound insulation in the VAZ-21104.
And yet, driving in a Prior is quieter and more comfortable. The size of the car interiors is absolutely the same. The seats and all the plastics fit from one car to another. True, the seats on the Prior are a little higher. This fact will please small drivers and disappoint giants.
Priora at one time enjoyed enormous success in the post-Soviet space. In the Caucasian republics it was the best-selling car. In general, it is impossible to say with certainty which car is better and which is worse. Each person makes his own choice based on personal experience.
Reasons for disassembly
So, we have already almost indicated the first reason - I don’t like it. This may also be necessary in the following cases:
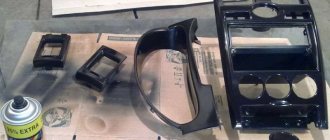
- For tuning. That is, when we try with all possible forces to correct the “face” of the car, which everyone sitting in the cabin is staring at, that is, the torpedo. To improve comfort and overall aesthetic appearance, you can install new linings, of which there are quite a few types today. The following linings are perfect for the VAZ 2110: • Euro 1, also known as Caprice. It looks nice, but it doesn't have a shelf on the passenger side;
Panel trim VAZ 2110 Euro-1• Euro 2 – similar to the previous one, but with a passenger shelf;
Panel trim VAZ 2110 Euro-2
• There are trims that are installed directly on top of the instrument panel. Installing them yourself is not at all difficult. Among these, one of the most popular is Chestnut;
Panel trim VAZ 2110 Kashtan
Panel trim VAZ 2110 Kashtan
Panel trim VAZ 2110 Kashtan• In addition, you can order an exclusive trim that makes the interior similar to that of the Nissan Primera, with the instrument panel in the center.
Trim Chestnut panel VAZ 2110 (dashboard in the center)
Trim Chestnut panel VAZ 2110 (dashboard in the center) - In order to get to the wiring, change some wire in it, or maybe a complete replacement of the entire wiring harness is necessary;
- To install a new stereo or video system, as well as supply other equipment that is necessary, but not provided for by the designers;
- Replace, fix or clean air ducts;
- When you need wind and noise insulation, since the standard one on the VAZ 2110 leaves much to be desired. Let’s not argue that tens of them are always making noise and rattling, and I really want to get rid of it.
Interior sizing Bimast Bomb
Sizing with Splen on top of Bimast
Interior sizing Bimast Bomb
Perhaps car owners will also find other reasons to replace the dashboard.