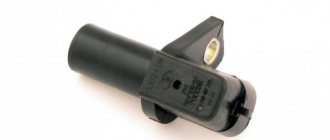
The crankshaft of a car is used to convert the translational motion of the pistons into rotational motion. On technical equipment with an electronic engine control system, a crankshaft position sensor (hereinafter referred to as CPPS) is installed. The controller is necessary to synchronize the ignition angle and the fuel system.
In the event of a malfunction of the equipment, a yellow indicator on the dashboard indicates the presence of a breakdown. The engine is unstable, idle speed is systematically reduced, power drops, and fuel consumption increases.
Some lyrics
Cars with injection, which is the Lada 4*4 or Niva, have many different sensors that are responsible for the operation of the entire car. The failure of one of them seriously affects the operation of the entire power plant. As a rule, a breakdown of the sensor leads to the lighting of the lamp on the “CheckEngine” dashboard, but the sensors have one problem: they do not fail immediately, but gradually and can give incorrect readings to the engine control unit, which will certainly lead to unstable operation of the internal combustion engine.
As a rule, failure of the sensor does not stop the car completely, but only puts the internal combustion engine into emergency mode. In this mode, the car can safely drive to the nearest service station, where it will be put in order.
But, there is one sensor that is responsible for reading and the state of the crankshaft position (CPCP); a breakdown of this sensor completely stops the internal combustion engine and makes it impossible to start until the cause is eliminated.
It should be noted that checking the sensor and signs of malfunction are similar to the Chevrolet Niva.
In this article we will talk specifically about the DPKV, namely its location, signs of malfunction, methods of checking and replacing.
Step-by-step instructions for self-diagnosis
To check the condition of the DPKV we need a multimeter. The measuring device is available to many car enthusiasts. If you don't have it, you can purchase it at any auto store. The price is affordable.
- From under the bottom of the car, disconnect the terminals from the sensor.
- We bring the limit switches to the contacts;
- Turn on the multimeter, set the position of the regulator to “resistance”;
- We carry out actual measurements;
- We compare the obtained data with standards. If the arrow tends to infinity, the controller is working. If it goes to “zero”, it’s a breakdown. Normally, readings should be 550-750 Ohms.
Depending on the diagnostic results, the technician makes a decision on the advisability of further operation of the equipment.
Examination
Checking the sensor is carried out in two stages: visual inspection and testing using a device. The check must begin with a visual inspection of the sensor and its power circuit.
Visual inspection
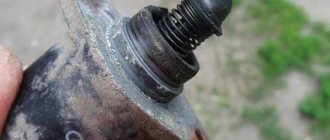
The sensor may stop transmitting readings due to contamination or an open circuit. Therefore, it is necessary to inspect the sensor for contamination and the power circuit for open circuits. The power circuit is also made of a special shielded wire, which helps protect signals from interference or current leakage. The slightest damage to the insulation can lead to unstable operation of the sensor.
The sensor also has a magnetic part, on which metal shavings often stick, which contributes to poor reading by the sensor.
Testing with the device
Checking the DPKV can be carried out using a special diagnostic tool or a Chinese ELM327 scanner, via ADC channels. These devices can also replace a regular household multimeter. Let's consider checking the sensor using a multimeter.
Although this test does not give a 100% result, it still makes sense to carry it out.
- We switch the multimeter switch to the resistance measurement parameter.
- We connect the probes of the device to the sensor and look at the readings
- The device should show a value from 500 to 700 Ohms
Such parameters are characteristic of a good, serviceable DPKV.
Recommendations for care and maintenance of the controller
- strictly comply with the car manufacturer's regulations;
- do not violate the terms of technical inspection, even when the factory warranty has expired;
- buy and install mainly original parts, the catalog numbers of which correspond to the factory markings;
- Carry out the installation work yourself if you have sufficient experience, otherwise use the services of professional workshops;
- Do not install parts or accessories from other technical equipment, even if they are similar in appearance. Full functionality is not always guaranteed.
The average service life of the DPKV is 80,000 km or more.
Replacement
Replacement is quite simple and does not require any car repair skills.
- To replace it, you just need to remove the negative terminal from the battery;
- Remove the connector from the DPKV;
- Unscrew the sensor from the bracket;
- Pull out the sensor, install a new sensor in its place and reassemble in the reverse order.
Symptoms of DPKV malfunction
- Difficulty starting the engine “hot” or “cold”;
- When moving downhill, detonation occurs;
- Idle speed is unstable;
- Motor power decreases periodically;
- Acceleration dynamics are passive;
- Sudden engine stop.
However, these symptoms are signs of a number of other breakdowns. It is extremely important to conduct comprehensive diagnostics using digital equipment.
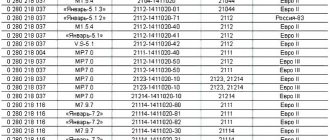
| Name / catalog item | Price in rubles |
| VAZ 21214-2123 OMEGA 173882 | From 350 |
| 2112-3847010 | From 350 |
| 21120-384701004 | From 350 |
| 21120-384701036 | From 350 |
How to check the functionality of the sensor
The VAZ inductive-type crankshaft sensor is checked with a multimeter for breaks inside the coil and the specified resistance, the value of which is in the range of 600-900 Ohms. It is also mandatory to check the DPKV wiring.
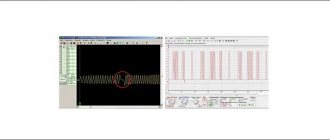
The test can be carried out by measuring inductance; for this you need to have three instruments: a voltmeter, a transformer and an inductance meter. The method is not complicated, but cumbersome and it is more efficient to buy a new sensor to check the performance of the engine.
The DPKV can also be checked by cranking the starter while observing the tachometer readings. Using a diode test, you can check for the presence of pulses at the injector connector.
Nowadays, the most popular are 3 methods, which are carried out quickly and provide information about the performance of the sensor with high accuracy.
The knock sensor, like other devices installed in the car, tends to periodically fail. This can be caused by various reasons, and often a minor breakdown can be accompanied by a complete failure of such an important component as the engine.
Among the most popular reasons for failure of the knock sensor are:
- wire break;
- insulation damage;
- breakage of the shielding braid;
- problems in the operation of the sensor itself;
- breakdowns in the software or hardware of the internal combustion engine control unit.
Checking the knock sensor will allow you to diagnose the malfunction. This is carried out using special measuring instruments or through visual inspection of the device.
So, for example, if there is a suspicion that a short circuit has occurred during the operation of the sensor, you will need to turn off the ignition and disconnect the device from the electronic control unit (ECU). Only after this will it be possible to begin checking the structure using an ohmmeter.
Sometimes the functionality of the wiring connected to the sensor is checked using a voltmeter. This is done with the ignition on. The device measures the indicators between the socket contacts and ground.
It is recommended to check the sensor itself using a multimeter. To do this, during testing, you should create artificial vibration by knocking on the device body. If the device data does not change, it means the element has failed.
Description
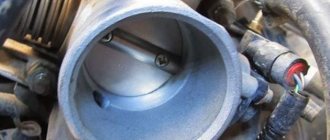
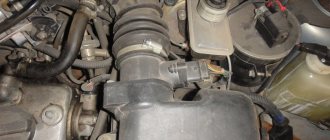
Where is the DPKV located on a Niva Chevrolet: in the engine compartment, at the end of the engine, above the crankshaft pulley.
Access to the equipment for carrying out maintenance from below, having previously dismantled the metal protection of the oil pan.
DPKV transmits signals to the electronic control unit (ECU) in real time and also reports the direction and speed of the crankshaft.
Based on the data received, the ECU makes a decision to reduce or increase the frequency, enrich the fuel mixture, or change the ignition angle.
How to replace the Niva Chevrolet crankshaft sensor yourself
Required materials and tools:
- key to “10”;
- head, knob, knob extension;
- rags;
- additional lighting as needed;
- new DPKV;
- Phillips head screwdriver.
- place the car on the inspection channel;
- secure the wheels with wheel chocks;
- squeeze the parking brake;
- from under the bottom of the car, unscrew the six bolts that secure the metal protection of the oil pan;
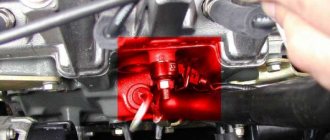
- Using a screwdriver, carefully pry up the block with terminals, remove it, and move it to the side;
- Unscrew the screw - the retainer from the sensor;
- remove the controller;
- We carry out troubleshooting of the seat, wipe it, clean it from residual dust and dirt;
- insert a new controller;
- screw it in and assemble the structure in reverse order.
DIY replacement completed. For a detailed step-by-step guide, watch the video.
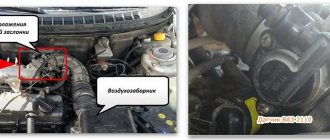
Where is the crankshaft position sensor located?
The induction type crankshaft position sensor is installed next to a special disk located in conjunction with the crankshaft drive pulley. The special disk is called a reference or master disk. Together with it, it ensures angular synchronization of the operation of the control unit. Skipping two teeth out of 60 on the disk allows the system to determine the TDC of the 1st or 4th cylinder.
The 19th tooth after skipping should face the DPKV rod, and the mark on the camshaft should be against the bent reflector bracket. The gap between the sensor and the top of the disc tooth is in the range of 0.8-1.0 mm. The sensor winding resistance is 880-900 Ohms. To reduce noise levels, the crankshaft sensor conductor is shielded.
After turning on the ignition, the control program of the unit is in the waiting mode for the synchronization pulse signal from the crankshaft position sensor. When the crankshaft rotates, the sync pulse signal arrives instantly to the control unit, which, in accordance with their frequency, switches the electrical circuit of the injectors and the ignition coil channels to ground.
The control unit program algorithm works on the principle of reading 58 teeth passing by the magnetic core of the DPKV, skipping two. The skipping of two teeth is a reference mark for determining the piston of the first (fourth) cylinder in the top dead center position, from which the unit analyzes and distributes the switching signals that control the opening of the injectors and the spark on the spark plugs over the engine operating strokes.
The control unit detects a short-term failure in the synchronization system and tries to resynchronize the control process. If it is impossible to restore the synchronization mode (lack of contact on the DPKV connector, cable break, mechanical damage or broken master disk), the system issues an error signal to the instrument panel, lighting the Check Engine warning lamp. The engine will stall and it will be impossible to start it.
The crankshaft position sensor is a reliable device and rarely fails, but sometimes malfunctions occur due to the inattentive or negligent attitude of specialists servicing the engine.
For example, a VAZ-2112 has a 21124 engine (16 valves where the DPKV cable is located very close to the exhaust manifold) and the problem usually arises after a repair, when the chip on the cable is not secured to the bracket. When the cable comes into contact with a hot pipe, it melts, destroying the connection circuit and the car stalls.
Another example would be a poorly manufactured drive disc, the rubber coupling of which may rotate along the internal connection.
The electronic control unit, receiving a single signal from the DPKV, determines the position relative to the crankshaft at each moment of time, calculating its rotation frequency and angular velocity.
Based on sinusoidal signals issued by the crankshaft position sensor, a wide range of problems are solved:
- Determination at a given time of the position of the piston of the first (or fourth) cylinder.
- Control of fuel injection timing and injector open duration.
- Ignition system control.
- Control of variable valve timing system;
- Control of the fuel vapor absorption system;
- Ensuring the operation of other additional systems related to engine speed (for example, electric power steering).
Thus, the DPKV ensures the functioning of the power unit, determining with high accuracy the operation of its two main systems - ignition and fuel injection.
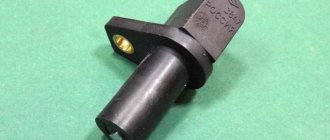
Before purchasing a DPKV to replace it, you need to clarify the type of device installed on the engine.
This component is located in a bracket, which is installed in the central area of the pulley on the generator drive. As a rule, on most modern cars it is not installed end-to-end, but with a gap of 1-1.5 mm near the structure of the toothed pulley itself.
For ease of disconnecting and adjusting the DPKV, a 50-70 cm wire is connected to it, which has the necessary connectors for keys. To align and adjust the position, you only need to adjust the washer secured above the seat of the element itself. Adjusting the washer can be done either by you yourself or by specialists at a car service center - in any case, it will allow you to avoid early breakdown of the engine cylinders and significantly reduce fuel consumption.
Crankshaft position sensor
Crankshaft position sensor location
If a malfunction occurs in the crankshaft sensor, the vehicle’s on-board computer is unable to set a number of characteristics necessary for the operation of the ignition system:
- Calculate the amount of fuel required for injection;
- Determine the right moment for injection;
- Change the angle of rotation of the camshaft;
- Determine whether ignition has occurred or not (relevant for gasoline engines).