The battery is an important component, without which the car simply will not run. Many drivers treat the battery as a consumable item - they replace it with a new one when it starts to act up. Power supplies “age”, but this can be slowed down if they are serviced on time and operating rules are followed. Testing the battery with a multimeter will allow you to evaluate its performance.
Checking the battery with a multimeter is necessary in order to notice possible malfunctions in time.
How to check the battery
When learning how to measure battery capacity with a multimeter, you need to consider the procedure for a vehicle battery.
A full check of the autonomous power source will allow you to avoid problems in the vehicle’s electrical network and extend the life of the battery. First, the battery must be disconnected from the machine system. It is allowed to disconnect only the “minus” contact. Next you need to turn on the multimeter. The test mode is set to the range from 0 to 20 V.
The multimeter probes are connected to the battery contacts. A red wire is connected to the positive terminal, and a black wire is connected to the negative terminal. If this procedure is performed correctly, the measurement result will appear on the device screen.
Measurements while the engine is running
Place the car on a level surface, open the hood, put the handbrake on and start it. When the engine is running, the generator and voltage regulator operate, which charge the battery. Therefore, the voltage at the terminals should be within 13.5-14 volts. In some cars, when the battery is discharged and the air temperature is low, the electronics automatically increases the voltage to speed up charging. In this case, it should fall smoothly as it charges. If this does not happen, the electrolysis process is activated in the banks. The electrolyte will begin to boil away rapidly. Overcharging is especially dangerous for modern gel batteries with limited gas emissions.
A voltage of less than 13.4 volts is a sign of undercharging. Operating in such conditions promotes sulfation of the plates and shortens battery life.
When measuring voltage, you need to turn off all powerful consumers: headlights, heater, audio system. Otherwise, the power of the generator when idling will not be enough to maintain the optimal voltage level.
There are several possible reasons for low voltage at the terminals:
- Poor contact.
- Generator failure.
- Voltage regulator malfunction.
You cannot operate a machine whose battery is in undercharge mode. The cause of the failure must be immediately localized and eliminated. If the voltage at the terminals and the output of the generator is very different, you need to clean the contacts on the battery with sandpaper or a file.
After checking without load, you need to turn on the headlights and other powerful energy consumers, add engine speed and repeat the measurements. If at high speeds under load the voltage drops to 13.4 volts or lower, diagnostics of the generator system and control unit is required.
How to test a battery with a multimeter with the engine turned off?
The average indicator, when checking the battery with a multimeter, with the engine not running, should be in the range of 12.5–13 V, with the upper value indicating 100% charge, and the lower value indicating 50%. The numbers are approximate, but the general picture is easy to understand. Also, do not forget that you should take readings immediately before the trip, and not after it, as soon as you have turned off the engine. It is especially good to carry it out when the car has not been used for some time, for example, in the morning after a night in the garage. This shows how well the battery can hold a charge.
Now you understand how to check the charge of a car battery with a multimeter. This device is worth purchasing for every motorist. Some rely on the on-board computer, but it does not provide sufficient accuracy. The built-in voltmeter is connected to the circuit of devices that consume energy, and not directly to the battery, therefore, part of the electricity is consumed “on the road”.
Battery capacity tests
The concept of battery capacity means how long it can work with optimal output of a certain amount of charge at certain U values. Capacity is measured in ampere-hours, and each battery is usually marked with its nominal capacity. The most common way to check a battery's capacity level is to place a specific load on it.
It would be best to use the load by temporarily unscrewing the car headlight, because the headlight has a power of 35-40 watts that is suitable in all respects. This means that the headlight, when connected to the battery, will take the required half of the current so that you can find out whether the battery capacity is normal. If the headlight goes out quickly, it means that the battery capacity, unfortunately, is not enough.
In order to determine whether the battery capacity is normal, you need to do the following:
- disconnect the battery from the car's alternator;
- connect the headlight load;
- leave the battery in this position , let it work under load for about two minutes;
- disconnect the headlight;
- set the voltage measurement mode on the multimeter ;
- take measurements of indicators.
If the battery is in good condition and has sufficient capacity, U must necessarily exceed 12.4 V. This figure should be remembered. If the voltage of the battery being tested is 12.4 V or less, this is an alarming signal that with such indicators the battery will not work for a long time and may fail at any time.
You can also check to see if the battery capacity is normal using a method called test discharge. This means that the battery needs to be charged and the load must be applied to it in such a way as to provide a current strength during discharge equal to that indicated in the technical data sheet of the battery.
To do this, we carry out the following actions:
- fully charge the battery;
- We carry out the load in accordance with the indicators indicated in its data sheet;
- connect a multimeter to the circuit - it will show the amperage level;
- monitor the multimeter reading and note the time during which the amperage decreases by 50 percent or more;
- compare the data obtained with the current data in the battery data sheet.
If the differences between these indicators are small, the battery is quite suitable for further use, the capacity is in order. If the difference is large, this is a signal that it is either time to charge the battery or replace it if necessary. You cannot directly obtain numbers indicating the battery capacity using a tester.
How to Visually Check a Car Battery Case and Cables
Now it's time to check the physical condition of your battery. A damaged battery case can not only prevent the battery from working properly, but can ultimately kill it. To check it, you need to remove it from your car.
Disconnect the cables first, starting with the ground terminal and then the positive terminal. Now unscrew the clamping mechanism to remove the battery from the tray. Make sure the holding mechanism works. If it doesn't exist, install it. This equipment prevents the battery from rebounding and becoming damaged while the vehicle is in motion.
Place it on a work surface or similar surface. Carefully inspect the battery case for possible damage. Check for a bulging side or cover, cracks around the housing, or damaged terminals. If your battery is damaged, replace it. Overcharging and internal short circuit will cause the battery to swell as the acid turns to gas. So if you notice signs of a bulge, check the charging system as well.
Now check the cables. Check the insulation around the cables and the condition of the cable threads for wear, cracks or fraying. Replace them if necessary. Make sure the clamp mechanism on your battery is working.
Instead of an afterword
Afterwards you will find out the actual mileage, number of owners, history of fines, as well as information about theft, participation in an accident, restrictions on car registration and much more. Be carefull!
Having fully studied the online report, it is still worth taking a closer look at the technical nuances of the car when purchasing. And if you are not confident in your knowledge, or it is not possible to go for an inspection, order an on-site inspection service. The specialist will conduct a diagnosis for you and make a detailed conclusion from a professional point of view.
Source
What parameters can be checked?
Using a multimeter, you can measure voltage with high accuracy. By the magnitude of the electrical voltage, you can determine whether the battery is charged or the element needs to be charged with direct current.
Using a multimeter, you can check the voltage not only of acid batteries, but also of cell phone batteries. To check the mobile phone's battery charge level, the device is switched to the mode for measuring direct current up to 20 V. In this mode, the digital device allows you to measure voltage with an accuracy of hundredths of a volt.
The screwdriver battery can also be easily checked with a multimeter. The rated voltage of the device, in this case, can be found out from the documentation of the power tool, and if the voltage is less than this value, then the battery must be charged.
The battery capacity can also be checked with a multimeter. For this purpose, you can use several methods.
You can check current leakage using a multimeter. If it is necessary to measure this parameter on a car, then in addition to the current leakage on the body, the leakage in the vehicle’s on-board network is also checked.
In this way, you can prevent rapid discharge of the battery and increase its service life.
How to check battery charge with a multimeter?
Determining the condition of a lithium-ion (the most common type of modern battery) battery is quite simple if you follow these instructions:
- Disconnect the energy storage device from the car and wait 5-6 hours.
- The multimeter should operate in the “voltage” mode (voltage test).
- A standard lithium battery produces current in the range of 12.7–13.2 volts. The switch is set to 20 or closest to it. This is how the voltage is measured from this value and below.
- The wires coming from the device are connected to the battery: red to the positive terminal, black to the negative terminal. If the wires are the same color, then you should focus on their markings and connect them to opposite charges, minus to plus and vice versa.
General information
A multimeter allows you to find out the real voltage of the battery, and the readings will be as accurate as possible. In turn, by the voltage you will understand whether the car battery is charged or needs power.
By the way, you can use a multimeter to find out the voltage of phone chargers. Video on how to check 12V with a multimeter using the example of such a power supply:
This meter also allows you to detect current leakage. At the same time, it is important to check for leaks not only on the body, but also in the on-board vehicle network.
In general, checking the battery with a multimeter is possible by:
- capacity;
- resistance;
- current or amperage;
- charge (voltage).
Thanks to this range of measurements, you can minimize the likelihood of rapid battery discharge and increase its service life. And if, for example, you know how to check the starting current of a battery with a multimeter, then you will understand why the engine does not start.
In this useful article we will tell you about the most important things. Let's start with how to measure a battery's charge with a multimeter.
Using a hydrometer to check battery fluid
- Remove the caps from the top of the battery.
- Immerse the tip of the hydrometer into the first cell of the battery and squeeze out the hydrometer bulb.
- Release the bulb so that the electrolyte enters the hydrometer needle.
- Read the specific gravity of the electrolyte as indicated in the instructions on the tool packaging.
- Record your values and perform the same test on the remaining cells.
- Compare your results with the results of the tool manufacturer's instructions.
Basically, if your readings fall between 1.265 and 1.299, your battery is charged. When your readings drop below 1.265, your battery will not be sufficiently charged. In most cases, a slow or fast charge will help restore charge and improve the chemistry in the battery. However, a difference between 25 and 50 points or more (the point is 0.001) between any of your readings indicates that the battery is sulfated and you need to replace it.
Replacing car wiring
When replacing wiring in a car, be sure to turn off the power, including disconnecting the battery. Of course, this is not a precaution against electric shock, but protection of the vehicle’s electrical equipment from possible short circuits that may occur during repair work.
Sometimes the replacement can be completed in 10-15 minutes - for example, if the wires of the “battery-generator” supply circuit are damaged. If the integrity of the wiring in the cabin is damaged, there are problems with grounding, or a short circuit in the on-board computer circuit, then the work will take much more time. And the main thing here is not to make a mistake, since incorrectly connecting the wires (for example, if the polarity is reversed) can cause a short circuit, damage to expensive electrical equipment and even a fire. If you do not have experience in electrical engineering and electrical installation work, it is better to contact a specialized service for the services of a professional auto electrician.
How to check the battery charge using the indicator
Many maintenance-free batteries have charge indicators that allow you to visually determine the condition of the battery. This option first appeared on Japanese products and quickly gained popularity due to its convenience and accessibility.
The hydrometer, as the indicator is called, is a transparent window on the battery cover. The color of the window changes depending on the condition of the battery:
- Green —full charge.
- Gray or white - need to be charged.
For some indicators, the window turns red when capacity is lost.
The principle of operation of the device is based on changes in the density of the electrolyte at different charge levels. It works like this:
A tube with a green float is attached to the window.
- When charging the battery, the density of the electrolyte increases and the float rises, approaching the window.
- If the battery is discharged, the density drops and the ball sinks in the electrolyte. As a result, the indicator window changes color to gray or black.
Some indicator models have a red ball that floats up when the density of the electrolyte decreases. This provides a red indication of the discharge.
When the electrolyte level drops, not the ball, but the electrolyte itself will be visible through the window. To prevent the destruction of the plates, you need to add distilled water to the jars and charge the battery.
The advantage of the indicator is that the device allows you to determine the condition of the battery without the use of special instruments. This is convenient when purchasing a battery or in road conditions when you need to quickly check the condition of the battery. However, indication using a float does not always allow one to draw accurate conclusions about the performance of the battery. Therefore, when in doubt, you should use a multimeter or a load fork. They are also useful when you need to check a battery that is not equipped with an indicator.
What is a multimeter
This is a household digital measuring device that is used to determine voltage (U), electric current (I) and battery resistance. Most often, this device determines U in a car battery. The digital meter has a high degree of accuracy, has wide functionality for measured parameters and quantities, and is also easy to maintain.
When measuring U in a car battery, it helps the user know how much capacity the battery has. Analysis of the test results obtained is very important, since it gives an idea of the performance of an important element of the vehicle's energy supply.
How to Test Battery Terminals Using a Multimeter
Dirty, corroded or loose terminals will lead to starting or no-starting problems and are one of the main reasons people think they have a "dead battery". Sometimes such problems are difficult to detect with a simple visual inspection.
Here you will use a voltmeter (or multimeter set to voltage) to check the battery terminals for voltage drop so you can understand the status of your battery connections.
First turn off the ignition system. Do this by temporarily disconnecting the ignition coil or removing the fuse, or the fuel pump relay (if necessary, find your vehicle's owner's manual or your vehicle's repair manual to locate the coil or fuse). This will prevent your engine from starting.
Use the red positive wire to touch the positive terminal of the battery and hold. Touch the black wire (negative) of your meter to the terminal of the negative wire that goes onto the battery. Have a helper crank the engine. If your meter registers more than 0.5 volts, you will need to clean or check the physical condition of the terminal and terminals.
Now check the other battery terminal. This time, however, use the black probe of your meter to touch the negative terminal of the battery. Now touch the red probe of your meter to the cable terminal connecting to the same battery terminal. Have your helper start the engine and check the voltage reading on your meter. If it exceeds 0.5 volts, you need to check the battery terminal for damage or clean it.
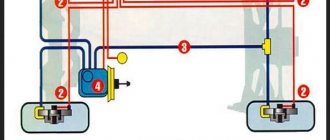
Checking current for leakage
In exactly the same way, you can measure current leakage in a car - with a current clamp or a multimeter. The measurement scheme will be the same as the previous one. Before starting the measurement, you must turn off the engine and disconnect obvious consumers:
- lighting equipment;
- car radio;
- other loads.
If the measured leakage current exceeds a reasonable value (the approximate sum of the remaining loads - car alarms, other car electronics that cannot or are difficult to turn off), you need to look for a problem - short circuit, insulation or contamination overlap, etc. You must understand that if a leak occurs through a contaminated battery case (oil stains, electrolyte, adhering conductive dust), then it will not be detected in this way - the current path will be directed past the circuit being measured. Therefore, at the first suspicion of abnormal consumption, you need to clean the battery case from dirt (for example, wash it with detergents).
Leakage current paths along a contaminated housing.
For more details, read the article: How to find current leakage in a car with a multimeter
How to check the “amperage” of a battery with a multimeter?
To determine the current that your battery produces, you will need to create a circuit with a load. Its role is played by any device or equipment that consumes electricity. To take measurements you will need to take the following steps:
- The device is set to ampere measurement mode, and the switch on it is set to alternating current, which is designated by the English letters AC.
- Disconnect the positive terminal of the battery and replace it with the negative wire of the measuring device.
- To the equipment that acts as a load, connect the negative terminal of the battery and the meter probe with a positive charge.
- Depending on the design, look at the displayed number or count it on the instrument scale.
A serviceable and fully charged battery exhibits readings in the range of 12.6–13 V.
Measuring battery voltage
Voltage is much easier to measure than current. Because you don't need to bother with the load. We turn on the multimeter in parallel. That is, we simply connect the red probe to the positive input, and the black probe to the negative input. But before that, you need to move the selector to the measurement limit closest to the top. Middle one from above: for a car battery it will be 20 volts, for small batteries - 10, if there is such a limit on the scale. Now you can touch the battery terminals with the probes - black for minus, red for plus.
How to test a battery with a load fork?
This is the most accurate method to determine the state of charge and the ability of the battery to operate at full load. It is used by professional auto electricians in service centers.
A load fork is a device that combines a voltmeter and a load resistance. Advanced versions of the device are also equipped with an ammeter, which allows you to estimate the load current. The fork operates in two modes:
- battery voltage measurement;
- imitation of starter operation.
Before starting the test, you should turn on the voltmeter mode on the load plug and connect it to the battery. If the device shows less than 12.7 volts, the battery needs to be charged.
| Voltmeter readings under load | >10.2 V | 9.6 V | 9.0 V | 8.4 V | <7.8 V |
| Charge percentage | 100% | 75% | 50% | 25% | 0% |
Checking the batteries
Checking battery performance.
The rated voltage of alkaline and alkaline AA batteries is 1.5-1.6 V. To check their performance, you can use a 2-step test:
- Without load. Select the constant voltage mode on the multimeter with a range from 200 mA to 5-10 A, apply the probes observing the polarity. Classify batteries according to the obtained indicators: more than 1.35 V - working, from 1.2 to 1.35 V - require testing under load, less than 1.1-1.2 V - must be disposed of.
- With load. You only need to check those batteries whose voltage at stage 1 exceeded the threshold of 1.2 V. After connecting the load to the circuit, you need to wait 30-40 seconds and then connect the multimeter probes. At a voltage of less than 1.1 V, batteries should be disposed of, at 1.1-1.3 V - they can be used in low-power devices (remote controls, computer mice), at more than 1.35 V - used in any devices powered by portable storage devices.
To test lithium batteries, other voltage values are accepted. When fully charged, a working battery produces 3.6-3.7 V, and when discharged - 2.5 V.
Reinstalling the battery
After cleaning the case, terminals and tray, reinstall the battery.
- Carefully place it on the tray.
- Attach to tray using clamping mechanism.
- Connect the terminals. This time, start with the positive terminal and connect the negative or ground terminal last.
- After connecting the terminals, spread a thin layer of Vaseline around the top of the terminals and terminal posts. This prevents corrosion from accumulating around the terminals.
Car electrical wiring repair
You can check and restore the car's electrical wiring yourself or at a car service center. After identifying faulty areas where there is damage to the wires, a short circuit or a break, they are soldered or completely replaced. Conventional twisting followed by crimping is not a full-fledged repair, but only a temporary measure - take this into account if you do not have the opportunity to solder the break points.
Wires are selected with the same characteristics as the existing damaged ones (resistance, metal). You should not install too long wires with a “reserve”; twisted open wiring under the influence of negative factors (temperature changes, moisture, dirt) is destroyed faster - this can lead to a short circuit. When replacing wiring harnesses with connectors, make sure that the contact groups are completely free of oxidation before work.
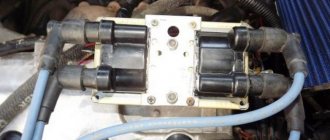
Mounting blocks located in the engine compartment are also considered a vulnerable element of a car's electrical system. Due to the destructive effects of temperature and moisture changes, damage to the protective coating and subsequent defects in tracks, connectors for connecting wiring harnesses, relays, and capacitors are possible. Repair of mounting blocks, consisting of circuit boards, fuses and electrical components, includes soldering to restore tracks and coating with a special protective varnish, as well as replacement of faulty elements and wiring, connectors, cleaning contact groups from dirt and oxidation.
Quick battery check
In some cases, car owners have absolutely no time to disconnect the battery from the car, as well as “digging” with the lighting and dashboard. Such car owners determine the battery charge level without removing it, right under the hood.
The process looks like this:
- When the car freezes after turning off the engine, the multimeter is connected to the battery according to the scheme: plus to “+”, minus to “minus”, respectively. It is worth considering that the indicators will have minor deviations. 12.7 Volts is a normal indicator.
- Then the car starts. When the motor starts, the voltage will rise to 14.7 Volts.
- It is recommended to check it under load (external lighting, window heating, medium heater mode). In this case, the norm is 14.6 Volts.
Measuring the voltage of a car battery with a multimeter is a feasible task even for a novice car enthusiast. Not everyone can afford an expensive battery equipped with a special indicator.
A practical and universal option is to measure the battery charge with a multimeter. This device, with a talking prefix “MULTI”, allows you to measure not only voltage, but also current. In addition, the multimeter can be useful for other electrical equipment, including phones, laptops, and screwdrivers. Remember that it is better to purchase such a device from trusted manufacturers in specialized stores.
Is it normal to leak?
No matter how strange it may seem, it is true (within reasonable limits, of course). Leakage is a natural process that occurs even on a new car. After all, a modern car is equipped with many systems (the same security alarm and ECU), which will “pull” current even when the engine is turned off. Experts identify certain numbers at which such a leak is normal.
How to clean a car battery
- Cleaning the battery case
You can use a simple procedure to clean the battery case. To do this, you need to prepare a mixture of 8 ounces of warm water and one tablespoon of baking soda. This neutralizes the acid and helps remove dirt from the battery case and terminals.
Wear safety glasses and rubber gloves and, using a soft brush, apply the solution to the top of the battery and the sides of the case. If your battery uses compartment caps (serviceable batteries), do not allow the mixture to seep under the caps and mix with the electrolyte inside.
Wipe with the solution and a clean rag. Continue applying the cleaning solution until you see no signs of buildup.
- Cleaning the Battery Terminals
As with the battery, remove dirt and corrosion from the terminals using baking soda and a water solution.
To make your task easier, pour the mixture into a Styrofoam or similar disposable cup and submerge the battery terminal in it for a minute or two. Next, use a battery compartment cleaning tool to finish removing corrosion from the terminals. Repeat the procedure until you see that both cables are free of corrosion.
- Cleaning the battery compartment
Check the condition of the battery compartment. Make sure there are no screws, cracks, pieces of dirt or signs of corrosion. If necessary, use the same solution to remove dirt and corrosion from the pan.
Common machine electrical faults
Auto electrics include various systems, parts, devices and elements of the vehicle - the ignition system, battery and generator, on-board computer circuits, fuses, sensors, relay blocks, various electronic sensors, auto lights, as well as auto electronics - climate system, audio system, automation and systems security. It is necessary to take into account the peculiarities of automotive electrical wiring in order to quickly find and eliminate a malfunction in the on-board network.
Common electrical problems include:
- Battery failure. This may be a consequence of insufficient electrolyte density, damage to the case with electrolyte leakage, destruction of the plates, or significant oxidation of the battery terminals.
- Generator breakdowns - winding breaks, problems with the voltage relay, failure of the diode bridge, wear of brushes and bearings.
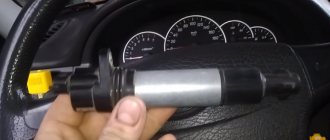
- Problems with the ignition system. We are talking about malfunctions of spark plugs, ignition coils, an open circuit or oxidation of the contact group.
- Deformations of electrical wiring - oxidation at connection points (inputs, contacts, terminals), breaks, destruction of wire insulation, short circuit of wiring, violation of the integrity of twists.
- Failure of electronic components. This refers to malfunctions of various electrical devices in circuits, devices and electrical equipment of a car (conductors, diodes, fuses, capacitors).
How to make a device with your own hands
When the necessary equipment is not available, you can make the device yourself by watching the video. It is necessary to take a voltmeter from ready-made instruments, and the remaining parts are constructed from improvised means. Difficulties will arise when calculating and creating internal resistance, which requires current.
A suitable material is nichrome wire, used to create heating coils in electric stoves. Nichrome elements can be replaced with a metal strip from other heating devices.
For a voltage of 12 V, the current indicator should be within 80-120 Amperes, and the resistance should be 0.1-0.15 Ohms. A device for measuring such resistance is difficult to find. For this reason, the length of one element is selected and the current that it passes is measured. After this, several similar parts are combined.
A homemade device is made sequentially:
- Select a nichrome wire or heating strip and measure the current up to 15 A with a multimeter. The element should pass 10-12 A.
- 10 such parts are connected, receiving a load of 100-120 A. The wire must be twisted securely.
- The resulting element is placed in a suitable housing and fixed in it. If the box is small, then the wire is bent several times so that the turns do not touch each other. The parallel connection must be reliable, which is ensured by insulating cylinders that are installed on the bends.
- The ends of the twist are soldered to the output contacts, and from the outside to the connecting wires.
- Connect a voltmeter.
- Clamps are attached to the ends of the connecting cable, which are then connected to the battery.
When the device is ready, you can take measurements at home.
How to measure cold cranking current using a universal tester?
To make objective measurements of the amperage produced by the battery in a car, you need to perform the following steps:
- Find an equivalent load, the maximum current through which, according to calculations, will not exceed the limit of the device in the desired mode. Let's say you use a device with a maximum mark on the panel of 20 A. You need to select a resistance such that when turned on it would not be greater. The battery produces a voltage of 12-12.7 V. To obtain a reading current equal to 10 A, you need to connect a load with a resistance of 1.2-1.27 Ohms.
- The resistor is connected to the car battery in series with your device.
- Preliminarily switch the measuring device to current control mode. If you don’t know, the panel will have the letter “A” written on it and numbers indicating the limit. Switch to the largest one. Also select ADC mode, that is, direct current measurement.
- When connecting to the battery, pay attention to the polarity of the probes. Red is always a plus; it must be included in the socket, near which there is a designation of limits and the measured physical quantities are indicated. Black is negative and is connected to the socket labeled “COM”, there is a ground icon next to it.
A series connection is a circuit in which all components are connected in one line. Current flows through all devices, and its strength is determined by the total resistance.
Reading the readings
To measure voltage, you need to switch the multimeter to voltmeter mode and connect one sensor to the circuit and ground the second.
When using a multimeter, you must correctly connect its contacts to the system components. The connection method depends on the polarity of the vehicle. In a car with negative grounding, it is necessary to connect the contact marked (-) to the body, and in a car with positive grounding, the contact marked (+) must be connected to the body. Refer to the instruction manual to check polarity.
Make sure that the contacts are securely fastened, and if necessary, clean them of rust and paint so that the readings are accurate. Sandpaper works well for cleaning.
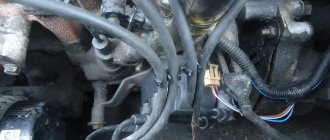
Working in the engine compartment, attach the sensor to the ground clamp on the battery
Ignition check
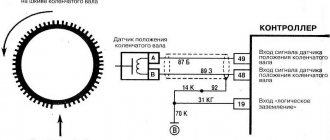
When testing a low voltage circuit, it is necessary to close it by closing the breaker contacts.
If an additional resistor is used in the coil, its action will cause the voltage at the input terminal to be lower (about 6-8V). To check the ignition voltage, connect a multimeter to the coil and ground. Turn the starter on and off briefly to bypass the additional resistor. The multimeter should show about 12V. Disconnect the multimeter from the coil.
If the value does not change, the fault lies in the low voltage circuit itself or the solenoid terminals.
Test these components by measuring the voltage drop across them. Connect the sensor between the terminals on the coil and to ground.
Close the contacts and switch the multimeter to low voltage mode. It should show 0-0.5V. If the reading is greater than 0.5V, the terminals on the coil are not working properly.
Switch the multimeter to high voltage mode and open the contacts. The readings at the input and output must match.
Zero voltage may indicate a distributor failure. In order to verify this, you need to turn off the distributor. If the voltage does not appear after turning off the distributor, most likely the fault lies in the coil itself.
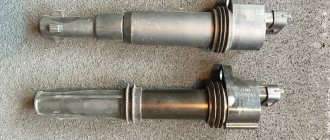
Checking high voltage wires
To check high voltage wires, you need to switch the multimeter to ohmmeter mode. If the car operates with intermittent ignition, it can be assumed that one of these wires is faulty.
Determine the type of wires. Carbon alloy wires have a resistance of 10,000-25,000 ohms. Copper-plated wires have low resistance, but are equipped with radio suppression plugs with a resistance of 10,000 Ohms.
Disconnect the spark plug wires, remove the distributor caps, and measure the core resistance at both ends. Make sure the readings are correct.
To check the insulation, measure the resistance of the core and the surrounding plastic. If the wire is in good condition, the readings should be the same.