On the VAZ 10th family, which includes the VAZ 2110-2112 models, the designers used an electronically controlled interior heating system, thanks to which the temperature set by the driver is maintained automatically.
On the VAZ-2110, instead of a manual heater control mechanism with a cable drive of the main elements - the coolant shut-off valve and dampers, an automatic heater control system (AHC) controller with a temperature sensor and a gearmotor that regulates the position of the dampers are used.
In such a stove, the valve for shutting off the antifreeze supply is no longer used, and the adjustment of the heater operating mode - “heating” or “ventilation” - is carried out by a central damper, which directs the air flow through the radiator or bypassing it.
Heating device design
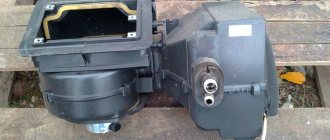
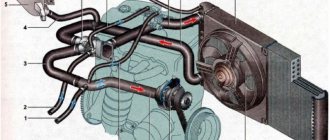
The heating of the VAZ-2110, through which a motorist can feel comfortable in his movable property at any time of the year, consists of several separate devices working in close conjunction. The central device of the unit is the radiator, with the help of which the air flows going into the cabin are heated. In order to be able to repair or replace the radiator, you will have to look for ways to it under the hood.
The second most important device is the air distributor, which has several pipes running throughout the cabin of the “tens”. Compared to the old-style models that preceded the release of the VAZ-2110, the new car has an evaporator, which has found a place in the air conditioning system
The operation of the stove is controlled through a special control unit. In the VAZ-2110 operating manual, this device has a different name (controller). The unit operates together with a temperature sensor located in the cabin. The sensor transmits information regarding temperature to the unit, after which the data is compared (the information displayed on the handle is taken into account). As soon as the system detects a temperature difference of 2°, warm or cooled air immediately begins to flow into the cabin.
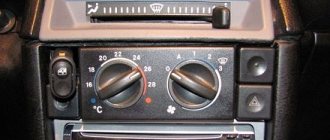
To understand how the heater works, you need to pay attention to the handle of the device; two extreme positions deserve special attention - MAX and MIN. The fact is that when the handle is set to one of these indicators, the system begins to supply heat, not taking into account the data from the temperature sensor
The VAZ-2110 stove provides for the presence of such a device as a gearmotor. The task of this device is to open and close the damper. A small-sized electric motor is extremely important in the operation of the heater. Even with a minor breakdown of the gearmotor, the system will be able to provide the car owner with only cold or only hot air. If this device breaks while the damper is closed, then the entire system will cease to perform its function. The main components of the heating device:
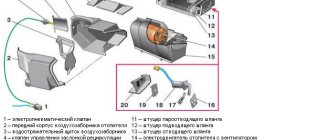
- radiator;
- a device that distributes air flows;
- SUAO block;
- ceiling sensor;
- lever;
- flap;
- gearmotor.
Purpose of the radiator
The VAZ-2110 stove of the new model has a radiator, through which the air flowing into the vehicle is heated. Quite often on the global network you can find diagrams in which the radiator is designated as a heat exchanger. The heating process in the device occurs due to the supply of warm antifreeze. The radiator is connected to the cooling system of the power unit through several pipes and hoses. Coolant circulates inside the heat exchanger all the time. The volume of incoming air and its direction depend on the location of the damper. When the heater damper is in an intermediate position, part of the air flows through the heat exchanger, and the remaining volume bypasses the radiator. In the diagram you can see that the radiator of the new model differs from other models in several useful modifications.
Operating principle of the control system and ceiling sensor
The operating principle of the VAZ-2110 stove can be understood by studying components such as the control system and the ceiling sensor.
The function of the ceiling sensor is to determine the temperature inside the vehicle. Then all the information will go to the SUAO block, where the incoming value will be equal to the temperature that is reflected on the handle of the VAZ-2110 heating device. As a result of the verification, the position of the damper will be changed or remain the same. Everything will depend on the difference between the values being compared. Through this simple manipulation, the temperature inside the car is controlled.
When setting the device to any of the extreme values, the information from the ceiling sensor will not be taken into account. The SUAO block is a set of microcircuits on which the functioning of the heater directly depends. If malfunctions occur, both the sensor and the control system can be replaced without much labor.
The device of the damper and gear motor
Due to the gearmotor, the position of the damper that regulates the air supply changes. This component of the system is controlled by the control system block. If a functioning device fails, the damper stops moving. The device itself looks like a small electric motor. Most often, a broken device must be completely replaced, since repairs are quite problematic. The same principle applies to the operation of the damper.
Replacing the gearmotor
If the damper does not work, hot or cold air blows from the heater, and the ability to adjust it is lost. In such a situation, the cabin heater gearmotor must be replaced.
Replacing the damper on a Priora begins with raising the hood and removing the wipers. To do this, remove the plastic caps and unscrew the nuts with a 14 wrench, after which they are easily removed. Next, the left and right frills are dismantled by removing the rubber pad, protective plastic caps and unscrewing six screws. Then the plastic soundproofing of the engine compartment is removed, the cooling system hose passing through it is carefully disconnected from the expansion tank, then the tank itself is removed. To avoid draining the coolant, the holes in it must be plugged.
To inspect the heater gear motor, remove the expansion tank mounting bracket by unscrewing two bolts under the wing and removing the protection above the left front wheel. After this, the wiper motor and trapezoid are dismantled.
Now the unit is being dismantled; first you need to carefully disconnect the heater damper sensor and the power supply contacts. After this, install and check the new spare part, reassemble everything in the reverse order, and the replacement of the stove gear motor is completed.
Assembly
Position of the damper
After this, reverse the assembly procedure according to the dismantling steps. Refill the system with coolant and check that the new damper is in place. It is important to ensure that there are no leaks and that the hose connections are not tight.
Turn on the stove and check how the heater behaves. If everything is normal, you have carried out competent and successful work, for which we congratulate you.
Repair and restoration of the stove damper
The deformed heater damper of the VAZ-2110 cannot be repaired; it only needs to be replaced. In this case, it is better to purchase a replacement metal part that is not so susceptible to temperature effects.
Whatever heater is installed on the VAZ-2110, to carry out repair work, the heater must be completely disassembled. In this case, the process of dismantling and disassembling depends on the design of the stove.
A positive aspect of the heater design on the VAZ - 2101 is its location - to get to it and the dampers you can from the engine compartment and you don’t have to remove the front panel.
Disassembling an old-style stove
For example, let's look at how to disassemble an old-style heater:
- Remove the terminal from the battery.
- We remove the windshield wipers, the seal, remove the air intake near the windshield (“jabot”) from the car, in the process you will need to disconnect the windshield washer nozzle tubes.
- We dismantle the insulation that separates the stove body from the engine compartment.
- We remove the gear motor.
- We divide the housing of the stove and air filter into two halves. To do this, unscrew the coupling bolts around the perimeter of the housings and remove the mounting brackets.
- Disconnect the fan power wires.
- Remove the outer half of the air filter and heater housing (along with the fan).
- We dismantle the inner part of the fan housing.
After this you will have access to the dampers. If you are only planning to repair or replace the heater dampers, there is no need to drain the antifreeze, since the heater radiator will remain in place and will not be removed.
Before removing the dampers, carefully inspect and remember their position and the way they are engaged. Further actions depend on the nature of the damage. Deformed damper parts cannot be repaired and only need to be replaced. As for damaged rods and levers, try to repair them or simply replace them. The damaged seal is replaced.
When assembling the stove, pay special attention to the engagement of the dampers. Do it as it was before disassembly, otherwise the dampers will not work correctly, which will affect the performance of the heater
Disassembly and repair of a new type heater
The new model stoves are disassembled differently:
- disconnect the battery terminal, drain the antifreeze;
- dismantle the frill and insulation;
- disconnect the power wires of the fan and micromotor gearbox;
- unscrew the fasteners that secure the stove body to the body;
- disconnect the coolant supply pipes to the heater radiator;
- We remove the heater from the car along with the filter housing.
After this, we disassemble the stove body, dividing it into two halves, after first disconnecting the air filter housing and removing the mounting brackets. Next, we change or repair the damper, assemble the heater and install it on the car.
Note that the general algorithms of work are indicated above, but in reality, dismantling the stove is not so easy, since many fasteners are located in hard-to-reach places, sometimes you have to disconnect or remove elements that make it difficult or interfering with the removal of the unit.
Video: Why the VAZ 2110 stove does not heat up. Modification of the damper.
The cars of the Togliatti automaker are assembled at an average level. There are some known shortcomings that affect many car models. In this case, we are talking about the stove of the VAZ 2110 model. Despite the fact that the manufacturer takes into account the previous shortcomings, in the “top ten” the air distribution system is considered a weak point. At the same time, if you regularly carry out preventive maintenance, you can avoid expensive repairs.
The vehicle is designed for movement, as well as providing passengers with a certain level of comfort. The stove plays an important role in this. The task of the VAZ-2110 vehicle unit in question is to maintain optimal temperature conditions.
Disassembly
Naturally, replacing a VAZ 21210 damper that works poorly or does not want to change its position at all begins with a rather troublesome analysis. Here are its stages:
- Draining coolant from the heater system;
- Disconnecting the battery. It is enough to disconnect the “minus”;
- Removing the trim, windshield trim, sound insulation upholstery;
- Removing the stove fan;
- Disconnecting the vacuum hose clamp from the heater body;
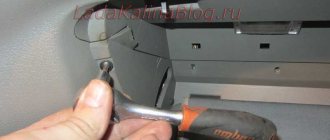
- Removing the front heater air intake housing. The work is meticulous and not fast. To make disassembly easier, removing the instrument panel can help. From inside, unscrew the screws that secure the heater, then it can be lifted;
- Removing spring brackets, mounting screws and removing the front housing;
- Removing all hoses from the radiator;
- Disconnecting the rear heater casing;
- You need to remove the radiator from the stove;
- It is now possible to replace the damper.
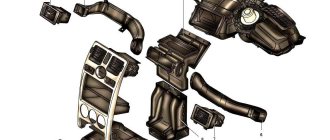
Stove design
This unit includes several devices. The radiator is the main element of the stove - it heats the air entering the cabin. It is located under the hood. The next component is the air distributor, equipped with special pipes that run through the cabin of the 2110.
Removing a faulty radiator, you can get to it through the hood
If we compare the “ten” with previous models, an important innovation has appeared in its heating system - an evaporator (the diagram includes it in the list). The device is installed in an air conditioning system
Not all owners know about its existence, since it rarely fails.
To control the operation of the heater, an SUAO unit is installed in the VAZ 2110 car, which is called a controller in the technical operating manual. The unit works in conjunction with a temperature sensor in the cabin; it is also called a ceiling sensor. The sensor reports the temperature to the unit, then this indicator is compared with the set temperature on the handle. If the indicators differ by more than 2°, warm or cooled air is supplied to the VAZ 2110 interior.
It’s worth taking a closer look at the handle, or more precisely at its extreme positions – MAX and MIN. If the heater knob is set to one of these indicators, heat is supplied without the operation of the temperature sensor in the cabin. The scheme includes all of the above elements.
The device of the “tens” heater includes another unit - a gearmotor, which is responsible for opening and closing the damper. The miniature electric motor performs an important task in the operation of the heating system, as evidenced by the diagram. If the gearmotor is faulty, the system will only produce cold or hot air. If the gearmotor fails when the damper is closed, the system will stop functioning. We have described the main components of the VAZ 2110 heater; the diagram contains a more detailed list.
- Radiator.
- Air distributor.
- SUAO block.
- Ceiling sensor.
- Lever.
- Damper.
- Gearmotor.
In the heating system, a radiator is installed for heating, which enters the VAZ 2110. It is also called a heat exchanger. Heating is carried out by the heat of the antifreeze. This component is connected to the engine cooling system by pipes and hoses. Antifreeze constantly circulates through the heat exchanger of the stove. The damper, based on the commands of the unit, directs the incoming air to the radiator or directly into the passenger compartment. If the heater damper is in an intermediate position, then one part passes through the heat exchanger, and the second bypasses the radiator. If we compare this part of the stove with previous generations of the VAZ, it has a number of useful improvements, as the diagram demonstrates.
SUAO and ceiling sensor
The process of removing the interior temperature sensor
These components of the VAZ 2110 heater are connected and operate according to the following principle:
- The sensor determines the temperature inside the car;
- This data is sent to the SUAO block;
- The block compares the temperature with the position set on the handle of the VAZ 2110 stove;
- After comparison, the position of the damper changes or remains the same - it depends on the indicator;
- This way the temperature in the cabin is controlled;
- If the heater handle is set to MAX or MIN, then the data from the ceiling sensor is not taken into account.
All these actions are demonstrated by the diagram. The block is a set of microcircuits; the normal operation of the stove depends on its serviceability. Both the sensor and the control system can be replaced.
Damper and gearmotor
The heater gear motor changes the position of the damper, due to which air is supplied to the cabin. This component is controlled by the control system block. If the device is faulty, the damper will not move. The unit is a miniature electric motor. When it breaks, it is usually replaced, since repairing it will be problematic. This also applies to the damper. The diagram shows the connections between the gearbox and the block.
Principles of interior ventilation
Before you figure out the causes of the malfunction, you should know the principle of the device and the rules by which ventilation is carried out. So:
- Air is supplied to the passenger compartment through the holes in the trim on the windshield: when the car is moving voluntarily, or forcibly with the help of a heater fan.
- Air escapes through the gaps between the inner door panels and between the upholstery, then through the holes located at the ends of the doors. The thermal insulation of the interior is improved by valves built into the openings, which allow air to pass out and prevent it from entering the inside of the car.
- The main part of the air is directed to the windshield; flows are directed to the central part and side windows through deflectors blocked by flaps.
- Air is supplied to the driver’s feet and the passenger sitting next to him through two pairs of deflectors: one pair is located near the floor, the other at knee level.
- Through a lining located on the floor tunnel and two air ducts built under the front seats, air is supplied to the feet of passengers in the rear.
- To prevent the entry of outside air, especially if the road section is polluted, smoky or very dusty, there is an air recirculation system. When the recirculation button is recessed on the instrument panel, the electro-pneumatic valve opens. In this case, under the influence of the vacuum that occurs in the intake pipe, the access of outside air is blocked by the recirculation system flap into the vehicle interior.
- The air temperature is regulated by the controller handle from 16°C to 30°C.
- Information about the temperature is read from its sensor by a unit with a microfan located on the ceiling. The unit turns on the micromotor when a temperature difference occurs, which controls the heater dampers. When the damper reaches the desired position, a signal is sent from the sensor to the control unit, which turns off the micromotor.
Repair
As we have already noted, the design of stoves on dozens with carburetor and injection engines has practically no differences. Therefore, the repair instructions below are suitable for owners of a VAZ 2110 with both types of power units.
If you are planning to overhaul your old-style stove, we recommend starting with the purchase of a radiator. Use copper as it is more efficient and helps the heater work better.
To carry out repairs correctly, strictly follow the points presented in our instructions and rely on video materials.
There is a plug on the engine block through which coolant is drained into any container. If you plan to use the same antifreeze or antifreeze again, choose clean containers. Next you need to move the frill forward. This process will take quite a long time, so be patient. Next, you need to remove the windshield wipers and get rid of as much as possible of everything that could interfere with the repair process. Remove your stove body
It is divided into two parts, which is important to know in advance. The front part of the stove body is removed directly along with the fan. After this comes the stage of dismantling the cabin filter. Check its current status
If the filter is dirty, this is an excellent reason to replace it. The next stage involves removing the second part of the housing. Loosen the clamps used on the hoses a little. This will allow you to easily remove the hoses. Having applied some effort, you can now finally remove the radiator from its seat.
Check its current status. If the filter is dirty, this is an excellent reason to replace it. The next stage involves removing the second part of the housing. Loosen the clamps used on the hoses a little. This will allow you to easily remove the hoses. Having applied some effort, you can now finally remove the radiator from its seat.
Reassembly
In fact, reassembling the unit only involves following the opposite sequence of operations. By disassembling the stove, you have the opportunity to simultaneously inspect other elements of your car to make sure they are working.
Get used to the fact that during complex repairs you need to check components along the way that are not related to the current problem you are solving. Even if the part is suitable for use, but has already worn out enough, it is easier to change it now than to carry out heavy dismantling work again in a couple of months.
The only nuance that you should pay attention to when reassembling is the type of stove
If you have an old-style heater, in this case it is important to pay attention to a couple of issues
- When the plastic housing is mounted in place, make sure that the pedal fits neatly into the groove intended for it.
- Check how tightly all the nodes fit into their seats. Otherwise, unpleasant consequences may arise that will force you to dismantle the entire assembly again. And this, as you already understand, is not an easy process.
That's it, now all that remains is to return the coolant back into the system and tighten the plug securely. Test your vehicle in a garage before driving it on public roads.
Principle of operation
The operating principle of such a control system is simple - the driver uses the left handle to set the desired temperature (completely cold or in the range from 16 to 28 degrees). Based on the set mode, the controller supplies power to the micromotor gearbox and it sets the dampers to the desired position.
Two-way communication is used between these elements - a position sensor is installed on the gearbox, which “informs” the controller about the opening angle. Thanks to the installed temperature sensor (located on the ceiling), the controller constantly monitors the degree of heating of the air in the cabin, based on which it adjusts the position of the damper to maintain the temperature set by the driver.
Temperature sensor VAZ 2110
Thanks to the use of automatic control system, the driver no longer needs to adjust the operation of the stove in order to maintain a comfortable temperature; he sets the temperature with a handle, and the controller does the rest. On the early VAZ-2110, the heater fan had three operating modes, the difference between which comes down to the rotation speed. Speed adjustment is carried out by installing a rheostat block in the power supply circuit of the electric motor. Then models appeared in which the fan received a 4th operating mode - automatic. When it is turned on, the fan operates under the control of the controller - the ACS regulates the rotation speed of the electric motor to adjust the temperature in the cabin.
The use of electromechanical control on the VAZ-2110 increased the convenience of controlling interior heating, but due to the more complex design, the likelihood of stove failure increased.
How malfunctions manifest themselves
The automatic temperature maintenance system used on the VAZ-2110 is more convenient in terms of control, since the automatic control system does everything independently, but is less reliable than a mechanical cable drive. Moreover, problems are caused by the electronic and electrical components of the stove - the controller, temperature sensor and micromotor gearbox, the central damper, which regulates the air supply to the cabin from the outside.
Problems with the operation of the VAZ-2110 heater related to the damper:
- lack of temperature control (only hot or cold air comes from the stove) regardless of the position of the handle on the controller;
- insufficient air heating (even when setting the handle to the maximum temperature);
- squeaks, knocks and extraneous noises after setting the temperature.
The cause of such problems is the central damper of the VAZ-2110 stove, which is adjusted by the controller through a gearbox. The design of the stove includes another damper - air distribution into zones. It is controlled using a handle mounted on the central air supply deflector into the cabin, so malfunctions with this part are rare.
Depending on the design of the stove, the damper may cause a disruption in the efficient operation of the heater for the following reasons:
- deformation;
- wear of seals;
- deterioration or damage to control levers and rods;
- skew.
To ensure tightness, the dampers have seals that reduce air leakage. Initially, foam rubber seals were used, which quickly wore out and became damaged. Later, foam rubber was replaced with rubber, but this only extended the service life of the seal; over time, the rubber ages, cracks and collapses.
On old-style stoves, rods and levers may break. On new heaters, there is another problem - wear on the edges of the square end of the gearbox, with which it is inserted into the groove made in the damper axis. As a result, the limit switch bypasses the groove, and the heater damper jams, although the gearmotor operates. The misalignment occurs due to the displacement of the damper axis in the mounting holes of the housing. Because of this, the damper warps and jams when opening.
Diagnosis of the problem
If the reason why the VAZ-2110 stove does not work is the damper, it is not difficult to identify it. To do this, disassemble the central deflector, turn on the ignition and rotate the temperature setting knob to its extreme positions. In a working stove, the central damper will not knock and will completely open and close the air supply channel.
If the heater damper does not move or stops in a position that does not completely block the air passage, it may be stuck. You can verify this by pushing the valve with your hand or a long rod. If after this the damper returns to its normal position, then this is the reason why it is jammed. Through the mounting hole of the deflector, you can assess the condition of the damper and its seals. If the damper is deformed, its bend is clearly visible.
Device
Periodic malfunctions in the operation of the heating system for the VAZ 2110 are an ordinary and common thing. Therefore, the owners of this model from the Russian automaker have to dig around in their own garage every now and then or send the car for repairs to specialists from service stations.
Heater circuit diagram
To understand exactly how to carry out repair and preventative measures, you first need to familiarize yourself with the diagram of the stove and its components.
| Element | Peculiarities |
| Electric motor | A fan is mounted on it. Both elements contribute to the injection of heated air into the cabin |
| Radiator | The entire operation of the heating system is based on this component. Remove the radiator and the heater will not work. Interestingly, the new model stove does not have a valve that shut off the flow of coolant through the radiator. Older devices have a faucet. The faucet was removed in order to avoid leaks, which were common on old stoves. Plus, they got rid of the tap for faster and more efficient heating of the interior. Although many owners of new tens do not agree with this decision, therefore, during repairs, they install a faucet on the stove |
| Dampers | In total, the stove has three of them. The first is responsible for air intake recirculation, the second is for opening and closing the heater duct, and the third is intended for control and is considered the most important |
| Resistor | This element is responsible for the speed of blowing hot air into the cabin. |
All elements, including additional valves, shields, fittings, are combined into a single unit. It, enclosed in a housing, is located in the engine compartment near the dashboard.
Air ducts
Air ducts are another block of the heating system. They come from the stove and perform several different functions at once:
- The interior is ventilated through central nozzles;
- Distribute the air through an appropriate distributor that supplies heat or air for ventilation;
- Another pair of air ducts serve to heat the rear row of seats;
- The system, which includes five nozzles at once, warms the feet;
- A pair of side air ducts take over the functions of heating the glass and partially heat the interior. This makes heating more efficient;
- A pair of nozzles are used for ventilation.
Electronic stove control
This electronic control unit operates directly from the passenger compartment. It consists of two main elements.
- Pen. Using the controller knob, the user sets the required temperature, which the stove then generates. Control is carried out by turning the knob in one direction or another, depending on what degree of heating you require at the moment.
- Temperature sensor. It is responsible for activating the stove when the temperature drops by more than 2 degrees compared to the value set on the controller. The sensor is equipped with a micro motor. When the handle is in position A, the micromotor in the stove block turns on, the damper is activated, thereby causing proper heating.
Control block
Before starting repairs of the entire stove, it is strongly recommended to check the condition of the sensor. You can find it near the heater lamp on the ceiling of the car. The device cannot be repaired. Replacement only.
Common faults
Most often, the VAZ 2110 suffers in terms of heating because the heater adjustment, as they say, does not work. Regardless of the selected position of the temperature control knob, only cold or, conversely, only hot air blows from the heater.
The reasons for this phenomenon may have different origins. Among them:
Jamming of the MMR (micromotor-reducer) that controls the damper drive; The plastic damper (the first VAZ 2110 was equipped with these) has a destroyed seat, and due to jamming it is impossible to control it normally. If the gearbox is working, but the damper does not turn, you can most often hear peculiar clicks - this is the square shaft turning in the socket. For such a malfunction, there is only one treatment - replacing the old plastic damper with foam insulation with a new one. Better, more modern, metal, with a rubber seal
This one does not warp or warp like its plastic sister; To finally decide who to blame - the damper or the MMR, you still need to pay attention to its control unit. He is also among the “suspects”.
Replacing the VAZ-2110 heater damper
Replacing the heater damper is not particularly difficult, however, it requires extreme care from the performer. In order to get to the valve, it is necessary to completely dismantle the stove. The main part of the work on removing the stove will be carried out in the engine compartment of the vehicle
Before directly disassembling the stove, it is important to initially disconnect the battery and drain the coolant from the heating system. After this, the windshield, soundproofing material, and heater fan are dismantled and adjusted.
Next you need to disconnect the vacuum hose clamp.
The next step is to remove the front part of the heater housing. The work is quite complex, so to simplify the removal of the heater body, you can additionally dismantle the instrument panel and unscrew the fasteners from the inside of the cabin that hold the heater in place. After this, you can lift the heater from the engine compartment and remove the brackets and screws securing the front part of the heater. Only after completing this amount of work can the front part of the stove be dismantled without difficulty.
Next you need to disconnect all the hoses and pipes that go to the radiator. After this, the rear heater casing and radiator are dismantled. Only after these manipulations have been performed will access to the damper be opened. At this point, the preparatory stage of work can be considered complete. After this, you need to proceed directly to replacing the VAZ-2110 heater damper with a new part.
Repair and replacement of the damper of a VAZ-2110 car
Dismantling a damaged part and installing a new one is not particularly difficult. The only question that may arise during dismantling is how to remove the heater damper rod of the VAZ-2110. Although it is plastic, it fits extremely tightly on the shaft. To dismantle it you will need two screwdrivers. Use a thin screwdriver to lift the fastening lever, and use a second screwdriver to loosen the plastic protrusions of the rod. After disconnecting the rod, the upper valve will go down on its own, since nothing else will hold it.
When installing a new part, you must pay attention to the fork located on the valve axis
It is important to secure it in such a way that it engages with the lever. When installed correctly, the heater valve should be in a raised position
In another situation, it will be impossible to adjust and replacing the part will not give the desired results.
When installed correctly, the heater valve should be in a raised position. In another situation, it will be impossible to adjust and replacing the part will not give the desired results.
When installing a new part, some drivers simultaneously modify the heater damper rods. The design of the rods has some disadvantages. When switching the damper control lever, you can see that in any position of the lever, the air flow towards the driver’s feet is blocked by either the first or second damper. To improve the distribution of air flow, it will be necessary to shorten the adjustable draft by three divisions. For this purpose, it is necessary to cut off the retractable rod end. Such a simple modification will help the damper to move to the required position, which will have a positive effect on air distribution. The flow of warm air will flow evenly to the driver’s feet, the side windows of the car and from the central deflector.
After this, all the removed parts are installed in the reverse order, and coolant is added. Care must be taken when connecting pipes and hoses. Only sealed connections will guarantee high-quality functioning of the heating system. After this, you can check the operation of the dampers and the entire heating system.
Let's sum it up
Malfunction of the VAZ-2110 heater damper is a common malfunction, especially in vehicles with old-style heaters. Breakage in most cases is due to the quality of plastic dampers, which are very often subject to deformation. It is possible to repair and replace the VAZ-2110 stove valve yourself without the help of professionals. Before starting work, you need to understand that in order to carry out high-quality repairs and restore the previous functionality of the heating system, the stove will have to be completely dismantled.
Despite the complexity of the work ahead, the result will please the driver and passengers with warmth and comfort in the vehicle interior. A high-quality repair of the heater damper and its drive guarantees stable operation of the vehicle’s heating system at any time of the year.
Assembly of the unit
Interchangeability of gearmotors
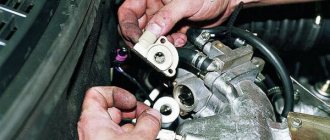
When the work to restore the functionality of the MMR is completed, install it in place. For this:
- Insert the pin of the micromotor-reducer lever into the slot of the lever. It is located on the damper drive;
- If the lever is not turned properly, apply 12V voltage to the motor connector pins using two wires. We are talking about yellow wires here. This way you can return the lever to the correct position;
- Having installed the micromotor-reducer, check it for operability, plus watch how the damper drive of your heater moves, whether the heater control lever “plows” properly to regulate the temperature.
We will repair or replace the damper and heater drive, you will be able to return the heater to its previous functionality and independently determine what temperature regime will be set inside the cabin of your VAZ 2110.
We are finishing the VAZ-2110 heater. Manual control
And there is no guarantee that the new one will work happily ever after. But replacement is a troublesome and expensive task: the unit costs about 550 rubles.
So this embarrassment happened at the editorial “top ten” (see the material “Last Year’s Snow” - ZR, 2006, No. 3).
The simplest and most effective way to restore acceptable interior heating was to insert a figure-of-eight valve into the heater pipe (see photo). The work takes only 15 minutes, and all you need is a knife and pliers. The valve control cable (the control cable for the air damper of a Zhiguli carburetor is suitable) can be conveniently brought into the cabin under the steering column. The air damper of the “tens” heater must be secured in the “hot” position. Access to it is with a long screwdriver through the removed air duct grille in the center of the instrument panel (“dashboard”).
To restore the heating control that is natural for the “ten,” instead of an unreliable electric drive, we installed a blind control cable from a GAZ truck, adjusting it to its length. Oh, the Bychka heater cable fits, but its price, like the gear motor, is 550 rubles...
The mechanical control of the damper fits the “ten” so well, as if this option was included in the design from the very beginning.
We remove the frill and the faulty gear motor, saw off the square shaft from it. We make a lever from metal, and a clamp from an M8 bolt (see figure).
We drill a hole in the panel and fasten a cable pre-adjusted to its length in it (we cut the cable sheath so that it serves as a limiter for turning the lever).
We insert a piece of the square shaft of the gearmotor into the damper axis, put a lever and clamp on it, insert the cable into the hole in the clamp, turn the damper to the “warm” position (the cable is recessed) and fix it.
Now the manual damper will last forever.
We are engaged in the drive
Simultaneously with replacing the damper, we check its drive, and if the MMR does not work, it is necessary to either replace the motor or repair it. After removing the trim and lining of the windshield behind the vacuum amplifier of the VAZ 2110, we find the MMR, disconnect two connectors - the MMR and the micromotor.
MMR new sample MMR old sample
Next, unscrew the screws and take out the MMR, from which we remove the motor. Its operation is checked by connecting to the automatic control system.
If you find that it is not working, you can replace it, but repair is also possible. The stages are:
- Partially bending the pressed side, remove the lid;
- Check the condition of the bearings, brushes and commutator;
- Replace or fix them. If the gear teeth of the gearbox are worn out, it needs replacement;
- Bearings require silicone grease.
If after repair the operation of the motor is restored, you can assemble the MMR and install it in place. In the VAZ 2110 this is done like this:
- The MMR lever pin must be inserted into the slot of the lever, which is located on the heater damper drive;
- If the indicated lever is turned incorrectly, you need to apply 12 V voltage with two wires to the contacts of the motor connector (yellow wires fit here), and the lever will move to the desired position;
- After installing the MMR, check how it works, at the same time, how the heater damper drive moves and the heater control lever works to set the temperature in the VAZ 2110 cabin.
We study the structure and diagram of the VAZ 2110 stove
If you decide to repair your car yourself, you need to have a good knowledge of its components and be able to read drawings. Of course, such skills come with experience in operating and maintaining the VAZ 2110. This time we will study the operation of the heater in detail. If the heating system functions properly, then both the driver and his companions will be comfortable inside the “ten”. This material contains stove diagrams and descriptions for them. The instruction manual also contains this information, but we try to describe complex processes in simple language
Our task is to convey important information to beginners and experienced motorists
This is what the disassembled heating system of a VAZ 2110 car looks like
Sealing the cracks in the front panel of the torpedo air ducts
The main problem with good blowing of side windows is the presence of a large number of cracks in the dashboard air duct system, which should only be sealed, thereby reducing heat loss and significantly increasing the pressure of the air flow for blowing the side windows of the car.
Heater duct routing
You will need silicone or anti-squeak (modelin). We seal around the perimeter all the cracks in the upper and lower parts of the torpedo panel. Also, do not forget to “silicone” all the mounting holes. At this point, you can consider the first stage of work completed.