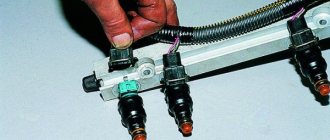
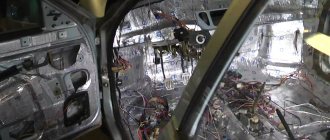
Hi all! Dear prior leaders, I want to get an answer, advice or opinion from experienced people and those who have already met him! The situation is as follows. I decided to install an oil separator (from the fuel filter of the carburetor family) to a small deflector (a small circuit of the ventilation system), which goes from the head cover to the throttle valve. For the sake of experimentation, see if oil accumulates there. At first I looked, there were no traces of oil, then over time the filter element began to turn black, I also thought that oil vapors had been caught, and then I forgot to look... And then today I saw it!
I didn’t notice during what period of mileage it accumulated such an amount of oil. I remembered. about 2000-3000 km. The driving style is calm, you don’t accelerate much in the city, I go 100-120 km/h on the highway. Sometimes it happens, I give her pi @ dy! =)) Yes, and here’s another one, the day before I went to the village and ran 160-170 km/h along the highway. Could this affect the oil yield? Oil Castrol Magnatec 5w40, changed 2000 km ago. The move doesn't eat oil. I want to put an oil catcher on the large vent (large vent loop) that goes from the head cover to the throttle body air tube, BUT I can't get around to it! If there is so much oil in the small one, what will there be in the large one?!
So that's it! I look forward to your comments! Thanks in advance!
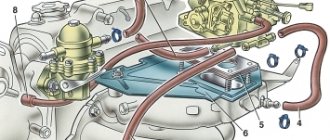
Particular attention is paid to protecting the environment when creating new car models. Therefore, the crankcase ventilation system (Priora, Kalina) was modernized to meet modern environmental safety requirements. It ensures the removal of combustion products of the air-fuel mixture, which collect in the oil pan as a result of exiting through rubber bands that do not fit very tightly to the cylinder walls.
Replacing the engine sump gasket for VAZ 2108, 2109, 21099
The pan gasket on the engines of VAZ 2108, 2109, 21099 cars and their modifications has to be changed in case of damage (oil leakage under the gasket), during engine repairs (replacing pistons, rings, etc.). Necessary tools, accessories and spare parts
"10" wrench (socket or socket wrench)
New engine pan gasket
Solvent (gasoline, diesel fuel, etc.), rags
We install the car on a viewing hole, overpass or lift
Removing the engine compartment protection sheet
Removing engine mudguards
Removing the lower clutch housing cover
Drain the engine oil from the sump
Features of replacing the engine pan gasket VAZ 2108, 2109, 21099
Unscrew the pallet mounting bolts
We use the key to “10”. There are 16 bolts in total.
Removing the engine sump
We move it forward a little to free it from engagement with the oil pump intake and remove it down.
Removing the old pan gasket
Cleaning the tray from dirt
We clean the pallet itself and its mating surface under the gasket with a rag soaked in solvent.
Clean the mating surface of the block for the gasket
We use rags and solvent. The main condition for installing a new pan gasket is that the parts in contact with it are clean and dry.
Installing a new gasket
Place a new gasket on the mating surface of the pallet.
Installing the sump on the engine
Carefully press the pan against the engine so as not to displace the gasket. First, we engage it with the oil intake, moving it slightly forward. Place several bolts along the edges of the pallet. Screw in the remaining bolts. Lightly tighten them first. We make the final tightening of the bolts in several passes from the middle to the edges of the pallet so that the gasket lies evenly. The final tightening torque is within 10 N.m.
Notes and additions
For installation, it is better to use a silicone gasket rather than a cork gasket, as it is more reliable and has a longer service life.
Special pressure shaped washers are installed under the heads of the pallet bolts.
More articles on engines of VAZ 2108, 2109, 21099 cars
VAZ 2170 | Cleaning the crankcase ventilation system
Over time, tarry deposits of crankcase gases accumulate in the crankcase ventilation system, making it difficult for these gases to be vented into the engine cylinders for combustion. Because of this, the gas pressure inside the engine increases and oil flows out of the seals. To avoid this, periodically clean and flush the system.
According to the manufacturer's recommendation, the crankcase ventilation system should be cleaned every 60 thousand kilometers.
Before each oil change, clean the crankcase ventilation system.
You will need: 8" wrench, Phillips screwdriver, needle nose pliers.
1. Remove the decorative engine cover (see “Removing and installing the decorative engine cover”).
2. Remove the air filter (see “Removing and installing the air filter”).
3. Loosen the clamp...
4 . and disconnect the large crankcase ventilation system pipe from the air supply pipe.
5. Loosen the clamp...
6... and disconnect the air supply hose from the throttle valve.
7. Loosen the clamp, disconnect the large pipe of the crankcase ventilation system from the cylinder head cover and remove it.
8. Similarly, remove the small crankcase ventilation pipe by disconnecting it from the starter assembly and cylinder head cover.
9. Loosen the clamp...
10 . and remove the supply pipe of the ventilation system by disconnecting it from the cylinder head cover pipe...
eleven . as well as from the cylinder block fitting.
12. Rinse the pipes with gasoline or kerosene, blow with compressed air and dry. Clean openings of fittings and pipe fittings.
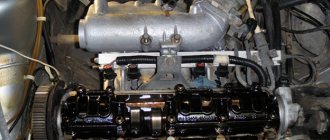
13. Remove the cylinder head cover (see Replacing the cylinder head cover gasket).
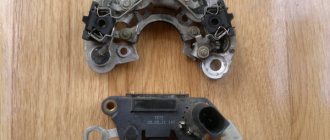
14. Remove the six bolts holding the spacer in place from inside the head cover...
15 . and remove the separator.
16. Using pliers, tighten the separator line clamps...
17. and remove the oil deflector from the oil separator.
18. Using a screwdriver, pry out the rubber O-ring.
19 and remove it. Replace a badly twisted or missing snap ring with a new one.
Before installing the cylinder head cover, clean (old sealant) and degrease the mating surfaces of the cylinder head and cylinder head cover. Apply a thin layer of sealant to the cylinder head mounting surface.
20. Install hoses and parts in the reverse order of removal.
How to restore the integrity of the bottom
When a difficult situation arises, car owners need an answer to the question: the engine sump has broken, what should I do? The first reaction should be to stop and turn off the engine. If the engine is not turned off, a rapid decrease in the engine oil level will occur, which will lead to oil starvation with subsequent serious damage to the elements of the power unit.
Repair of steel pallets is carried out by welding or gluing with a special sealant or cold welding. Aluminum parts are restored by welding in an argon environment.
How to seal an aluminum engine sump? In order to independently repair the underbody, eliminate oil leaks and repair existing cracks in the body without removing the part from the car, you must perform the following operations:
- clean the surface from dirt using a wire brush;
- blot the leaking oil around the resulting hole;
- cut off a piece of cold welding and knead it thoroughly, like plasticine;
- remove any oil leaks again using a rag;
- apply the first layer of cold welding in the form of putty:
- After the applied layer has hardened, treat it with emery cloth;
- Apply a second layer of cold seal until the leaks are completely eliminated.
To reliably eliminate the resulting defects of this unit, you must contact the service center for qualified assistance. In a service station, the lubricant is completely drained, diagnostics, dismantling and high-quality restoration of the tightness of the part is carried out using welding operations, followed by checking and installing the bottom in its original place.
Good day everyone!
So last time the current pan showed itself, and I thought about a solution to the problem. I went online and everyone unanimously shouted to remove the pan, which is logical and understandable. For the test, I decided to test the method with cold welding, drained the oil, left it for a day, wiped it with sandpaper and degreased it. Cold welding was Manol
. 2 syringes, squeeze out and mix. We are waiting for the result as written for 15 minutes, I waited a lot longer... I filled in the oil and started running! Well, it’s clear that it’s not normal to degrease without removing it, even with the oil drained, droplets still seep through the crack.
Well, I think there is another cold welding, Hi-gear “Cold Steel”
It comes in a bottle as an almost homogeneous mass; you also need to knead it and stick it on like plasticine.
I’ll say right away that there’s a big difference, High Gear sticks much better. As much as I could degrease, I also degreased it without removing it. I covered it up... and lo and behold, it didn’t run, I went once on the road, the second time on the second day I saw it was dripping underneath!
Much less than with Manol, or even a bare crack, but there is! Apparently he couldn’t withstand the temperature or went soft...
Next is the most reliable method. Welding! To do this, of course, you need to remove the pan, so cooking is not an option. The Subaru manual describes the action as terrible, and they also write on the internet. Remove the manifold, jack up the car, jack up the engine and gearbox until it stops, and so on and so on.
I thought what the hell, I put the driveshaft and 2 extensions on a small ratchet, and removing the pan took 10 minutes, including pulling it off the sealant and twisting it to remove it from the oil receiver.
Still, it seems to me that this will only work on the atmosphere beam, which makes me very glad that I left it like that)
In general, I took it off and went to the nearest welder, I say drop or spit, there is a small crack here) There was a diesel Nissan in the box with the engine running, there was a column of smoke, it hurt my eyes. I went out. The pan comes out in 2 minutes, I didn’t even have time to see what he was cooking, unfortunately...
Well, okay, the problem is solved, that’s the main thing, installation is coming soon. I would have installed it right away, but winter came, it was -15 degrees windy outside and there was a lot of snow falling. Weather, are you aware that the month of spring is already behind us?!
stuck on a frozen track
I have a steel crankcase (there are also light alloy ones)
A photo would be nice. We had to boil both the pipes and hydraulic oil tanks. If it's a gap. I would cook it directly with butter. I even had to plug large holes with wooden caps (so that the oil would not interfere with the arc too much) and scald them. Of course it would be better to remove it. is it really that long and difficult?
If you are not afraid that the oil vapors in your crankcase may explode (and will definitely explode), then cook... Who can stop you?
You will not be able to completely remove the remaining oil from the crankcase... And those 30-50 grams that remain in the form of a film on the walls of the pan are quite enough for an explosion after evaporation. Have you ever seen a volumetric explosion of petroleum vapors? As an engine specialist, I will tell you that the spectacle is enchanting..
After the antifreeze, you still have to remove the pan and wash the antifreeze.. You won’t pour oil into the antifreeze, will you?
But I tell you again, no one can stop you...
Replacing the pump on the "nine"
In order to make a replacement, you need “13” and “10” keys, socket heads, extensions and cardans. You may also need screwdrivers, and be sure to have a wheelbrace, jack, supports and wheel chocks. To drain the oil, you need a container of at least 5 liters in volume.
Sequence of work:
Disconnect the negative terminal from the battery. Loosen the tension on the generator drive belt and remove it. Drain the oil into a container. If present, remove the protection. Remove the pallet. At this stage, you need to inspect the oil receiver grid. If it is clogged, then most likely there will be no need for further dismantling. You'll just have to install a new receiver or clean the old one. There is no point in installing a new pump, since the breakdown is clearly not in it. Loosen and remove the timing belt. Remove the oil pan. Remove all 6 bolts that secure the pump housing to the engine block
Please note that there are washers underneath them. Don't lose them. Now you can completely remove the VAZ-2109 oil pump.
Assembly is carried out in reverse order. It is recommended to check the alignment of the marks on the crankshaft and camshaft. Now you know how to change the oil pump on a VAZ-2109 (injector). On carburetor modifications of cars, all work is carried out in the same exact way.
Cleaning the crankcase ventilation system of the VAZ-2170
- Round Nose Pliers
- Small Phillips screwdriver
- 8 mm spanner
Spare parts and consumables:
Over time, tarry deposits of crankcase gases accumulate in the crankcase ventilation system, making it difficult for these gases to be vented into the engine cylinders for combustion. Because of this, the gas pressure inside the engine increases and oil flows out of the seals. To avoid this, periodically clean and flush the system.
According to the manufacturer's recommendation, clean the crankcase ventilation system every 60 thousand km
Before each oil change, clean the crankcase ventilation system.
1. Remove the decorative engine cover (see “Removing and installing the decorative engine cover”).
2. Remove the air filter (see “Removing and installing the air filter”).
3. Loosen the clamp.
4. Disconnect the large crankcase ventilation system outlet hose from the air supply hose.
5. Loosen the clamp.
6. Disconnect the air inlet hose from the throttle body.
7. Loosen the clamp, disconnect the large pipe of the crankcase ventilation system from the cylinder head cover and remove it.
8. Similarly, remove the small crankcase ventilation pipe by disconnecting it from the starter assembly and cylinder head cover.
9. Loosen the clamp.
10. Remove the ventilation system supply hose by disconnecting it from the manifold cover fitting.
11. Similarly with the cylinder block fitting.
12. Rinse the pipes with gasoline or kerosene, blow with compressed air and dry. Clean openings of fittings and pipe fittings.
13. Remove the cylinder head cover (see “Replacing the cylinder head cover gasket”).
14. Using an 8 mm wrench, remove the six cage bolts from inside the head cover.
15. Remove the separator.
16. Use pliers to tighten the separator line clamps.
17. Remove the oil deflector from the oil separator.
19. Take it off. Replace a badly twisted or missing snap ring with a new one.
Before installing the cylinder head cover, clean (old sealant) and degrease the mating surfaces of the cylinder head and cylinder head cover. Apply a thin layer of sealant to the cylinder head mounting surface.
20. Apply a thin layer of sealant to the cylinder head mounting surface.
21. Install hoses and parts in the reverse order of removal.
Article missing:
- High-quality photo of the repair
- Tool image
,. -. ,. — 60 .
: eight, , . 12.
… 2… 4… 6. eighteleven. 12,… 13... 10… 12.. 14… 16(0) (6954) sirob | 2010 27
3. Loosen the clamp...
4 . and disconnect the large crankcase ventilation system pipe from the air supply pipe.
5. Loosen the clamp...
6... and disconnect the air supply hose from the throttle valve.
7. Loosen the clamp, disconnect the large pipe of the crankcase ventilation system from the cylinder head cover and remove it.
8. Similarly, remove the small crankcase ventilation pipe by disconnecting it from the starter assembly and cylinder head cover.
9. Loosen the clamp...
10 . and remove the supply pipe of the ventilation system by disconnecting it from the cylinder head cover pipe...
eleven . as well as from the cylinder block fitting.
12. Rinse the pipes with gasoline or kerosene, blow with compressed air and dry. Clean openings of fittings and pipe fittings.
13. Remove the cylinder head cover (see Replacing the cylinder head cover gasket).
14. Remove the six bolts holding the spacer in place from inside the head cover...
15 . and remove the separator.
16. Using pliers, tighten the separator line clamps...
17. and remove the oil deflector from the oil separator.
18. Using a screwdriver, pry out the rubber O-ring.
19 and remove it. Replace a badly twisted or missing snap ring with a new one.
Before installing the cylinder head cover, clean (old sealant) and degrease the mating surfaces of the cylinder head and cylinder head cover. Apply a thin layer of sealant to the cylinder head mounting surface.
20. Install hoses and parts in the reverse order of removal.
Download information from the page
What happens if the pallet is not repaired or replaced?
So, if an element is damaged, this will clearly affect the operation of the power unit. Let's look at a few damages. If there is a deep deformation of one of the planes without a hole on a motor with an oil pickup, and the pan itself is made of aluminum alloy or plastic, then in this situation there is a risk that the oil pickup tube will be higher than the level of the lubricant. Often, with such damage, these parts break off completely.
If the oil does not leak out, but the deformation is quite deep, you need to add the required amount of oil and try to start the engine. In the case of minor deformations and no breakdown, the oil pickup device may not break off, but the gap between the tube and the bottom of the pan will greatly decrease - this may be enough to operate the engine under low loads
It is important to consider that if the pan is damaged, at any moment the engine may experience “oil starvation” during sudden acceleration and increased speed. All this will not have the best effect on all nodes
The most common consequences of oil starvation is the seizure of the upper connecting rod bearing, which entails jamming of the entire engine. Also, the liner may turn during operation. In extreme cases, the connecting rod will break, which will damage the cylinder block.
How to determine the malfunction?
The oil light on the instrument panel came on. This is a bad sign!
Usually the light on the instrument panel will light up first if there is something wrong with the pressure. As long as it doesn’t burn, the pressure is most likely normal. If the pressure is not all right, the engine noise will increase. The earbuds will also start to knock. This will be clearly audible when the engine speed exceeds 3,000.
Consequences
If the liners rattle, then you will need to disassemble the engine and grind the crankshaft. But sometimes sanding may not be necessary. All parts of the cylinder head are most susceptible to damage. In this case, the motor will stall. Then the camshaft will begin to collapse.
When oil starvation occurs in the engine, it will take less than a minute of engine operation for the liners to turn into foil. This should be remembered.
Selecting a new element
There are two ways to get a new engine protection element.
- Purchase a finished product. An easy method that requires you to visit a hardware store, buy a plate, and then install it according to the existing fasteners. In rare cases, fasteners have to be adapted to your car.
- Make your own plate. The task is not easy, but it allows you to save a lot. You will need certain skills, a sheet of quality metal, a grinder and some time.
Tangible effect of the new protection
Taking into account the features of the presented options, we recommend choosing the first one. However, self-production is a complex process that requires a careful approach.
https://youtube.com/watch?v=-EneK5UplPw
There are several main criteria by which it is recommended to choose a protective plate for the underbody of a VAZ 2109 car.
| Selection criterion | Peculiarities |
| Quality | You can verify the quality of the product by studying the documents for the part or by experiment. To clearly verify this, apply acid to the surface of the leaf. You need acid, which is available in batteries. Apply and then wipe clean. If there are no marks left on the product, then the plate is really good, high quality. If there are traces, you are dealing with a dubious product. But it is possible to check the real characteristics only during operation, when the protection passes the test of roads and the winter-summer period |
| Appearance | Most plates offered on the market allow the element to be mounted without removing the mudguards. That is, installation is carried out in strictly designated areas. But this has its drawbacks. First of all, the air cooling of the power unit will noticeably deteriorate. It also creates free space between the mudguards and the protection. This will lead to regular accumulation of dirt in this cavity. But the ingenuity of our car owners is a powerful weapon against the shortcomings of manufacturers |
| Manufacturer | The choice on the market is huge, but among this range there are literally several protection manufacturers that you can trust with your car. A striking example is the domestic company Sheriff. They make protection from high-strength steel, which makes it an excellent assistant in counteracting stones, potholes and other surprises on the roads. The structure of the element ensures air cooling of the motor. Plus, the design provides for the presence of anthers that protect against the accumulation of dirt in the cavity, and seals that act as shock absorbers, dampening noise and vibration when the plate comes into contact with the bottom. The plate thickness is about 2 millimeters, but the price is affordable |
Design from Sheriff
An important aspect of protection from the Sheriff company is the holes provided in the plate, through which you can change the oil filter, drain the oil, and other consumables without removing the element.
Purpose of the part
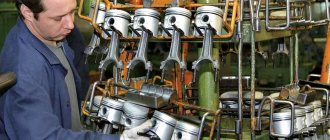
The oil pan plays the role of a tank in the engine design. Although the part is not structurally complex, it is assigned a number of the following tasks:
- Storing oil that is poured into the engine to lubricate internal parts. Oil accumulates in the sump, and when the internal combustion engine is operating, it is sucked in by the oil pump through the oil receiver and supplied through channels to the working parts of the engine.
- Preventing lubricant from splashing when the vehicle is moving.
- Protecting oil from negative environmental influences.
- Cooling the lubricant, which is heated by the engine.
- Collection of products produced by CVS, such as fine metal dust and larger particles.
- Engine cooling. The pan located below cools down when the car moves, and thereby takes heat from the engine, reducing its temperature.
Various materials are used to make engine pans. This can be stamping or casting, as well as combined options. Looking ahead, it must be said that Lanos cars use engine oil crankcases made of aluminum and metal alloy. Why this is so, and what is best for the car, we will find out further.
What type of oil pump is installed on Priors
There are two main types of oil pumps used on cars today. They are called rotary and gear. Priora uses rotor-type products. In addition, you should also be aware that rotary pumps are adjustable and non-adjustable. Adjustable devices change their performance, which is necessary to achieve the optimal level of oil pressure in the system.
Priora is equipped with unregulated oil pumps, in which the function of changing oil pressure is assigned directly to a structural element such as a pressure reducing valve.
This part of the mechanism works as follows:
- when the engine operates at medium speed, the pump pumps oil, creating optimal pressure;
- When the engine speed increases, the oil pressure increases, and to prevent unpleasant consequences from occurring, a pressure reducing valve comes into operation and relieves excess pressure. The oil simply returns back to the crankcase through the opening channel.
The operating principle of a rotary pump is quite simple. Inside there are two flat gears, one of which is located inside the other. The products engage with each other during engine operation, thereby ensuring oil pumping. Below is a diagram of the Priora oil pump design with the designation of the component parts and their articles (serial numbers).
Diagram of the Priora oil pump
Name and article numbers of the components of the Priora oil pump
The inner gear is connected to the shaft and is the drive gear. Entering the grooves that are inside the outer gear, oil is pumped.
Below is the design and description of the Priora oil pump.
Interesting! If the oil pump on a car fails, this is often due to a jammed pressure relief valve.
Similar products from other companies
- Oil purification filter Sintec (Sintek) SNF-3105-m for GAZ 3102 Volga engine injection, for GAZ 2705 GAZelle, Sobol 117 b
- Air filter Sintec (Sintek) SNF-2405-b for foreign cars Chevrolet Aveo (Chevrolet Aveo), Daewoo Kalos (Daewoo Kalos) engine 1.4/1.4l 16v/1.6 98 b
- Air filter Sintec (Sintek) SNF-402-v 103/1 for GAZ carburetor engine 111 b
- Air filter Sintec (Sintek) SNF-2110-v (EKO-102 for VAZ injection engine, LADA Kalina (Lada Kalina), LADA Priora (Lada Priora), for foreign car Audi (Audi) 94 b
- Air filter Sintec SNF-1266-b for foreign cars Opel Astra g/h, Zafira |/||, Saab 9-3, for VAZ, Niva Chevrolet 1.8 i 16v 84 b
- Air filter Sintec SNF-1015-b for foreign cars Ford Tourneo, Transit 92/95, Volvo 440/460/480 98 b
- Air filter Sintec (Sintek) SNF-3466-b for foreign car Hyundai (Hyundai) County/hd65/72 engine Euro-3 433 b
- Air filter Sintec (Sintek) SNF-lr003-b trapezoid for foreign car Renault Logan (Renault Logan) 165 b
- Sintec oil filter SNF-5540-m for foreign car Hyundai County/hd65/72/78 d4al/db/dd 211 b
- Oil purification filter Sintec (Sintek) SNF-75/3-m for VAZ LADA Largus (LADA Largus), for foreign car Renault Logan (Renault Logan) 112 b
- Air filter Sintec (Sintek) SNF-lr002/1-b panel original for foreign car Renault Logan (Renault Logan) 162 b
- Oil purification filter Sintec (Sintek) SNF-2101-NF-01-m for VAZ, for Moskvich, for UAZ 107 b
- Air filter Sintec (Sintek) SNF-2101-v (EKO-101/1) for VAZ, for Moskvich, for ZAZ Tavria carburetor engine 62 b
- Oil purification filter Sintec (Sintek) SNF-2105-NF-05-m for VAZ 2110-2115 injection engine 104 b
- Air filter Sintec SNF-1019-b for foreign cars KIA Carens 2/3, Cerato, Shuma 1/2, Sorento 2.4 83 b
- Air filter Sintec (Sintek) SNF-lr001-b round for foreign car Renault Logan (Renault Logan) 148 b
- Air filter Sintec (Sintek) SNF-2413-b for foreign cars Hyundai (Hyundai) i40/ix35, KIA Sportage (KIA Sportage) 3 121 b
- Air filter Sintec (Sintek) SNF-2409-b for foreign cars Hyundai (Hyundai) i-30, KIA Ceed (KIA Sid) 98 b
- Air filter Sintec (Sintek) SNF-luxtr105p-b for GAZ low 183 b
- Air filter Sintec (Sintek) SNF-luxtr104р-b for GAZ high engine ZMZ 406, Steyr (Steyer) 560 209 b
The description and image of goods on the website are for informational purposes only and may differ from the actual description, technical documentation from the manufacturer and the actual appearance of the goods. We recommend checking the availability of the desired functions and characteristics of the goods with the seller.
If you did not find what you were looking for on the page or want to find additional information on your request, try using the search form or follow the links to the following sections:
- Spare parts for passenger cars, auto parts
- Oil receivers for passenger cars
Causes of malfunction of VAZ 2108/2109 oil pumps
Before deciding to repair or replace the oil pump, it is worth understanding the reasons that may indicate problems. By the way, problems are possible not only with the mechanism itself, but also with other elements of the lubrication system:
- decrease in pressure in the crankcase;
- problems with pressure sensors;
- use of low quality motor oil;
- using oil that is not suitable for this vehicle;
- problems with the lubrication or safety valve;
- oil filter clogged;
- contamination of the oil receiver or pump housing.
Contamination of the oil receiver leads to a decrease in pressure in the system and the light comes on.
The blockage may occur due to contamination of the engine crankcase itself. The problem is solved by removing and cleaning the pan. The operation of the oil pump can be disrupted by other problems that are identified during the diagnostic process. These include:
- gasket damage;
- unreliable filter fastening;
- high wear of mechanism parts;
- reduction valve failure.
When to remove the oil pump on a Priora and how to check it without having to remove it
The need to remove the oil pump on a Priora arises if it is suspected of being faulty. In addition, the following signs may be a reason for its dismantling:
- to check tightness;
- to replace the oil pump gasket;
- damage to the cover due to mechanical impact;
- damage to the crankshaft sensor mounting;
- Diagnostics of the pressure reducing valve.
The reason for checking the oil pump and oil receiver on a Priora may be expansion joints that begin to bother the owner. If the products begin to knock when cold, but the sound disappears when the engine warms up, then one of the reasons for such consequences may be the oil pump. If its performance decreases, then oil will flow to the compensators late and in insufficient quantities, which means they will knock when the engine is running cold. As soon as the engine warms up and the channels expand, the situation is corrected.
Interesting! One of the most reliable ways to check the serviceability of the oil pump is to connect a pressure gauge to measure the pressure in the system. The pressure gauge is screwed in instead of the pressure sensor, after which the engine starts. At idle, the oil pressure in the system should be at 1 atmosphere. At rpm the value should not exceed 4.5-5 atmospheres. Based on the measured values, we can conclude that the oil pump is working properly.
Preparing for work
Preparation plays a big role in successfully replacing the oil pan gasket. Actually, this event will not be very difficult.
- Drive the car into the pit or lift it using a lift;
- Provide high-quality light so that you can carefully inspect the condition of the pallet;
- Remove the crankcase protection if you previously installed it on your VAZ 2110;
- The oil pan must be cleaned because a large amount of dirt and oil accumulates on it. It is also recommended to clean the areas adjacent to the oil pan;
- The easiest way to detect a leak is when the engine is warm, but only at idle speed. This will increase the pressure in the oil system and will show how serious the problem is with oil leaking through the oil pan gasket.
Operating principle of SVKG
Car engines have a ring exhaust system. The gases produced as a result of the production of diesel fuel, gasoline or liquefied gas are not released into the environment, but are returned to the engine, where they are burned again. The second end of the crankcase ventilation pipe is attached to the intake manifold, which allows gases to flow back into the cylinder chamber for combustion. A significant portion of the gases, if re-entered, are ignited when the fuel is ignited, and the remaining gases are released into the atmosphere through the exhaust system. A small percentage of the gases are returned to the cylinder chamber for re-combustion. This process continues.
There are two methods for changing the oil
Changing the oil in a VAZ 2112 with engine flushing
After the old oil is drained, flushing oil is poured into the engine and the car is idled for about 10 minutes, after which the flushing oil is drained and new engine oil is poured in (the disadvantage is that the remains of the flushing oil remain and as a result they can cause engine operation have a negative impact). Since then the remains of the flushing oil will be mixed with the working oil, and the properties and tasks of these oils are different, which will accordingly have a negative effect on the performance characteristics.
Changing the oil in a VAZ 2112 without flushing the engine
After draining the old oil, new engine oil is immediately poured in (the disadvantage is that the remnants of used engine oil with the presence of combustion products will mix with the new engine oil, thereby reducing the working life of the oil).
Replacing the oil receiver sealing ring
Last summer I changed the hydraulic compensators, everything was quiet before changing the oil less than 500 km ago from SHEll to Shell and after driving for 2 days they started knocking again, in short everything is bullshit, let's do it again