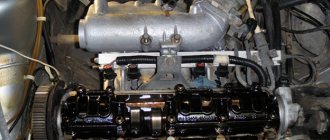
I’ve been wanting to buy a plastic cover for a long time, I don’t understand why some kind of plastic cover doesn’t come from the factory on 8-valve engines, only on 16-valve engines, but oh well, I started googling in stores, no, no, no, no, you have to order it at the car market, so I gave up on it. I accidentally went on Avito and entered spare parts for the viburnum and saw that they put the cover up for sale for some 300 rubles, although in the neighboring region they sell it for 1000. Although it doesn’t affect anything, when you open the hood, something is clearly missing. The installation is simple, there are 2 options: - remove the valve cover, replace the studs with long ones and put on the cover (the downside of this procedure is unnecessary body movement and the cost of gaskets and fastenings) - an easy way to buy studs and long bolts, replace the nuts. I bought it at a hardware store. Studs 6/18 mm and long bolts 6 mm for everything I paid 25 rubles.
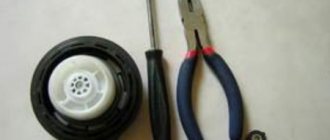
Unscrew the nut on the valve cover
We tighten the long bolts, then the hairpin and repeat the procedure with the second one, unscrew the neck and put it on top.
Catalog number: 2111-1008650
Standard price:
490.00 rub. Your price
Price For registered:
455.00 rub.
Before visiting the store, check product availability!
Brackets for installing a decorative cover for an 8kL engine
with 19% discount
Dirt plugs for the steering rod opening for Lada Granta, Kalina, Kalina 2
with 14% discount
Aerodynamic shields for Lada Granta, Kalina 2, Kalina, Priora, Datsun
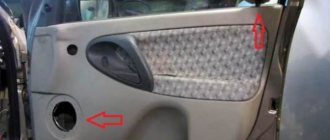
with 15% discount
Reflectors at the door
with 14% discount
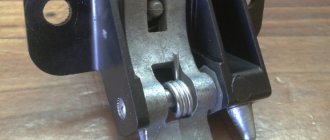
Silent bolts for door locks Lada Kalina, Kalina 2, Granta
with 19% discount
Chrome door lock buttons for Lada Kalina 2, Granta
Original decorative engine cover for 8kl VAZ
Any car enthusiast makes sure that his car is in perfect condition.
If there are any problems with transport, they must be resolved promptly. So, if you see that there is a leak between the valve cover and the engine block, then you should suspect that the cover gasket is leaky. Such an element does not have a global function in the operation of the system. But if problems arise with the gasket, then you should not turn a blind eye to them, despite the fact that the motor will work properly.
Replacing the valve cover gasket
The faulty part must be replaced, otherwise oil will leak from under it. This point can cause a number of problems. So the valve cover gasket of a VAZ 2114 can be replaced independently without the involvement of specialists. Some craftsmen are of the opinion that the gasket needs to be changed every time the cover is removed. This point must be taken into account when carrying out various works.
Consequences of untimely replacement
There are not many consequences, but they are quite compelling to change the gasket in time. Firstly, this is directly related to oil leakage, which reduces the volume in the engine. Even if the loss is insignificant, it may just be enough for the internal parts of the power unit to wear out faster.
Secondly, air constantly gets under the valve cover, which can affect the quality of the air-fuel mixture and the engine will begin to “eat” a sufficient amount of fuel.
Thirdly, dirt and foreign objects, as well as water during winter and rainy periods, can enter through the resulting cracks. This can negatively affect the operation of the power unit, cylinder head and other elements, as well as affect the performance of the entire system as a whole.
Fourthly, leaked oil contaminates the outer part of the block, onto which dirt clings. It can also affect the operation of the power unit and other elements.
What do you need to know about the motor?
Before the valve cover of the VAZ 2114 is removed and the gasket is replaced, it is worth talking about the features of the engine. If you don’t know anything about design features, then the best solution would be to turn to specialists. Remember that to carry out such work you will need a certain tool.
ICE device
| № | Detail number | Part name |
| 1 | 2108-1003298 | screw |
| 2 | 2108-1003278-01 | Washer |
| 3 | 2108-1003277-01 | Sleeve |
| 3 | 2108-1003277-02 | Sleeve |
| 4 | 2108-1003274 | Cover pin |
| 5 | 2111-1003260 | Cylinder head cover |
| 6 | 2108-1003271 | Bolt M12x1.25x135 |
| 7 | 2108-1003265 | Washer |
| 8 | 14328201 | Plug 10 cup |
| 9 | 14329101 | Plug 30 cup |
| 10 | 1118-1003011 | Cylinder head |
| 11 | 2101-1002042 | Sleeve |
| 12 | 14329201 | Plug 36 cup |
| 13 | 10158601 | Plug 16 spherical |
| 14 | 11183-1002011-10 | Cylinder block |
| 15 | 14234330 | Bolt M10x1.25x65 |
| 16 | 2108-1003284-10 | Ring sealing |
| 17 | 2111-1003284 | Ring sealing |
| 18 | 2111-1003286 | Bolt |
| 19 | 2111-1003288-10 | Stub |
| 20 | 10725911 | Nut M6 low |
| 21 | 11197773 | Conical spring washer 6 |
| 22 | 13541221 | Hairpin M6x22 |
| 23 | 2108-1003270-10 | Cover gasket |
| 23 | 2108-1003270-11 | Cylinder head cover gasket |
| 24 | 21083-1003020-10 | Head gasket |
| 24 | 21083-1003020-11 | Head gasket |
| 25 | 2112-3855020 | Knock sensor |
| 25 | 2112-3855020-01 | Knock sensor |
| 25 | 2112-3855020-02 | Knock sensor |
| 25 | 2112-3855020-03 | Knock sensor |
| 26 | 2101-1002040 | Sleeve |
In particular, a car enthusiast needs to have on hand the following details:
How to make a replacement
If the engine protection is damaged during a collision with an obstacle, it should be replaced.
It is done in the following order:
Thus, the entire process will only take a few minutes.
Speaking about replacing the crankcase protection, one cannot fail to mention such an issue that worries many drivers as installing additional protection. It is designed to provide essential protection against damage when driving over very rough terrain and to ensure that even in very severe collisions with obstacles the crankcase will not be deformed.
At the same time, if you decide to install additional protection, you should definitely remember the following:
At the end of the conversation, it is worth recalling once again that the crankcase protection is not just a metal pan, but an element that protects the engine from failure due to oil leakage. That is why its condition should be checked periodically, and if it is severely damaged, it should be replaced immediately.
Reasons for gasket failure
When all the processes have been sorted out and the choice of valve cover gasket has been decided, it is necessary to consider the reasons for the failure of this element:
- Wear. Perhaps the most common reason is that during use this element tends to crack because it is constantly exposed to hot oil.
- Stretching. Constantly high temperature negatively affects the rubber product, which loses its physical properties and stretches, which entails a loose connection and the passage of lubricant.
- Oil streams. Occurs due to gasket breakdown. This usually happens after the engine overheats severely.
- Pressure. Excessively high pressure can squeeze the gasket out of its seat, which will cause oil to flow like a river.
Why do you need a gasket?
It is clear that without such a gasket the car will work as before. But you need to understand that it plays a certain role, even if it does not affect the technical features of the car. It is important that when a leak occurs, a number of serious problems can arise.
The gasket has a certain service life. It must be promptly replaced as it wears out.
If we consider the main task of this part, then it is worth saying that it is to ensure the tightness of the connection. In order for the connection between the valve cover and the engine part to be tight, a gasket is needed. You don’t need any special skills to find the cap, because it has a neck for filling engine oil.
Analogues (manufacturers)
Of course, the manufacturer and many automotive experts recommend installing the original valve cover gasket, but, as practice shows, substitutes are often of higher quality and have a much longer service life.
So, let's look at which analogues of the original part are recommended for installation on a car:
| Manufacturer's name | Catalog number | Cost in rubles |
| Glaser | X08964-00 | 300 |
| Goetze | 50-025881-00 | 750 |
| Ajusa | 56021200 | 1000 |
| Trialli | GZ 101 7022 | 1500 |
As you can see, the cost of alternative gaskets is quite high, but as practice has shown, the service life of the parts is twice as long as the original.
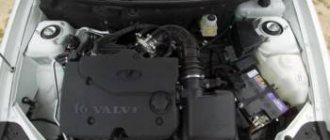
Decorative engine cover for VAZ
With the transition to an electronic gas pedal, AVTOVAZ has abolished such a thing as a decorative engine cover . It slightly reduces the noise from the engine, since it is glued on the inside with a layer of noise insulation, and also has an aesthetic function (protects it from dirt and dust). Let's see what is needed to install a decorative engine cover on VAZ cars with E-gas.
Previously, on old Kalina and Grant cars, this cover was attached to 4 studs: 2 on the valve cover, 2 on the intake manifold. The new Ladas have a plastic intake manifold instead of a metal one, so there are only 2 studs left on the valve cover on which the cover can be installed. Most likely, for this reason they stopped installing it. However, this cover holds well even with 2 studs. In order to install the decorative cover, it is necessary to replace the standard studs (2108) with longer ones (2112). To do this, remove the standard studs and screw in long studs instead.
2108
2112
We install the cover on two studs. It holds tightly and securely, even with two stiletto heels.
How to replace?
Domestic cars are not perfect; over time, you may notice that oil is leaking from under the gasket. In this case, it is simply necessary to make a replacement. Of course, you can try to tighten the bolts more tightly, but this is unlikely to help solve the problem. If you are wondering how to change the valve cover gasket on a VAZ 2114, then you should proceed sequentially. Anyone can cope with such a task as replacing the valve cover gasket 2114.
The sequence of your actions should be as follows:
Disconnecting the hoses Removing the accelerator cable Removing the bracket Unscrew the valve cover fastening nuts Remove the valve cover New gasket
When the cover is removed, it is worth cleaning the oil separator screens. This manipulation can be done by unscrewing the bolt and removing the cover.
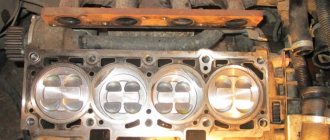
Step-by-step dismantling
Let's look at how to change the engine oil seal of a VAZ 2114 with an 8-valve engine.
The work order is as follows:
- Place the car on a level surface, support the rear wheel with stops. Set the gearshift lever to the neutral position, remove the front right wheel and engine protection. You can remove part of the fender liner for easy access to the front engine cover.
- Under the hood, unscrew the bolts securing the timing belt protective cover. Loosen the generator and remove the generator drive belt.
- Set the valve timing marks on the camshaft and crankshaft. To do this, rotate the crankshaft with a socket wrench until the arrows on the pulleys align with the special ebbs on the body. This corresponds to the position of the first piston at TDC.
- Before removing the timing belt, loosen the tension roller and unscrew the bolts securing the upper and lower sprocket. Inspect the belt for damage and traces of oil. Change if necessary.
- Drain the oil from the engine and unscrew the pan. It is secured with 16 10mm wrench bolts. Remove the clogged oil receiver and clean thoroughly.
- Using a 24mm socket, unscrew the pulley mounting nut, to do this, secure the crankshaft itself. Under the pulley there is an oil pump, into the cover of which the front engine oil seal is pressed. It is secured with six 10mm bolts.
- Remove the oil seal from the seat using a flat screwdriver or carefully press it out with a socket of a suitable size.
What is the purpose of the engine cover?
First, it keeps the top of the motor clean. And owners of Lada cars know that the engine compartment seals in domestic ones are not very good. Secondly, with the engine cover the engine compartment looks much more aesthetically pleasing. On no foreign car the engine is presented to the owner uncovered.
If you care about your car, welcome to shop.
The decorative trim is held on the engine by 4 rubber couplings placed on the studs of the cylinder block cover and the receiver.
0 Comments
1 Pingback
Leave a Reply Cancel reply
Categories
Similar articles
We check the tension of the alternator belt on VAZ 13, 14, 15.
Replacing the alternator drive belt on a VAZ 2113, 14, 15
Replacing the steering rack on VAZ 2113, 14, 15 cars
Replacing steering rods on VAZ 2113, 2114, 2115
Replacing tie rod ends on VAZ 2113, 2114, 2115.
We eliminate the leak from under the front engine cover. VAZ 2108, 2109, 21099, 2113, 2114, 2115
A dirty engine is not uncommon. Oil, seeping through the “sweating” gaskets and seals and mixing with dust, gives the engine its corresponding appearance. There is no big problem in this. Many “dirty” people live well into old age. Alarm signal - oil stains under the car after parking. Day by day they grow in size, and the oil level in the crankcase drops noticeably. You shouldn’t delay repairs - otherwise, much more significant ones may be added to the costs of purchasing it. First of all, this applies to engines with a timing belt - for example, those found on all front-wheel drive VAZs. This belt, getting oily, quickly collapses. And then - depending on your luck. If the “one and a half” (21083) is easy to revive by replacing only the belt, then for models 2108 and 2112 you will probably have to install new valves to replace the bent ones, or even deal with the guide bushings. But the leak will still have to be fixed! We preferred to do this in advance. You can also work on the ground, having first hung and reliably insured the front part of the car. The engine oil must be drained.
Reasons for replacing the crankshaft oil seal
The internal combustion engine design has 2 sealing rings on both sides of the crankshaft. They prevent oil leakage from the crankcase while the engine is running. Cars of the VAZ-2114 and 2115 family have the same VAZ-2111 engine. The seals themselves are located under the timing belt protective cover and in the clutch housing on the gearbox side.
The cause of leakage may be a malfunction of the crankcase ventilation system. This often happens due to clogged hoses. In this case, excess pressure causes engine oil to leak through the seal, especially if it is already old.
Common causes of wear are:
- low quality o-ring material;
- incorrect installation of the oil seal in the seat;
- damage to the rubbing surface due to mechanical scuffing of the shaft;
- natural aging and loss of elasticity due to long service life.
A strong leak from the rear oil seal is noticeable by the clutch slipping when starting to move and when changing gears.
Engine dismantling VAZ 2114, VAZ 2115, VAZ 2113, Lada Samara 2
Before disassembling the engine of a VAZ 2113, VAZ 2114, VAZ 2115 car, it is advisable to wash it and drain the oil from the crankcase. Engine disassembly steps
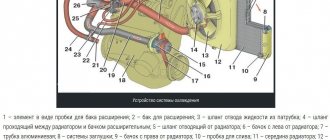
Removing components and parts of the air supply system: 1 – air filter; 2 – mass air flow sensor; 3 – throttle pipe; 4 – sealing gasket; 5 – receiver; 6 – exhaust pipe of the engine cooling system; 7 – hose clamps; 8 – supply pipe of the coolant pump; 9 – throttle pipe heating hoses; 10 – inlet pipe hose
Remove hoses 9 for supplying and discharging antifreeze, as well as the crankcase breather, from the throttle pipe. Remove the throttle pipe by unscrewing the fastening nuts.
Disconnect the gasoline supply and drain pipes. Remove the vacuum hose by disconnecting it from the pipes and from the gasoline pressure sensor.
Removing the receiver and inlet pipe: 1 – support bracket; 2 – inlet pipe; 3 – receiver gasket; 4 – receiver; 5 – bracket for the tip of the accelerator drive cable; 6 – bracket; 7 – exhaust manifold screen; 8 – support bracket
Remove the receiver 4 and the fuel line bracket by unscrewing the bracket nut 6 and nuts 2.
Removing the fuel rail with injectors: 1 – injector rail; 2 – pressure regulator; 3 – vacuum hose; 4 – inlet pipe; 5 – nozzle; 6 – nozzle latch
Remove the injector ramp 1 with regulator 2 by unscrewing the 2 mounting bolts.
After unscrewing the nuts and bolts, remove brackets 1 and 8, then remove the pipe with bracket 6 and screen 7.
On the left side, remove the wires, ignition module and knock sensor. Remove the spark plugs, antifreeze temperature sensor and oil pressure sensor VAZ 2114. Unscrew the temperature sensor from the outlet hose of the cooling jacket.
Removing the generator: 1 – generator drive pulley; 2 – bracket for the right engine mount; 3 – mounting plate; 4 – tension bar; 5 – generator; 6 – generator mounting bracket; 7 – generator drive belt
Remove bar 4 and belt 7 of the generator. Remove the generator. Block the flywheel of the VAZ 2113, unscrew the bolt securing the generator pulley and remove the pulley.
Removing the camshaft drive: 1 – front protective cover; 2 – rubber seal; 3 – toothed belt; 4 – camshaft pulley; 5 – crankshaft toothed pulley; 6 – spacer washer; 7 – tension roller
Remove belt cover 1. Unscrew the tension mechanism nut. Loosen and remove toothed belt 3. Remove tension roller 7 with washer 6.
While holding pulley 4 of the camshaft Lada Samara 2, VAZ 2115, VAZ 2114, VAZ 2113 from turning, unscrew the pulley bolt and remove the pulley. Remove toothed pulley 5 from the shaft.
Removing the coolant pump: 1 – rear protective cover of the toothed belt; 2 – coolant pump; 3 – gasket
Unscrew the bolts securing the antifreeze pump 2. Unscrew the bolt and nut securing the rear cover 1 and remove it. Then remove the pump with gasket 3.
Remove the exhaust manifold, then the thermostat, and the antifreeze circulation pipe.
Removing the oil filter using a tool
Unscrew the oil filter. Disconnect and remove the breather. Remove the oil level dipstick.
Location of rubber elements on the crankshaft
In the design of power plants, two oil seals are used on the crankshafts - front and rear. They both prevent lubricant from leaking out of the engine. The rear oil seal is installed on the end of the shaft to which the flywheel is screwed. Due to the fact that this end switch is presented in the form of a flange, the dimensions of the oil seal are quite large, with a significant layer of rubber. This ensures a considerable service life of the rubber element.
The front oil seal is located on the end of the shaft, which is used as a drive for systems and mechanisms of the power plant or auxiliary equipment. The rubber element is located behind the drive gear, which is mounted on the shaft end and secured with a key connection. The dimensions of this oil seal are smaller than the rear one. And this affects the resource of the element.
Due to the leak, oil gets onto the outer surface of the engine, causing it to become dirty. This also increases the consumption of lubricant, which must be replenished periodically. Leakage is especially dangerous for engines in which the timing belt is driven by a belt. Oil-based liquids have a negative effect on rubber elements. If oil gets in, the belt can delaminate and break, which is especially dangerous if the engine is “plug-in” (if the belt breaks, the pistons collide with the valves).
How to remove a VAZ 2114 engine: we analyze the process in detail
Many car enthusiasts, taking into account the price of a VAZ car and the possible cost of repairs in a car repair shop, are thinking about how to remove the VAZ 2114 engine with their own hands.
This article is intended specifically for thrifty and independent car owners, in which we will figure out how to remove the engine, install it back, what options for this procedure exist and how to check the compression after the repair. In addition, we will look at how to do this yourself without involving other people.
Removal and installation of the VAZ 2114 engine
There are several typical circumstances after which removing the VAZ 2114 engine becomes an absolute necessity. The most common of them are body repairs and the need for major repairs of the engine itself (its replacement).
Before carrying out repair work, it is necessary to prepare in advance:
The standard engine removal algorithm is as follows:
IMPORTANT! When you disconnect the fuel pump, do it with two 17mm wrenches, otherwise you will simply break the tube.
At this point, engine dismantling is considered complete; after repair work, it is installed in the reverse order. The only exception is that the power mount fasteners are tightened in the same order in which they were twisted, starting from the rear.
Where is?
To prevent lubricant from getting onto components outside the oil pan, there is an oil seal at the outlet holes through which the crankshaft is connected to other engine components. One of them is front, the other is rear. Their purpose is to ensure the tightness of the housing.
Crankshaft seals
The front one is located behind the crankshaft pulley on the oil pump. To replace the rear one, it is necessary to dismantle the gearbox, clutch and flywheel, then the rear cuff will be accessible. You can see this clearly in the video posted at the end of the article.
Without removing the gearbox
If there is no pit, overpass and friends, you will most likely have to figure out how to remove a VAZ 2114 engine without a box. You can perform this procedure yourself, and you will not need any special physical activity. Part of this procedure will not differ in any way from the general algorithm, so we will focus only on the differences.
To prepare a working base you will need bricks and a jack. It is necessary to smoothly lift the car and place brick by brick under the front wheels, having first secured the rear wheels so that the car does not roll.
The key differences between the methods begin when you completely free the motor head from the wires connected to it:
BE CAREFUL! Sometimes the engine does not want to fall off the box on its own, in order to fix this you will have to gently push it with a crowbar.
When you put it back together, don't forget to secure not only the engine, but also the box itself with rope. To carry out reassembly without removing the box, you will need an assistant.
Necessary tools for work
The VAZ-2114 crankshaft oil seal is replaced in a garage or car service center. You can change it yourself if you have minimal plumbing skills and the necessary tools:
- jack and reliable support for lifting the car and hanging the internal combustion engine;
- wheel anti-roll bars;
- set of socket heads from 10 to 27;
- open-end and ring wrenches;
- slotted screwdriver;
- hammer;
- container for draining used oil from the engine sump;
- special graphite lubricant;
- automotive sealant;
- rags or wipes.
Repairs are best done by changing the engine oil and cleaning the crankcase. In this case, you will need a can of fresh oil, an engine sump gasket, an oil pump cover gasket, and a new front oil seal.
Important! Carry out the work on a lift or in an inspection pit. If they are absent, it is enough to raise the front part of the car as high as possible and install it on reliable supports, for example, cuttings of sleepers or cinder blocks. It is strictly prohibited to stand under a machine mounted on a jack.
Extraction from the top
If you have a good winch or 3-4 reliable assistants, then there is no better solution on how to remove the engine from the VAZ 2114 through the top. This method differs from removal through the bottom in that it eliminates the possibility of damaging the engine itself or the car. The most important factor in the success of this operation will be your accuracy.
The procedure for removing the engine from the top must be carried out as carefully as possible. It is important to take into account everything that can affect the engine falling off its mounts. Moreover, if you do everything correctly, this method will be the least labor-intensive. At its core, this procedure is no different except for removal from removing an engine without a gearbox.
Compression test, troubleshooting
One of the main reasons for engine repair is decompression. Actually, the troubleshooting itself must be done every 30 thousand km, combining it with valve adjustment.
Signs of the need for early technical inspection of the engine are:
If you experience similar symptoms, you need to do the following:
IMPORTANT! The normal pressure in the VAZ 2114 engine is 1.0 MPa in the standard configuration and 1.4 MPa on an eight-valve engine.
After the procedure is repeated for all cylinders, it is necessary to analyze the records. So, in a working engine, compression should not fall below 1 MPa and should not have a spread between the cylinders of more than 0.2 MPa. Otherwise, you will have to repair the engine.