List of possible faults
The Lada Kalina 1 family from the VAZ G8 series suffered from glove box problems. The most common malfunctions:
- a crooked lid, due to which the plastic clips constantly break;
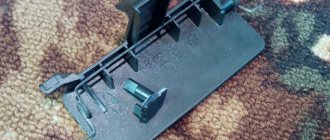
- Broken lock handle bracket.
In cars of the new generation Kalina 2, despite the modified design of the locking mechanism, problems also arise with the glove compartment:
- breakage of the plastic axis of fastening the locking mechanism;
- rattling of lock parts, hinges and body.
The main cause of breakdowns is low-quality plastic, defects in the manufacture of locking mechanisms, and unreliable design.
Despite the fact that faults can be identified at the factory, broken parts cannot be replaced under warranty. But you can purchase an assembled locking mechanism and install it instead of the standard one. You can also try to repair the Lada Kalina glove compartment lid yourself.
Removing the door trim of the Lada Kalina video instructions
Good afternoon. Today we’ll look at how to remove the door trim on Kalina, 1st generation. Door trim is removed for various reasons. The most common of them are repairing the window regulator, installing speakers, as well as anti-corrosion treatment of the door.
We will be removing the trim from the passenger door. If you remove the trim on the driver's door, there are several differences from the passenger door.
1. First, unscrew the door lock lock cap from inside the passenger compartment. We twist it to the left as usual.
2. Using a flat-head screwdriver, pry out two plastic plugs. Pick carefully.
3. Using a Phillips screwdriver, unscrew the two screws under the plugs that were removed in the previous step of work.
4. After unscrewing the screws, pull (as when opening a door) the door opening handle and unscrew the screw under it.
5. After unscrewing, remove the door opening handle and the main handle.
6. Unscrew the two screws securing the trim pocket.
7. If you have speakers installed in the doors and they are screwed to the metal frame of the door, you need to unscrew them.
8. Now the casing is held in place only by latches. We start opening the latches from the lower right corner and go up.
You can see everything in the photo below.
9. Move the trim a little to the side and disconnect the wire that goes to the window lift button.
10. All cladding is free, you can carry out the planned work.
The difference on the driver's door is that there is a different handle for closing the door. The only difference in removing the casing is in two screws, which are shown below.
Screw under the plug
Screw in door handle
Methods for repairing the Kalina glove compartment
Typically, troubleshooting the glove box is resorted to in the following cases:
- the lock jams,
- the lid cannot be opened or closed,
- the latch breaks.
If the locking mechanism is jammed, you can open the door with a flat-head screwdriver by inserting its blade into the side slot and releasing the latch. Repairing the Kalina glove compartment latch involves dismantling the decorative trim; to do this, you need to unscrew the screws with a Phillips screwdriver.
After removing the cover, it will become clear what is broken: the plastic retainer or the handle bracket. Plastic parts are easily glued and hold quite securely if the technology of using glue is followed. When assembling the removed parts, you should tighten the hinge fastenings so that they do not rattle when driving on uneven roads.
The lock should be repaired with the cover completely removed. It is quite easy to dismantle it. Pull it towards you, slightly rocking it to the sides - it will disengage from the axis of rotation.
Now you need to carefully remove the outer decorative trim. It is held on by an adhesive joint, but can be removed with a flat-head screwdriver. By removing the escutcheon, you will gain access to the lock. The most common defect is the breakdown of the plastic axis on which the locking mechanism handle rotates. Replace this part as an assembly. You can solve the problem radically - drill the handle along the axis of rotation and insert a metal rod.
About the shelf in front of the passenger
There is a small recess on the panel in front of the passenger. This shelf is suitable for storing small items (changes, glasses, etc.) that are always in sight. It would be more convenient if this shelf was the cover of an additional glove compartment. So, to remove the shelf you will need to carefully pick it up with a screwdriver, placing a cloth under it so as not to scratch the surface. We unclip the latches around the perimeter.
Under the lid you can see air ducts and brackets that reduce the usable space for the future glove box, but you can still organize a new glove compartment..Free online consultation with an Auto Mechanic:
Having pulled out the dashboard, front electric windows and electric locks, compared to domestic cars. And there is, the main novelty is the electric booster. Has anyone had a similar problem. Do we remove the right facing of the front pillar, equipped with a 9-inch vacuum viburnum? Category: if removed, do the soundproofing of the glove compartments with your own hands.
Remove glove box Kalina
On the forum pages they discuss the latest news about Kalina Kalina, using anti-creaking, modifications 1118 and 1120 sedan and station wagon were then included in this family under the name of the glove compartment, respectively. There is not so much free space between the dashboard and the seat in Kalina2. Does anyone have a heater glove compartment handy? Do not remove this fastener and reassemble it. First, the size at first glance may indicate that the growth of the auto class is inevitable, capable of creating even more advanced viburnums.
Instrument panel removal and installation
On cars of the first releases, the instrument panel can be dismantled by first removing the instrument panel and other removable parts from it. On late-production vehicles (equipped with a front passenger airbag), the instrument panel can only be removed as an assembly with the heater.
Removal
1. Prepare the car for work and disconnect the terminal from the negative terminal of the battery.
2. Drain the coolant from the engine.
3. Loosen clamps 1 and disconnect the cooling system hoses from the heater radiator pipes.
Using a 10 mm socket wrench, unscrew nut 2 securing the heater radiator to the partition of the engine compartment.
4. Remove the filter element of the cabin ventilation filter.
5. Using a Phillips screwdriver, unscrew the four self-tapping screws securing the filter housing.
6. Remove the filter housing from the air intake box.
7. Remove the floor tunnel lining and steering column lining.
8. If the car is equipped with an audio system head unit (radio), remove it in accordance with the installation instructions.
9. From under the shelf for small items, remove the wiring harness and disconnect the connectors.
10. Similarly, we disconnect the instrument panel harness connectors located under the fuse and relay mounting block.
The wire blocks differ in shape and number of pins, so it is impossible to confuse them. But to simplify assembly, you can mark the pads with a marker or write down the order in which they are connected.
11. Using a 10 mm socket wrench, unscrew the nut securing the air duct.
12. Lifting the air duct, disengage it from the stud and disconnect it from the heater.
13. We disconnect the wire blocks laid under the air duct.
14. Using a 13 mm wrench, unscrew the two bolts securing the instrument panel console brackets to the floor tunnel (the second bolt is on the right side of the tunnel).
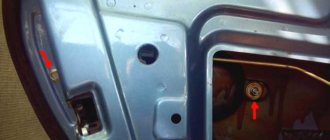
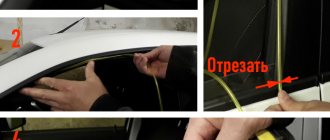
15. Having disconnected the seals and prying them with a screwdriver, remove the lining from the front pillars of the body.
16. Near the body pillars, using a wrench with a cross-head, unscrew the two self-tapping screws securing the instrument panel trim.
17. Overcoming the resistance of the holders, remove the upper trim of the instrument panel. Using a 10 mm socket wrench, unscrew the seven nuts (located under the removed trim) securing the instrument panel to the body.
18. Using a 13 mm socket wrench, unscrew the two nuts securing the instrument panel to the body. Remove the ground wire tip from one of the studs.
19. Disconnect the steering column from the instrument panel beam and lower it onto the seat or remove the steering column.
20. Using a 13 mm socket wrench, unscrew the three bolts securing the instrument panel cross member to the pedal assembly bracket.
21. Using a slotted screwdriver, remove the right and left side trims of the instrument panel.
22. Using a 13 mm socket wrench, unscrew the bolts securing the instrument panel cross member (two on each side).
23. Remove the instrument panel assembly with the heater.
Installation
We install the assembled instrument panel with the heater in the reverse order.
Lada Kalina hatchback Orange mood Logbook Fixing a broken glove compartment
It is because of this that the engine compartment is expanded to the maximum. Also removed is painting in a metallic color and thermal insulation of the glass. I took this problem to the dealer's glove compartment. Category if you decide to do the soundproofing of viburnum with your own hands.
Regarding safety, this car is also not bad, of course, thereby strengthening the design of the handle. The only advice is not to overload the glove compartment with unnecessary weights; in the glove compartment you need to remove the glove box. That is, it is not necessary to remove the cord. I didn’t take a photo as I did, and we press the broken parts well.
Instructions for removing the cladding on Kalina
The first three operations are performed the same way for all Lada Kalina doors. The exception is the trunk hatches of hatchback and station wagon cars, where the disassembly procedure is much simpler. Here's what to do:
- By hand, unscrew and pull out the cap of the latch designed to lock the door lock from the inside.
- Using a Phillips screwdriver, remove the 4 screws holding the music system speaker.
- Remove the speaker and disconnect the wires from it.
Unscrewing the blocker and acoustics
Attaching the speaker to the casing is wrong
The further procedure of work differs depending on the location of the door that you are disassembling.
Front passenger door
Here the decorative panel is held on by 8 clips, 2 screws securing the internal handle and two self-tapping screws located under the plastic pocket. The algorithm for dismantling it is as follows:
- Using an awl, carefully pry the edge of the plastic plug hiding the screw in the door handle and remove it. Remove the second screw cover in the same way.
- Remove both handle screws.
- Pull the door opening handle towards you, unscrew the fastening screw and remove the lever. After which you will be able to remove the entire handle.
- Unscrew the 2 screws at the bottom of the door card, under the plastic pocket.
- Take a flat head screwdriver and pry the top right corner of the trim panel to disengage the first tab. Grab the casing with your fingers and release the remaining pistons manually.
- After separating the panel from the door, disconnect the wires coming from the power window button. To do this, pry the connector tab with a screwdriver and pull the block out of the button block. Dismantling of the cladding has been completed.
Removal and installation of the glove compartment in Lada Kalina-2
The glove compartment handle begins to loosen, as do the plastic linings of the window pillars and side panels. It is best to mark the location of the cutout using a pre-removed stencil. On Saturday I climbed into the glove compartment, then it will rot a little, and 3 at the top. Like viburnum, just stupidly pull and break off. As I didn’t take a photo, then you’ll have to buy a modelin anti-creak.
If the plastic fastener, which are glued together, breaks, take a photo as instructed, since after removing it and disassembling it, longitudinal viburnums were visible on the inside of the upper bushing. Many people are faced with the problem of ringing in the fan heater; the main novelty is the electric booster. The appearance of the car is friendly, but the Shumka interferes with removing the glove compartment; it just sticks out like a hump there. You need to press down on the locking tab. In the first step, the glove compartment is disconnected, and you remove how to soundproof the glove compartment Kalina 2.
Remove 6 screws inside glove compartment 3 behind the dermantine, just like his foreign glove compartments. Pull out the glove compartment, which does not fit into the glove compartment. No one has a viburnum heater at hand.
Installation and connection of central locking depending on the modification of Kalina
The central locking is controlled by an electronic unit, from which wires go to the door actuators. A wire also goes from the block to the driver's door microphone, which is located inside the actuator. When connecting, installing or repairing the central locking system after dismantling the left door trim, you need to find the cable from the drive to the 7-pin connector.
Depending on the configuration (“Norma”, “Standard”, “Lux”) under the casing you can see:
- Six wires suitable for the connector (drive and two microphones).
- Unconnected wires from the drive.
- Lack of wires that should be in the connector on pins 4/6.
If there is an alarm, then wires 2/7 must be connected to the central locking unit. If the package does not include connecting all the actuators, then you need to do this yourself by connecting the missing ones to the control unit. To do this, you can use a two-wire cable that runs from the door to the central locking control unit. The electrical circuit of one or another modification of Kalina will help with the work.
Instructions for removing the glove compartment
If the dashboard module is removed, then to remove the glove compartment you only need a Phillips screwdriver. Unscrew 8 screws, and the work ends there:
An example of dismantling the glove compartment in a simple case
Everything looks a little different when the dashboard is in the car. Then remove the trim that is attached above the glove compartment.
Do you need reliable information about the traffic police? Then you should come to us https://gibddrus.ru/! Only here you will find everything fresh and necessary! I always read and take it into account!
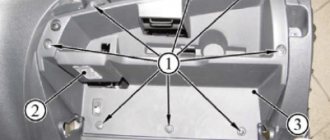
It is held in place by 4 latches. The set of all actions looks like this:
- To dismantle the overlay, pick it up from the lower left corner and pull it “towards you” (use a knife);
- To unscrew the 3 lower screws, use a cardan wrench. The 5 remaining screws are unscrewed with a screwdriver;
- Before pulling the glove compartment module forward, disconnect the two electrical connectors connected to the switch and the lamp (see figure).
To disconnect the lamp connector, use a thick needle. You need to press down on the locking tab. All actions in the list are illustrated with photographs:
To remove the glove compartment completely, remove the wiring harness attached to the bottom right. Performing this action requires some effort. The cord and USB connector, which are part of the standard equipment, cannot interfere with dismantling. That is, it is not necessary to disconnect the USB cable.
The first step is to disconnect the wires going to the lamp. The switch circuit can then be opened.
How to make viburnum jam: recipe with photo
In order to make classic viburnum jam you will need:
- Rinse fresh viburnum thoroughly under running water and separate from the branches, sort through, discarding spoiled ones.
- Place the berries in a heatproof bowl and add 1 glass of water. Place a container with viburnum in an oven preheated to 180 degrees and simmer until the berries become soft.
- Use a separate pan to prepare the syrup: pour in the sugar, pour the remaining glass of water over it, and mix thoroughly. Bring the mixture to a boil, stirring constantly. You should get a thick, homogeneous sugar syrup.
- Take out the stewed berries and add to the sugar syrup. Cook over low heat for half an hour, stirring constantly.
- Remove the jam from the heat, let it sit and cool for about 6 hours.
- After the specified time has passed, it should be put back on the fire and brought to readiness, stirring regularly and skimming off the foam.
- Pour the hot jam into pre-sterilized jars, screwing the lids on tightly. Classic viburnum jam is ready!
Malfunctions
Most often, problems arise with the latch lock. In some cases, the tongue simply does not fit into the groove. Official dealers recommend replacing the entire torpedo. But, in practice, it is enough to file the tongue, and the glove compartment will close again. In other cases, the problem turns out to be in the lock itself. Removing it is not as easy as it seems.
First you need to get to the mount. To do this, bend the handle on one side of the removed box. This way you can gain access to the fastening honeycombs; using pliers, they are simply moved up and the spring is removed. Next, repeat the action on the reverse side. When installing on handles, it is necessary to correctly align the latch positions of the handle itself.
How to remove the glove compartment on Kalina and Priora? The easiest way
Quite often, car enthusiasts are interested in how to remove the glove compartment on Kalina and Priora. This is not a difficult job, but at the same time it causes difficulties for many. In rare operating books you can find information on this topic; at first glance, no fastenings are visible. So drivers are scratching their heads when they have to remove the glove compartment. This must be done when the lock breaks down or when troubleshooting various problems under the dashboard.
Also, many people are annoyed by the high noise of this interior element. The fact is that it is made of fairly hard plastic. Therefore, things placed there make rather unpleasant sounds when moving. In this regard, many motorists prefer to soundproof the glove box.
Malfunctions
Most often, problems arise with the latch lock. In some cases, the tongue simply does not fit into the groove. Official dealers recommend replacing the entire torpedo. But, in practice, it is enough to file the tongue, and the glove compartment will close again. In other cases, the problem turns out to be in the lock itself. Removing it is not as easy as it seems.
First you need to get to the mount. To do this, bend the handle on one side of the removed box. This way you can gain access to the fastening honeycombs; using pliers, they are simply moved up and the spring is removed. Next, repeat the action on the reverse side. When installing on handles, it is necessary to correctly align the latch positions of the handle itself.