How to remove the gas tank on a VAZ 21213 video
Dear visitors of the Autotrack website! We will be very grateful for your comments on the video clip “How to remove the gas tank on a VAZ 21213 video”; registration is not required for this. We also ask you to let us know if you have any problems playing the video.
This car is not for you. Rust is easy to take care of. The anticorrosive thing you did was nonsense. I have a 99 year old car with rust and chips only with a mileage of 200 thousand. Is it difficult to change the alternator belt? Try doing this in a foreign car. The car fogs up - put the radiator valve in order and ventilate the car for 5 minutes every trip in winter. The transfer case increases engine power. - Wow
05/09/2016 – 05:13 XAREK999
I dressed the jacket in the color of the wallpaper very stylishly. :3
04/09/2016 – 06:00 Mobili S
The new section is good, but please choose better video quality and ask the owners not to shoot vertically. :
04/05/2016 – 23:24 MobilLugansk
By generator. If the generator gives less charge, it’s not the brushes. When the brushes are present, the charge disappears altogether. I had a charger of 13, 2 installed an additional diode, now 14. Any electrician can do this.
03/20/2016 – 21:10 MobilLugansk
On rubber. The dear K 156 will drive everywhere in the forest, unless you look for lakes 0.5 m deep filled with shit. In winter, yes, only winter - there are no thorns in Hancock.
02/28/2016 – 06:41 MobilLugansk
Author Is shooting vertically a director's move? But in general, I love Niva. I have a silver Crocodile 2012.
02/18/2016 – 19:43 Pavel Oleinikov
good review, keep filming, take a test drive, but immediately remove the chips, treat and paint, otherwise we’ll be a complete ass later, take care of it and everything will be fine
Damn, how many times have I offered to take off my nivar? We need to organize a meeting of nivavods in Cheby
01/31/2016 – 06:22 Zhenya Mikhlichenko
01/11/2016 – 17:52 Nikita Davydov
But does the Lada Urban really work at 95 or can you fill it with 92 and what is the consumption in the city?
12/20/2015 – 19:09 Valery 777
MACHINE '11 Aren't you tired of the guys? do repairs? After all the videos about the Niva and breakdowns, I lost the desire to buy. There was a Honda HR-V, it was driving through the door of the snow, it was moving, but the car was repaired in 1999, but in 2 years it required replacing the pads and stabilizer bushings = 2300 rubles. I really want a Niva, but it’s a shame the car is ’11 and falling apart
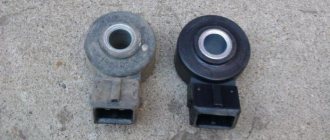
What is the essence of this system
Kalina's automatic fault diagnosis system includes several devices.
The display displays information that is processed by all devices. To prevent car owners from having to independently service their cars, manufacturers do not try to talk about the location of the devices and their decoding. It should also be borne in mind that the information received from the automatic diagnostic system is processed by the on-board computer, which simplifies the repair of the automotive unit, since the owners have the opportunity to visually find out where the defect is detected.
Since the Lada Kalina does not have an on-board computer, the owner will only be able to visually familiarize himself with the code number, and he will have to guess the location of the breakdown on his own. In order to avoid mistakes when repairing your car, experts recommend knowing each code by heart in order to promptly eliminate any type of malfunction.
. 21213, 21214 ()
There must be a minimum amount of fuel in the tank.
Disconnect the negative cable from the battery. Remove the fuel tank compartment cover (see Removing an electric fuel pump with a fuel level sensor). Remove the right side upholstery (see Removing interior upholstery). We disconnect the electric fuel pump from the wiring harness and pipelines (see Removing the electric fuel pump with a fuel level sensor). Unscrew and remove the fuel tank cap.
| 21213, 21214 () | |||||||
| AudiBMWCheryChevroletCitroenDaewooFordHondaHyundaiInfinitiIsuzuJeepKIALexusMazdaMercedes-BenzMitsubishiNissanOpelPeugeotRenaultSaabSkodaSubaruSuzukiToyotaVolkswagenVolvo | |||||||
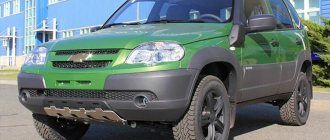
Appearance
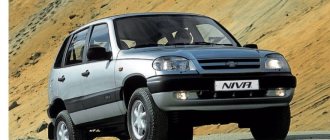
The car has the same design as its three-door modification. The body has simple and clumsy shapes. At the front there is a regular black grille and round halogen headlights. At the top are side lights and turn signals. The bumper is made of metal. On the sides there is a wide black molding with a huge inscription “VAZ-2131”. The mirrors are black, without turn signal indicators or electrical adjustments. This car comes with stamped 16-inch wheels from the factory. Separately stands out, which is called “Urban”. This car has a slightly different, more modern and pleasant design. Essentially, the body design remains the same. The only changes are the bumpers, which have now become plastic, and the radiator grille, which has received a more stylish look (there is a photo of the model in our article).
The mirrors on the Niva were also changed. By default, the car is equipped with alloy wheels. Otherwise there are no differences. This is the same Niva, built on the basis of a three-door car, which, in turn, was released back in the 70s.
Does this car have any problems with the body? Some say that due to the elongated base on the Niva, it breaks the power elements of the body, like the frame on the Gazelle. But in practice no one has proven this, and these statements are only arguments. As for the quality of painting, this is really the weak point of the Niva. Although, compared to the UAZ, this car does not chip and rot so quickly. The metal itself is poorly processed at the factory, so after purchase it is recommended to apply additional Movil (or anticorrosive).
Replacing the gas tank (fuel tank) Niva VAZ 21213, 21214, 2131 lada 4×4
There must be a minimum amount of fuel in the tank.
Disconnect the negative cable from the battery.
Remove the rear seat.
Remove the right side trim and floor covering
Remove the fifteen bolts securing the fuel tank cover to the floor panel and remove the cover. .
Disconnect the electric fuel pump from the wiring harness and pipelines.
Unscrew and remove the fuel tank cap.
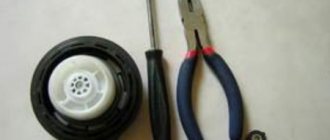
Use a Phillips screwdriver to loosen the clamp.
. and remove the plastic tank ventilation hose from the right fitting.
Similarly, disconnect the tank ventilation hose from the left fitting.
Use a Phillips screwdriver to loosen the clamp on the fuel tank hose and filler pipe.
. and remove the hose from the tank fitting.
Using pliers, loosen the clamp of the filler pipe hose.
Remove the filler pipe with hoses and the rubber O-ring.
Using a 13mm socket, unscrew the two rear mounting bolts for the fuel tank.
. and two bolts for the front mounting of the tank to the body cross member.
. remove the fuel tank.
Before installing the tank, we secure the plastic tank ventilation hoses to the top of the cross member with adhesive tape so that the tank does not crush the hoses.
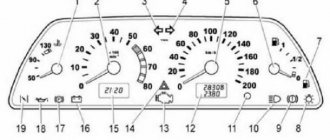
Deciphering codes, checking devices
https://www.youtube.com/watch?v=3C757Ur_C8k
Mistake No. 2. Overvoltage.
Error No. 3. An error has been detected in the fuel sensor level; it occurs if the circuit is broken.
Error No. 4. Coolant temperature sensor error.
Error No. 5. The outside temperature sensor has failed.
Error No. 6. The motor has overheated. This happens if the engine overheating alarm is triggered.
Mistake No. 7. Oil pressure is in poor condition. Happens if the alert bell is triggered.
Mistake No. 8. Problems with the brakes. Happens if the alert bell is triggered.
Mistake #9: The battery is dead. Happens when the alert bell is triggered.
To reset all types of errors, press and hold the reset button until all data on the display is cleared.
Testing of devices and their combinations is carried out in accordance with technical specifications using special equipment (pulse generator, from a stable power source, etc.).
If a short circuit suddenly occurs in existing devices (less than 40-50 Ohms), the maximum temperature indication must prevail.
The devices operate from an electronic module, which receives signals from various sensors. The tachometer and speedometer are powered by stepper electric motors. The electrical instrument cluster cannot be repaired. The daily mileage of the car can be set on the 0 key, which is located on the right. The meter and its readings are saved when the battery is disconnected. That's all. Good luck!
- We have collected a huge selection of videos about repair, tuning and maintenance of VAZ cars
- Share photos and rate photos of other users
Also interesting: What is an injector, why is it needed and how does it work?
VAZ 21213 | Removing the fuel tank
Removing the fuel tank
There must be a minimum amount of fuel in the tank.
Disconnect the negative cable from the battery. Remove the fuel tank compartment cover (see Removing an electric fuel pump with a fuel level sensor). Remove the right side upholstery (see Removing interior upholstery). Disconnect the electric fuel pump from the wiring harness and pipelines (see Removing the electric fuel pump with a fuel level sensor). Unscrew and remove the fuel tank cap.
Use a Phillips screwdriver to loosen the clamp.
. and remove the plastic tank ventilation hose from the right fitting.
Similarly, disconnect the tank ventilation hose from the left fitting.
Use a Phillips screwdriver to loosen the clamp on the fuel tank hose and filler pipe.
. and remove the hose from the tank fitting.
Using pliers, loosen the clamp of the filler pipe hose.
Remove the filler pipe with hoses and the rubber O-ring.
Using a 13mm socket, unscrew the two rear mounting bolts for the fuel tank.
. and two bolts for the front mounting of the tank to the cross member.
. remove the fuel tank.
Before installing the tank, we secure the plastic tank ventilation hoses to the top of the cross member with adhesive tape so that the tank does not crush the hoses.
Connection features
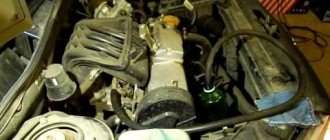
The first thing you should arm yourself with is a high-quality wiring diagram for the Niva 21213. It is shown in the photo below. Firstly, such a diagram is useful for maintenance, and secondly, with its help it is easy to determine the location for connecting the wiring harness.
Factory color scheme of electrical equipment VAZ 21213
The second important point is the frequency of use of the chandelier:
- Constantly, including traffic in urban environments;
- Only when driving outside urban and suburban highways (off-road). And here a proven diagram is absolutely necessary for an off-road vehicle.
The chandelier control output can be connected to a standard switch
The most preferable is the removable option, which provides for quick installation and dismantling of the chandelier, as well as its safe connection to the standard electrical wiring. The video in the article clearly demonstrates this process. Connection instructions are presented above.
But what you should pay attention to is the adjustment of the light flux. The fact is that when driving off-road, the hood of a car is often covered with dirt, which in the dark glares in the headlights, blinding the driver.
Therefore, there are 2 options:
- Install a special sun visor above the windshield;
- Move the chandelier back so that the edge of the light stream does not fall on the hood of the car.
Proper installation of the chandelier prevents glare
Removal and installation of the fuel tank Niva 2121, Niva 2131
Replacement of fuel tank, injection power system, repair, photo.
Replacing the fuel tank photo, Design of the fuel injection system Niva 2121, Niva 2131
There must be a minimum amount of fuel in the tank.
Disconnect the negative cable from the battery. Remove the fuel tank compartment cover (see Removing an electric fuel pump with a fuel level sensor). Remove the right side upholstery (see Removing interior upholstery). We disconnect the VAZ 2121 electric fuel pump from the wiring harness and pipelines (see Removing the electric fuel pump with a fuel level sensor). Unscrew and remove the fuel tank cap.
Use a Phillips screwdriver to loosen the clamp.
. and remove the plastic hose for ventilation of the Niva 2121 tank from the right fitting.
Similarly, disconnect the tank ventilation hose from the left fitting.
Use a Phillips screwdriver to loosen the clamp on the fuel tank hose and filler pipe.
. and remove the hose from the tank fitting.
Using pliers, loosen the hose clamp of the Niva 2131 filler pipe.
Remove the filler pipe with hoses and the rubber O-ring.
Using a 13mm socket, unscrew the two rear mounting bolts for the fuel tank.
. and two bolts for the front mounting of the tank to the cross member.
. remove the fuel tank.
Before installing the tank, we attach the plastic hoses for the ventilation of the VAZ 2131 tank to the top of the cross member with adhesive tape so that the tank does not crush the hoses.
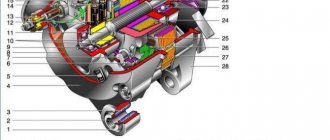
Injection engine power supply system
Power supply system for injection engine Niva 2121, Niva 2131
Features of the injection system
Features of the injection power system Niva 2121, Niva 2131
Replacing the fuel filterRemoving and installing the fuel filter Niva 2121, Niva 2131
Replacing the air filterRemoval and installation of a replaceable air filter element Niva 2121, Niva 2131
Checking the fuel system pressureChecking the pressure in the fuel system Niva 2121, Niva 2131
Replacing the fuel tank
Removal and installation of the fuel tank Niva 2121, Niva 2131
Replacing the fuel pump and fuel sensorRemoval and installation of an electric fuel pump with a fuel level sensor Niva 2121, Niva 2131
Replacing the fuel pressure regulatorRemoving and installing the fuel pressure regulator Niva 2121, Niva 2131
Installing and removing the fuel rail Niva 2121, Niva 2131 Checking fuel injectors Niva 2121, Niva 2131 Installing and removing injectors Niva 2121, Niva 2131 Throttle valve driveRemoving and installing the cable and pedal of the throttle valve Niva 2121, Niva 2131
Replacing the throttle assemblyRemoval and installation of throttle assembly Niva 2121, Niva 2131
Replacing the idle air controlRemoval and installation of the idle speed regulator Niva 2121, Niva 2131
Replacing the air filter housingRemoving and installing the air filter housing Niva 2121, Niva 2131
Fuel vapor recovery systemPossible error codes for viburnum
What error codes exist for VAZ Kalina?
- The highest voltage on-board network of the machine.
- Fuel sensor error (for example, within 20 seconds it was detected that the circuit was broken).
- Coolant temperature sensor error.
- The motor is overheated.
- Oil pressure is in poor condition.
- The brake system has broken down.
- Battery low.
What should I do to troubleshoot? You should hold down the key and turn on the ignition, but do not start the car. The arrows on the dashboard will move and the lights will turn on. After this, you need to press one of the keys on the switch, which is located under the steering wheel. Then the arrows will be at the initial position, and errors will be shown on the display.
Let's give advice to those who buy a used VAZ car - most drivers don't even think about the fact that there is an option for diagnosing and resetting Lada Kalina errors.
And therefore, before buying a VAZ, you should run this option to find out everything about the past of the car you are purchasing.
The modern automotive industry is a very developed industry; it is almost always an excellent assistant to any car owner.
This does not depend on the make of the car; the presence of BC is an excellent feature of almost any car produced over the last ten years. A similar system is no exception for VAZ. Many people know what an on-board computer is, but not everyone knows how to evaluate errors that have occurred and determine their significance. Let's look at the above errors.
It should be noted that many of the errors characteristic of VAZ are understandable. For example, a temperature sensor error, the BC can issue it when the motor is cooled. But it happens that the computer gives an error falsely.
Also interesting: LADA (VAZ) 2121 (4×4), buy Niva 2022 in Moscow, photos and prices - official dealer
For example, once the motor was overheated, the computer suddenly notifies about the error, even if there is none. That is, errors can occur if the BC remembers information about an overheated motor.
And therefore, when this problem has been fixed, it is better to reset all BC readings.
And to fix it, you should press the Reset key - it is located under the control buttons of the on-board computer. But if the faults are not identified, you need to ask a professional for help. You should also pay special attention to the errors of the machine's bookkeeping system if it has already been used and was purchased secondhand.
Three ways to drain gasoline
In other cases, when it is necessary to drain some of the gasoline, for example, for roadside assistance, refueling a blowtorch or kerosene stove, you can use one of three methods:
- Draining gasoline through the filler neck.
- Removing fuel through the drain hole in the tank.
- Drain using a standard fuel pump.
Depending on the amount of fuel that needs to be removed from the tank, we choose one of three methods.
Through the neck
Draining gasoline through the filler neck.
Despite the fact that this method is quite troublesome, it can be used when you need to drain all or almost all of the gasoline.
It is important to remember that under no circumstances should you drain the tank (if it is clean and does not require flushing). The fact is that the gas pump, located inside the gas tank, uses gasoline both as a lubricant and as a coolant.
In old VAZ models, as in most carburetor cars, the tank was located right next to the filler neck. Therefore, it was easiest to pour gasoline with a hose. In the Niva Chevrolet, the tank is located about a meter from the neck, and the filler pipe has a rather complicated configuration. That is why to pump out fuel you will need a hose at least one and a half meters long, or even more.
Niva cylinder head gasket, specifics
What is the way out of this situation and what can be put into the engine? We have conducted quite a lot of experiments with the consent of regular customers. 5-7 gaskets from different manufacturers were tested on cars that are driven every day. In several cases, parts were sent to the trash bin during the visual inspection phase. Three manufacturers performed well. EZATI, Fritex, Ajusa (Spain). Subsequently, only the EZATI brand remained. In addition to the well-known metal package, Fritex also produces two series of shrink gaskets of very good quality. But unfortunately, it turned out to be very difficult to work directly with the plant in Yaroslavl and their dealers. And a representative of the Spanish brand, after noticing that this article was being actively purchased, raised prices so that the gasket began to cost more than the metal package.
cylinder head gasket 21213, 21214. Manufacturer EZATI
The cylinder head gasket of the EZATI Niva is also quite actively counterfeited, so we recommend buying it from a trusted place. It is very difficult to say how the original differs from a fake, but when you hold two spare parts in your hands, visually and tactilely, it is immediately clear. The surface of the original gasket, when touched, resembles “suede or nubuck” materials. Not shiny, not varnished, but rather slightly rough. In the area of the first cylinder there is an engraving of the catalog article. The structure of the crimp layers is similar to the effects of “shot peening”. All in small craters. Maybe this will be visible in the photo when enlarged. With proper installation, no penetration of this gasket was recorded. The service life is usually determined by the wear of the valve-guide pair. We also install this gasket in case of modified cylinder head. In the near future there are plans to make a small gift for the services, namely a set that will include a cylinder head gasket for an EZATI Niva, bolts, manifold and receiver gaskets, a exhaust pipe gasket and German copper-plated nuts. This is a kit that will include everything that needs to be changed in case of replacing the cylinder head.
Replacing the clutch, not without consequences (93460). — Lada 4×4 5D, 1.7 l., 1998 on DRIVE2
I can’t say that the clutch ended unexpectedly, the first bells were already there, but as usual, at the wrong time. On Friday morning, after being on duty, Ivan’s car had to be towed due to dozens of his cars being temporarily incapacitated. It didn’t seem like there was much of a load, the vehicle was not torn apart. In general, during the day the clutch completely ran out. On Saturday I drove the SEVEN for my shift, fortunately my family didn’t have to go anywhere. After scouring the Internet and talking with experienced drivers about possible damage, either the plug broke off or the spider broke off. The same Internet said that you can replace the plug without removing the box, which was a little reassuring. Sunday morning, I went to the store, bought a fork and its boot (140 rubles). In the garage
Compare the height of the baskets
The height of the baskets turned out to be approximately the same, due to the bending of the petals. The release valves are the same, both with and without the spider; they used to tell me that without the spider the bearing is thicker. I started the assembly by replacing the fork, since I bought a new one
At the same time, I decided to make an inspection of the CV joint, the boot of which had long been torn (since the purchase of the Niva). With grief, they halved the CV joint, as I had never dealt with them before.
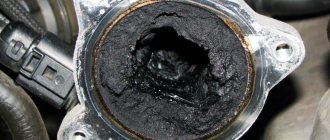
How to get rid of the adsorber?
First of all, answer one question: “Do I need to get rid of it?” This device has advantages, albeit minor ones. But for the “operation” to be successful, you will need:
- Buy a filler cap for the gas tank.
Adsorber VAZ 2114: design and operating features 4 — Ratings: 46
Heading In a modern car there are a lot of different devices. Twenty years ago, no one in a car needed such commonplace things as a GPS navigator and an on-board computer. One such previously unseen device appeared quite recently, and it is called an absorber. This thing is a special device whose purpose is to absorb exhaust gases and various vapors, and divide mixtures into two or more components. The operating principle of this device is based on a special liquid, which is the main working element - it is an absorbent.
Work principles
Fuel typically evaporates, and in sealed containers like a tank, the evaporation builds up pressure. From the tank, vapors go to the separator, condense and return back to the tank, excess vapors are sent to the adsorber, where the active element absorbs them.
If you have ever stored gasoline in a canister, you have seen how it swells during long-term storage; if you are not so lucky, you could see how it “explodes,” usually on the lid, but on plastic canisters the weakest point is not determined by the lid.
This is what this process looks like when the engine is turned off, when the engine is running, the system opens the adsorber valve (purge valve), when the valve is open, the vapors do not reach the absorber, but are directly blown into the intake pipe, where the engine successfully burns them.
This algorithm is designed to obtain two advantages of the system:
- Increasing the environmental friendliness of the car due to the absorption of fumes.
- Fuel economy when driving (savings are 1%, but present).
As we figured out, gasoline vapors are absorbed by the adsorber or blown into the intake valve, which is responsible for changing operating modes and controlling the system. It switches during system startup, thanks to the engine start controller; during ignition, it turns on the receiver, the sorbent is purged and unabsorbed vapors are immediately sent to the engine, saving every milligram of evaporated fuel.
In addition to the above advantages, the system also does not allow the smell of gasoline into the lard of the car, but such a system also has disadvantages (albeit controversial), motorists complain that it:
- takes up space under the hood;
- is the culprit of unstable operation when broken;
- Expensive.
Part two - storm drain with a well
The first “pancake” turned out to be quite functional, and the craftsman decided to repeat it when he got around to installing a storm drain not for the dacha, but for the house. This time it all started with a drainage well:
- I dug a pit and leveled the base so that later I wouldn’t have to cast a crooked lid;
- He installed the ring and deepened the well;
- Filled with a drainage layer (gravel, fraction 5-20 mm);
- I purchased a round rain inlet with an outer body diameter of 80 cm.
- I made a connection into the well - the pipe is sloped, 1 cm by 1 m, not enough, but a large flow is not expected. Since there will be a layer of fertilization on top, the pipe protrudes slightly.
At the same time, I cast a cover for the well and refined the manhole cover - painted it.
Since the soil is sandy, after laying the pipe at a given angle, I did not fill it up, but filled it with a liquid solution of sand, in order to avoid voids under the pipe that could remain when backfilled with dry soil. And to avoid the pipe from floating up, I loaded it with a brick. After which he laid the cast slab on the well, installed the base of the hatch and covered the entire structure with fertile soil.
Design
It would seem that a lot of time has passed since the debut of the three-door. However, in 1993, the designers decided not to change the appearance of the car. Thus, the new model 2131 was born in the guise of the still old Niva 2121. The reader can see what the extended modification looks like in the photo below.
The 5-door Niva is a car that has the same design as the three-door. At the front there is a classic black grille and round headlights. At the top there is a rectangular block with dimensions and turn signals. The hood, like on classic Zhiguli cars, opens away from the driver. By default, the car is equipped with 16-inch iron wheels. The only differences in design are a couple of doors with “Zhiguli” handles. Otherwise, the car is identical to model 2121.
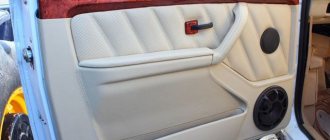
Salon
Inside, the car looks the same as the three-door Niva. The front panel was borrowed from the Zhiguli (five). The instrument panel is from a VAZ of the Samara-2 family. The steering wheel is the same as on the “Classic”. The column has no adjustments, and the steering wheel itself does not have a comfortable grip - they say in the reviews.
Also alarming in the cabin is the abundance of transmission levers. There are three of them here. The first is responsible for the gearbox, and the other two are responsible for the transfer case and locking. Nearby there is also a 12-volt cigarette lighter and a small niche for small items. The standard glove box is also small in size. The seats are soft, without much lateral support. There is no armrest here. There are also no airbags. But there are belts with pretensioners and a system for securing child seats.
If we talk about the level of equipment of the VAZ Niva-2131, it is quite poor. All adjustments here are mechanical; there are no heated seats or air conditioning. There are no acoustics or electric windows. Moreover, the VAZ Niva-2131 was produced in this configuration until the release of the updated Urban version. The latter, for an additional fee, can be equipped with air conditioning, heated seats and mirrors, as well as electric windows. But again, there are no standard acoustics here.
The second row is designed for three people. There is much more space for them here than in the three-door.