January 11, 2018 Lada.Online 285 219 23
E-GAS or electronic gas pedal is installed on all Lada models (XRAY, Vesta, Largus, Granta, Kalina, Priora and Niva 4x4). Owner reviews about it are not reassuring; many complain that the e-gas pedal is “dumb” (less sensitive and informative than a conventional cable). Did you know that in some cases the electronic accelerator pedal can be adjusted to be more responsive and a little livelier?
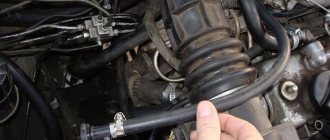
We determine the model of the accelerator pedal; this can be done by the catalog number, which is glued to the side of the body. If you cannot access the sticker, you will have to remove the electronic gas pedal:
- Disconnect the block with wires next to the gas pedal;
- Unscrew three nuts using a 10mm wrench;
- Remove the housing and pedal assembly.
The manufacturer installs at least two types of electronic gas pedals on Lada cars (depending on the year of manufacture):
- Old model (catalog number: 11183-1108500);
- New sample (article: 11183-1108500-01).
Each block is modified differently. Attention! You do all further actions at your own peril and risk. In addition, you may lose your warranty.
Principle of operation
The entire electronic throttle control system consists of three main elements: the electronic pedal module, the control unit and the throttle control module.
- The electronic gas pedal is a plastic pedal-lever with two position sensors. The sensors are potentiometers whose movable contact is rigidly connected to the rotary axis of the pedal.
- The electronic control unit (ECU) constantly monitors the position of the pedal using sensors and, based on these and additional signals, sends commands to control the throttle gearbox and fuel injectors.
- The throttle control module receives signals from the ECU and changes the position of the throttle valve. Its position is also monitored by two sensors, the signal from which is sent to the ECU for feedback.
How to check and replace the gas pedal of a Lada Granta
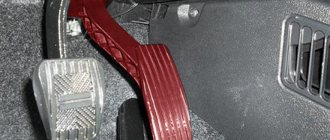
The gas pedal is electronic; it has no mechanical connection with the throttle valve. The engine control is completely electronic.
The driver, by pressing the gas pedal, only indicates how much acceleration he would like to give to the car, and the engine management system implements this.
The same thing happens when the driver loosens the pressure on the gas pedal, holds it down in one position, or completely removes his foot from the gas pedal.
This system is called “E-gas” (E-GAZ). Engines with such a system can meet EURO IV─V environmental standards.
The electronic gas pedal consists of a plastic lever, which is integral with the pedal and two sensors built into the bracket.
All elements form a single structure, which is sometimes called the gas pedal module.
Each gas pedal position sensor (built into the gas pedal bracket) is a potentiometer, the moving contact of which is rigidly connected to the rotary axis of the pedal lever.
The electronic control unit (ECU) continuously monitors the position of the pedal using sensor signals.
The change in position is controlled by the changing resistance at the terminals of both sensors.
In accordance with these parameters, the ECU sends control commands to the throttle gearbox and to the fuel injectors.
As a result of wear of the moving contacts or conductive paths, the sensors may fail or the signals coming from them will not be correct.
If the signals are violated, the engine will operate unstably, and “failures” are possible in transient conditions.
When idling, the engine speed may change spontaneously.
If one of the sensors (or its circuit) fails, the engine control system malfunction warning lamp will light up.
If the signal from the sensor is not restored within the control time, the ECU will switch the system to backup mode.
In this mode, when you sharply press the gas pedal all the way, the speed will increase slowly.
The car will be able to continue driving to the repair site under its own power.
There may be a slight increase in fuel consumption and changes in some other technical parameters of the engine.
In the event that both sensors fail, the ECU will switch the engine management system to emergency operation mode, the engine will only operate at speeds slightly above idle (1500 min-1).
At the same time, the car retains the ability to move independently, albeit at a slow speed.
This will allow you, if necessary, to leave the intersection, pull over to the side of the road, or move the car to a safe place a short distance.
CHECK AND REPLACE
The gas pedal position sensor cannot be repaired; in case of a malfunction, the electronic gas pedal must be replaced as an assembly.
The need to perform work is determined by checking the technical condition of the engine control system.
To do the job you will need a multimeter.
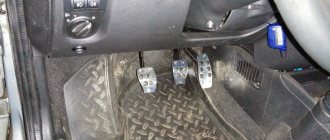
Removal
1. Disconnect the negative terminal from the battery.
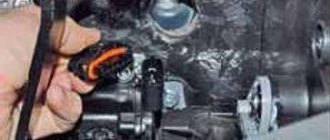
2. Press the clamps of the wiring harness block and disconnect the block from the gas pedal sensor.
3. Using a 10 mm socket wrench, unscrew the three nuts securing the gas pedal.
4. Remove the gas pedal from the studs
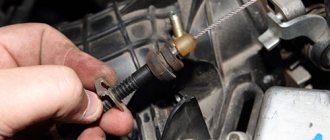
Examination
Using a multimeter in ohmmeter mode, you can check the condition of the moving contacts and conductive paths of the gas pedal position sensors. For this:
1. Connect one multimeter probe to pin 4, and the other to pin 2.
2. Slowly moving the gas pedal, we control the electrical resistance on the device, which should gradually decrease.
3. Repeat the test by connecting the multimeter to pins 4 and 3.
4. Similarly, we check the conductive path of the other sensor, connecting the multimeter in series to pins 1-6 and 6-5.
If, when checking any of the tracks, the resistance changes abruptly, the sensor should be replaced.
Installation
Install the gas pedal in reverse order.
To avoid accidentally bending the leads in the gas pedal sensor connector, connect the wire block before installation.
Then we put the gas pedal bracket on the studs.
Tighten the pedal mounting nuts to 6 - 8 Nm.
| Pin no. | Sensors | Output purpose |
| 1 | Sensor No. 2 | Voltage (+3.3V) |
| 2 | Sensor No. 1 | Voltage (+3.3V) |
| 3 | "weight" | |
| 4 | Signal from sensor No. 1 | |
| 5 | Sensor No. 2 | "weight" |
| 6 | Signal from sensor No. 2 |
When operating, you need to remember that your car is equipped with pedals connected to electronics. Try to prevent moisture from getting on the pedals. Need to use mats, etc.
Advantages and disadvantages
Not all drivers like the electronic gas pedal. This is not surprising, since this element was introduced mainly to improve the environmental friendliness of the car and simplify its design, and not for convenience.
The fact is that combining all modern electronic driver assistance systems with a manual throttle is quite difficult and expensive. It is much easier to install electronic elements, simultaneously adding smart assistance systems and protecting the car from the driver himself.
Let's look at everything in more detail, because E-gas has several tangible advantages and disadvantages.
Advantages:
- Better environmental friendliness. This is also achieved through electronic control of engine speed;
- Smoothing out sharp gas changes. The ECU simply does not allow the driver to change the speed of the power plant too sharply;
- Reduced fuel consumption. Everything is clear here, if you drive less aggressively, fuel consumption will decrease.
Flaws:
- Non-repairable. In the event of a breakdown, the pedal assembly, ECU or throttle control module are replaced rather than repaired;
- Slight delay in response to the gas pedal. For most drivers, this drawback will not be critical, but some notice that the engine responds to the gas pedal with a slight delay, and the change in speed is smoother than with a cable drive;
- Softer gas pedal. It is easier to press, but this results in loss of information content.
What happened
I tried all the described procedures and checked the result. I accelerated to 100 km per hour and timed it. The result was an acceleration time of 10.4 seconds, although it was almost the same before. What does this adaptation provide? The dips when the pedal is pressed hard have disappeared. The slight twitching of the car when driving slowly in 1st gear has also gone away. Therefore, adaptation of the gas pedal still needs to be done once every 5000 km.
How to repair headlight hydrocorrector on Lada Granta - instructions.
Not too big changes were noticed. If anyone decides to make such an upgrade, I do not recommend moving the slider too much. It is enough to move it forward by 10%. This concludes the review, thanks to everyone who subscribes to the channel and supports! Write how you modified or repaired the electronic pedal, and what came of it.
Malfunctions
In general, the electronic assembly is more reliable than the cable. There are fewer rubbing parts; the electronics constantly monitor not only the position of the gas pedal, but also the throttle valve. In the event of a malfunction, the electronics simply will not allow the driver to start moving.
At the same time, the pedal assembly has contacts and conductive tracks that are subject to wear. If it is higher than normal, then the engine will operate unstably; at idle, the engine speed will “float” and “fail.” The electronics will signal a malfunction using the “Check Engine” warning lamp. In this case, the ECU will go into standby mode, in which the engine speed will change very slowly, even if you press the gas pedal sharply. This mode of operation and the “Check Engine” signal are an indication that there is a fault in the contacts.
But if two sensors in the pedal assembly or the throttle control module malfunction at the same time, it leads to emergency operation. In this case, the electronics will keep the engine operating at 1500 rpm. To fix the problem, you will need to contact a service station.
Replacing the gas pedal on Grant
The replacement procedure is quite simple and does not require special technical means. In order to dismantle the unit you will need: - A key for 10.
Sequential steps to replace the gas pedal of a Lada Granta:
1. The first step is to remove the negative terminal from the battery. 2. Next, you need to move to the driver’s side of the car. 3. Above the gas pedal, find and disconnect the contact chip that is connected to the sensor connector.
4. After that, take a 10mm wrench and unscrew the three fastening nuts. When there is insufficient internal space, it is most convenient to use a socket wrench.
5. Remove the pedal from the special mounting pins. Reinstallation is carried out in a mirror sequence.
Description of the problem
In general, there was a terrible downpour, puddles on the roads, and general floods in the yards.
Heavy rain could affect the operation of the car's electronic systems
But we had to go, my wife and daughter were in the shopping center, and the queue for the minibus, according to them, was huge. I am inclined to believe that the minibuses simply stalled (we have old, decrepit Gazelles in our city).
We have one place that is constantly flooded. I look, and there are new Kia Sid floating on the radiator grille in the water, well, I’m taller, I thought that nothing would happen. Here, as luck would have it, the traffic light is still red, and the intersection is straight, only a pedestrian crossing, on which there is no one at all, since it is knee-deep in water. Most people pass it, even on red lights, quietly. And I’ve only been driving for a month, I’m not used to breaking rules yet. Has stopped.
Belt whistled due to water ingress
My Granta is standing there, waiting for the green light, and then the alternator belt started whistling, as if it was slipping. I see the voltage on the on-board computer jumps, from 13 Volts to 11.8, and there is a whistle under the hood. The light turned green and I was off. I started, drove out of the puddle, accelerated a little and the whistle disappeared. The voltage on the on-board computer screen leveled out to 13.6.
Among the current consumers, my headlights were on, the rear window was heated, the tape recorder was working quietly, and the heater was turned on at second speed to blow the windshield.
I got to the shopping center, stopped, and waited for my wife and daughter. The engine begins to vibrate and bleed a little. I went home already on the detour, there are fewer puddles there. I dropped everyone off and decided to go to the garage.
I started the engine, the revolutions jumped to 6000, I was already scared. Then they dropped to 1000, the engine sneezed and died. The check engine light on the dashboard came on. It started again, it idles, but pressing the gas pedal does not respond. I try to start, it idles and doesn’t respond to the pedal at all when driving. So I drove to the garage in second gear, well the 21116 engine is torquey and drives like a tractor.
I repeated the experiment in the garage. I started it up, tried to press the gas pedal, nothing happened, the revs were like a glove, the engine icon was still on.
How I solved the problem of gas pedal failure
- I took a smoke break and decided to remove the terminal from the battery.
- I reset it and waited five minutes. He swore that he forgot the diagnostic adapter at home.
- Reconnected the terminal and started it.
- “Jackie Chan” stopped burning, the engine reacts to the gas pedal with a vigorous increase in speed. The engine really didn’t start at first, it started only the second time.
I left the garage, circled along the pit line, and came back. There were no signs of damage. Now I'm afraid to drive in the rain.
What could it be? Now I’m subconsciously afraid that if I start the engine, my Lada Granta won’t want to go anywhere in rainy weather. How likely is this situation to happen again?
Features of the Lada Granta throttle assembly
The throttle valve is turned by an electric motor through a gearbox. Both are built into the throttle body. When starting and warming up the engine, as well as during idling, the flow of air into the cylinders is regulated by opening the throttle valve. The throttle position is controlled by two sensors built into the throttle body.
The throttle valve opening angle is set by the electronic control unit (ECU) depending on the estimated amount of air that should enter the engine cylinders. This takes into account the operating mode of the engine (starting, warming up, idling, and so on), the temperature of the ambient air and the engine, and the position of the gas pedal.
Control commands are sent to the throttle assembly to the electric motor. At the same time, the ECU monitors the opening angle of the damper and, if necessary, sends appropriate commands to adjust its position. As a result of the fact that the ECU simultaneously regulates the amount of injected fuel and incoming air, the optimal composition of the combustible mixture is maintained in any engine operating mode.
The electric throttle body is sensitive to deposits that may accumulate on its inner surface. The resulting layer of deposits can interfere with the smooth movement of the throttle valve, jamming it (especially at low opening angles). As a result, the engine will operate unstably and even stall at idle, start poorly, and failures may also appear during transient conditions. To avoid this, as a preventive measure, deposits should be removed with special detergent compounds during regular vehicle maintenance. A large layer of deposits can completely block the movement of the damper. If flushing fails to restore the throttle assembly to operability, it must be replaced.
Factors influencing tight grip
When the car is new, the clutch pedal is easy to press, but over time, a number of factors begin to interfere with its smooth operation. Let's look at these factors in the order they appear.
First factor: grease
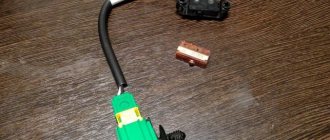
The first to announce itself is thickened lubricant. The image shows a clutch cable removed from a Granta after 45,000 km and 2 years of operation. What's wrong with him?
The movement of the cable in the jacket is tight. It takes some effort to move it. It seems that instead of lubricant from the inside, the cable is coated with plasticine. The same cannot be said about the movement of the new cable, which has no lubrication at all. The new cable in the jacket moves very easily.
Prevention of “thickened grease”
Fortunately, this problem is easily solved. It is enough to drop just a few drops of gasoline into the base of the shirt.
This can be done with a medical syringe directly from the interior without removing the cable. The effect is immediate. Galosh gasoline, which can be bought at almost any hardware store, is suitable as a solvent.
It is clear that the solution is temporary, because as the gasoline evaporates, the lubricant will still thicken, but this will be enough for some time.
Second factor: internal cable wear
Let's consider the following factor that complicates the movement of the cable in the jacket - internal wear. To find out the internal condition of the cable removed from the Granta (after a run of 45,000 km), I had to bite off the threaded tip and then pull the cable itself out of the jacket. This is what happened.
At first the cable is light, almost new, but then brown fragments appear. It feels like used oil was dripped onto the cable. They just did it from the inside, because it is impossible to do it from the outside, since the cable is covered with a nylon sheath.
Let's take a closer look at these brown fragments.
Now let’s cut the cable in the area of the brown spot to look even deeper. This is the end of the cut.
When the cable was unraveled a little, everything became clear. Look, there are dark spots on the inside of the steel cable threads - these are contact spots or places where the outer threads come into contact with the core threads.
Why are they dark? The fact is that the cable has lubricant inside. When the cable is new, the lubricant inside the cable is almost colorless. However, during operation, the steel threads begin to rub against each other. And even in the presence of lubricant, developments similar to small grooves still form on the steel threads.
If you draw an enlarged steel thread, the grooves look something like this.
What happens to metal dust resulting from friction? Metal dust mixes with the lubricant inside the cable and turns it into a characteristic dark brown color. The greater the concentration of metal “dust,” the darker the stain becomes. In areas of increased wear, the “cable color” turns black.
We still have an open question: why does the development form only in some parts of the cable? The answer is simple - because it is in these places that the cable experiences increased load.
Pay attention to this rubber bushing and the cable that ran inside the shirt in this very place.
And here is where this bushing is located.
The cable has a bend on both sides of the bushing. How does the cable behave at the bend? If, for example, you take a nylon thread and start rubbing it on a wooden block...
Where do you think the thread will break? That's right, on the bend.
Because it is at the bend that increased friction occurs. Now it is clear why brown spots appeared on the cable only in some places - these are bending places where the cable experiences increased loads.
Over time, the bends begin to deform, slightly expanding and increasing the internal resistance to the movement of the cable in the jacket. In the future, the output on the steel threads becomes greater and they begin to break, like a nylon thread.
The ends of the broken threads destroy the nylon sheath and come out, forming a kind of metal “brush”, which further complicates the movement of the cable.
Where does the Lada Granta clutch cable break most often?
Now let's move on to the most highly loaded section of the clutch cable. Pay attention to the color of the cable in the area where it is crimped with a threaded end - it is almost black.
What does black tell you? If we draw an analogy with motor oil, it turns black when the wear of parts is very severe. This happens when the oil is not changed for a long time and it loses its frictional properties, resulting in increased wear of parts - hence the black color of the oil. Do you think anyone changes the oil in the cable? No. Therefore, with increased wear, the lubricant first turns brown and then turns black. As practice shows, it is in this place that the cable breaks most often.
With intensive use of the car, the clutch cable lasts on average 2-2.5 years. By the way, the removed cable on which the research was carried out is exactly 2 years old and its “life”, apparently, was already coming to an end. Why can we draw this conclusion? When the cable was cut with pliers at the junction with the threaded end, it was possible to do this with one hand. Plus just a few bending movements and the tip fell off. It felt like the cable had already been half destroyed from the inside. This was actually the case, because when I tried to do the same thing on the “light” section of the cable, nothing happened. You can't just cut it through with pliers. Now the natural question is: why does the cable break here?
Third factor: excessive leash resistance
So we smoothly move on to the third factor that increases the load on the clutch cable - this is the leash. Now the tip of the cable and the cable itself are located in the same plane.
For clarity, let's designate this plane with a red line and start squeezing the clutch. Until a certain moment, the tip of the cable with the leash remains motionless, which leads to a slight bend in the cable.
The blue line indicates the new plane of the tip with the leader (relative to the original one). It turns out that the cable at the base of the tip is bent at a slight angle.
This happens due to excess resistance between the plastic guide and the clutch fork.
The lack of lubrication or the presence of dirt between them does not allow the leash to immediately respond and turn after the cable. The sliding of the leash in the groove of the clutch fork occurs jerkily.
With further movement, the tip naturally aligns relative to the cable, but those small bends at the base create that same destructive load.
Leverage matters
There is one more circumstance that can either increase the service life of the cable or speed up its breakage. This is the length of the lever that is formed after adjusting the length of the cable.
The longer the lever, the easier it is to turn the leash, the less the cable bends at the base of the tip, and the longer its service life.
Those who like to twist the leash all the way shorten the service life of the cable, since there is no lever as such, and when the clutch is pressed, the cable at the base of the tip bends as much as possible. The illustration below is an example of such a leash position.
Preventing internal wear of the clutch cable
To reduce the load on the cable, it is necessary to ensure that the mating surfaces of the plastic leader and the clutch fork are clean and lubricated. Such prevention will significantly reduce cable bending at the base of the threaded end and extend the life of the clutch cable.
Leash AGAT
Some car owners install an “AGAT” leash instead of a plastic leash.
Thanks to the bearings, "AGAT" ensures a good response of the threaded tip following the cable and prevents it from bending. By unloading the most heavily loaded section of the clutch cable, the AGAT leash can significantly extend its service life.
On the Internet you can find a lot of negative reviews about the AGAT leash. They mainly boil down to the fact that it is useless, since no changes occur with its installation. Most people expect that after installing it the clutch pedal should become “super light”, but... a miracle does not happen - hence the negativity.
Although a slight “relief” in pressing the clutch does occur, this is not the main purpose of its installation. Importantly, it prevents permanent bending of the cable at the base of the threaded end and “extends the life” of the clutch cable.
Disadvantages of the AGAT leash
The “AGAT” leash, in the form in which it is depicted in the previous illustration, has two disadvantages:
1. The locking bracket is too large. Some “Grant Guides” complain that because of this bracket the bearings do not rotate, as it clamps them. This trouble nullifies all the advantages of a leash.
If your leash has a similar problem, then it is easy to solve - just replace the stopper.
2. There is an opinion that vibration from the engine is transmitted into the cabin through the AGAT leash. This problem is also easily solved. It is enough to put rubber bands on the bearings.
The image below shows an example of how both shortcomings can be addressed.
This solution was sent by Nikolai, one of our subscribers.
We will add only one thing from ourselves - do not place “AGATE” on an old cable, as in this image.
You see, the cable at the base is already black, which means it will soon break. As a result of the break, you will also lose the leash. Therefore, it is better to place the “AGAT” leash on a new cable.
With intensive use of the car (without the AGAT leash), the clutch cable, as mentioned earlier, on average lasts 2-2.5 years. If by this time you decide to replace the clutch cable, you can use the guide from the article on our website: “Step-by-step instructions for replacing the clutch cable of a Lada Granta.”
Cliff location No. 2
Another cable break may occur in the area of the engine compartment partition.
About ten centimeters from the thrust bushing. Somewhere here.
How so? - you ask. After all, this area is light, there is not even a hint of bending or wear. The fact is that some “Grant Guides” artificially bend the cable in this place, without even suspecting the consequences. Someone, wanting to get rid of clicks in the clutch pedal, places a hose or tube under the cable.
As a result of this “improvement”, the load on the cable increases, and subsequently can lead to premature breakage.
If you are tormented by clicks in the clutch pedal, then you can look at the solution to this problem in the article “Eliminating clicks in the clutch pedal of a Lada Granta FL”, just do not make changes to the design of the cable - this way you will extend its service life.
Fourth factor: wear of the clutch pedal bushings
So, we seem to have sorted out the cable, now let's move on to the next factor that makes it difficult to squeeze the clutch - these are the plastic bushings of the clutch pedal. Here's what the pedal axle looks like with the bushings and retaining clip.
The bushings play the role of sliding bearings. They are inserted into the base of the pedal, on one side and the other.
The pedal is then placed in the pedal block and secured by the axle, and the axle in turn is secured in the pedal block by a locking clip.
The pedal itself is actually supported on this axis.
During operation, the plastic bushings wear out. As a result of wear on the bushings, the clutch pedal begins to “walk” from side to side (left/right). By the way, when the play becomes more than 5 mm, you should think about replacing the bushings. If this is not done in time, then when the bushings are completely worn out, the inner part of the pedal base will begin to rub against the axle, that is, metal on metal.
The clutch pedal axis, in turn, will begin to rotate in the mounting holes of the pedal block, breaking them very badly. All this will create even more resistance, and the pedal will become tighter and tighter.
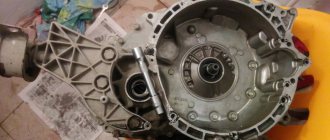
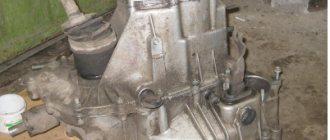
Fifth factor: burst pedal assembly
Experiencing constant increased load, the pedal block may fail and crack. The image below is an example of a burst pedal assembly.
A burst pedal block will make it impossible to fully depress the clutch and changing gears will become very problematic.
Prevention of pedal assembly
The service life of the pedal unit can be extended by timely replacement of plastic bushings and sufficient lubrication of this loaded unit. All preventive measures outlined in this article are available to every car owner.
However, there is another reason for the “stiff pedal” of the clutch, the elimination of which will require not preventative measures, but a full-fledged repair. We are talking about extreme wear of the drive and driven clutch discs.
The more wear, the tighter the pedal
Why does the clutch pedal become tighter as the clutch (driven and driven discs) wears out? The article “Eliminating clicks in the clutch pedal of a Lada Granta FL” examined the operation of the clutch in detail. It also showed the position of the diaphragm spring blades as a result of wear on the driven disc. It depends on the position of the petals whether the clutch will be tight or not.
The reason for the increased load is illustrated in the image below.
As you can see in the image, the new clutch has diaphragm spring blades that “protrude” at a very small angle. On a worn clutch, the petals protrude beyond the “basket” more strongly and at a much greater angle. The greater the angle, the higher the resistance becomes, the harder it is to press the spring, the “tighter” the clutch pedal becomes. Accordingly, the load increases on the entire clutch release mechanism: both on the cable and on the pedal assembly. The only solution to the problem is a complete replacement of the clutch kit (basket, disc, release).