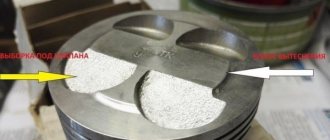
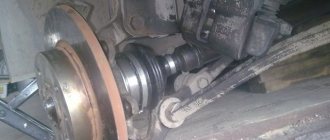
The outer CV joint on a Lada Priora car needed to be replaced after it began to crackle. I had to crawl under the car and there it was discovered that the boot was torn. And because of this, the CV joint failed. Replacing the boot requires removing the CV joint. But if the CV joint starts to crunch. It will also have to be changed.
Because dust and sand got into it. The rolling surface of the balls is worn. Simply replacing the grease and boot will not solve the problem. The CV joint will still crunch. And eventually it will jam.
Preparing to remove the outer CV joint
In order to remove the CV joint, you need to do a little preparatory work. This work consists of unscrewing the CV joint nut from the wheel side.
As you can see in the photo, the nut is covered by a cap; it must be removed, but this requires removing the wheel.
The car needs to be jacked up. And set additional stops so that the car rests on these stops and not on the jack.
Hanging the car is the most important procedure in all repairs. The car must be positioned in such a way that you can live under it. Drink coffee and watch TV. And you don’t worry about something falling on you from above. The jack is intended exclusively for raising and lowering the car. And if only the jack is under the raised car, it cannot be used.
If there are no factory stops installed with the jack. Wooden blocks or boards will do. You cannot lay bricks. They split and the car falls. In general, even if you spend the whole day securing a lifted car safely, it’s not a big deal. And much better than remaining crippled. Sorry for the digression. But we can't rush.
After hanging the car, you need to remove the wheel. to remove the protective cap. Then the wheel must be installed back. And lower the car until it makes full contact with the floor. This must be done in order to unscrew the CV joint nut. It tightens with great effort. And stalled. In the groove of the CV joint.
To unscrew it, you will need a powerful wrench. On which you can put the pipe as an extension. This is why you have to put the car on the floor so that there is support. And the gearbox did not turn over due to the applied effort. After the nut is unscrewed, the car must be returned to its jacked state and the safety stop must be securely positioned. And remove the wheel.
Disassembly procedure
The first operation is not removing the wheel, but unscrewing the large wheel bearing nut. It is caulked, so it will be much more difficult to loosen when the car is raised. After this, the wheel bolts are loosened and the car is raised with a jack.
Do not forget to place reliable supports under the rear wheels to secure the car.
If the Priora has a metal sump protection installed, then it also needs to be removed in advance. In addition, it does not hurt to partially empty the gearbox oil sump to avoid liquid lubricant leaking through the open hole after removing the drive.
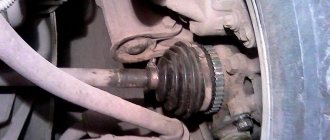
Removing the ball joint
It is necessary to disconnect the stand from the lever. To do this, you need to unscrew the ball joint. Either from the lever or from the stand. It is more convenient to unscrew the two bolts from the rack. Which secure the ball joint.
If you unscrew the nut from the lever, the ball joint will not come out. The finger is a cone. A puller is required for removal. Or you will have to apply strong blows to the junction of the lever and the finger. The boot may be damaged. After the bolts are unscrewed, it is imperative to pay attention to the ball joint. It shouldn't be loose. If you crank. It should sit tightly in the ball. If it dangles and there is play. The ball joint must be replaced immediately. To do this, unscrew the nut and use a puller to remove the ball joint pin. You can simply apply a few sharp blows with a hammer to the side of the lever. Where is the pale inserted?
Since the connection is conical. As a result of the impact, the hole will be deformed and the finger will be squeezed out. But this is a rough option. And it doesn’t always help to use a special puller. After the strut is disconnected from the lever, you can pull the CV joint out of the hub.
Approximate prices
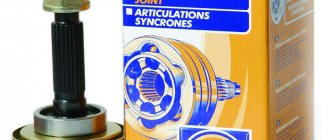
In Russia, a motorist can purchase a CV joint for a Priora car at a price of 1,100 to 1,600 rubles .
Approximate prices depending on the type of auto parts:
- External grenade - from 1100 rubles per set.
- Internal - from 1200 rubles per set.
Approximate prices for products from different manufacturers:
- AvtoVAZ - about 1600 rubles .
- Pilenga - about 1200 rubles .
- LGR Holding – about 1300 rubles .
- Hofer - about 1280 rubles .
- GKN – about 1500 rubles .
Replacing the outer CV joint of the Prior
The CV joint sits on the shaft using a splined connection. The splines have two slots into which retaining rings are installed. On the inside, the ring limits the movement of the CV joint inside the shaft. And it is a rigid thrust ring. On the other side of the shaft, the CV joint retaining ring is springy and when the CV joint is installed, it is compressed. There is a slot in the inside of the splined part of the CV joint.
The ring gets into it and, straightening, stops the CV joint from coming out of the shaft. This connection ensures that the CV joint is in a fixed position and eliminates its beating. In order for the CV joint to come out, it is necessary to apply several sharp blows to the CV joint. As a result, the retaining ring will compress and the CV joint will freely come off the shaft. All that remains is to remove the remaining old grease from the torn boot from the shaft. And wash the spline connection.
Packing the CV joint with lubricant
Before installation, the CV joint must be filled with lubricant. Special CV joint oil 4 is used as a lubricant. Lubricant must be filled into the splined part until it begins to show from the balls.
This will fill the entire internal volume of the CV joint.
Replacing the CV joint boot on a Priora
Before installing the CV joint on the shaft, it is necessary to put the CV joint boot on. It is not necessary to remove the internal retaining ring. The boot is put on the shaft like a stocking. At the same time, he turns inside out. After the boot passes the locking ring, you need to turn it back out.
To install the narrow part of the boot on the shaft there is a ring-shaped extension. The boot should slip through it... and rest against it with its back side. this will look like a stopper for the boot. If it is installed before this expansion, the boot will quickly tear. And the replacement of the Priora CV joint boot will need to be repeated.
Installing the CV joint on the shaft
The CV joint must be inserted into the splined part of the shaft up to the outer retaining ring. After the CV joint rests against it, apply a slight sharp blow to the CV joint from the outside. Be sure to place a wooden block at the impact site. To avoid damaging the CV joint threads.
The outer retaining ring is compressed by the impact and the CV joint is pushed onto the shaft until it touches the inner retaining ring. As soon as the CV joint rests. The outer retaining ring will snap into place in the groove of the CV joint. It is necessary to put the boot on the CV joint. After the boot is in place. Clamps are installed.
How to tighten a clamp on a CV joint
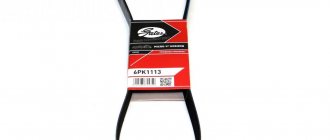
Tightening clamps requires a lot of patience, especially if you don’t do it often. The clamp that comes with the kit. Most precisely suited for installation on the CV joint boot. Because after installation it has minor protrusions. Which do not allow catching grass, wire and all possible fibers.
The installation principle is quite simple. At the end of the clamp there is a slot with a protruding peak. it is necessary to hook the peak onto the protrusion on the clamp located exactly in the place that gives the normal tension of the clamp. There are two additional tabs on the clamp. Designed for gripping with pliers or pliers. With the help of these protrusions the clamp is tightened. A clamp with a smaller diameter can be pulled together almost without problems. Using pliers.
Their span is enough to reach the protrusions on the clamp. But I had to tinker with a larger diameter clamp. A larger span of something is required that can tighten the clamp. I couldn't find anything of that size at hand in the garage. I had to use old metal scissors, having previously sharpened the hooks on the tips of the scissors. And only after that it was possible to tighten and connect the clamp.
That is, it is very difficult to tighten the clamp on the CV joint without special tools.
So-called Euro clamps are sold separately in stores. Installing them is more convenient and faster. The clamp is connected using protrusions at the end. Then it is pulled together using regular pliers.
After installing the boot, you can insert the CV joint into the hub.
Installing the CV joint in the hub.
After the CV joint is installed on the shaft. It must be inserted into the hub. The stand is retracted again. The CV joint easily fits into the hub.
The ball joint is screwed to the rack with two bolts. Then you need to put the wheel back in place and lower the car to tighten the CV joint nut.
The tightening force is 225-247 N*m. The force is quite large, you don’t always have a torque wrench at hand. This nut is tightened as tightly as possible so as not to strip the threads. If tightened without a torque wrench. There is no need to be afraid of squeezing the bearing. Bearings are installed on the hub. Here the CV joint is simply attracted to the hub. And the large tightening force is associated with the loads that the CV joint transmits to rotate the wheel. Tightening prevents runout from appearing in the splined part of the hub and CV joint. After the CV joint is tightened. It is necessary to lock the nut.
Then remove the wheel again and put the protective cap back in place. Screw in the stabilizer.
Replacing the CV joint on a Lada Priora. The procedure is not complicated. This means that you can make repairs yourself, even if you haven’t done it before, without much effort. The only problem with the clamps is of course problematic. Therefore, it is better to take care in advance and purchase Euro clamps for the anthers
Factors on which the price depends
Grenades for Priora are sold at various sales points. Motorists note a wide range of prices for this spare part. Sellers explain the wide price range by the influence of the following factors on the price:
- Quality.
- Originality.
- Part type.
- Manufacturer's fame.
- Popularity of the implementer.
- Place of purchase.
- Need to order delivery, installation.
Where is the best place to make a purchase?
If a grenade in a Priora car fails, then you need to start looking for a new spare part. There are many places where such parts can be sold in Russia. Therefore, the motorist should not have problems with the choice.
It is recommended to decide in advance on the place of purchase. In total, the Priora owner has three options:
- Visit a store that sells domestic and imported spare parts.
- Go to the car market.
- Consider offers from online auto parts stores.
The choice of location depends on preferences regarding the manufacturer and financial situation. If you want to purchase an original part from the AvtoVAZ plant, then it is better to make a purchase in a specialized store. Today, many people order auto parts from online stores. But you need to understand all the risks that a motorist faces when choosing this place of purchase:
- They may send you a defective part.
- They may send you a used spare part instead of a new one.
- They may ask you to transfer money and not send anything.
If you want to save money, the popularity of the manufacturer is not important, then you can visit the car market. Parts from little-known companies are sold here. You can stumble upon a Chinese counterfeit of a famous brand. Therefore, when choosing a car market as a place of purchase, you need to be careful.
Factors on which the price depends
Grenades for Priora are sold at various sales points. Motorists note a wide range of prices for this spare part. Sellers explain the wide price range by the influence of the following factors on the price:
- Quality.
- Originality.
- Part type.
- Manufacturer's fame.
- Popularity of the implementer.
- Place of purchase.
- Need to order delivery, installation.
Varieties
CV joints are classified according to their design features into four types:
- Ball bearings (the most common, present in all types of rear-wheel drive passenger cars).
- Paired (used extremely rarely, have a complex design).
- Crackers (they are mainly equipped with buses and trucks).
- Tripoid (used in internal structures, characterized by axial movement).
Sounds and symptoms of breakdown
There are several signs of a hinge failure:
- Anther rupture. It is enough to go to a service station, where the faulty element will be replaced, and the need to repair the CV joint itself will disappear.
- The sound of a grenade. The sound is very reminiscent of the friction of brake pads worn down to metal.
- Jerks. When the car starts moving, the driver may feel slight shocks. This behavior indicates broken grenade grooves.
- Clicks. They appear at the moment of movement, and their number varies from 2 to 5. When moving, the unpleasant sound disappears, but the next time you try to move, it appears again. This also indicates a malfunction of the grenade.
- Crunch. If the sound appears directly when moving, then this is an alarming signal. The CV joint is not only worn out, it is about to seize. Driving with such damage is dangerous, so it is best to call a tow truck and send the car to a workshop.
If at least one of the listed symptoms of a malfunction appears, then it is better to send the car for diagnostics. Experienced drivers can inspect the joint themselves and identify the source of the problem.
Approximate prices
In Russia, a motorist can purchase a CV joint for a Priora car at a price of 1,100 to 1,600 rubles .
Approximate prices depending on the type of auto parts:
- External grenade - from 1100 rubles per set.
- Internal - from 1200 rubles per set.
Approximate prices for products from different manufacturers:
- AvtoVAZ - about 1600 rubles .
- Pilenga - about 1200 rubles .
- LGR Holding – about 1300 rubles .
- Hofer - about 1280 rubles .
- GKN – about 1500 rubles .
Debugg
The detection of even small defects in the boot indicates that the joint is filled with dirt and lack of lubrication. The CV joint cannot be operated in this condition, so it is necessary to remove the boot and fill the hinges with new lubricant.
Before applying fresh lubricant, the part is disassembled, thoroughly cleaned, and dirt is completely removed. Then the mechanism parts are washed with gasoline, dried and new lubricant is applied. For the internal hinge, 100–110 grams of lubricant are used; for the external hinge, 70–80 grams are sufficient. The CV joint is installed on the wheel and covered with a boot.
Experts recommend installing new, original boots after lubricating the hinge, since old parts lose elasticity and may crack after a short period of time. Non-original anthers do not fit perfectly at the mounting points, so a new portion of dust and water will quickly fill into the gaps.
You can fix the problem yourself
An important condition for the successful operation of CV joints is the choice of high-quality lubricant. Experts advise giving preference to compositions based on molybdenum disulfide, which minimize friction in the components and effectively protect them from corrosion, and also have a minimal destructive effect on the boot.
It is important! It is contraindicated to use graphite lubricant for CV joints. It cannot protect the part from increased loads, and therefore leads to accelerated wear.
What happens if you don't change the CV joint?
It is possible to operate a car with problems in the CV joint if a slight crunch is heard when turning: it is enough to replace the damaged boots and renew the lubrication of the part. When driving a car with a slightly damaged joint, you must reduce your speed when turning.
If vibration is observed when accelerating and a crunching sound is heard even when driving straight, the CV joint must be replaced urgently. A faulty CV joint can fail completely, causing the wheel to suddenly seize. If this happens at high speed, you can expect the most dire consequences.
It is important! On some vehicle models, significant wear or breakage of the tripod CV joint causes the bearing needles to be thrown into the gearbox housing, from where they are lifted along with the oil and ground by the gears. Repairing such an engine costs almost the same as buying a new car.
Video: what can happen if you don’t change the CV joint boot in time
The CV joint is one of the main chassis parts of a front- and all-wheel drive vehicle, and driving comfort and safety depend on its condition. If there are signs of a joint failure, do not delay diagnostics and repairs - otherwise it is unlikely that it will be possible to “cure” the drive.
Comments
TOP materials of the week
TOP products in the store (more)
At what point in your opinion should the price of Grant start?
Lada.Online
Lada (“Lada”) is a brand of cars produced by JSC AVTOVAZ. Previously, it was used only for export cars, and for the domestic market, cars were produced under the Zhiguli brand. In 2004, the management of AVTOVAZ announced the transition to the Latin alphabet for the official spelling of the names of all cars produced by the plant: Lada - instead of "VAZ" and "Lada".
Lada.Online is the largest Russian-language automotive resource with a daily audience of thousands, which is dedicated primarily to cars of this brand, the domestic automotive industry and the automotive world in general.
This site is not the official LADA website.
© 2022 Lada.Online. Copying of material is permitted only with a link to the source.
Source