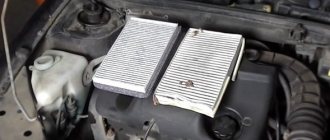
Any modern internal combustion engine operates by igniting the fuel-air mixture. To prevent dust particles from getting inside the engine, the air intake system is equipped with a special filter. For each car, the manufacturer develops its own air filter that meets the design features of the engine. But over time, the air filter becomes clogged and loses its properties. Accordingly, it needs to be changed.
Replacing the air filter on a Lada Vesta car is not particularly difficult. But for some reason, many car owners forget to do this in a timely manner. If we talk about the replacement interval, then the Lada Vesta air filter must be changed after 30 thousand kilometers. But if the machine is used in difficult conditions, then the replacement interval must be reduced by 2 times.
Replacing the engine air filter on Lada Vesta and XRAY
For the engine to operate, a mixture of fuel and air is required.
To prevent dust and other small particles from entering the engine, an air filter is installed in the air intake. For Lada Vesta and XRAY, AVTOVAZ recommends changing this filter element every 30,000 km. mileage for Vesta and once every 15,000 km for XRAY. When operating the vehicle in difficult conditions (for example, increased dust levels), the filter should be changed more often. Article number (catalog number) of the engine air filter:
- Original Renault 165460509R
- Analog PILENGA BMFA2180
- Analogue BIG FILTER GB962
- Analogue SIBTEK AF27030
- Analogue BM FA2180
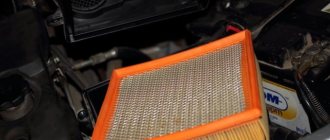
Unlike previous Lada Vesta and XRAY models, replacing the engine air filter is performed without tools. To remove the filter element from the plastic housing you must:
- squeeze the latches along the edges of the case;
- push the housing with the filter up;
- remove the filter from the box.
Installation of the filter element is carried out in the reverse order. The process is also shown in the video:
How often do you replace the engine air filter on your Vesta or XRAY? Do you trust this procedure to the dealer or change it yourself? Let us remind you, do not forget to change the cabin air filter on time.
Source
For a domestic car - a domestic filter
We also recommend paying attention to less popular substitutes from Russian manufacturers:
| Manufacturer | Cabin filter model |
| Nevsky filter | NF6433 |
| Nevsky filter | NF6433C (carbon) |
| TSN Citron | TSN 97888 |
| TSN Citron | TSN 97888K (coal) |
| SibTEK | AC 43003 |
| SibTEK | AC 0443003 |
Experienced car owners recommend installing a carbon filter in the summer, especially before the plants begin to actively flower. It better protects the air from harmful bacteria and allergens. In winter, you can get by with a regular cabin filter.
According to the Lada Vesta maintenance regulations, the cabin filter is replaced every 15 thousand km. But in fact, replacement may be needed more often. First of all, the service life of the filter depends on the environment. In places with increased gas and dust levels, the filter element needs to be changed 1.5–2 times more often.
The most obvious signs of the need to replace the cabin air filter:
- penetration of unpleasant odors from the street into the cabin (with the windows closed);
- in winter the stove does not work well, and in summer the temperature in the cabin constantly rises;
- fogging of windows;
- Dust quickly accumulates on interior items.
If the above problems occur, you need to replace the cabin filter, regardless of the mileage of the car. On the Lada Vesta, this part is located under the panel, to the left of the glove compartment, under the plastic facing decorative cover. Removing/installing the cabin filter on Vesta is a little difficult, since the seat is slightly smaller, and the installation of the filter element itself is carried out without a mounting cassette.
Replacing the Lada Vesta air filter. Expert advice on choosing
The process of independently replacing the Lada Vesta air filter is a feasible task for a driver even without experience and skills.
Main steps for replacement:
- Place the car at the repair site.
- Open the hood, press the plastic guides on the sides of the body.
- Remove the cleaning element, replace it with a new one, and reassemble the structure in the reverse order.
Removing and installing the actuator of the switching mechanism of the robotic gearbox of the Lada Vesta car
We are preparing the car for work. We install the car on the elevator.
Disconnect the resonator tubes 1, Figure 1, the inlet from the air intake and the air filter housing, close the two mounting bolts with a 10mm head and remove the resonator.
Using pliers, tighten clamp 1, Figure 2, fasteners and disconnect the upper crankcase ventilation tube 3 from tube 7 of the cylinder head cover.
Using a Phillips screwdriver, loosen fastening clamp 2 and disconnect inlet pipe tube 4 from the accelerator tube.
When performing operations, removal/installation of the gear shift mechanism drive is not allowed:
— disassembling the drive, except for cases when it is impossible to remove the drive from the gearbox without disassembling;
— the actuator falls; if it falls, the actuator must be replaced;
— connect the servo drive to the power source and operate it outside the gearbox;
— manually turn the drive using shaft 2, Figure 3, or gear shift lever 4;
— hold the drive by the shank of the gearbox shaft 2 or the locking plate 3;
— touch the contacts of the actuator connectors with ungrounded objects or hands (sensors may be damaged due to electrostatic discharges).
The drive cannot be repaired. If a fault is detected, the drive is checked, repaired or replaced by ZF.
Position of the gearshift lever when installed on the gearbox (as delivered), 3/4 line selection, gearbox neutral.
Removing the drive
Using a 10mm socket, unscrew the bolt 5 securing the air filter, Figure 2, and remove the air filter 6 assembled with pipe 4 of the intake pipe.
Move the gearshift drive to neutral in one of the following ways:
1 - using a diagnostic tool;
2 - turn on the ignition, press the brake pedal and move the gear lever to neutral, turn off the ignition and wait for the control controller to turn off - 1 minute.
If the actuator cannot be placed in neutral, ensure that the harness connectors are securely connected to the connectors on the actuator, control controller, and actuator. Inspect the harness connector to the brake light switch for loose connections. Inspect the wiring harnesses for breaks, damaged insulation, and short circuits. If necessary, diagnose the robotic transmission.
Disconnect the ground wire terminal from the battery.
If the gear shift drive is in neutral, use a size 13 socket wrench to remove the three bolts 1, fig. 4, fasteners, and remove drive 2 from switch 3.
We inspect the working parts of the drive (shaft and gear shift lever, locking plate) and make sure there is no damage.
If, after diagnostics, a malfunction of the drive is detected and the gear shift lever is in a position other than “neutral,” remove the drive in the following sequence:
— using a replaceable Torx T30 socket, unscrew two screws 5, Figure 5, fixing the upper electric motor to the drive cover, and remove the electric motor 4 assembled with the fixing clip 3;
— using a replaceable Torx T30 socket, unscrew the seven screws 2 securing the top cover of the actuator and remove cover 1;
— try to manually move gear sector 1, Figure 6, to the neutral position (for example, if the upper electric motor fails);
— use a 13 mm socket wrench to unscrew the three mounting bolts and try to remove the drive from the gearbox.
If it is not possible to remove the drive from the gearbox, you must also perform the following steps:
— unscrew nut 2 securing the gear sector (replaceable head 13, crank);
— remove the drive from the gearbox (the gearbox shaft remains in the gearbox, so removing the drive requires significant force);
— remove the gear shaft from the box.
Remove the vent plug from the drive.
We clean the mating surfaces on the gearbox and drive from old sealant.
We clean the threaded part of the two M8 × 25 bolts of the actuator holder and the corresponding holes in the gearbox housing and degrease it.
Drive installation
Before installing the shift actuator, do the following:
— in the gearbox, check the position of the shift rods and, if necessary, move the rods to the “neutral” position”;
— apply liquid gasket PS-1 to the connecting surface of the gearbox under the drive with a solid roller with a diameter of 2 mm;
— apply sealant to two M8 × 25 bolts that secure the drive with a 3 mm wide belt, according to the diagram in Figure 7.
Reinstall the gearshift actuator and secure it with three bolts. The tightening torque of the bolts is 16 - 25 Nm (1.6 - 2.5 kgf.m).
Replace the vent plug.
Install air filter 6, fig. 2, with the inlet hose assembly onto three mounting brackets and secure with bolt 5.
Connect the inlet hose 4 to the accelerator hose and tighten the 2 fasteners with a clamp.
Attach the upper pipe 3 of the crankcase ventilation to the pipe of the cover 7 of the cylinder head and install the clamp 1 of the fastening.
Connect the resonator inlet 1, Figure 1, to the air filter housing and air intake and secure it to the housing with two bolts.
Connect the ground wire terminal to the battery and tighten the locking nut. The tightening torque of the nut is 4-6 Nm (0.4-0.6 kgf.m).
Complete the AMT training procedure.
When to change
The manufacturer recommends a replacement interval of 30,000 km in the operating manual. If you actively use a technical device in conditions of increased gas pollution, on rough terrain, or during periods of heavy leaf fall, reduce the period by a third.
If the car is used in normal mode, without special loads and according to the “to work - from work” scheme, 30,000 km is quite the optimal interval.
Signs that replacement is needed
- Unstable engine operation at idle speed;
- when driving downhill, the engine lacks power and “requires” a shift to lower gears;
- difficulty starting the engine;
- fuel consumption is higher than usual;
- passive acceleration dynamics;
- The accelerator pedal is uninformative.
Step-by-step process for replacing the air filter Lada Vesta 1.6
On a Lada Vesta 1.8 car, replacing the engine air filter is carried out according to a similar scheme.
Preparation of the workplace, necessary materials:
- rags;
- new cleaning element;
- a household vacuum cleaner or its analogues for blowing out the cavity, sucking up leftover leaves, dust, dirt;
- additional lighting if daylight is not enough.
Sequencing
- We place the car on a flat area, an overpass. We block the rear wheels with wheel chocks to prevent any unintentional movement. Squeeze the parking brake.
- We turn off the engine and open the hood.
- We find the plastic cover of the air filter housing, press on the sides, and release the latches.
- We remove the cleaner, carry out troubleshooting, and preventive maintenance. We lay the new element, always with the rubber edging up, with the cut forward.
Self-replacement is complete. No more than five minutes of time was spent, over 1000 rubles were saved.
- length - 270 mm;
- width - 125 mm;
- height 75 mm.
Type: hygroscopic fiber.
Installation with carbon filler at the request of the car owner.
What's wrong with the Vesta Sport air filter. Flaws
All the advantages that were listed above are smashed into rubbish by the headless design of a banal plastic case. If you are not ready to make serious modifications to the case, it is better not to buy or install it.
The first and most important flaw in the Lada Sport filter housing is leakage. As you know, an air filter is needed in order to filter out the smallest particles of silicon (read: dust).
Vesta Sport air filter layout diagram – stock (1) and modified (2)
50 grams of powdered silicon (ordinary dust) that gets into the intake manifold is enough to destroy the piston, camshaft beds and crankshaft liners over an area of about 100-150 km.
However, the stock Vesta filter, if it differs in size by at least 3-5 mm from the factory one, does not make any sense.
Unpurified air is sucked into the cracks, which wears out the engine many times faster than specified by the manufacturer.
Lada Vesta Cross (lada vesta cross)
The same story, as practice shows, awaits the filter from Vesta Sport. Here's the thing. The resonator has been removed from the air supply system, and a filter housing is located in its place. The case consists of two parts, connected by six screws. According to the engineers, a filter element should be attached between the upper and lower parts.
But it is not firmly attached,
bends and irregularities
can be observed along the entire perimeter of the seal Thus, from the lower part of the housing through cracks and leaks,
dirty air freely enters the cylinders
.
This doesn't mean anything good. Let's remember about dust. The tightness of the filter element installation requires serious improvement.
Desperate tuners print special frames on 3D printers to press the filter element to the body and ensure tightness. Those who do not have printers cut out frames from stainless steel, strictly observing the dimensions, all for the same purpose - to ensure tightness. A logically justified question arises: what are we fighting for?
Practice has shown that for a
1.6 liter
a sports filter
is absolutely useless
. This is evidenced by measurement figures and research by enthusiasts. No changes in the performance of the 1.6 liter engine were recorded. Apart from the placebo effect, of course.
In this place, near the left headlight, the air directly enters the filter housing.
Possibly with water Possibility of water hammer
increases significantly, since air enters the intake manifold directly from under the radiator grille, right next to the left headlight.
The intake tract, in the case of installing a sports intake system, is reduced in duration by almost three times, so water
(especially if the filter shrinkage is leaking)
has direct access to the throttle space
, that is, directly into the cylinders.
Review of Manufacturer Prices
| Name / Catalog article | Price, rub.) |
| Original | |
| 165460509r from Renault (1.6, 1.8 l.) | From 800 |
| High-quality analogues | |
| Pilenga FAP2180 | From 400 |
| Ekofil EKO01200 (carbon) | —/— |
| Patron 5459837 | —/— |
| Mann CU C27030 | —/— |
| BM FA2180 (BM-Motorsport) | From 450 – 500 |
*prices are as of January 30, 2019.
Other options
Below are modification options from other West owners, using several other components. All details can be viewed in their logbooks.
Option from Ivan Kiselyov. On Drive under the nickname BAHO and his car Lada Vesta *Blues Sky*
Option from Alexander. On Drive under the nickname MiheyA and his car Lada Vesta sedan 1.8 AMT
On Drive under the nickname WaPJIaTaH and his car Lada Vesta Fantan
Recommendations for selection
Purchase consumables mainly at official points of sale. Do not use the services of unverified suppliers who sell products at reduced prices.
Check the tightness of the packaging, the presence of holograms, barcodes, dates and batch numbers. If you have any doubts about the quality and origin, do not purchase.
Conclusion
A clean air filter means good acceleration dynamics, low fuel consumption, and stable engine operation. Car owners often violate the replacement intervals for the cleaning element, thereby reducing the efficiency of the equipment.
Any car enthusiast without experience or skills in servicing a technical device can cope with replacing the air element. However, be extremely careful, as incorrect installation will lead to depressurization and the intake of untreated air from the outside.
If you are experiencing difficulties or do not have free time, contact the specialists in the workshop for additional help and advice.
Source
What happens if you don't change the filter?
If the driver refuses to change this part, the car will not stop moving immediately: fuel consumption will initially increase, traction will decrease, which will only be the “first bell.” Then black carbon deposits will begin to form on the spark plugs from an excess of incoming fuel (this will lead to the replacement of the spark plugs). One day your “vesta” will refuse to start the engine and give the driver and passengers rides about their business. This usually happens at the wrong time - which means it is better not to neglect the advice in the service book and replace worn-out car components in a timely manner.
Replacing Lada Vesta filters
Replacing Lada Vesta filters is an important procedure that is part of vehicle maintenance. Timely replacement, use of high-quality consumables (filters) and work done correctly are the key to trouble-free operation of the car.
That is why it is important not only to change parts on the car in a timely manner, but also to use only suitable parts of good quality. If we talk about replacing filters, then the Lada Vesta has only 4 of them in the car - oil, air, cabin, fuel.
Replacing the Lada Vesta air filter
Replacing the fuel filter Lada Vesta - instructions with video
Replacing the cabin filter of Lada Vesta SV Cross - instructions with photos and videos
The oil filter is changed every time the engine oil is changed. This is the most important consumable material, on which the life of the motor directly depends. After all, high-quality filtration is important for motor oil so that it contains a minimum content of contaminants and metal particles that are formed during engine operation. Other characteristics of the oil filter, such as the response pressure of the bypass valve and the reliability of the check valve, are no less important. In order for the engine lubrication system to work correctly and reliably, you need to use either original oil filters or high-quality duplicates.
Replacement frequency
To find out how often the air filter needs to be replaced, look at the instructions and maintenance regulations for the car. The regulations state that replacing the air filter in Vesta is necessary every 30,000 km. But the instructions add that when operating the car on unpaved roads, the air filter must be changed every 15,000 km.
The consequences of untimely replacement of the air filter in Vesta lead to:
Review of the popular car Lada vesta: sport wagon cross
- loss of engine power;
- increased fuel consumption;
- decreased continuity;
- unstable cylinder operation.
If the filter element is heavily contaminated, so little air will enter the engine that it will not start or stall while driving. You should not save on a penny part, because this can result in large costs in the future.
At a certain point, the suction draft of air will rupture the clogged air filter. Abrasive sand will get into the system, which over several thousand kilometers will wear off the piston system, cylinders and valves. Expensive repairs will be inevitable.
To keep your car operational for many years, do not forget about such a “little thing” as an air filter. Every motorist can change it with his own hands in five minutes.
Replacing the Lada Vesta air filter
Any modern internal combustion engine operates by igniting the fuel-air mixture. To prevent dust particles from getting inside the engine, the air intake system is equipped with a special filter. For each car, the manufacturer develops its own air filter that meets the design features of the engine. But over time, the air filter becomes clogged and loses its properties. Accordingly, it needs to be changed.
Replacing the air filter on a Lada Vesta car is not particularly difficult. But for some reason, many car owners forget to do this in a timely manner. If we talk about the replacement interval, then the Lada Vesta air filter must be changed after 30 thousand kilometers. But if the machine is used in difficult conditions, then the replacement interval must be reduced by 2 times.
Where is it located, when to change it and which cabin filter to install
Location - Vesta cabin filter is located in the area of the front passenger seat, on the left, behind the tunnel panel.
Replacement frequency - Lada Vesta maintenance regulations indicate a replacement interval of 30,000 km.
It would be a good idea to check and clean the filter at 15,000.
Suitable filters are original, with catalog number - 272773016R. Analogs: FRAM CF11706, BOSCH 1987435011, MAHLE LA923, MANN-FILTER CU22011.
Place where the filter is located
To carry out preventive maintenance, temporary dismantling of the storage compartment will be required. However, experienced specialists practice replacing the cleaning element in a different way, which we will consider below.
Air filter Lada Vesta
In all major cities there are large stores where you can buy a Lada Vesta air filter. You just need to come to the store and the managers will select different filter options for you. But if you order a filter via the Internet, then it is best to immediately use the catalog numbers.
For correct selection, you must use the original (OEM) part number 165460509R. Using this number you can select both the original Lada filter and analogues from other manufacturers. Let's try to select a filter through the online store exist.ru*.
Lada 165460509R — 654 RUR BIG Filter GB-962 — 242 RUR Pilenga FA-P 2180 — 257 RUR Patron PF1990 — 378 RUR MANN-FILTER C 27 030 — 927 RUR Hengst E1440L — 1013 RUR
*Please note that all prices are current at the time of writing.
You can also find an air filter for Lada Vesta using the original Renault number 16 54 605 09R. Essentially, this is the same filter, manufactured at the same factory, but packaged in different boxes.
Effect
If you consider the reviews of the owners who went through with this modification, it becomes clear that the effect is quite noticeable. They note that the engine begins to “breathe”, and not only at the bottom, but also works more vigorously after 3,000 rpm.
The engine revs noticeably easier up to 5,000 rpm. Those who often drive in traffic jams claim that the car has stopped shaking in traffic jams.
In general, installing a large air filter on your Lada Vesta yourself is completely worth it, especially if you don’t buy branded products.
Replacing the air filter on a Lada Vesta car
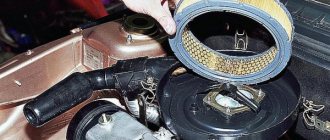
Now let's move on to the replacement itself. It’s not difficult to do, so everything can be done even if you don’t have a garage. Unlike previous Lada models, Vesta does not require tools to replace the air filter. Everything is done with bare hands.
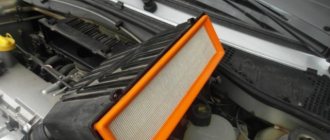
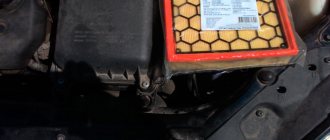
1. Open the hood and find the air filter housing.
2. Squeeze the latches along the edges of the cover and remove the air filter frame along with the filter element.
3. Remove the filter from the box and install a new one in its place.
4. Reassemble everything in reverse order.
That's all. You can do it in 2 minutes.
How to replace the cabin filter of Lada Vesta instructions with photos
loading…
Using a T-20 wrench, unscrew the screw securing the right floor tunnel lining to the bracket. Using a T-20 wrench, unscrew the screw securing the right floor tunnel lining to the bracket.
Use a slotted screwdriver to pry up the three latches...Use a slotted screwdriver to pry up the three latches...
...and remove the lining. The arrows indicate the clamps...and remove the lining. Arrows indicate clamps.
Use a slotted screwdriver to remove the right side of the instrument panel. Use a slotted screwdriver to remove the right side of the instrument panel.
Using the T-20 key, unscrew the self-tapping screw of the lower left fastening of the glove box. Using the T-20 key, unscrew the self-tapping screw of the lower left fastening of the glove box.
Using the same tool, we unscrew the screw of the lower right fastening of the glove box... Using the same tool, we unscrew the screw of the lower right fastening of the glove box...
...and three self-tapping screws for the upper fastening....and three self-tapping screws for the upper fastening.
We move the glove box away from the instrument panel and, by pressing the latch, disconnect the connector from the box illumination lamp on the left side. We move the glove box away from the instrument panel and, by pressing the latch, disconnect the connector from the box illumination lamp on the left side.
Having released the connector lock, disconnect the wire harness from the backlight switch. Having released the connector lock, disconnect the wire harness from the backlight switch.
Now, having finally disconnected the glove box, we put it on a soft (to avoid scratches) surface.
Squeezing the two latches with your fingers, remove the filter cover strictly to the right. At the same time, its lower part follows the guides. Squeezing the two latches with your fingers, remove the filter cover strictly to the right. At the same time, its lower part follows the guides.
Filter cover and clips that must be squeezed to remove.Filter cover and clips that must be squeezed to remove.
We remove the air filter from the installation location, slightly bending it in height. We remove the air filter from the installation location, slightly bending it in height.
We take out the air filter. We take out the air filter.
It is better to clean the filter installation area with a vacuum cleaner.
When installing a new filter, pay attention to the fact that the arrow on the filter should be directed along the air flow, that is, towards the rear of the car. When installing a new filter, pay attention to the fact that the arrow on the filter should be directed towards the air flow, that is, towards rear of the car. Attention! The filter fits into place only with some deformation; it must be slightly bent diagonally, since the height of the hole is less than the height of the filter. You shouldn't be afraid of it
Having taken its position, the filter will straighten out and perform its functions normally.
You shouldn't be afraid of this. Having taken its position, the filter will straighten out and perform its functions normally.
Attention! The filter fits into place only with some deformation; it must be slightly bent diagonally, since the height of the hole is less than the height of the filter. You shouldn't be afraid of this. Having taken its position, the filter will straighten out and perform its functions normally.
Having taken its position, the filter will straighten out and perform its functions normally.
Carefully install the filter cover along the lower guides and make sure that the latches are engaged. Next, we reassemble in the reverse order.
How to replace the cabin filter of Lada Vesta - instructions with photos
How to replace the cabin filter of Lada Vesta - instructions with photos Photo: Behind the wheel.RF
loading…
What you need to know about the air filter on the Lada Vesta
In order for a combustible mixture to form and completely burn in the engine, the fuel needs air. But moisture, dust and larger particles can enter with the air flow.
To eliminate unfavorable impurities in the combustion chamber, use a special air purifier for the engine. The Lada Vesta air filter contributes to the full and reliable operation of the car engine and prevents it from wearing out too much.
Any clogging of the unit entails a decrease in the performance of the power unit and leads to an increase in the consumption of fuels and lubricants.
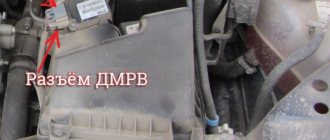
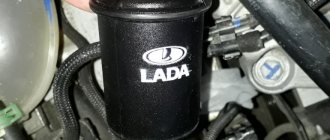
If you open the hood of a Vesta car, the filter is located in the upper right corner, behind the power source, in a black plastic box, you can immediately see it. Access to it is completely free from all sides.
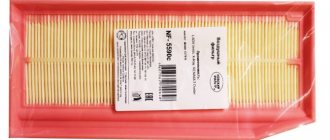
The car is produced with a gasoline engine in two variations: 1.6 and 1.8 liter engine. The Lada Vesta air filter, regardless of the volume of the power unit, has constant dimensions: 270x125x75 mm (length, width, height). The product is supplied by the Renault concern with catalog number 165460509r, which uses this model in its cars.
A certain amount of time passes, and the node begins to clog. The lack of air to ensure the fuel combustion process entails a noticeable increase in gasoline consumption and a decrease in the dynamic characteristics of the engine. Typically, deterioration in the performance of a Lada car is noticeable after 30,000 kilometers in the urban cycle and 15,000 kilometers over rough terrain.
Therefore, it is recommended to constantly inspect the air filter, because it can not only become clogged, but also become deformed. If the volume changes significantly, the part should be immediately replaced with a new filter. Maintenance regulations for Lada Vesta are considered to be once every 30 thousand mileage.
Advice. If engine power has become noticeable and fuel consumption has increased, then the first thing you need to pay attention to is the car’s air filter.
Work to replace the filter must be done while the engine is still warm after another trip. A small drawback of the lid of the box in which the filter is located is the material – plastic, which is fragile when cold and can break. Therefore, when the engine is warm, the plastic latches on the box lid are more pliable.
How to change the air filter on Vesta? The replacement procedure is not difficult; all work can be done with your own hands, without the involvement of an assistant.
Reviews are positive and negative
| № | Positive |
| 1. | Dmitry , 38 years old, insurance company employee, owner of Lada Vesta: I have been actively using the car for several years, there have been no major breakdowns. I eliminate imperfections, roughness, and defects myself. Recently I replaced consumables and filters. I always buy originals, even if they are 20–25% more expensive than analogues, but they are of high quality. |
| 2. | Kirill , 43 years old, sales consultant: the car is only a year old, it works properly. I visit service stations at strictly scheduled times for diagnostics, troubleshooting, and replacement of worn-out elements. I share the position of the masters; I buy only original parts. |
| 3. | Vladislav , 29 years old, private entrepreneur: I cover up to 20,000 km in a month, spend a lot of time traveling to sign contracts. I don’t have any energy left to work on the car, so I use the services of a service station and visit them periodically for preventive maintenance. Recently replaced the air filter. I didn’t buy the original, it’s expensive, a high-quality analogue is 30% cheaper. |
| 4. | Georgy , 45 years old, driver: for the second year in a row I have been driving on Vesta. The car is good, I won’t talk too much about it. Imported spare parts are expensive, I replace them with domestic analogues. |
| 5. | Vadim , 39 years old, service station foreman: over the full five years of working in the workshop, I have seen a lot of equipment, I know the strengths and weaknesses. I looked at cars for a long time, and in the end I chose the Lada Vesta. I'm happy with the purchase, no complaints. I successfully replace imported parts and consumables with domestic analogues. |
| 6. | Vitaly , 36 years old, manager: after the purchase he drove over 30,000 km. The workshop indicated the need to replace the air element. I don’t understand manufacturers, I entrusted the choice to a specialist. I bought a filter from Renault Duster, it turned out that they are identical. |
| 7. | Gennady , 29 years old, employee of an IT company: every week I devote time to my car and carry out diagnostics. Somewhere I add oil, fluid, tighten the timing belt. There are no major damage, but there are plenty of little things. I also change consumables myself; I often buy domestic analogues rather than originals. I think that it is not advisable to overpay for a brand. |
| 8. | Vyacheslav , 33 years old, household appliance repairman: my Vesta is already three years old, during which time I have made no capital investments, except for scheduled maintenance. The car is solid, the quality is noticeable in comparison with the Granta and Priora. |
| 9. | Slavik , 38 years old, company manager: my positive review of the Patron 5459837 air filter, which I recently bought in a store. The manager recommended and pointed out numerous positive reviews. I'm happy with the choice, the car starts from a half-turn, the engine runs stably. |
| 10. | Kirill , 45 years old, banker: I use the car to travel to work - from work, sometimes out of town, to go fishing. The mileage per month is small, I carry out scheduled maintenance regularly, there have been no major breakdowns. |
| Negative | |
| 11. | Dmitry , 39 years old, private entrepreneur: the model is new, but the defects remain from previous versions. Many defects, frequent breakdowns due to small things. Some of the spare parts are foreign-made in the original design. In order not to overpay, I buy Russian brands that are not of inferior quality. |
| 12. | Vladislav , 48 years old, pensioner: I use the car for fishing trips, out of town for recreation. In general, the model is good, but unforeseen situations and breakdowns occur. I get service from a service station and buy original parts. Sometimes it's difficult for the budget. |
| 13. | Victor , 39 years old, manager: a year has passed since the purchase of the car, and I have already visited the workshop twice unscheduled to eliminate defects. Nothing serious, but an unpleasant feeling from the build quality. |
| 14. | Konstantin , 41 years old, medical worker: I bought the car second-hand, now I regret it, it’s better to get a new Granta. The factory warranty has expired, the car is starting to fall apart and requires investment. Original spare parts are expensive, you have to look for high-quality substitutes. |
| 15. | Stanislav , 35 years old, head of a security company: after the Lada Granta Vesta, this is something unearthly, a good car. Breakdowns happen from time to time, so I go to a workshop for repairs. |
| Video - replacing the Lada Vesta air filter | Video - EVERYONE HAS A BREAKDOWN!!! |
Analogs
Judging by the reviews of car enthusiasts, it is not necessary to buy an expensive imported model; it is enough to supply goods from a domestic manufacturer. Analogues also cope well with the task.
The most common analogues:
- model from the company BM-MOTORSPORT - BM FA2180 with a cost of up to 200 rubles. This inexpensive copy is in no way inferior to the original Vesta filter;
- Pilenga FAP2180 is next in the price category (400 rubles). There is one significant drawback - the padding polyester layer is too thin, so the filter element does not fit tightly enough to the body;
- MANN-FILTER C27030 – when using this element, the price increases to 1000 rubles. Fits perfectly and is of high quality.
Air filter Lada Vesta, X-Ray, RENAULT Duster (1.6), air filter element OE
Lada Vesta cars have been produced since the beginning of 2015. This model is equipped with a VAZ-21129 engine, which is equipped with a rectangular filter, the housing of which is mounted on top of the engine. The factory code for the air filter is 165460509R.
The Lada Vesta engine air filter plays an extremely important role in supplying the car with a high-quality fuel-air mixture. It serves to purify the atmospheric air necessary for the engine to form a combustible mixture. Prevents dust, moisture, and foreign objects from entering the combustion chamber, which contribute to increased wear of parts of the cylinder-piston group.
Air filter 165460509R Italy, the most affordable in price, does an excellent job due to high-quality materials and advanced technologies. Thanks to the presence of pre-cleaners made of synthetic material and reliable fixation of the curtains, they provide maximum air purification.
To form a combustible mixture, the VAZ-21129 engine requires approximately fifteen times more air than fuel. That is, if you burned ten liters of gasoline in a day, the air filter had to process a volume of one hundred and fifty liters. The combustion of this mixture in the engine cylinders directly affects the power of the car engine.
As the filter is used, the working surfaces of the replaceable air filter element become dirty, it cannot pass a sufficient amount of air, which leads to:
- reduction in power and deterioration in the dynamic characteristics of the vehicle. A mixture that is too rich will not allow the engine to operate optimally;
- increased fuel consumption. The lack of air in the combustion chamber will be compensated by increasing the injection of gasoline, which will not burn completely, but will be released into the atmosphere along with the exhaust gases;
- Excessive fuel consumption will lead to an increased content of harmful substances in the vehicle exhaust. Prolonged operation in this mode contributes to the formation of carbon deposits on the pistons and spark plugs.
A car with a clogged air filter loses its power, and you start spending extra money on wasted fuel.
In accordance with the regulations, the replaceable element of the air filter of a Lada Largus car is replaced every 15 thousand km.
It should be taken into account that the air filter should be replaced not simply based on the mileage of the car after the previous maintenance, but depending on its condition and operating conditions.
BM fa2180 from the manufacturer BM-Motorsport
The most popular (most likely, the affordable price and decent performance played a role). The properties are similar to “branded” products, but the price is almost 3 times lower. The average price at points of sale is 180 rubles.
TSN (9.1.1736) and SCT SB295 are quite good substitutes at a price that is 2 times cheaper. The average price is 300 and 400 rubles.
Pay attention to other companies that produce spare parts for Vesta. Before purchasing, take the time to search for customer reviews. Some manufacturers sell products that are so lousy that they shouldn’t even cost a ruble. The buyer finds out about this when the next maintenance is due.
Self-installation of a large air filter on Lada Vesta
Attempts by LADA Vesta owners to increase engine power and make its operation more flexible do not stop. Particularly valued are methods that do not require significant processing and costs, not to mention chip tuning, to which the attitude is ambiguous.
Finalization
And now, another way has appeared - a cold intake and a large air filter on the Lada Vesta, the same as the one on the Sport modification. The peculiarity of this method is that it is suitable for both engines of the model - 1.6 and 1.8 liters.
Lada Vesta Sport has an enlarged air filter created specifically for this version. In addition, this modification has a different air intake location - it is located next to the left headlight behind the radiator grille.
Components
The entire Lada Vesta Sport air filter kit consists of a number of elements. Their names and articles are presented in the table.
| Air filter half housing (upper) | 8450032859 |
| Filter element | 8450032860 |
| Semi-housing (lower) of the air filter | 8450032858 |
| Bolt | 7703008226 |
| Screw M6x30 | 8450002332 |
| Washer 6x18 | 8450003738 |
| Elastic bushing for fixing the electric fan | 8450001134 |
| Intake pipe hose assembly | 8450032835 |
| Screw clamp assembly | 8450001108 |
| Clamp 16 | 7703083470 |
| Hose (upper) crankcase exhaust ventilation | 8450008594 |
| Connection pipe | 8450101902 |
| Air intake assembly | 8450032837 |
| Screw clamp assembly | 8450001108 |
| Connection pipe | 8450032838 |
| Washer 6x18 | 8450001123 |
| Bolt M6x25 | 8450006008 |
Alternative
However, one of the owners of Vesta, whose name is Evgeniy and is known on Drive under the nickname gps-nav , found an alternative way to install a large air filter on the Lada Vesta, which is several times cheaper. It involves purchasing components from different cars and their subsequent modification.
- filter element - Filtron AP 074/3 is suitable - 330 rubles;
- air filter housing from the Ford Mondeo 3 model – 600 rubles – can be purchased under article number 4609885902;
- air filter pipe from the VAZ 2111 model – 700 rubles;
- sewer pipe 75 mm and sewer bends 90° and 67° – 220 rubles;
- fitting - 30 rubles;
- plastic ties (2 units) and a metal clamp (2 units).
After all the listed components have been purchased, you can begin work.
Work progress
Self-installation of a large air filter on a Lada Vesta begins with modification of the housing itself. First of all, it is necessary to solder the factory hole through which air is taken in.
Next you need to solder the purchased pipe. You can do this in different ways - using epoxy resin, soldering a metal mesh, using a stapler, etc. But in general, soldering using a metal mesh provides the most durable fixation.
Next you need to connect the sewer pipes and outlets.
To prevent the connector from interfering with the installation of the filter housing, it must be recessed and secured with a tie.
All that remains is to put in place the homemade air intake, constructed from sewer components, install it with the desired slope and secure it with a clamp.
Then you need to move the car’s battery to the right and back until it stops, since otherwise it will interfere with the installation of the large air filter housing on the Vesta.
The case itself needs to be tightly fixed, and to do this, place it in such a way that the rear legs rest on the corrugation with wires.
This completes the independent installation of a large air filter on the Lada Vesta.
Effect
If you consider the reviews of the owners who went through with this modification, it becomes clear that the effect is quite noticeable. They note that the engine begins to “breathe”, and not only at the bottom, but also works more vigorously after 3,000 rpm.
The engine revs noticeably easier up to 5,000 rpm. Those who often drive in traffic jams claim that the car has stopped shaking in traffic jams.
In general, installing a large air filter on your Lada Vesta yourself is completely worth it, especially if you don’t buy branded products.
Source
Finalization
And now, another way has appeared - a cold intake and a large air filter on the Lada Vesta, the same as the one on the Sport modification. The peculiarity of this method is that it is suitable for both engines of the model - 1.6 and 1.8 liters.
Lada Vesta Sport has an enlarged air filter created specifically for this version. In addition, this modification has a different air intake location - it is located next to the left headlight behind the radiator grille.