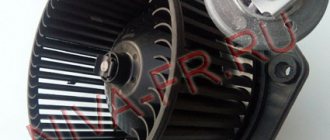
The Chevrolet Niva SUV has been very popular among domestic car enthusiasts for many years. The versatility of the vehicle and high cross-country ability are what are most valued among the owners of the “baby”. The car is suitable for daily trips, for going hunting or fishing, and can also serve as a “workhorse”. The Chevrolet Niva is a versatile, but structurally not ideal car.
What fans of the compact SUV are most unhappy with is the interior, which looks a little unfinished. It is possible to correct this drawback and make the movement of passengers more comfortable by tuning the interior of the Chevrolet Niva. Doing all the work yourself, without resorting to the help of specialists, will not be difficult. The main thing is to arm yourself with the necessary tools and show a little imagination.
Do-it-yourself modification of the Niva Chevrolet stove
The Chevrolet Niva is equipped with a liquid-type heating system combined with an engine cooling radiator.
This design, the main function of which is to heat the interior, allows, if necessary, to increase the intensity of engine cooling. In addition, the LC and GLC trim levels include air conditioning. Despite the rather complex design of the heating system of the Chevrolet Niva, most of the problems can be solved independently. With proper diagnosis, this will not be difficult.
Considering the design flaws in the Chevrolet Niva heating system, many car owners are upgrading the stove with their own hands. The most common purpose of such tuning is to improve the air supply to the driver's and front passenger's footwells. To do this, additional air ducts are installed and the shape of the damper drive strip is adjusted. For this modification you will need:
- two plastic tubes (plumbing or cable ducts);
- two plastic couplings corresponding to the inner diameter of the outer diameter of the tubes;
- thin sheet plastic (cut plastic card);
- Super glue;
- file;
- drill and set of saw bits;
- screwdrivers;
- stationery knife.
It is necessary to work with the plastic of the heater housing very carefully, as it is quite fragile. The actions are performed in the following order:
- Select tubes suitable for the role of additional air ducts.
Plumbing pipes can be used as additional air ducts - Remove the side trims on the center console on both sides.
- Remove the damper drive strip located on the left side of the heater.
- Ream the top curved opening of the plank by approximately 2 millimeters.
- The lower curved opening must be reduced by 2 millimeters by gluing plastic plates.
You can extend the bottom guide slot by gluing together scraps of plastic card - Using a drill and saw bits matching the outer diameter of the coupling, drill two holes in the heater body, the bottom edges of which should be 10 millimeters above the factory air ducts.
Holes in the stove body should be drilled very carefully - Insert and secure the couplings into the drilled openings. In this case, you can use sanitary sealant.
The plastic coupling will ensure reliable fixation of the new air duct tube - Insert the new air duct tubes into the couplings and secure them.
- Install an upgraded damper control bar. Before fixing it, it is important to correctly align the dampers themselves.
- Check the efficiency of foot airflow at different operating modes of the stove.
As a result of the actions performed, the intensity of the supply of warm air to the lower part of the cabin should increase noticeably.
Thus, repair and replacement of most elements of the Chevrolet Niva heating system can be carried out independently. You can also modify the stove and eliminate its design flaws with your own hands. This will require a minimum set of tools and careful adherence to the recommendations of specialists.
Before the heater is improved, it is necessary to understand the principle of operation of the dampers. Then you should completely dismantle the decorative panels located on the left side of the Chevrolet Niva stove. The next step is to remove the regulator responsible for the position of the dampers. When optimizing your car, you need to understand the design of the heating device, which will allow you to dismantle the “unnecessary” equipment without unnecessary delays. The motorist must remove the lower part of the regulator, through which the front flap is activated.
When dismantling all the plastic elements, you should not try to abruptly remove the parts, since almost all the components of the device being disassembled are made of fragile plastic, which breaks even under more or less significant impact. If, however, due to haste or carelessness of the owner of the movable property, the lower part of the device being removed gets a crack, it can be hidden with a soldering iron.
Modifying the Chevrolet Niva stove with your own hands involves the need to secure the lower damper so that it is tightly closed in the upper position. Of course, such a modernization completely eliminates the ability of the motorist to take advantage of the “front” position, however, it provides many other more significant advantages.
To tightly fix the front flap, you will have to make a small-sized bracket with your own hands (it is best to resort to using a simple tin), which will be held on by a self-tapping screw.
Once the “front” of the stove is in the closed position, you will need to think through the trajectory of the element that regulates the simultaneous supply of heat to the glass and legs. It is worth noting that skilled craftsmen, when upgrading their Chevrolet Niva, use all available means, in particular, an ordinary discount card will be useful for optimizing the stove. By means of which a cut line is drawn, then the element is glued with cyanoacrylate and filed to size with a file.
The modification of the Chevrolet Niva heater should be completed after the hand-cut part is glued with superglue.
The Chevrolet Niva inherited a fairly efficient heater from its previous VAZs. Even in 20-degree frost, the temperature in the cabin can be quite comfortable after just five minutes of warming up. But like all VAZ models, the “Dzhiem” SUV suffers from the build quality and the quality of the components supplied to the assembly line. This is also reflected in the operation of the heater - if the stove does not blow into your feet, then the reasons can be looked for in several places at once. Let's look.
The heater radiator is leaking
And this may depend on a lot of factors - the quality of the pump, the tightness of the system and the heater radiator, including the correct operation of the thermostat, and the quality of the coolant. If the temperature with a fully warmed-up engine is within 80-90 degrees, we look for the reasons for the lack of air in the legs in the design of the heater.
Turn on maximum heat.
A feature of the stove on a Chevrolet Niva is the absence of a heater radiator tap, that is, antifreeze circulates in a full circle in winter and summer and passes through the heater radiator. Taking this fact into account, the factory somewhat complicated the design of the air ducts and air dampers - there are two of them in the Chevrolet Niva.
Upper deflector flap.
One works for frontal airflow, the second is responsible for supplying air to the feet of the front and rear passengers and the driver. It is with this damper that problems arise that we will try to solve.
One of the ways to solve the problem of poor foot airflow.
Also interesting: What to check when buying a Niva
In some cases, the correct switching method does not work and then you have to modify the heater to achieve full functionality.
We will improve the cracks and eliminate leaks in the stove.
Warm air simply spreads throughout the cabin, escaping through leaks in the dampers and air ducts. Naturally, each specific car has its own gaps in the heating system, so there cannot be a single treatment recipe.
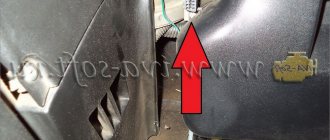
However, with little effort, without removing the front panel and the entire heater, you can modify the guides for the dampers so that the main flow of warm air is supplied to the feet. To do this, you need to remove the casing from the console on the driver's side and, if desired, the steering column casing.
In front of us on the stove side is a die, which is responsible for the direction of movement of both dampers, and therefore the direction of air supply. All that remains is to unscrew the die with the slots, change the shape in the uppermost slot from curved to straight, maintaining the starting and ending points.
A radical solution to the problem of poor foot airflow is to close one damper AT ALL with foam rubber.
Having changed the geometry of the movement of the upper damper, it remains to firmly fix the lower one, which is responsible for blowing the legs. It is enough to fix the lever of the lower damper with a self-tapping screw in the position of blowing the legs. Now there will be constantly warm air in the legs, and its quantity and proportions between the windshield and the legs are smoothly selected by a conventional air direction regulator. This way you can come to an agreement with the Niva Chevrolet stove and make it evenly warm up the interior.
Details Category: Interior and trunk Updated 06/06/2016 16:33
The aluminum radiator heats up quickly, is inexpensive, has good rigidity and is light in weight.
Usually the cable braid is damaged, which leads to the need to replace the entire part. You can purchase suitable cables at an auto parts store. When choosing a new heater cable, you should pay attention to its length. To replace the cables, you only need flat-blade and Phillips-blade screwdrivers.
The replacement process is as follows: Remove the side panel of the lower part of the center console. It is located under the steering wheel to the right of the pedal assembly and the modification of the stove on a Chevrolet Niva using self-tapping screws. In the resulting niche you will find two cables. Unscrew all accessible screws securing them. In the niche under the console there are lower fastenings for the damper cables. Remove the switch handles of the heater control unit.
Heater modification
The standard heater in the Niva car is quite weak and in severe frosts does not warm up the interior of the SUV well. In specialized stores you can purchase a modernized stove, which is much quieter than the standard one in terms of noise level and at the same time heats the interior better even in severe frosts.
The new heater uses VAZ spare parts, so if necessary, you can easily and cheaply repair the stove.
Do-it-yourself modification of the Niva Chevrolet stove
Most often, tuning fields are carried out for off-road use. This is not a complex technological process; it is enough to install the following elements on the car:
- Power kit. Includes a heavy-duty front bumper made from bent steel tubing with a platform for a winch. Making this product is not difficult, you only need to have tools and equipment for working with metal: a pipe bender, a grinder, a welding machine
- Off-road tuning of a Chevrolet Niva necessarily involves replacing standard wheels and tires. The following sizes are perfect here: 1. 215/75/ R15. 2. 205/70/ R16. 3. 205/80/ R16. The first numbers are the tire size, its height and width, the designation after the letter R is the rim diameter. For the last two values, modifications to the front wheel arches may be necessary. Everything here will depend on the width of the tire.
- Installation of a snorkel - an exhaust pipe that goes to the roof. This is necessary if the Niva Chevrolet will be used in extreme off-road conditions.
- A separate item is the installation of a winch on a Chevrolet Niva. Do not assume that this equipment is only necessary for those who participate in competitions. This practical equipment will be an excellent helper during outdoor recreation, as well as in the country and fishing. It is enough to install an electric winch and the car will not care; it will be able to pull itself out of a hole or ditch, and will also help others. The equipment body can be hidden under a homemade metal casing.
Tuning a Chevrolet Niva for off-road use can be complemented with protective, military paint, matte or glossy. This requires certain knowledge. The repainting process is quite labor-intensive and requires an appropriate mark in the technical documentation, so painting is not a mandatory element of tuning 2123 Chevrolet Niva.
Main stages of interior insulation
All work carried out on insulating the interior can be divided into several main stages:
- The entire interior is being dismantled. Insulating materials should be laid exclusively on bare metal, which is still carefully prepared, rust is removed, and painting is carried out. Dismantling the interior space can take quite a long time, as care must be taken.
- Once the interior space has been cleared, the selected insulating materials can be installed. An important point is that all air ducts should be left open, as they do not allow moisture to form.
- Fastening materials can be done in different ways. Some have their own adhesive layer, others require the use of special glue.
- After laying the insulating material, the interior is reassembled and all equipment is installed.
Sidebar: Important: Particular attention is paid to insulating the door structure. This is due to the fact that in most cases they become the source of noise in the car interior.
Introduction
Modifying the Chevrolet Niva stove with your own hands does not require huge labor costs and investments. As practice shows, it can be done by absolutely anyone who wants to upgrade a standard unit in such a way that the airflow is maximum. All owners of a Chevrolet Niva car note the impossibility of adjusting the warm air in such a way that the glass and the area where the feet of the driver and passengers are located are simultaneously heated.
In fact, there are several methods to make interior heating more optimal and productive, however, in the material below we will consider a method that allows you to carry out all the manipulations without first removing the front panel. In addition, this modernization method does not require large financial investments.
We drag complex elements using glue (doors, panels, etc.)
- Initially, you need to prepare the surface; to do this, you need to rinse it well, sand it and degrease it. Sanding should be done carefully to avoid leaving scratches.
It is best to degrease with products specially designed for this purpose, such as Supercolle or at least gasoline.
- Then glue is applied to the entire surface and material, uneven areas are coated with a brush. Use a hair dryer to heat and smooth the material.
If you can’t glue the material to some areas of the surface, then they need to be filled with automotive putty and the re-upholstery must be repeated again.
Chevrolet Niva engine tuning
There are a huge number of options for modifying the Niva Chevrolet engine, which will significantly increase its technical characteristics:
- Replacing the crankshaft and piston rings gives an increase in volume of 0.1 liters
- Replacing injectors
- Replacing the control unit
- Correction of engine geometry by increasing the diameter of the valves and the pushrod well for the intake and exhaust ports. New pushers with a diameter of at least 1 mm are required
- Sealing valves increases power by 10%
- Replacing the catalyst with a flame arrester. This is a tuning of the Chevrolet Niva exhaust system, but it helps improve the technical performance of the engine
All these operations require direct intervention in the technical device of the car. The optimal way to chip tune a Chevrolet Niva engine is to work with the brains of the engine – the injector. Software knowledge is required here. With its help, the technical parameters of the machine are changed. This method is the least expensive.
Video of chip tuning of a Chevrolet Niva with your own hands.
Also interesting: How does the injector work? / Sudo Null IT News
Let's sum it up
Almost all cars of domestic origin are not famous for their high-quality interior and its good insulation. In most cases, this is the weak point. Despite the participation of a foreign company in the design of this car, problems remained. However, many of them can be solved. You can increase comfort in the cabin in summer and winter by soundproofing the cabin. You can do this kind of work yourself. Before tuning, you should decide whether such tuning is needed. This is due to the fact that the Chevrolet Niva has a fairly large number of various shortcomings, and high-quality insulation of the interior requires significant investment.
Chevrolet Niva suspension tuning
Niva Chevrolet was created for driving on rough terrain, so the car’s suspension is able to withstand serious loads, but not all and not always. Therefore, to improve cross-country ability, it is necessary to strengthen the suspension.
The most popular and relatively simple is lifting a Chevrolet Niva with your own hands, that is, increasing the ground clearance. For this purpose, special kits are sold, the installation of which will require the use of plumbing and pneumatic tools, as well as the presence of a lift. Suspension tuning itself consists of the following stages:
- Reinforcement of the suspension with shock absorbers, they are installed in parallel with the standard ones. You must first prepare fastenings for them
- Improvement in terms of reliability of standard fastenings of support units
- Installation of shock absorbers or gas-oil shock absorbers
- Replacing standard springs with reinforced modifications
- Installation of non-adjustable steering knuckles
- Replacing standard hubs with rotary ones
- Particular attention must be paid to the jet thrusts; they must be strengthened.
Tuning the Chevrolet Niva transfer case is an important stage in suspension modernization. But in the case of Niva Chevrolet, this is more likely to eliminate childhood diseases, which increases the level of reliability of the technological unit. To do this you need:
- Replace standard bearings with double row ones
- Replacing bearings will require replacing caps
- Be sure to change the seals
- Equip the transfer case with additional shaft support
Helpful advice
It is imperative that the transfer case be properly centered. This reduces the vibration level and increases the technical life of the unit.
Replacing the driveshaft
The modernized driveshaft was developed directly at the Kardan plant, where cardan shafts for VAZ cars are developed and manufactured. The new shaft can be much quieter and less susceptible to vibration. The new part not only improves performance, but is also more reliable and durable. The main distinguishing feature of this design is the movable hinge. It is to this that all vibration is transmitted. There are other modifications to the Niva Chevrolet that can reduce vibrations and extraneous noise; it is best to use them together.
Chevrolet Niva interior tuning
Tuning the interior of a Chevrolet Niva with your own hands is traditionally reupholstering it. Genuine leather on the seats or a high-quality substitute will be especially chic. Chrome or imitation mahogany inserts may appear on the doors.
A good, relatively simple, but expensive option would be to replace the seats with sports ones. An integral attribute is a new steering wheel. If you need to save money, it is best to use a technique called flocking - applying cotton dust to the sheathing, which creates a fleecy effect. The new interior can be given any color.
You can also replace the standard seat belts, install xenon or bi-xenon interior and underbody lighting. Additional sound insulation will not hurt. Instead of a standard stereo system, a bot computer would look great - it’s also a functional solution.
Exterior and interior improvements
You can remodel a car body in different ways, but the most interesting modifications are those that are functional. There is never enough usable space in a car. An additional roof rack will allow you to take significantly more things “on board”. For ease of loading and unloading, you can add a ladder to the body or rear doors of the car.
The interior is less important for off-road driving, but at the same time we spend the most time there, so it is impossible not to pay attention to it when making modifications to the Niva Chevrolet. For additional comfort, you can equip the interior with heated seats or reupholster the seats in a more pleasant material. The most important thing is that all work is done efficiently, otherwise you may not get the desired result. Any modification or repair of the Chevrolet Niva must be carried out by professionals, so it’s better to contact a good service center, then you will have an excellent car.
Tuning Chevrolet Niva panels
Here the expression will be relevant: the need for invention is cunning. Tuning a Chevrolet Niva torpedo will help you realize your imagination and available materials with your own hands:
- Construction foam
- Various homemade items
- Epoxy – epoxy resin
- Grinding tool
All of the above will give the standard torpedo a new stylish appearance.
The second improvement option is to fit the torpedo from other car models. This may require modification of the standard fasteners. But the same can be done on a new torpedo, which will be a rational solution. A good option would be to upholster the dashboard with some expensive material, such as leather.
Tuning the Chevrolet Niva instrument panel is done using specialized overlays or elements from other cars. Here everything is limited only by the owner’s imagination.
Instrument panel tuning options
The choice of options for tuning is not particularly large:
- Install a device from another car. In this case, you will need the services of a qualified electrician, since the connectors will have to be redone. You can also install a digital version of the tidy - it will be more than original.
- As a tuning option, you can install LED bulbs instead of regular ones. Many car owners choose this option because it is less expensive and the easiest to implement. Try to choose the shade of LED lamps with special attention, as some of them tire your eyes at night, and the clarity of instrument readings may decrease. The shade should not be very bright, but at the same time noticeable.
- Another tuning method is to install original instrument scales on the speedometer, tachometer and other sensors. Moreover, you can buy such scales either ready-made or make them yourself in accordance with your preferences.
All these activities require removing the instrument panel.
Replacement with non-standard
If all of the listed types of tuning are not to your taste, you want something more substantial, then you can replace the dashboard with a new one, there are a huge number of options for each model, but do not forget to be careful when choosing, since they are all very different and it is not a fact that will suit your car specifically. Nowadays, consoles with large displays are especially popular; of course, this pleasure is not cheap, but it looks serious.
The easiest option for tuning a dashboard or dashboard is to buy a new one, but it is much more interesting to make the upgrade yourself and catch the admiring glances of passengers.
Source
Tuning the Chevrolet Niva radiator grille
Tuning the Chevrolet Niva radiator grill with your own hands is a procedure that, in principle, is not particularly necessary, but will be a good addition to the modernization of optical instruments. You can tune the radiator grille by making your own sample or by installing components from another car brand.
A simple and cheap option would be specialized overlays that will give a stylish look to the standard model and will not require additional technological alterations.
Brake upgrades
If a more powerful engine is installed on a car or a standard one is modified, then it is necessary to pay attention to the brakes. Their modernization usually begins with replacing the front brake discs with discs of larger diameter. Next, replace the rear drum brakes with disc brakes. At the same time, the brake machine also changes.
After modifying the brake system, it is necessary to thoroughly bleed the system and check its performance. Especially if the car was modified with your own hands.
Tuning headlights on a Chevrolet Niva
Tuning Chevrolet Niva optics is aimed not only at creating a non-standard appearance, but also at improving their light, as well as visibility at a distance. You can buy and install advanced headlight modifications or work with standard options:
- Installation of additional LED lenses on dimensions
- Installation of rotary modules and additional LEDs
- Change in color, tone, texture, headlight substrate
- Chip installation
- Installation of reflectors
- Replacing standard lamps with high-performance LED lamps
Tuning the rear lights of a Chevrolet Niva is done according to the same principle, plus you can use specialized overlays.
Below you can watch a video on how to install fog lights on a Chevrolet Niva with your own hands.
We drag the visors
- Prepare the elements for the pattern.
- Take the dimensions of the visors and transfer them to special paper with a margin of 3-4 mm in the opposite direction so that there is no sagging in the future and the cover fits exactly under the visor.
- Cut out a pattern from paper and attach it to the material, circle and mark a dotted line at a distance of 0.5 cm.
- Sew the materials on three sides, and on the back side, where the visor will be attached, add a separate stitch for tightening.
- For even curves, without bumps or irregularities, make 10 small cuts in an acute triangle shape.
- Turn out the resulting cover and insert the visor into it, tighten it.
Tuning the trunk of a Chevrolet Niva
The easiest way to do tuning of a Chevrolet Niva trunk with your own hands is to install LED elements on the lid. They can also be attached around the perimeter of the rear door arch.
For those who love music, the trunk of the Niva Chevrolet opens up enormous opportunities for experimentation. You can install powerful speaker systems with a subwoofer there, although you will have to sacrifice capacity.
A completely exotic solution would be to install a small billiard table that will extend and unfold automatically. The Niva Chevrolet trunk volume of 320 liters opens up wide opportunities for modernization.
Below you can watch a video on how to make an organizer for the trunk of a Chevrolet Niva with your own hands.
Upgrading the suspension to match the new transmission
After tuning the transmission due to inertia, it is necessary to modify the suspension. Experienced Niva owners, even without changing the basic characteristics of the car, often replace standard suspension parts with more reliable ones that are resistant to operational loads. The practice of replacing rubber bushings with polyurethane ones is quite common and should be taken into account by each Chevy Niva owner.
Polyurethane silent blocks, couplings, seals, limiters and similar suspension elements last several times longer than conventional rubber ones. They are also not sensitive to temperatures and petroleum products, and work well in rupture and compression.
Installing double shock absorbers, contrary to the assurances of skeptics, will not make the suspension inert. Double shock absorbers will increase the car’s ability to withstand dynamic vehicle loads and make it possible to drive the car off-road at high speed.
On numerous forums that are dedicated to tuning the Chevy Niva, the issue of choosing the type of shock absorbers that is optimal for installation on an SUV with a short wheelbase is very often discussed. Fans of radical changes stick to gas-filled shock absorbers.
Niva operating experience shows that shock absorbers pay off only if they participate in cross-country racing. During normal operation, high-quality oil shock absorbers or conventional gas-oil shock absorbers from reputable manufacturers have proven themselves to be the best.
Repair of heating system components
The recirculation damper mechanism is dismantled and the cable is removed. Each end must be twisted into a ring and securely fixed.
Using a cable, the position of the air supply flap is changed. Assembly is carried out in the reverse order. Replacing the interior heating control unit A faulty control unit can also cause incorrect operation of the interior heating system. Its dismantling, necessary for repair or replacement, requires the following procedure. The negative terminal is disconnected from the battery. All handles are removed from the heater control mechanism.
To do this, you need to carefully pull them towards you. All handles are removed from the heater control mechanism. Use a flat screwdriver to remove the air circulation lever.
Use a flat screwdriver to remove the air circulation lever. Use a screwdriver to pry up and then remove the block lining. Use a screwdriver to pry up and then remove the block lining. Under the lining, use a Phillips screwdriver to unscrew two self-tapping screws.
Under the cladding, two self-tapping screws are unscrewed. The control unit is removed. Remove the connector with the wires going to the speed switch. The block of wires that provide illumination of the unit is disconnected. The connector with wires is removed from the control unit. If there is an air conditioner, all hoses coming from the vacuum switch are disconnected.
Also interesting: Review of the standard Niva Chevrolet alarm system
Use a screwdriver to remove the bracket holding the damper cable braid and other similar elements. All rods are disconnected from the control unit. A new or repaired device is installed in the reverse order.
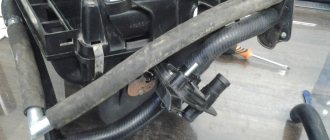
After dismantling, the control unit is repaired or replaced with a new one. Replacing the stove pipes If a coolant leak is detected, the pipes along with the clamps should be replaced. The work is performed in the following sequence: The coolant is drained from the system.
The screws securing the glove compartment are unscrewed and it is removed. Use a Phillips screwdriver to unscrew the clamp of the lower pipe. The hose is removed carefully - the antifreeze should not get on exposed skin. If difficulties arise, the pipe should be rotated around its axis. Correctly turning on the foot airflow It turns out that even after several years of owning a Chevrolet Niva, not everyone knows how to properly turn on the warm air airflow to the feet.
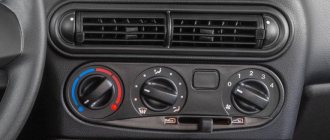
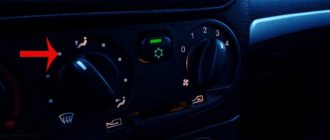
By using fan speed controls and damper position controls, and using sound logic, we can end up with a situation where the entire flow of hot air is directed onto the windshield and into the face of the driver and front passenger. Of course, the car is warm, even hot, but your feet are cold.
Practice has shown that Shniva has a special algorithm for supplying hot air to the legs. On most copies this is done like this: Warm up the engine until the flow of warm air is clearly felt by your hand.
The fan speed switch is set to the fourth position, 4th speed. Turn the airflow direction knob to exactly 12 o'clock. Immediately return it to the position around the clock. Correct position of the stove blower control. The air damper will make a characteristic click and the air flow will flow to your feet.
Exceptions are the heater valve built into the partition of the engine compartment, and the pipes connecting the heater to the engine cooling radiator. If necessary, this unit can be replaced entirely.
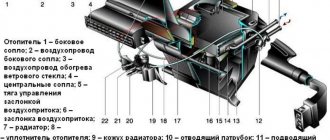
The radiator and heater dampers are combined into a single unit: The air forced by the heater fan enters the heating system through the air intake located under the windshield.
Depending on the position of the damper, the air flow goes either through the heater radiator or directly into the air ducts. The distribution damper is responsible for distributing the flow between the air ducts. The selection of the stove operating mode, temperature and air flow direction is made using the stove control unit located on the center console.
Heating system with air conditioning The principle of operation of a car heater with air conditioning is similar to that described above. However, its design is significantly different. Instead of an intermediate heater housing, an air conditioner evaporator is installed, hidden by a plastic casing. When the air conditioner is turned on, air is supplied to the cabin through the evaporator using a damper.
The design of a car heater with air conditioning is somewhat different: To carry out high-quality repairs, you first need to understand the reasons and identify the faulty element of the system. The stove does not heat the footwell. There may be several reasons why the stove does not direct air to the feet.
First you need to find out whether this mode is turned on correctly. Due to the design features of the damper system, the direction of air to the legs is carried out as follows: Set the fourth rotation speed of the stove fan. Set the heater mode switch to the upper vertical position. Switch the mode controller one position to the left.
After this, air should begin to flow into the legs. If this does not happen, the procedure should be repeated several more times. If the mode still does not turn on, you should check the following components: Coolant leak If antifreeze leaks from the cooling system without visible streaks on the radiator and pipes, you need to pay attention to the condition of the heating system. The main signs of a coolant leak through the heater are: Typically, the leak occurs through the heater radiator.
To verify this, you need to remove the lower part of the center console. If traces of moisture are detected in the area of the stove body, it is recommended to replace the radiator.
If a coolant leak is detected through the heater radiator, it should be replaced. Before replacing the heater radiator, you should check the tightness of the heater pipes and their connections. The stove does not warm up the air well. Often the stove does not warm up the interior effectively enough. Instead of hot air, slightly warm or even cool air comes from the deflectors. This usually happens for the following reasons: Thus, when diagnosing a malfunction, first check the coolant level in the cooling system.
If it is insufficient, they begin to look for leaks. If the stove cannot melt the ice on the windshield, it is faulty. If the amount of antifreeze is OK, and the stove does not respond to changes in the position of the temperature regulator, the damper is faulty.
With proper diagnosis, this will not be difficult. Replacing damper control cables Damper control cables fail quite often. Usually the cable braid is damaged, which leads to the need to replace the entire part.
You can purchase suitable cables at almost any auto parts store. When choosing a new heater cable, you should pay attention to its length. To replace the cables, you only need flat-blade and Phillips-blade screwdrivers.
Read news about the new Niva
- The modernized Lada Niva Legend (4x4) 2021 was shown on the Internet
- Lada 4×4 Bronto - sales stopped, new details » Lada.Online - all the most interesting and useful about LADA cars
- Description of the instrument panel Lada 4×4 (VAZ 2121, 2131) » Lada.Online - all the most interesting and useful about LADA cars
- Chevrolet Niva gasoline consumption per 100 km
- Buy LADA (VAZ) 2131 (4×4) 2022 in Rostov-on-Don, low price for Lada 2131 (4×4) 2022 on the Avto.ru website
- Fuses Niva 21214 injector «
- The new large Lada 4×4 Niva “Bigster” 2021-2022 based on the Dacia Bigster was shown for the first time. The SUV has changed beyond recognition
- New Niva Chevrolet Lux 2022 - review of GLC equipment
Materials used for interior insulation
Today, manufacturers of insulating materials produce a fairly large number of products that have their own specific performance qualities. Common insulating materials include:
- Visomat is a self-adhesive substance that is designed to absorb the resulting vibration. Note that it is produced on the basis of bitumen impregnation. Recently it has been used quite often.
- Vibroplast is one of the most common insulating materials today, which has increased elasticity. Like the previous one, this one is designed to absorb the resulting vibration.
- Isotone is a material designed to absorb sound waves.
- Stizol is a design option used as a sealant. Also suitable as sound insulation and for keeping heat in the car.
- Bitoplast is a sealing material whose purpose is to prevent the formation of various skips. An important point is that it has a sticky layer, which ensures quick fixation.
- Madeline is another sealant that is made on a fabric basis.
To perform high-quality insulation of the interior, it is not necessary to use all the materials under consideration; only a few are selected. Today, glass wool is used less and less, as it has one significant drawback - when moisture accumulates, its performance characteristics are significantly reduced.
The simplest light tuning
- After you have removed the dashboard, remove the dark-edged protective glass.
- Remove the arrows and turn the panel over, unscrew the screws that hold the entire structure using a Phillips screwdriver.
- The next step is to remove the scales, but since they are glued to the plexiglass, be careful not to break it.
- Peel off the light filter (located on the scales) and wipe off any remaining glue with nail polish remover or solvent.
- Then we put everything back in its place and check it.
Important! It is better to control the entire process through a fluorescent lamp, so all the shortcomings are visible.
The scale values on the dashboard will be highlighted much brighter than before the upgrade. This option is quite simple and quick. Moreover, there is less chance of breaking something.
Disassembling the dashboard
If the shield malfunctions, it will have to be disassembled in any case to determine the cause of the breakdown. How to remove the instrument panel? “Niva-Chevrolet” will not cause problems in this sense.
This is done as follows:
- Use a slotted screwdriver to pry up and remove two plugs. The first is located to the right of the hazard warning button, and the second is in the far right corner of the panel trim.
- We turn out the screws located under the plugs.
- We pull out the right side of the dashboard trim and remove the connectors from the control buttons. Remember (take a photo) which connectors go to which buttons!
- We disengage the left side of the trim, remove the block from the buttons for turning on the headlights and dimensions. We remove and remove the lining.
- Unscrew the two screws securing the dashboard. Disconnect the connectors.
- We remove the panel.
First, disconnect the battery; this must be done, since the dashboard contains a lot of wiring that can be shortened during careless removal. To de-energize, remove the terminal from the minus and this will be enough. After which you can remove the console.
Dashboard plug addresses
| White 13-pin header (X-1) | |
| 1 | "Mass" (body) |
| 2 | Tachometer (low voltage input) |
| 3 | Tachometer (high voltage input) |
| 4 | battery (via fuse F-3) |
| 5 | Coolant temperature sensor |
| 6 | Fuse F-10 |
| 7 | Empty (reserve) |
| 8, 9 | Electronic engine control unit |
| 10 | Terminal “15” of the ignition switch (via fuse F-10) |
| 11 | Handbrake switch |
| 12 | Generator output "D" |
| 13 | Oil pressure sensor |
| Red block for 13 pins (X-2) | |
| 1 | Ambient temperature sensor |
| 2 | Terminal “15” of the ignition switch (via fuse F-16) |
| 3 | "Mass" (body) |
| 4 | Panel light control |
| 5 | Turn switch (starboard repeaters) |
| 6 | Turn switch (left side repeaters) |
| 7 | Brake fluid level sensor |
| 8 | On-board computer |
| 9 | Speed sensor |
| 10 | Fuel level sensor |
| 11 | F-14 fuse |
| 12 | Emergency light switch |
| 13 | Terminal "50" of the ignition switch |
Description of devices and indicators
The Niva Travel and Niva Chevrolet panel has the following icons and indicators:
Designations:
- Coolant temperature gauge. Informs the driver of the current coolant temperature and warns of overheating.
- Tachometer. Shows crankshaft speed. The numbers on the panel must be multiplied by 100 to get an accurate result.
- Left turn signal indicator.
- Right turn signal indicator.
- Speedometer. Displays vehicle speed in km/h.
- Fuel level indicator. Shows the remaining gasoline in the tank.
- Low fuel level warning indicator. Lights up when there are 5-6 liters left in the tank.
- Indicator for turning on the side light.
- Malfunction indicator in the service brake system. Lights up when the brake fluid level drops. For the test, the light comes on while the starter is cranking.
- Headlight high beam indicator.
- Daily mileage reset button.
- Odometer with the ability to display other parameters. Shows total and daily mileage.
- Differential lock activation indicator.
- Check Engine. Lights up when there is an engine malfunction.
- Clock and thermometer. Later instrument panels display the voltage of the on-board network.
- Generator lack of charge indicator. It turns on when the ignition is turned on and if the generator is working, the lamp should go out immediately after the engine starts.
- Parking brake engaged indicator.
- Low oil pressure indicator. It should go out after the engine starts. It can turn on when the oil level is low and there is insufficient pressure in the lubrication system.
- Lamp for monitoring the performance of the immobilizer and standard security system.