Chevrolet Niva diagnostic connector: where it is located, diagram, description
First, you need to find out whether the car has an immobilizer system.
Chevrolet Niva (NIVA Chevrolet). The check is on. Do-it-yourself engine diagnostics.
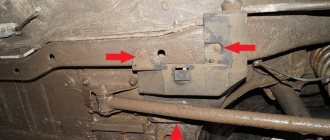
This procedure helps to extract the additional performance inherent in the motor. To restore communication between the contacts, a jumper is installed, as shown in the picture below:
CHEVROLET-NIVA. on a Chevrolet Niva? just be more precise. otherwise they couldn’t find it on the service. Discussion closed by moderator....
Check engine error If the check engine light comes on on a Niva Chevrolet, this warns that there are malfunctions related to engine operation. The diagnostic connector in a Chevrolet Niva car is located at the bottom right of the steering wheel. The connector can be installed under the hood; for models with a low dashboard, it is installed in the cabin, on the glove compartment side; with a high panel, it is installed in the area of the central part of the dashboard.
One of the main conditions for the connector is the ability to connect a K-Line format connector. To carry out such diagnostics, you need to find the computer connector in the car.
Let's take a closer look at Chevrolet Niva error codes with decoding: As practice shows, knowing how to perform an independent check is very useful, since this knowledge helps to quickly identify a malfunction and eliminate it in a timely manner.
Check engine error If the check engine light comes on on a Niva Chevrolet, this warns that there are malfunctions related to engine operation. The light comes on at the moment when the engine begins to detect a failure or error and writes a specific code into its memory.
Let's look at the main reasons why this warning may appear: The fuel-air mixture has an incorrect composition. This problem is eliminated by filling the tank with higher quality gasoline. Low engine oil level There is a problem with the ignition system, which may be due to a faulty spark plug or ignition coil. The power system is faulty. It is possible that fuel injection into one of the cylinders has stopped. The lambda probe is faulty. A separate sensor has failed in the ECM system. It can be concluded that in some cases, when the engine starts and the check light is on, this may indicate that the engine is running in emergency mode and the problem is not very critical.
If the engine starts and stalls, then this is most likely a problem with the fuel supply or the crankshaft sensor has failed. In any case, it is better not to use the car until you find out the exact reason.
Chip tuning Some drivers, in order to increase engine power, do chip tuning of the Chevrolet Niva. This procedure helps to extract the additional performance inherent in the motor.
First, you need to find out whether the car has an immobilizer system. If it is, then you need to check the adapter itself. If this is not possible, you should check the diagnostic system for any breaks that may be in the wiring between the connector and the ECU line.
Chip tuning
Some drivers do chip tuning of the Chevrolet Niva in order to increase engine power. The essence of this procedure is to remove the established restrictions by adjusting the optimal factory settings in the electronic control unit. This procedure helps to extract the additional performance inherent in the motor.
The whole process can be divided into several stages:
- Reading the necessary data from the electronic control unit
- Making the necessary adjustments
- Updating and recording new data
The main advantage of this procedure is:
- Engine power increases
- Speed limit removed
- You can change the fuel type
- All factory settings can be returned at any time
The disadvantages include:
- High cost of work
- The ECU may fail
- Increases fuel consumption, reduces system life
- Errors may appear
Each specialist has a different attitude towards chip tuning, some consider it useful, while others think that this procedure can negatively affect the performance of the car, while reducing its service life.
To summarize, we can conclude that you can identify error codes on a Chevrolet Niva either independently or using a special device. If malfunctions occur, they must be eliminated as soon as possible, otherwise this may lead to irreversible negative consequences in the operation of the entire system.
Types of diagnostic cords for data transmission
With a standard arrangement, the diagnostic line can be connected to the gap between the immobilizer and the ECU. If there is no immobilizer, the diagnostic line is completely shielded and a plug is installed at the connector connection point.
Installing a Chevrolet Niva on-board computer
To restore communication, you need to install a jumper between the contacts, as indicated in the diagram, or install an immobilizer. The location of the connector itself may differ in different models produced by the AvtoVAZ concern. The connector can be installed under the hood; for models with a low dashboard, it is installed in the cabin, on the glove compartment side; with a high panel, it is installed in the area of the central part of the dashboard.
The Chevrolet Niva diagnostic connector is located near the ignition switch. To find it you need to look next to the steering column housing.
The electronic control unit itself is located under the glove compartment, near the front passenger's feet. In order to gain access to it, you need to remove the glove box and remove the fuse box mounts.
Connecting diagnostic equipment in a Chevrolet Niva car
To diagnose a car's on-board computer, special diagnostic equipment is used, which is usually connected to a personal computer or laptop. For data transfer, a COM port is usually used, into which a K-LINE type connector is connected.
When connecting the car to the device, errors may appear on the PC screen. Typically, the diagnostic device displays a message indicating that there is no communication with the controller. But you shouldn’t panic, there could be many reasons for this. First, you need to find out whether the car has an immobilizer system. If it is, then you need to check the adapter itself. If this is not possible, you should check the diagnostic system for any breaks that may be in the wiring between the connector and the ECU line.
With a standard arrangement, the diagnostic line can be connected to the gap between the immobilizer and the ECU. If there is no immobilizer, the diagnostic line is completely shielded and a plug is installed at the connector connection point. To restore communication, you need to install a jumper between the contacts, as indicated in the diagram, or install an immobilizer.
The location of the connector itself may differ in different models produced by the AvtoVAZ concern. The connector can be installed under the hood; for models with a low dashboard, it is installed in the cabin, on the glove compartment side; for models with a high panel, it is installed in the area of the central part of the dashboard. The Chevrolet Niva diagnostic connector is located near the ignition switch. To find it you need to look next to the steering column housing.
The electronic control unit itself is located under the glove compartment, near the front passenger's feet. In order to gain access to it, you need to remove the glove box and remove the fuse box mounts. If you have a long cable, then it is not necessary to remove the fastenings.
Connectors for connecting diagnostic equipment used in VAZ cars
There are a large number of connectors that are supplied to connect equipment. One of the main conditions for the connector is the ability to connect a K-Line format connector. Installation with a standard VAZ connector and OBD II standard is also possible
Types of diagnostic cords for data transmission
The NPP NTS cord is equipped with KR2 adapters with a triple core, in which 2 wires are separated for connection to the battery using crocodiles and an additional signal cable connected to the contact block. If you need to extend the wire yourself, remember that the maximum length should be no more than 15 meters so as not to create unnecessary interference.
And, undoubtedly, the most convenient to use is the model with a built-in Kline type adapter. It allows easy connection to a laptop and is compatible with many special applications for car diagnostics.
Where is the diagnostic connector located on a Chevrolet Niva?
The classic location of the diagnostic connector block in most cars is behind the steering wheel near the ignition switch . Chevy Niva is no exception. The OBD type pinout is used. On-board diagnostics of the first generation was developed back in 1991 with the purpose of reading information on the state of the ECU (electronic control unit). This system is responsible for all engine functions.
The first copies of Niva Chevrolet used a 12-pin OBD1 connector . Since 2002, it was changed to 16-pin OBD2. To select the correct diagnostic equipment for the on-board computer, you need to find out in advance what type of pinout is in a particular Chevrolet Niva.
Additional Information
On some Chevrolet Niva models there is a 12-pin block, this is due to the fact that these models are equipped with other control units of older models. Modern car scanners are mainly based on the OBD2 connector, so to connect to 12 PINs you will need a special adapter purchased or made independently.
The correct connection diagram for a 12 PIN block with a 16 PIN adapter
OBD 1 pinout
To correct the operation of electronic systems, OBD equipment was invented. The first generation pinout has a rectangular shape with 12 pins.
Each element of the nest has its own purpose:
- pin A transmits mass information;
- B corresponds to the diagnostic L-line;
- D—CO potentiometer;
- contact G is responsible for the fuel pump control functions;
- H—food;
- M - K-Line diagnostics.
At the bottom of the pinout there is a “Key” , which is responsible for maintaining the correct design of the equipment. This element is designed to ensure the correct orientation of the plug and connector in the car.
Car brands and years of manufacture
Any injection model before 2002 has an OBD1 pinout. When determining the type of diagnostic connector for 2002 cars, it is worth considering that some may already use OBD2. They can be easily distinguished by their “rosette” shape .
Access and location
To find OBD1, just look behind the steering column - where the ignition switch is located. The connector is accessible to the driver.
OBD 2 pinout
The 12-pin OBD1 in the Chevrolet Niva has been replaced by OBD2 . This is due to the introduction of new standards in Europe since 2001. This solution has significantly expanded the possibilities of car diagnostics.
The first copies of the equipment showed general error information. Using OBD2, the car owner can independently obtain complete information on the state of the ECU by using a scanning device or adapter. 16-pin connector. Its shape has changed: now it is a trapezoid with a narrowing downwards.
Diagnostic connector pins for used protocols
The OBDII standard suggests the possibility of using 5 diagnostic protocols . Chevrolet Niva uses 3 of them:
- J1850 PWM. High-speed protocol with a performance of 41.6 Kb/sec. Transmits signals via pins 2, 4, 5, 10, 16.
- J1850 VPW. (The principle) of transmitting signals via pins 2, 4, 5, 16 is the same, but the speed is 10.4 Mb/s.
- ISO 9141-2. The simplest protocol that does not require complex communication microprocesses (unlike the above). Performs pulse transmission using pins 4, 5, 7, 15, 16
Features: The ISO 9141-2 protocol is easy to determine, thanks to pin 7, as well as the exclusion of pin 2 (10) on the Chevy Niva diagnostic connector.
If the system does not have pin 7, the SAE J1850 VPW (Variable Pulse Width Modulation or Pulse Width Modulation) protocol is used. The specified signal transmission protocols function properly via a standard OBD-II J1962 connector cable.
Selecting equipment for diagnosing Niva Chevrolet
The first step when choosing a cable for reading information from an on-board computer is determining the type of connector.
The main difference between OBDI and OBDII (besides the year of manufacture of the vehicle in which it is installed) is the shape of the connector. How to determine what type of pinout is used in a particular car is described in detail above. It is also possible to connect the K-Line connector to the OBD connector on the Niva Chevrolet. In this way, special diagnostic equipment is installed.
To read information from the OCU you will need:
- a scanning device that supports the required type of connections (currently, in addition to traditional equipment operating via a USB cable, there are items that support wi-fi and bluetooth functions);
- laptop;
- adapter (if necessary);
- appropriate software for diagnostics (for the Russian automotive industry, the ScanMaster ELM 2.1 and OpenDiagPro programs are recommended).
Important! The computer must support the same types of information transfer as the adapter. Otherwise, connection will not be possible.
There is a wide range of diagnostic equipment on the modern market . It is divided into the following types:
- "amateur" equipment;
- multi-brand (multifunctional) devices;
- professional equipment.
The last two categories are used for work at service stations and dealerships . For self-diagnosis, it is enough to purchase a simple adapter for beginners based on the ELM327 chip.
Even the most minimally functional equipment is capable of performing all basic tasks (detecting an error, correcting it, transmitting information about the state of the ECU to the PC screen). Such a service in service centers costs up to 1,500 rubles. Purchasing an adapter will save the Niva owner from the need to contact specialists and save money.
Carefully! There are cases when the controller generates an error even though it is fully operational. The reason is the failure of the scanning device itself.
Self-diagnosis
The function involves shutting down the system in which the breakdown occurred, followed by enabling a bypass program . A "Check Engine" light on the dashboard should worry the owner of a Chevrolet Niva. The developers have provided a standard self-diagnosis function. This option is useful in cases where there is a short-term failure in the program, but the machine continues to operate as normal. You can identify an “accident” using self-diagnosis.
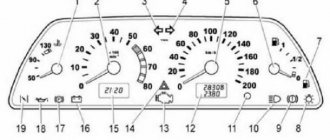
The motorist needs to perform the following algorithm of actions:
- Press and hold the odometer button.
- Insert and turn the ignition key so that the arrows on the panel move up.
- Press the odometer again. The BC firmware version will be displayed on the screen under the speedometer.
- Press the button again. An error code is displayed.
- To reset the information, you must press the odometer again.
Help: If the “code” that appears on the screen is “0”, this indicates that there is no malfunction.
Each number indicates certain errors read by the car's on-board computer. To determine the exact cause of the malfunction, you need to decipher the code that appears on the screen.
Results
A competent diagnostic exercise of the ECU will allow you to identify and correct problems that have arisen in the operation of the on-board computer. To do this correctly, carefully study the type of pinout, select a scanner to read the information and display it on the PC screen.
By adhering to the above tips and instructions, the motorist will be able to complete the process successfully. If errors occur again, the owner of a Chevy Niva will not have to contact a car service center and overpay for diagnostics.
Chevrolet Niva diagnostic connector: where it is located, diagram, description
First, you need to find out whether the car has an immobilizer system.
Chevrolet Niva (NIVA Chevrolet). The check is on. Do-it-yourself engine diagnostics.
This procedure helps to extract the additional performance inherent in the motor. To restore communication between the contacts, a jumper is installed, as shown in the picture below:
CHEVROLET-NIVA. on a Chevrolet Niva? just be more precise. otherwise you didn’t find it on the service? Discussion closed by moderator...
Check engine error If the check engine light comes on on a Niva Chevrolet, this warns that there are malfunctions related to engine operation. The diagnostic connector in a Chevrolet Niva car is located at the bottom right of the steering wheel. The connector can be installed under the hood; for models with a low dashboard, it is installed in the cabin, on the glove compartment side; with a high panel, it is installed in the area of the central part of the dashboard.
One of the main conditions for the connector is the ability to connect a K-Line format connector. To carry out such diagnostics, you need to find the computer connector in the car.
Let's take a closer look at Chevrolet Niva error codes with decoding: As practice shows, knowing how to perform an independent check is very useful, since this knowledge helps to quickly identify a malfunction and eliminate it in a timely manner.
Check engine error If the check engine light comes on on a Niva Chevrolet, this warns that there are malfunctions related to engine operation. The light comes on at the moment when the engine begins to detect a failure or error and writes a specific code into its memory.
Let's look at the main reasons why this warning may appear: The fuel-air mixture has an incorrect composition. This problem is eliminated by filling the tank with higher quality gasoline. Low engine oil level There is a problem with the ignition system, which may be due to a faulty spark plug or ignition coil. The power system is faulty. It is possible that fuel injection into one of the cylinders has stopped. The lambda probe is faulty. A separate sensor has failed in the ECM system. It can be concluded that in some cases, when the engine starts and the check light is on, this may indicate that the engine is running in emergency mode and the problem is not very critical.
If the engine starts and stalls, then this is most likely a problem with the fuel supply or the crankshaft sensor has failed. In any case, it is better not to use the car until you find out the exact reason.
Chip tuning
Some drivers do chip tuning of the Chevrolet Niva in order to increase engine power. The essence of this procedure is to remove the established restrictions by adjusting the optimal factory settings in the electronic control unit. This procedure helps to extract the additional performance inherent in the motor.
The whole process can be divided into several stages:
- Reading the necessary data from the electronic control unit
- Updating and recording new data
Making the necessary adjustments
The main advantage of this procedure is:
The disadvantages include:
- High cost of work
- The ECU may fail
- Increases fuel consumption, reduces system life
- Errors may appear
Each specialist has a different attitude towards chip tuning, some consider it useful, while others think that this procedure can negatively affect the performance of the car, while reducing its service life.
To summarize, we can conclude that you can identify error codes on a Chevrolet Niva either independently or using a special device. If malfunctions occur, they must be eliminated as soon as possible, otherwise this may lead to irreversible negative consequences in the operation of the entire system.
Types of diagnostic cords for data transmission
With a standard arrangement, the diagnostic line can be connected to the gap between the immobilizer and the ECU. If there is no immobilizer, the diagnostic line is completely shielded and a plug is installed at the connector connection point.
Installing a Chevrolet Niva on-board computer
To restore communication, you need to install a jumper between the contacts, as indicated in the diagram, or install an immobilizer. The location of the connector itself may differ in different models produced by the AvtoVAZ concern. The connector can be installed under the hood; for models with a low dashboard, it is installed in the cabin, on the glove compartment side; with a high panel, it is installed in the area of the central part of the dashboard.
The Chevrolet Niva diagnostic connector is located near the ignition switch. To find it you need to look next to the steering column housing.
The electronic control unit itself is located under the glove compartment, near the front passenger's feet. In order to gain access to it, you need to remove the glove box and remove the fuse box mounts.
Where is the diagnostic connector located on Priora, VAZ, Chevrolet Niva
It should be noted that only four low-order bits are used in the control byte - the high-order bits are reserved for some special commands and can be used by the PC when initializing a connection with the controller and negotiating the data transfer protocol, as well as the controller to control transmission errors.
Self-diagnosis of NIVA CHEVROLET, VAZ, etc.
We draw your attention to the fact that this website is for informational purposes only and under no circumstances is it a public offer, defined by the provisions described in part 2 on page. The principle of operation differs little from standard troubleshooting schemes. Diagnostic cords Now a little about the cord.
Chevrolet Niva - the control unit is located in the area of the front passenger's feet. Connector for connecting diagnostic equipment…
So, for example, a 3-byte command would look like this: The decimal format is indicated by the label dec. To find it you need to look next to the steering column housing.
Setting the MSB control byte indicates the presence of problems, and the following status byte will contain the corresponding information. The advantages of this method are that it automates many processes when identifying the cause of a machine breakdown.
When connecting the car to the device, errors may appear on the PC screen. Typically, the diagnostic device displays a message indicating that there is no communication with the controller. But you shouldn’t panic, there could be many reasons for this. First, you need to find out whether the car has an immobilizer system.
Types of diagnostic cords for data transmission
If it is, then you need to check the adapter itself. If this is not possible, you should check the diagnostic system for any breaks that may be in the wiring between the connector and the ECU line. With a standard arrangement, the diagnostic line can be connected to the gap between the immobilizer and the ECU. If there is no immobilizer, the diagnostic line is completely shielded and a plug is installed at the connector connection point.
To restore communication, you need to install a jumper between the contacts, as indicated in the diagram, or install an immobilizer. The location of the connector itself may differ in different models produced by the AvtoVAZ concern.
The connector can be installed under the hood; for models with a low dashboard, it is installed in the cabin, on the glove compartment side; with a high panel, it is installed in the area of the central part of the dashboard.
The Chevrolet Niva diagnostic connector is located near the ignition switch. Start the engine and write down the codes displayed by the MIL indicator lamp.
If the lamp does not display any codes, proceed to the next step of the test. Rewrite the codes displayed by the MIL lamp - if no codes are displayed by the lamp, therefore, the failure has a different reason.
Clearing the self-diagnosis system memory For more information on reading trouble codes, see the scanner user manual.
ELM327 OBD2 scanner (test and review)
Turn off the ignition and disconnect the test mode connector. General data The connection diagram is shown in the illustration. The device acts as a simple scanner and is designed to read diagnostic codes and data from the OBD II system: engine speed, coolant and intake air temperature, load characteristics, air flow into the engine, etc.
Main purpose: To connect to a computer, a 3-wire cable is sufficient; connection to the diagnostic connector is carried out with a 6-wire cable. The supply voltage is supplied to the controller via the OBD diagnostic connector. Recommendations for use To connect the device to the car, an unshielded cable with a length of no more than 1 can be used.
Connecting diagnostic equipment to the car
When using a longer cable, reduce the resistance of the resistors at the input of the device R8 and R9 or R. When using a shielded cable, the shield should be turned off in order to reduce the capacitance. The cable for connecting to the computer's serial port can also be unshielded. The device operates stably with a cable length of up to 9 m. For significantly longer cable lengths, a more powerful RS communicator should be used. The topology of the electrical connections is arbitrary.
If humidity is high, use additional bypass capacitors. Free browser software for reading codes and data can be downloaded from the manufacturers' websites or the website of our publishing house arus.
An optional condition is even the presence of a hard drive in the computer. General principles of data exchange Unless otherwise stated, all numbers are given in hex format. The decimal format is indicated by the label dec. Data exchange occurs over a three-wire serial connection without the use of initialization handshaking service messages. The device listens to the channel for messages, executes received commands and transmits the results to a personal computer PC, after which it immediately returns to listening mode.
The data entering and exiting the controller is organized in the form of a chain of sequential bytes, the first of which is control.
Typically, the control byte is a number from 0 to 15 dec in decimal or 0-F hex, describing the number of subsequent information bytes. So, for example, a 3-byte command would look like this: A similar format is used both for incoming commands to poll the on-board self-diagnosis system, and for outgoing messages containing the requested information.
It should be noted that only four low-order bits are used in the control byte - the high-order bits are reserved for some special commands and can be used by the PC when initializing a connection with the controller and negotiating the data transfer protocol, as well as the controller to control transmission errors. In particular, in the event of a transmission error, the controller sets the most significant bit of the MSB of the control byte to one.
Niva Chevrolet location of the diagnostic connector
Since a computer is still the same machine, sometimes the Chevrolet Niva OBD connector also malfunctions.
It also happens that the computer reports a malfunction of the entire system, although in fact you need to tighten the nut. Such diagnostics are developing very rapidly, and the developments of professionals are leading to such a method of troubleshooting becoming the main one. To carry out such diagnostics, not much is needed, the Chevrolet Niva OBD connector is precisely: To carry out such diagnostics, you need to find a computer connector in the car. Its location differs in different cars. Main sources of energy consumption Connecting diagnostic equipment in a Chevrolet Niva To diagnose the on-board computer of a car, special diagnostic equipment is used, which is usually connected to a personal computer or laptop.
When connecting the car to the device, errors may appear on the PC screen. Typically, the diagnostic device displays a message indicating that there is no communication with the controller.
Connecting diagnostic equipment in a Chevrolet Niva car
But you shouldn’t panic, there could be many reasons for this. First, you need to find out whether the car has an immobilizer system.
Chevrolet Niva OBD connector If it is present, then you need to check the adapter itself. If this is not possible, you should check the diagnostic system for any breaks that may be in the wiring between the connector and the ECU line. With a standard arrangement, the diagnostic line can be connected to the gap between the immobilizer and the ECU.
Niva Chevrolet location of the diagnostic connector
Without a scanner everything starts and works without problems. Car g.
The brains are like this: Bosch 7. I connect this scanner to Ford from my phone - it shows everything.
I took another scanner with the same characteristics from KIA. The result is identical.
I installed the OpenDiag program - through these scanners it can read errors, but cannot connect to the ECU.
Location of the diagnostic connector in VAZ cars
It should be noted that initialization of the VPW and PWM protocols is much faster, since it only requires the transfer of relevant information to the controller.
On models that meet the ISO standard, initialization takes about 5 seconds, spent on information exchange between the controller and the on-board processor, carried out at a speed of 5 baud. The reader should note that on some ISO vehicle models, protocol initialization will pause if a data request is not sent within a 5-second interval - this means that the PC must automatically issue requests every few seconds, even in idle mode .
Diagnostics of Niva Chevrolet
The Chevrolet Niva diagnostic connector helps you obtain information about how most units work, into which special equipment is connected via Bluetooth or a cable. Therefore, if you want to conduct independent diagnostics, it is important to know where it is.
The connector in the Niva is located under the steering wheel on the right side, and the pinout itself is under the dashboard on the driver’s side. To check the on-board computer, you need to use special equipment that transmits all the necessary information to the laptop. Data transfer is carried out using a COM port into which a K-LINE type connector is installed.
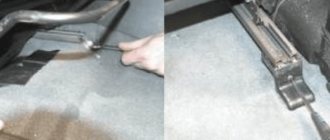
When connecting, errors may appear on the laptop screen. At this moment, there is no need to worry, since the appearance of such messages may be due to a lack of communication with the device itself. You should also check whether the standard anti-theft system is installed; if so, check the adapter itself. If there is a standard location, then it is connected to the diagnostic line between the ECU and the immobilizer. And if it is missing, a plug is installed in its place. To restore communication between the contacts, a jumper is installed, as shown in the picture below:
Depending on the year of manufacture of the model, the connectors may differ from each other.
Chevrolet Niva obd connector
Where is the Chevrolet Niva diagnostic connector located?
Computer diagnostics itself spread in the West many years ago, but in our country this concept is just being introduced into the consciousness of motorists.
The advantages of this method are that it automates many processes when identifying the cause of a machine breakdown. The principle of operation differs little from standard troubleshooting schemes. During such diagnostics, computing devices are connected to various parts of the car and tested for faults. All results appear on the screen, after which a further repair plan is developed. The main advantage of such a breakdown detection system is the huge savings in time that could have been spent searching for breakdowns. The results are always very accurate, so the repair plan will be as effective as possible.
Since a computer is still the same machine, sometimes it also has failures. Sometimes the computer cannot find a breakdown in the engine, so you should not count on such diagnostics 100%, although this search method is mostly accurate and fast. It also happens that the computer reports a malfunction of the entire system, although in fact you need to tighten the nut.
Such diagnostics are developing very rapidly, and the developments of professionals are leading to such a method of troubleshooting becoming the main one.
To carry out such a diagnosis, not much is needed, namely:
- computer near the car;
- K-Line adapter;
- extension cord from the outlet to the car;
- special programs.
To carry out such diagnostics, you need to find the computer connector in the car. Its location differs in different cars. It can be located both under the hood and inside the car.
Self-diagnosis
If it is not possible to check with a special device, then this can be done using self-diagnosis, which will help to quickly identify all problems associated with the operation of the car. To do this, press the odometer button and turn on the ignition. The speedometer needle will begin to rise to the top; by pressing again, information about the firmware will appear on the screen, and by pressing again, all existing errors will appear.
Let's take a closer look at the Chevrolet Niva error codes with decoding:
During self-diagnosis, error 8 and error 14 often appear, the first informs about problems in the brake system, and the second is related to fuel consumption, quite often this is a system glitch, but in any case you need to replace the sensor responsible for these mechanisms, or reset the memory by resetting the battery terminals.
As practice shows, knowing how to perform an independent check is very useful, since this knowledge helps to quickly identify a malfunction and eliminate it in a timely manner.
Which program is suitable for elm327 obd2 scanner on an Android smartphone?
Quite a difficult question for a beginner. There are many programs in the play market; the developer of my scanner, for example, strongly suggests Torque . The program is beautifully done. For cars of the desired brand, you can additionally download so-called PID files (a set of sensors) and make settings for them. I did not find a PID for my car.
I didn’t like Torque as an on-board computer; it diagnoses errors, but I didn’t understand the settings. It seems to me that it is poorly compatible with domestic cars.
I recommend two other programs. One for diagnostics only, called OpenDiag . It will show errors, knows how to reset them, and also knows how to reset the ECU to factory settings. If you configure it correctly, there is no price for it!
I use a different one for the on-board computer. There is a normal Russian language, the instrument panel is already configured, it has what I need. Even the free functionality is enough to display the readings of any sensor in the form of a graph and set the boundaries of optimal and threshold values. You can look by dates at what happened before and what is now. Very easy to use and set up for a newbie like me. It's called Car Scanner .
The functionality of these programs is approximately the same, but compatibility with your car and user friendliness are of great importance. These applications are easy to download to your smartphone; there are also versions for Windows (Open Diag).
Is my ELM working well? Yes, I'm happy. With the help of a friend, we carried out diagnostics for the first time since purchasing the car. Mileage 40,000. Showed mismatch of camshaft and crankshaft marks, incorrect opening angle of the air damper. Increased air mass flow, increased fuel consumption.
I removed and washed the housing with the damper in kerosene. I removed the cylinder head cover and it turned out that the chain guide had been completely chewed up and the chain was dangling. I aligned the marks, installed a new damper and chain tensioner. I pulled the chain. Replaced the fuel filter. After which the scanner no longer showed errors.
Check engine error
If a check light comes on on a Niva Chevrolet car, this warns that there are malfunctions associated with the operation of the engine. The light comes on at the moment when the engine begins to detect a failure or error and writes a specific code into its memory.
Let's look at the main reasons why this warning may appear:
- The air/fuel mixture is incorrect. This problem is eliminated by filling the tank with higher quality gasoline.
- Low engine oil level
- Engine overheated
- There are problems with the ignition system, which may be due to a faulty spark plug or ignition coil
- The power system is faulty. It is possible that fuel injection into one of the cylinders has stopped.
- Lambda probe faulty
- A separate sensor in the ECM system has failed
We can conclude that in some cases, when the engine starts and the check light is on, this may indicate that the engine is operating in emergency mode and the problem is not very critical. If the engine starts and stalls, then this is most likely a problem with the fuel supply or the crankshaft sensor has failed.
In any case, it is better not to use the car until you find out the exact reason.
Deciphering error codes
The first character is a letter and indicates a fault block:
- B - body;
- C - suspension;
- P — engine (ECM, gearbox);
- U - data exchange bus.
The second character is a number, code type:
- 0 — SAE (standard);
- 1.2 - OEM (factory);
- 3 - reserved.
The third character is a number, system:
- 1, 2 - fuel system;
- 3 - ignition system;
- 4 — reduction of exhaust gas toxicity;
- 5 - idle;
- 6 - ECU or its circuits;
- 7, 8 — transmission (automatic transmission).
The fourth and fifth characters are numbers, the error code itself.