Installation sequence
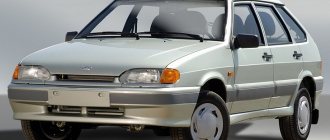
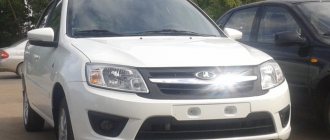
On the body of the Kalina-2 there are fastenings in the form of four bolts, onto which the nuts that hold the amplifier are screwed. These nuts still need to be purchased, their standard size is M8. We looked at how to remove the bumper of the Lada Kalina 2 earlier. But anyway, let’s briefly repeat this sequence:
- Using a 10mm wrench, unscrew the 6 bolts located on top of the radiator grille;
- There are similar bolts at the bottom, their number is 3. Remove these bolts;
- On the bottom side of the bumper you can see the screw caps, which can be unscrewed with a Phillips screwdriver. The number of screws is 4;
- Two similar screws are located on the side of the fender liners. They definitely need to be unscrewed!
- The assembly called the “front bumper” is disengaged from the side brackets.
Print out the drawing and find similar parts on your car.
Kalina-2 bumper, fastening parts: 1 – metric bolts, 2 – self-tapping screws
Note that the connector for the fog optics (if any) must be disconnected before dismantling. Assembly is carried out in reverse order.
The most common mistakes: sometimes not all the screws located next to the fender liners are unscrewed. There is no need to explain what this can lead to.
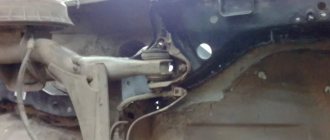
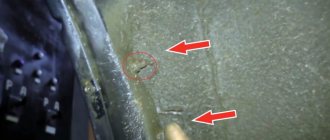
The part itself, called the “bumper reinforcement,” is easy to install. There are appropriate fastenings on the body; all that remains is to tighten 4 nuts. But the design has a bracket that holds the “signal”. This bracket must be removed as shown in the picture.
Removing the signal bracket, installing the bumper amplifier
Preparatory stage
Necessary tools, materials:
- set of hydraulic compensators (16 pieces);
- oil seals, plugs, sealing gaskets;
- anaerobic sealant or Loctite - industrial glue;
- new rubber rings for injectors;
- engine oil;
- filter element;
- set of automotive tools;
- additional lighting.
Owner reviews, recommendations
The part designated by number 21900-2803131-00 may have the following names from different sellers: bumper beam, channel, etc. This “beam” is usually sold unpainted. Therefore, we take putty and prime it. And then we take the part to a paint shop and let them apply a polymer coating. It is not recommended to install an unpainted metal part. It will quickly begin to rust.
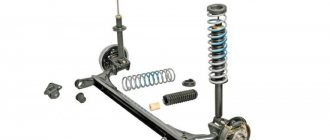
Various amplifier installation options
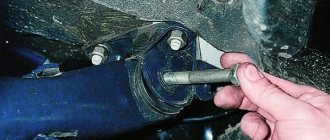
It is advisable to place washers under the nuts, then the paint will not be scratched. The “beam” itself, unpainted, weighs about 1 kg and is easy to transport. A labor-intensive process, as you can understand, is the installation of a standard bumper. This operation is best performed by two people.
There is no point in trying to apply the polymer coating yourself. The baking temperature of the paint is +70 C. C. There is no need to try to solve this problem using a household oven - the bracket simply will not fit in the oven.
It is easy to notice that the bumpers of the Lada Kalina 2 and Grants differ in design and shape. As the owners of the “second Kalina” themselves say, the installed bumper amplifier does not change the appearance of the car. But coming closer to the radiator and looking from top to bottom, everyone notices the iron bracket. Therefore, it is better to paint it with black matte enamel. There are no other options.
Front speakers Kalina
There is audio preparation in the front doors, but on new Kalinas, in the standard configuration, there is no wiring in the front doors.
Set 13cm. Speakers in the front doors of Kalina can be installed in various ways. 1) Quick and easy installation, no need to remove door trim. Just attach the ring from the speaker to the door trim and circle it with a marker. Use a sharp knife to cut a hole in the upholstery. It is worth considering that the standard audio wires are short, so it is best to install the speakers in the viburnum door with the connectors facing down, otherwise the wiring may break when the glass is released.
2) Installation of speakers through spacers. This method, together with noise insulation, gives better sound quality. You will need to remove the door trim and attach the spacer rings from the kit (or make them from plywood) in the car door.If you choose the second method, then it is recommended to consider 16cm. speakers. Depending on the model of speakers of this size, they can be installed without spacers and no modifications will be required, or you will have to cut the door iron or install spacers.
Bumper protection may affect safety
Previously, we looked at how a strut extension is mounted under the hood of the Kalina-2. The presence of such a part cannot worsen passive safety, which applies not only to LADA cars, but to any car in principle. Can the same be said about a bracket rigidly attached under the bumper? There are no amplifiers from the factory, and the conclusion suggests itself.
When carrying out any tuning, owners rarely think about how safety indicators will change as a result. Crash tests are always performed on standard vehicle configurations. But what do we get by changing the body design? We can only guess.
There is such a characteristic as “creasability”. It is better to take this into account when choosing alloy wheels, so as not to subsequently encounter the appearance of suspension defects. Something similar can be said about the body: by strengthening one thing, we increase the likelihood of failure of everything else.
The engine compartment of a modern car is crushed during a collision, the engine goes down, and the so-called “safety capsule” remains unharmed. For station wagons and hatchbacks, this capsule is considered to be the passenger compartment. Everything that is in front of the capsule should, as it were, soften the blow. The conclusion is obvious: it is unsafe to install those parts that prevent the bumper, fenders, and front side members from collapsing. The tuning discussed here is performed at your own peril and risk. We are waiting for your comments.
PS You cannot buy part “21900-2803131” from official dealers. You can find it in auto parts stores. The manufacturer is OJSC AvtoVAZ.
Basics of the design and operation of a hydraulic compensator
Configuration
The idea of automatic regulation of thermal clearances can be implemented in two versions: a conventional hydraulic pusher and a hydraulic support. The latter is used in gas distribution modules with rocker arms. On the Lada Priora in the sixteen-valve version, the intake and exhaust are equipped with individual camshafts. The optimal solution for this arrangement is the use of a hydraulic pusher.
The Priorov hydraulic compensator on the 126 engine consists of the following parts:
- A plunger pair, including a cylindrical cage and a piston with a ball valve.
- The outer housing is a pusher.
- System of grooves and holes for oil supply.
Principle of operation
The oil composition enters the internal cavity of the piston and, overcoming the resistance of the spring, pushes the ball away to fill the closed cylinder. When filling the liner, oil pushes the piston out and the hydraulic tappet rests against the cam. Next, the ball valve is locked and the assembly unit works like a regular pusher on motors with an adjustable valve mechanism.
Countersinking saddles
When repairing the cylinder head yourself, be prepared for the most monotonous and lengthy process - countersinking. A lot depends on its quality:
- tight fit of the valve to the seat;
- compression ratio in the combustion chamber.
The seat grinding work is carried out with a special tool - a roller cutter (less often - a countersink). With its help, a not quite finished seat can be given the desired shape so that the valve fits more tightly. Start work with a countersink at 60 degrees.
As soon as metal removal has begun in a circle, change the nozzle - take a countersink with a cone angle of 120 degrees. Work with it until a clear round edge appears. The final stage of countersinking is done with a 90-degree cone - it should go through the working chamfer of no more than 1.5 mm. Further grinding of the valve will increase it to the required value.
Review of manufacturer prices and the cost of hydraulic compensators for the Lada Granta
| Name / catalog article | Price, rub.) |
| Original 2191-1007300 | From 2600 / set 10 pieces |
| RUVILLE 267200 | From 230/unit |
| RUVILLE 267687 | —/— |
| INA 420 0073 10 | —/— |
| INA 420 0127 10 | —/— |
| JSC "Prosport" 845412 | From 250/unit |
| JSC "Prosport" 845931 | —/— |
*prices are current as of October 22, 2018.
Technical data of pushers:
- Weight: 1.150 kg;
- Size: 210 x 175 x 90 mm.
Reviews
| № | Positive |
| 1. | Victor: the valve mechanism works properly, there are no complaints. At 55,000 km the valve began to knock, so I contacted the workshop. It turned out that the fastening nut had become loose. |
| 2. | Vasily: I don’t know of any problems with the engine and its mechanisms, I regularly carry out technical inspections and fill in high-quality oil. |
| 3. | Sergey: at 65,000 km I replaced two pushers, the service life is good. The remaining hydraulic compensators are normal, the master said they were in good working order. |
| 4. | Vladlen: I’ve heard a number of negative reviews about the quality of the pushers, I can’t confirm, the machine works like a watch. I believe that careful handling of equipment and high-octane fuel are the key to long-term operation. |
| 5. | Vladimir: at 70,000 km I replaced a set of pushers. I think that the resource is more than sufficient. I carried out the work myself, the replacement procedure is not complicated. |
| Negative | |
| 1. | Slavik: my pushers went off at 35,000 km. The reason is the quality of workmanship and the fineness of adjustment. It is obvious that the technology is broken. Under warranty, they replaced a set of new ones. |
| 2. | Gennady: after 40,000 km, I replaced the set of pushers. Initially they knocked on “cold”, then constantly. The workshop said that there was a manufacturing defect. |
| 3. | Ivan: replaced two pushers in a year. What kind of workmanship can we talk about? I leave my negative review. |
Price issue
Changing the head gasket yourself will be quite inexpensive, since its cost ranges from 220 (for 8-valve engines) to 550 rubles (for 16-valve engines). In addition to it, you will need a gasket between the exhaust pipe and the catalyst, which costs no more than 100 rubles, and 10 new head bolts, costing 40–50 rubles each.
Performing such work at a service station depends on the territorial location and ranges from 4 thousand rubles in small cities (Tula, Bryansk) and up to 10 thousand rubles in large cities (Moscow, St. Petersburg).
Have you ever had to change the cylinder head gaskets on your car yourself?
Photo gallery
The photo below shows some stages of replacing the gasket on an 8-valve VAZ engine.
Engine with the valve cover removed Unscrewing the exhaust pipe from the converter Internal part of the engine cylinders with a damaged gasket The gasket itself Place where the gasket was punched Cylinders washed with gasoline Head removed from the engine Carbon deposits on valves and combustion chambers
The photo below shows some of the stages of disassembling a 1.4 liter engine.
Removing the washer reservoir Removing the rail with injectors Dipstick guide Timing drive removed Camshaft gears removed Removing the camshaft supports Internal parts of the cylinders 16-valve head
Conclusion
The hydraulic compensators on the Grant (16 valves) are its weak point. The manufacturer knows about the defect. We hope that the problem will be resolved soon.
However, not everything depends on the manufacturer. Owners do not follow vehicle maintenance rules. By violating factory instructions, you expose parts to premature wear.
High-octane fuel, high-quality motor oil, and a non-aggressive driving style are the main factors that increase the service life of parts.