The armrest has long been considered an integral part of comfort for high-class cars. However, cheaper models cannot please their owners with this pleasant and useful item. Of course, you can buy a VAZ 2107 armrest. However, this is not the car for which it is customary to buy expensive bells and whistles. If you are the proud owner of a Russian “Seven”, everything can and should be done with your own hands! So in this article we will discuss how to make a homemade armrest inexpensively and efficiently.
Is it needed at all?
It seems that since you are reading this article, then you personally really need it. Or maybe you don’t really need it, but you really want it. Why not fulfill this simple human desire?
Moreover, this thing is very useful. Many drivers note that having a good armrest greatly eases the load on the back and arm muscles, especially if the car has a manual transmission. If you consider yourself to be a reasonable, sane driver, then your seven will have just such a box.
The armrest is also very convenient to use as a place to store necessary small items. Someone here carries water or a mobile phone. For many, this is a convenient place to store their glasses case. Someone puts documents and a wallet here. If desired, you can make the device so that there will be buttons on it to control certain functions of the car.
So installing an armrest on a VAZ 2107 is not a luxury, but a completely justified thing from a practical point of view.
How to prepare for work
Choosing material for the frame
The best material is wood. You can also use a regular board. But chipboard, fiberboard, or any plywood is much more convenient to work with. If you want a structure without corners, then you can only use plywood, as it allows itself to be bent. To do this, it is held over hot steam or soaked in water. Pay attention to the thickness of the material: the best option is 1 centimeter. A slight variation of 0.8 to 1.5 centimeters is possible. Ordinary foam rubber is used as upholstery for the lid. Tools you will need: jigsaw, graph paper, meter tape.
We take measurements for the future drawing
Of course, you can use ready-made diagrams and drawings. But in order for everything to work out reliably, it is better not to rely entirely on information from the Internet, but to act independently. Therefore, we proceed according to the following scheme:
- Measure the distance between the two seats.
- Sit in the driver's seat, grab the gearshift lever and determine what height of the future armrest is most convenient for you.
- You also need to take a measurement between the back of the seats and the handbrake.
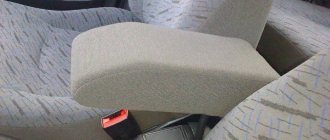
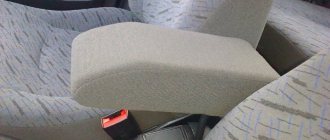
- You need to determine the distance between the seat belt buckles.
- Measure the height of the handbrake and its dimensions.
- You also need to find out the dimensions of the mounting location for the future product.
When making all the necessary measurements, remember that you will need to take into account the thickness of the upholstery that you plan to use later.
Making an armrest
If you are starting this kind of work for the first time, before making a structure from fiberboard or plywood, it is worth making a life-size model from cardboard. To connect the cardboard parts of the layout, you can use tape or paper clips. The model will allow you to verify whether any miscalculations were made when designing the design of the VAZ 2107 armrest. The manufacturing process of the armrest looks like this:
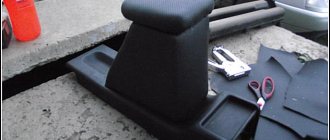
- mark future parts on a sheet of chipboard or plywood;
- cut out the marked elements with a jigsaw;
- if necessary, bend the plywood parts by pre-treating them with steam or soaking them;
- connect the parts with metal corners and self-tapping screws, having previously lubricated the joints with glue;
- place a layer of foam rubber on the lid and cover it with leather or other material;
- cover the walls of the armrest (to make them soft, you can place felt or foam rubber under the upholstery).
Design process, drawings and diagrams
After the measurements are taken, you can begin drawing the future product. You need to be extremely careful: a small mistake can cause the armrest to not fit into place or interfere with the normal functioning of other elements of the car.
You can use ready-made sketches and diagrams. But even in this case, you need to adhere to the following tips:
- You need to depict the product from all sides: side view, front view, rear view, top view. Indicate all dimensions on the drawing; these notes will be useful to you when performing work.
- The drawing must be made separately for the armrest cover.
- You also need to figure out in advance how the lid will be attached - should it bend or fold down. This will affect where the mortises and other fasteners will go.
- Decide right away how long the screws you will need. Indicate their dimensions directly on the drawing.
- Determine how you will install the finished product - either simply secure it tightly between the seats, or use special fasteners. The diagram should show the grooves of the lower part of the product.
- Apply the finished drawing to special graph paper (you can find it in a sewing store). This will allow you to create a pattern with which you will definitely not be mistaken with the dimensions when making the armrest.
Manufacturing
This work is quite simple for those who have held a jigsaw at least once in their life. If all the measurements were made correctly and you have made a good drawing of the future product, then all you have to do is follow these steps:
- Cut out all the details on graph paper, thereby creating patterns.
- Attach the patterns to the plywood and use a pencil to draw the outlines of the future parts on it.
- Using a jigsaw, cut out the parts from plywood.
- To make it easier to make curves, use hot water or steam to soften the plywood.
- Now it's time to fasten the individual parts with self-tapping screws. It is better not to use glue - the connection is unlikely to be of high quality.
- If you wish, divide the internal space of the product with partitions, thereby creating several compartments.
- Glue a piece of foam rubber onto the top of the lid, which will create a soft and comfortable feeling for your elbow.
Wrapping process
To cover the product, we will again need patterns from graph paper. We hope you haven't thrown them away yet. You will also need approximately a linear meter of the selected covering material, high-quality glue, nylon threads, and a good hair dryer. First, we will discuss in more detail which materials and tools are best to choose.
The most obvious material for covering interior elements is leather. You can choose either genuine leather or eco-leather. The main thing is that the material is really of high quality and does not crack in the cold. It is best to buy specialized leather for cars. It is unlikely that a material intended for furniture will be suitable. After all, furniture is usually used in comfortable home conditions. And the car will be exposed to both direct sunlight and severe frosts.
Owners of the VAZ 2107 also often choose Alcantara as upholstery. Its cost is approximately the same as that of genuine leather. Cheaper materials are usually of poor quality. Alcantara is good because its velvety surface is pleasant to the touch and protects your elbow from fogging. It is easy to clean from dirt and easily withstands temperature changes. It is easy to use in the process of pulling interior elements. You can even purchase Alcantara with a self-adhesive base, which will make working with it much easier. Glue is a very important material for further work. Moment glue is not suitable for the armrest. Over time, it will cause the skin to swell and peel away from the body. It is best to use special glue for auto leather.
To make the glove compartment look nice from the inside, you can use an ordinary carpet. It is inexpensive, scratch-resistant and does not tear. This is very practical considering what you will be storing inside the product.
So, let's move on to the description of the tightening process itself.
- Using a graph paper pattern, transfer the contours of the armrest parts to the wrong side of the facing material. It is necessary to take into account that for the lid you will have to add a few millimeters, which is due to the foam rubber applied to it. For other parts, it is better to remove two millimeters in order to tighten the upholstery and fit it as tightly as possible.
- Apply glue to one edge of the piece and carefully glue it to the body. Glue each subsequent side of the part after a few minutes to allow the glue to dry.
- Preheat the material using a hair dryer. If you are using leather, you can soak it in warm water for 15 minutes. It will be more difficult to work with such material, but in the end you will get a more accurate result.
- Fold the edges of the material inward and cut off the excess.
- The material needs to be pulled as tightly as possible - otherwise it will dangle carelessly.
Installation
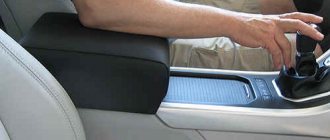
Most often, the armrest is installed as follows: it is clamped with bolts that hold the seat belt buckles. The seats will have to be moved forward, the mounting bolts will need to be unscrewed, the fork-shaped brackets for attaching the armrest will be inserted there and the bolts will need to be tightened back. Some people make special corners with which the armrest is attached to the floor with self-tapping screws.
Such a disadvantage as the lack of an armrest can be easily eliminated. You can, of course, buy it, but if you make it yourself, the car will have an armrest that fully matches the interior layout and the car owner’s needs.
Armrest – luxury or necessity?
The driver's seat in a car should be comfortable and ergonomic. Car armrests are one of the necessary components of this comfort. When the hand rests on the armrest, it relaxes (the load is removed from the muscles of the shoulder and elbow group). The overall load on the spine and back muscles is reduced (you can give your neck a more comfortable position, and even tilt your head back onto the headrest). As a result, driver fatigue is reduced (especially on long trips).
Universal armrests have additional convenient devices and functions that make the trip even more comfortable:
- box (box) for small items - now you can always place the same documents for vehicles, as well as other useful and necessary things at hand;
- space for a small bottle of water or a glass – not all armrests provide space;
- components, several departments of boxing - not all;
- a sliding mechanism that allows you to move their upper support cushion to a position convenient for the hand or to open access to the box and cup holder - not for everyone;
- suitability in size and mounting method for installation in many car models;
- buttons and other electronic controls for some electrical devices of the car - common;
- other.
The following requirements are imposed on the design and quality of factory armrests. First of all, they must be safe and comply with the standards developed by the United Nations Economic Commission for Europe (UNECE). When developing them, it is necessary to follow rules that take into account the anatomy of people of different heights; they were convenient for both those with a height of 140 cm and those with a height of 190 cm. The factory armrest must withstand loads of 110–120 kg; recline so as not to interfere with the use of the handbrake, high-speed steering, or the use of seat belts; have a sufficiently soft supporting surface under your hand. Its appearance should be in harmony with the interior of the car.
How to Make an Armrest in a Car with Your Own Hands
as a do-it -yourself locomotive
?
how to make an armrest
in
a car
?
Probably every car enthusiast has thought about how to distinguish his car from others using various body kits, spoilers and other tuning elements. How to make your own hand How to make a leather armrest in a car with your own hands. Yes, these parts can add sportiness to your iron horse, but they will not increase comfort or power. Therefore, it is worth considering a more practical installation, such as an additional armrest.
This not only hides a lot of small things (keys, documents, etc.), but also makes the car's interior more interesting and unique. How to remove the exhaust gas recirculation valve with your own hands? Forum. How about making an armrest in a car , I’ll tell you our article today.
Getting ready for work
How can I start making this item? The best place to start is by measuring and drawing the car's armrest. Before doing any work, carefully measure the distance between the front row seats and then record the data in a workbook. Based on the measurements, you will receive a future image (drawing) of the armrest. Remember that this diagram has special meaning because these are the values you will be making the part from. You should also keep in mind that seat spacing can vary significantly even among similar makes and models of vehicles. Useful information on how to repair a tire yourself using convenient tools. Every motorist had to have their car's wheels and tires repaired. So, if your friend has exactly the same car (make, model), then you should not take measurements in it. Pump functions in car design. How to make the replacement yourself: tools, attachments, additional pump. Video guide on removing and replacing brake pads and discs on the Audi A4 B5 (Audi A4 B5). how to do auto repair do it yourself. videos and articles. Be sure to calculate the distance using your vehicle only.
It is important to remember that in addition to the driver and passenger seat backs, there are important parts such as the handbrake lever and the seat belt. When measuring, take these features into account, as otherwise the armrest will not allow you to fasten your seat belt correctly or apply the handbrake. After all this, you can safely begin.
How to start making a car armrest?
It's very simple. you need to take some kind of wood spray (like an electric jigsaw) and a sheet of wood. The latter can be obtained from an old chipboard cabinet door. All important measurements should be noted according to the drawing and outline.
And now the assembly
Folding the armrest will be more difficult. To do this, mark the workpiece and drill holes for the screws. The sweat then turns into a box. At the final stage of assembly, the outer side of the structure is covered with coarse sandpaper. But this is not the end of our work on armrests. We must cover the entire structure with lining fabric.
Decorative cladding
How to sew an armrest for their
Hands ? The best place to start is by choosing the material. How to do body repairs yourself | The body is already repairing its cars. The final choice here depends on the brand and prestige of the car. For example, if you are making an armrest
for a Gazelle
Do it yourself
, then it would be wiser to pump it.
How to make an armrest for a Mitsubishi car. The same applies to domestic cars. Made armrest (VAZ 2107) Do it yourself It is recommended to cover it with the cheapest material. For more pathos and chic, you can use Alcantra. How to make a wick at home? Age for. How to install and remove door trim on a Skoda Fabia. If you decide to do it yourself to replace the door trim on your Skoda Fabia, it is best to do everything in the following order: It is not recommended to use leather as upholstery. This is very expensive, and besides, not every car lover copes with this by adding an armrest. their Hands
.
Design and production of universal armrest elements
Based on the measurements taken, we create a drawing or sketch. It is best to do several: separately for front, side, top and, if necessary, bottom views. We depict with our own hands the appearance of the armrest in all sketches in accordance with the selected projection for each specific sheet - front, side, top. Then, on all types, we mark the parts that will make up the design of the future universal arm support. After this, it is necessary to make as detailed a detail as possible of all the identified elements of the armrest on each of the sketches - you should indicate in detail for each detail:
- its dimensions, and for curly elements also the radii of roundings (bends);
- the place and method of fastening to other structural elements, indicating the distances to the edges of this part, the diameter of the fastening (if self-tapping screws are selected), the depth of the fastener into the attached part or intermediate bars (on another sketch projection, where this will be visible).
For the armrest support cushion (also known as the drawer lid) and the wall to which the former will be attached, it is necessary to indicate the location and dimensions of the tilt-and-turn fasteners (furniture hinges and their attachment points). Anyone who is good at designing and working with various materials and tools can develop a sliding cover design.
Fixing the future armrest between the seats can be done both by its tight fit and by using specially designed and prepared fasteners. In the first case, it is necessary to provide cutouts and grooves on the side parts of the universal arm support that will fit on the interior elements located between the seats. Also, after making the armrest, but before covering it, you will need to decide in the car at the installation site the thickness of the lining material on the side walls of the support. If you plan to make special fastenings with your own hands, then for this you will need to tie the lower parts of the armrest to the interior elements or fastenings already existing on them. In accordance with the selected interaction diagram between the universal support and the interior, the fastening method and details are developed. For both options for fixing the armrest, we display the corresponding additions to the design in its sketches.
After such preliminary preparation, further work should go like clockwork, unless, of course, a mistake was made anywhere. Therefore, it is worth checking all the sketches again - we look at them for compliance of the dimensions of the developed structure with the dimensions of the free space allocated for it in the cabin, the mutual coordination of all the parts and fastenings of the future armrest.
Types, design and features of VAZ armrests
All armrests used in Volzhsky Automobile Plant cars are divided into three large groups according to their purpose and installation location:
- Standard door armrests;
- Additional armrests;
- Central (console) armrests.
Interior door handles with armrests for VAZ cars
VAZ front door with integrated armrest
Standard armrests are mounted on the inside of all side doors, serving as a support point for the driver's (left hand) elbow and passengers. VAZ cars of various models use several design types of door armrests:
- Armrests combined with door handles into one removable structure;
- Armrests without handles, integrated into the plastic door trim;
- Armrests with and without handles, made in the form of a removable part of the door trim.
Parts of the first type were used only on early car models - VAZ-2101, 2102, 2103 and 2106. This armrest is a solid plastic part of a curved shape, the horizontal part acts as a support for the elbow, and the inclined part serves as a door handle. The surface of the part is textured (imitates leather), and a decorative insert-molding is provided on the horizontal part. The armrest is mounted using three screws; the mounting holes can be closed with decorative plugs.
Parts of the second type have been used on cars starting with the VAZ-2104; this design is also used in current Lada models (Priora, Granta, Largus). This type of armrest is formed in the form of a horizontal or inclined shelf directly in the plastic door trim. An inclined plastic door handle is mounted in front of the armrest; in early VAZ models, the handle is secured with two screws (the wells under them are closed with decorative plugs); in current models, hidden mounting with screws and latches is most often used.
Parts of the third type are used on current Lada Kalina models; such armrests are structurally similar to those described above, but they are made in the form of a removable section of the door trim. Armrests of this type are most often separated from the handles, which are also made in the form of a removable part of the upholstery.
An intermediate option are armrests integrated into the door trim, but having a decorative overlay with a texture or color different from the texture and color of the main upholstery. Such armrests are used on some current Lada models and modifications, including Vesta.
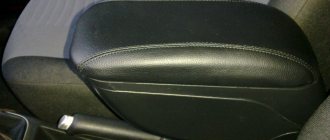
Additional armrests are an upgrade carried out by the car owner themselves; they are installed on the inside of the front seats. Most often, one armrest is used for the driver’s right arm, but it is also possible to use a second armrest on the passenger’s seat. All parts of this type on the market today have a fundamentally identical design. The basis of the armrest is a horizontal platform under the elbow, made of plastic or having a soft supporting surface (foam rubber covered with woven material, leatherette or other non-woven material). At the bottom of the armrest there is a shaped steel stand with a bracket for mounting on a chair. Installation of an additional armrest is most often done using the seat belt buckle bolt, but other free holes in the lower part of the seat base are also often used.
Central (console) armrests also belong to non-standard upgrades. Such products are made in the form of box-shaped structures with an upper horizontal or inclined platform, which are installed on the console between the front seats. Armrests of this type have two main varieties:
- No bar;
- With a bar.
Parts without a bar are a U-shaped structure, on top of which there is a support platform (plastic or soft, covered with various synthetic or natural materials), and on the sides there are steel supports (aka brackets). Such armrests act as a support for the elbow and a decorative element of the interior.
VAZ central armrest with bar
Installing an additional armrest to the seat belt buckle
Parts with a bar have a similar design, but inside they have a so-called bar - a place for storing small items. There are several types of bar:
- Inner box with a hinged lid, which serves as an upper support platform. In this case, the platform is mounted on hinges; for ease of opening, a small strap may be located in its front part;
- Front bar in the form of one or more shelves, drawers or boxes with lids. In this case, the upper support platform is rigidly fixed. Designs with cup holders have become somewhat widespread;
- Combined - with a hinged lid and front shelves.
In this case, additional and central armrests can be divided into two groups according to applicability:
- Universal;
- For a specific model range or a specific car model.
Universal products have dimensions and designs averaged for different car models, which makes them possible to install in most VAZ cars. Specialized armrests have dimensions and designs designed for a specific model range of cars, so their use on other models is difficult or completely impossible.
Currently, the market offers a wide variety of VAZ armrests for early and current car models; they have a variety of functionality and design. Most often, manufacturers of these accessories give preference to a classic design that matches the standard (factory) design of the car interior. However, there are also original armrests in an unusual and bright design, which is often used by car owners for decoration and tuning.
Selecting materials and making your own armrest
To make your own armrest body and cover, any wood material 8 mm thick is ideal. It can be plywood, board, chipboard or fiberboard. If the support pad and/or front wall must be curved (rounded), then only plywood is suitable for their manufacture - it can be bent over steam. To cover the armrest with your own hands, you can choose leatherette, leatherette, leather or other material.
We cut out all the details with our own hands from the selected material using a hacksaw, or better yet, a jigsaw (it will ideally handle all shaped elements). Then we steam the parts that need to be bent and wait until they cool down. Only after this can the necessary cutouts be made in them, if provided (for example, for a handbrake in the front wall).
When all the body parts are ready, we fasten its structure with self-tapping screws or wood glue. If its fixation should be based on the spacer principle, then we decide on the thickness of the cushioning material, which can be thinner plywood or craigs. We glue the cut overlays to the sides or place them on self-tapping screws. Then we cover the body with the material chosen for this. It is advisable to first make patterns for the body from graph paper, and then use them to cut the fabric for fitting and sew a cover from the resulting pieces, which will need to be stapled over the body.
How to install an armrest in a car with your own hands?
This is perhaps the most important task for a car enthusiast, because the ease of use and the duration of its operation as a whole depend on how correctly the box is installed. The task is further complicated by the fact that during installation the car owner can easily damage interior parts. It is also unacceptable to use the so-called “collective farm tuning” inside - this will only aggravate this situation.
How to install an armrest in a car with your own hands? To install this element itself, you will need to have the following set of materials:
- One polypropylene tube with a steel interior.
- M8 hairpin 100-110 centimeters long. We will need it to fasten the plastic in the cabin (in all cars, under the decorative plug, the plastic is held on by very short bolts, so we will lengthen them).
That's probably all you should buy to install an armrest in a car. By the way, to achieve reliable fastening under the decorative plug, it is recommended to drill another hole (you will have 3 of them in total).
Making an armrest for a VAZ-2107: where to start
Before you start making the armrest, you need to take measurements of the distances and sizes at the pre-installation site. You need to perform these steps in your showroom, as some parameters may differ even in cars of the same series. So that later you don’t have to remember which measurement and where it came from, all parameters must be entered on a pre-drawn sketch of the future armrest.
It will clearly show what distances and dimensions have been measured, and what remains to be added. Having independently completed drawings, during the manufacturing process there is no need to return to the machine to clarify some parameters. It is necessary to take the following measurements:
- distance between seats;
- armrest level height;
- the gap between the handbrake lever and the surface of the seat back (we ensure safety for passengers sitting behind);
- the distance between the seat belt buckles, allowing them to be fastened freely;
- the dimensions of the handbrake and the height of the handle (the armrest will be installed on top of some part of it).
How to make an armrest for a car with your own hands
If for some reason it is not possible to buy a ready-made element, there is only one way out: make it yourself.
Preparation for the process
First of all, using a tape measure in the cabin, you should measure the place where the device will be installed. Moreover, measurements must be taken in the cabin of your own car. Even for two cars that look identical, the interior layout elements may differ in size. The difference may be only a few millimeters, but it is this that will ultimately interfere with normal installation.
The following parameters are measured:
- distance between driver and passenger seats;
- the level at which the seated driver's elbow is located;
- the distance from the engaged handbrake lever to the back of the driver's seat. This is done so that passengers sitting in the back do not touch the armrest with their feet;
- the maximum height to which the handbrake lever rises when it is turned on (this dimension is removed only if the armrest structure partially covers the brake lever);
- You also need to know how far apart the seat belt latches are.
Choosing material
As a rule, homemade armrests are made from either plywood or chipboard. Sometimes a solid board 7–9 mm thick is used. If it is expected that there will be curved parts, then only plywood can be used, since only this material can be given the necessary bend by holding it over steam. As for upholstery materials, they can be very different: artificial leather, genuine leather, dermantine, etc. The choice here is limited only by the imagination and financial capabilities of the car owner.
We design the main elements
All above dimensions must be recorded. Based on them, a simple sketch is created in three projections. You can even do this by hand, on a regular piece of notebook paper.
The simplest sketch of a homemade armrest, made on a notebook sheet
It is necessary to clearly imagine what the future armrest will look like.
The following points must be indicated on the sketch:
- all sizes;
- if the armrest contains parts with figured bends, the sketch should indicate the radii of these bends;
- location of mounting holes with mandatory indication of their diameter;
- the type and parameters of the fastener that you plan to use (for example, if these are self-tapping screws, then you should indicate their diameter and thread pitch);
- the depth to which the fastener penetrates into the body parts or into intermediate structures (often armrests are screwed with screws to wooden substrates, so knowing the penetration depth of the fastener will allow you to more accurately calculate the thickness of the substrates);
- if you plan to assemble an element with a hinged lid, then you should indicate where and on what the furniture hinges holding the lid will be attached. Also, do not forget about their size.
At the design stage, you should definitely consider how exactly the armrest will be fixed in the cabin. This could be a set of screws, or the piece could be held in place simply by a tight fit between the seats.
Design of elements for the armrest on the VAZ-2107
Using the taken parameters, we make a drawing. For convenience, it is advisable to draw the armrest in three planes: side view, top view and rear view (front view if necessary). Next, on all the drawings we put the dimensions of the parts that it consists of. For the cover, as well as the walls to which it will be attached, you need to indicate the location of the fastener with the dimensions, as well as the points of their connection. Those who have experience in design will independently develop a mechanism for a more complex sliding lid.
It will be possible to fix a homemade armrest on a VAZ-2107 due to a very tight fit or using pre-prepared fasteners. In the first option, you need to provide grooves on the side parts that will fit tightly on the lower part of the cabin. In the second - mark the mounting points on the drawing and in the car interior.
Do not forget about the thickness of the lining material for the side walls of the armrest. In both options for attaching the armrest, we fix all the additions in the drawing. After careful preparatory work, the main work will be enjoyable, if, of course, there were no errors in the design.
Types of car armrests
There are different types of car armrests. They come with or without an internal compartment (bar) for storing various small items, and even with backlighting inside. There are three main types of such homemade products.
A simple armrest without a folding cover. It does not allow you to store small items inside. The accessory takes up little space, does not interfere with driving at all, and looks elegant and compact.
For those who need to store glasses, cloths for wiping the interior and exterior, and other small items, you can make a product with an opening top. There is space inside to store various items. This armrest will be a little larger and more voluminous.
There is also a third type of armrests. In them, the interior space is illuminated with a specially installed light bulb. It lights up when the storage compartment is opened. This is very convenient in the dark. The backlight makes it easy to find the desired item in the dark.
There are other types of armrests. For example, you can make a product that has several compartments for storing different items. Or you can come up with a completely original and unusual detail that will fit well into the interior of the car and will perfectly perform its function.
Required material
For the manufacture of the lid and body, it is advisable to use wood with a thickness of about 8 mm. Chipboard and plywood lend themselves well to processing. If the support cushion or front panel is planned with bends, then only plywood will do - it bends easily under the influence of steam. Leather, suede, leatherette, etc. are suitable for outer covering.
We cut out the parts with a hacksaw. If you need to make curves, it is advisable to use a jigsaw; it will allow you to easily cut out the desired shaped elements.
After cutting out all the parts, we assemble the body using self-tapping screws or wood glue. If its fastening will not be done by a tight fit, then you should determine the thickness of the cushioning material. We glue the prepared overlays on the sides or fasten them with the same screws. Next, we cover the entire body with the material you like. To give the support pillow softness and the desired shape, we glue foam rubber to the top of the cover. We lay felt on top of it and fasten the lids to the sides. After this, we cover it with the necessary material and install it on the body, followed by fastening it to the hinges. If desired, we cover the inside of the armrest.
Selection of material
When planning to make an armrest with your own hands, installing it in the seat, you should select the material. Such structures are rarely made from wood.
Homemade supports are mainly made of chipboard or plywood. Although a solid board may be suitable, but not more than 7-9 mm thick.
If you plan to make a complex structure with curves, only plywood will do.
Since the structure will need to be covered, here in addition prepare something from the following list:
- foam;
- polyurethane foam;
- eco leather;
- skin;
- textile;
- dermantin, etc.
Here you will decide the external aspects yourself.