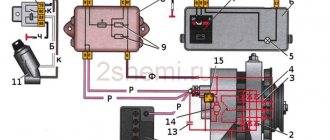
Connection diagram for generator 9412.3701 for Niva 21214i. Generator 9412.3701 is installed on a Niva 21214i with an injection engine. We present the electrical diagram of its connection.
Connection diagram diagram, connection of generator 9412.3701 for Niva 21214i
Notes and additions
— On a Niva 21213 car with a carburetor engine, a 371.3701 generator with a slightly different connection diagram is installed.
More articles on the Niva 21214i car
— Diagram of the engine control system (ECM) of the Niva 21214I
— Wires for the rear lights of the Niva 21213
The Niva has excellent cross-country ability and can compete with many modern foreign-made jeeps. However, due to such a significant drawback, most owners of these cars experience significant inconvenience, and therefore decide to improve this vehicle. This can be done by moving the generator upward.
The fact is that during testing of the VAZ-21213 for cross-country ability, sand, dirt, stones and water may enter the generator. However, there is another, quite significant drawback - coolant constantly gets onto the generator. This problem can be solved by using the above method. But how to do it right?
It should be understood that if you use your VAZ-21213 in most cases for trips around the city or on the highway, then there is no need to move the generator. But if the Niva is used for off-road driving, then you simply cannot do without it.
Maintenance Tips
The factory instructions require troubleshooting the ignition system in the following sequence:
Ignition system: wiring for Niva 21213
- From the ignition switch (terminal 15), connect the wire to the coil (terminal +B) to a test lamp;
- Connect its negative terminal to ground;
- Turn on the ignition - turn the key in the lock to position “II”;
- If the control lamp lights up, then the circuit is working. If not, look for damage to the wire;
- With the ignition on, pull out the central wire from the coil from the distributor;
- Bring its metal tip to the cylinder block so that a gap of 3-4 mm forms between them;
- Turn on the starter for a few seconds;
- If the spark jumps, the coil is working.
Tip: you can quickly check the switch in one way - take it from a working car. If the car starts with the new switch, then you need to buy a new one.
Dashboard
All control devices are interconnected. This combination consists in particular of:
- speedometer;
- tachometer;
- coolant temperature indicator;
- 12 indicator lamps;
- battery charge sensor;
- fuel level indicator.
All of them are located on the panel.
The schematic diagram shows the combinations available on the instrument panel:
- tachometer (1);
- stabilizer (2);
- panel illumination (3);
- coolant heating indicator (4);
- gasoline level (5);
- toxicity reduction systems (6);
- heated luggage door glass (7);
- fog lights (8);
- high beam (9);
- outdoor lighting (10);
- turn signals (11);
- TG level (13);
- oil pressure (14);
- differential locks (15);
- fuel reserve (16);
- seat belts (17);
- parking brake (18).
D1, D2 are diodes (type IN4002).
Cars manufactured before 1996 also have a voltmeter (12 in the diagram).
Finally, there are two resistors:
- R1 – at 470 Ohm (0.25 W);
- R2 –51 Ohm, (5 W).
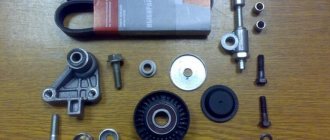
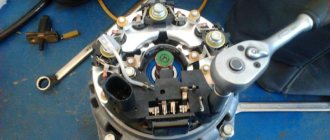
Guide to removing and connecting the generator
To remove the unit, you need to prepare a set of tools: keys “10” and “19”, ratchets with heads, a hammer and a small extension.
We recommend: Hyundai Accent won't start - what to do?
The process consists of the following steps:
- First of all, remove the negative terminal from the battery.
- Next, you need to remove the engine protection and the right mudguard.
- Then, using a hammer, carefully knock out the mounting bolt and remove it.
- At the next stage, you need to disconnect all the wires going to the generator: the plug and the wires secured with a nut.
- Then the fastening on which the belt tensioner is located is unscrewed.
- By removing the belt, the assembly can be dismantled through the hole that was formed after removing the protection.
- After replacement or repair, install the unit in reverse order.
The generator is connected according to the diagram.
Electrical connection diagram
Price issue
The VAZ 21214 generator has good repairability, which allows you to significantly save money if worn or broken parts are replaced in a timely manner.
If you change the complete unit, the cost of replacement will be as follows:
- generator 21214 – 3125 rub.;
- lower mount – 133 RUR;
- fastening bolt - 53 rub.;
- tension bar - 55 rub.;
- relay RS-527 – 57 rub.
Total: 3423 rub.
Generator replacement
To repair or replace the generator, the car owner will have to remove the unit completely from the car or turn to professionals for work. If you still want to carry out the replacement yourself, then first you will need to prepare all the necessary tools:
- hammer;
- extension;
- keys to "10" and "19".
The procedure consists of the following sequence of actions:
- First, you will need to park the car in a place designated for inspection and repair. The car will also need to be secured using special wheel chocks. Finally, in order for the work to be carried out safely, you should disconnect the battery by disconnecting the terminals from it.
- After this, you need to remove the engine protection. It is attached to several bolts, and they must be unscrewed to get to the lowest bolt of the generator.
- After this, you will need to knock out the mounting bolt using a hammer. It is recommended to knock carefully so as not to damage the thread and to prevent the bolt from coming out in the opposite direction. A hammer is necessary, since a wrench or any other tool simply cannot handle a bolt.
- Next, you need to remove the bolt, swinging the generator from side to side. It is necessary to bolt in any case, as this makes it easier to remove the rod.
- The fourth step involves disconnecting the wiring. To do this, the power wires connected to the housing are disconnected from the unit. In this case, you can first disconnect the plug from the wires.
- Wires are also attached to the generator, tightened with a nut or bracket. In this case, the nuts must be unscrewed with a wrench, and then the loose wires must be pulled out.
- Finally, after disconnecting the wires, you can begin to unscrew the upper fastening element with the belt tensioner. For this you will also need a wrench, as well as a small extension cord.
- Disconnecting the fastener will allow you to remove the belt and alternator. Then you can start cleaning the vacated space with a brush and installing a new unit.
The structure is assembled in the reverse order; the entire procedure will take about two hours if you have all the necessary tools.
We recommend: How to replace the air filter on a Volkswagen Polo sedan: we explain in general terms
Additionally, it is worth noting that when everything is assembled, you will need to adjust the position of the generator using the tensioner. To do this, you need to unscrew the tensioner nut and tighten or loosen the belt, while observing the battery charge.
If the indicator returns to normal, then the selected tension is sufficient. There is no need to tighten the structure, as the generator bearing may fail. If the tension is insufficient, the generator will work intermittently, and this can also lead to breakdown.
Dismantling and connecting the generator on Niva 2121: step-by-step instructions
The generator is the source of electrical energy for the vehicle. The article discusses the 21214 generator, its design features, possible problems and troubleshooting methods, and provides step-by-step instructions on how to remove and connect the device.
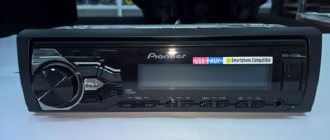
On Niva 21214 cars there is a generator of type 9412.3701, on VAZ 21213 - type 371.3701, on Niva Chevrolet there is a generator 2123.
All of them are alternating current electric machines with electromagnetic excitation, having a built-in rectifier unit with silicon diodes and an electronic voltage regulator.
The maximum current generated by the generator unit type 9412.3701 is 80 A, voltage - 13.2 - 14.7 V, rotation - right.
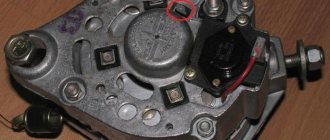
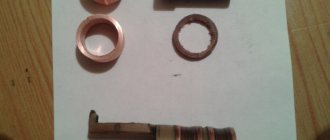
Design of unit 21214
The unit covers are attached to the stator using 4 bolts. The covers have bearings installed. They rotate the rotor shaft. In the front bearing, the inner race is clamped with a nut along with a thrust ring and washer. The 2nd bearing is also pressed into the back cover.
The stator has a 3-phase winding, one of the ends of which is connected to a rectifier unit consisting of 6 diodes. Of these, 3 diodes are negative, 3 are positive. According to the polarity, they are pressed into the plates. The entire structure consists of a rectifier unit, which is located on the back cover of the generator unit covered with a protective casing.
The design of the unit also includes contact rings and brushes. On the back side of the back cover there is a brush holder, which is structurally connected to the voltage regulator. The rectifier contains a capacitor that protects the electrical network from power surges.
The “B” terminal of the generator set must be connected to the positive terminal of the battery, and the negative terminal of the battery to the vehicle ground. If the connection is incorrect, this will lead to breakdown of the diodes.
Generator Niva 21214
We recommend: Kia Sid won’t start: reasons
Basic malfunctions and ways to eliminate them
Checking the health of the unit is done using a multimeter. After the engine is started, the voltage at the battery terminals should be 13.6 V. If the value is higher or lower, this indicates a break or short circuit of the windings, oxidation of the slip rings, a malfunction in the brush assembly, or voltage regulator.
The generator unit may not work well due to weak belt tension or its breakage. In this case, you need to adjust the tension or replace the belt. Faulty voltage regulator, needs to be replaced.
If a breakdown, short circuit, or damage to the rotor windings is detected, it should be replaced. If there is a break or short circuit in the stator windings, it requires replacement. If the diodes are damaged, the rectifier unit is replaced.
Nuances of moving a generator
The disadvantage of domestic Niva SUVs is the location of the generator unit - at the bottom of the engine compartment. It constantly gets contaminated when driving off-road, and coolant constantly drips. The problem is solved by moving the generator upstairs (the author of the video is SARTANETS).
To transfer, you will need a set of keys, a bracket, mounting bolts, and a V-belt. You can make a generator transfer bracket with your own hands according to the drawing below.
Drawing of a homemade bracket
Sequence of actions during transfer:
- We dismantle the propeller, pump and remove the belt.
- By unscrewing the standard bracket, you can remove the generator.
- We cut off the bead around the side of the cylinder head and on the cylinder block.
- Then you should unscrew the two bolts and two studs.
- Next, the assembly is installed on a new bracket and final assembly is performed.
1. Schematic illustration of unscrewing the fastening material
2. Car with the belt removed
3. Unit in a new location
Thus, moving the generator unit upstairs is not difficult.
Nuances
When replacing a generator with a Niva 21213, 2121, 21214, a number of subtleties arise, and one of them is the location of the generator unit. It is located at the bottom of the engine compartment.
Actually, this is why problems arise with the operation of the structure: while driving, various contaminants get on the generator, and coolant drips. If you don’t want to constantly change the generator unit, it is recommended to move it upstairs.
To ensure that no problems arise during the operation of the car, it is important to monitor the condition of the car. First of all, it is recommended to regularly inspect the generator.
So, when the “battery” light blinks on the dashboard, if suspicious noises or creaking sounds occur, you should be wary and think that the generator is not working correctly.
Timely inspection will help to avoid unpleasant situations in the form of breakdowns of the constituent elements of the generator, and as a result, failure of entire electrical systems.