Print this article Font size 16
VAZ cars are wonderful because they can be easily and cheaply upgraded, tuned and other changes. Moreover, most of the work can be done with your own hands.
Drivers who spend a lot of time behind the wheel want to feel maximum comfort and convenience. And if, when driving along narrow streets or in heavy traffic, both hands are kept on the steering wheel, then in calmer situations the right hand is removed. And where to? On an armrest that doesn't exist?
Indeed, the armrest on the VAZ 2114 will not be a superfluous element that will have a positive effect on the ergonomics of the car. Today we will talk in our material about what they are, how to make an armrest with your own hands or install a ready-made structure.
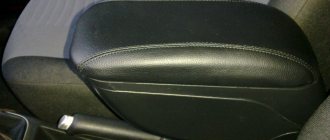
Armrest for VAZ 2114
The vast majority of car owners, in addition to simple, everyday driving, want to receive maximum comfort and minimum inconvenience from the driving process. But if we are talking about the VAZ 2114, then there is no need to talk about any comfort.
However, there is no reason to be upset; there is a way out of any situation, for example, the production of all kinds of modifications for your favorite iron horse. One of these extremely convenient and popular modifications is the armrest of the VAZ 2114, which will be discussed today.
Device and purpose
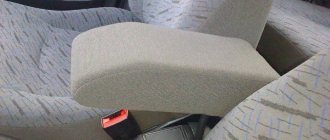
The armrest is a product that is designed to support the driver’s right hand, and in some cases, to store personal items (documents, phone, etc.). The device is placed between the two front seats. There are models on sale that differ in the following parameters:
- type of lid (opens, does not open);
- manufacturing materials (plastic, wood, MDF);
- quality of upholstery (leather, substitute, fabric);
- dimensions (width, height, depth);
- design.
In addition, armrests can be factory-made or made independently, which is very common among some car enthusiasts.
How to make an armrest for a VAZ 2114
Of course, you can buy a good product at the auto market or in a specialized store, but not everyone is ready to pay several thousand rubles for lower quality items. Moreover, if you have a great desire and a small amount of time, making it yourself will not be a difficult procedure.
In order to make a high-quality and functional product yourself, you will need a drawing of the armrest for the VAZ 2114. You need it so that the final result is a smooth and neat design.
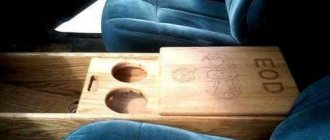
As can be seen from the figure, the material used for the production of the armrest is eight-millimeter MDF and solid oak.
Next, consider the process of self-production:
First of all, let's estimate all the dimensions indicated in the drawing in relation to our free space between the seats. You don't want to end up with a frame that won't fit between the seats. Purchase all necessary materials
In order to make an armrest for a VAZ 2114 with your own hands, prepare the following tools: - an electric jigsaw; - coarse and fine grain sandpaper for sanding wooden surfaces; - self-tapping screws; — a screwdriver (if you don’t have one, a screwdriver and a drill will do); - pencil and ruler; - good, high-quality glue (which is very important); - upholstery; - foam rubber; - nylon threads (if you use stitching); - powerful hair dryer. Now that everything is ready, we need to make the frame of the structure. To do this, take the material and, according to the dimensions in the drawing, using a pencil, outline the contours of the walls, base and cover of the workpiece. Using an electric jigsaw, cut out all the necessary structural parts. Take sandpaper and sand the sharp and uneven corners of the workpieces. Mark the joints for further fastening of the workpieces using self-tapping screws
Apply markings to organize the internal space in the future armrest. Using a screwdriver and self-tapping screws, fasten the component parts of the product together. If you do not have an electric tool, manual screwing will be very difficult. To make the process easier, using a drill with a drill of the required diameter, you can make small guide holes, after which it will be easier to screw in the screws. Install the necessary fittings (hinges for the folding armrest). Now is the time to sheathe the resulting structure. It is recommended to select upholstery materials depending on the texture and color palette used in the interior of your car. Typically used for upholstery: leather, velor, leather substitute, Alcantara. For the top cover, on which the driver’s hand will be located, it is necessary to adapt (glue) a full-size piece of foam rubber (later it will be sheathed). After selecting the material, we cover the walls and cover of the armrest. In order for natural or artificial leather to stretch well, it must be heated with a powerful hair dryer and, without allowing it to cool, be pulled onto the frame. In addition, from a practical point of view, it makes sense to sheathe the internal sections of the armrest (so that the objects inside do not rattle when moving). A material such as carpet is perfect for this. Now all that’s left to do is install the finished product into the car’s interior.
Handmade
To create an armrest for the VAZ 2114 you will need drawings. You can find them on the Internet, or you can do them yourself, taking into account your personal wishes and preferences.
There shouldn’t be any serious problems with making your own armrest. The main thing here is to have a good mood, a set of tools and materials.
- Prepare your work area.
- Take measurements of the area of the cabin where you plan to place the armrest. Place it directly between the front seats. The design can be compact or as large as possible. It all depends on your wishes.
- After taking measurements, proceed to drawings.
- Next, buy upholstery material that will go well with the car's interior.
- Chipboard is ideal as a material for the frame.
- Cut out the necessary structural elements, sand them so that there are no irregularities or sharp corners that could cause the skin to tear when tensioned.
- The chipboard elements are connected to each other with self-tapping screws. It is difficult to do this manually, so arm yourself with a screwdriver.
- Consider the presence of internal space, shelves and compartments. They should be provided for at the stage of drawing formation.
- The upper cover of the armrest must be slightly larger than the body itself. About 2-5 centimeters, or whatever is more convenient for you. The main thing is not less than 20 millimeters. You will also need a cover for the armrest itself, which you can rest your hand on while driving. Its length is usually chosen to be 20 centimeters longer than the body. Although your personal requirements are also taken into account here.
- As for covering the armrest body, for this you can use everything that you have available - leather, leatherette, velor, films that imitate carbon, natural carbon, and so on.
Differences in exams
It is recommended to pay attention to the fact that the requirements of the traffic police and driving school programs change quite often. Therefore, you need to clarify the nuances immediately before entering and passing the exams.
At the moment, even before the start of the educational process, students have the right to choose not just the make of the car, if the driving school offers different cars, but also the type of transmission on which the training will take place. In general, the procedure for acquiring driving skills with an automatic and manual is not much different: the theoretical part is the same for everyone, exercises on the racetrack and in the city too. The only difference is how the driving happens.
Universal option
The armrest is a universal type, it is made not only for the VAZ 2114 model, but it is also suitable for the VAZ 2108, 09, 099, etc. The main thing is that the fastening matches.
This part is installed at the seat mounting location and secured with mounting bolts. In size, it can be either for one hand (driver) or for two (driver and passenger).
The advantages of the universal option undoubtedly include its low cost. Also, such an armrest is much easier to sell, if necessary, since it also fits other models.
This part has two varieties: hollow and cast. The first option, in addition to serving as an arm rest, can also serve as a glove compartment. Accordingly, its cost will be more expensive. Sometimes, this element of the interior can be equipped with cup holders.
The universal armrest for the VAZ 2114 car has some disadvantages. For example, it is not always possible to choose the color of a part that matches the overall color scheme of the interior. Also, the quality of the materials from which this interior element is made leaves much to be desired. But, despite this, it is more popular than the standard version of the part.
'); if("undefined"===typeof loaded_blocks_drive){loaded_blocks_drive=[]; function n(){var e=loaded_blocks_drive.shift(); var t=e.adp_id; var r=e.div; var i=document.createElement("script"); i.type=”text/javascript”; i.async=true; i.charset=”utf-8″; i.src=»https://www.drivenetwork.ru/data/»+t+».js?async=1&div=»+r+»&t=»+Math.random(); var s=document.getElementsByTagName("head")||document.getElementsByTagName("body"); s.appendChild(i); var o=setInterval(function(){if(document.getElementById(r).innerHTML&&loaded_blocks_drive.length){n(); clearInterval(o)}},50)} setTimeout(n)}loaded_blocks_drive.push({adp_id:e ,div:t})})(47602)
Useful video
You can get interesting tips and recommendations by watching the video below:
We continue the topic of tuning and modification of VAZs. Today we will talk about how to install an armrest in the interior of a VAZ 2114 with your own hands. We have already raised the topic; we recently talked about how to install an armrest on a VAZ 2109, so we deliberately omit the lyrical digression.
To work you will need:
- Armrest "Alamar";
- Bolt M6x20 (included);
- Key for "10" and "17";
- Approximately 30 minutes of time.
What is the difference between training for a manual and automatic driving license?
According to Government Decree No. 1097 of October 24, 2014 (as amended on August 14, 2018), cars with manual transmissions used for training and practical exams must be equipped with auxiliary clutch and brake pedals. They must also have a rear-view mirror for the examiner and identification marks “Training Vehicle” (Appendix 3 to the legislative act). Cars with automatic transmission are not equipped with an additional clutch pedal.
The learning process itself on cars with automatic transmission and manual transmission does not differ either in the number of training hours or in the actions practiced. The duration of the course is 2.5-3 months, depending on the conditions of a particular driving school; the same exercises are performed at the autodrome and in the city (turning around, entering an overpass, changing lanes, etc.). The only difference is in the way the vehicle is driven: a car with a manual transmission requires shifting the clutch, but to drive a car with an automatic transmission, only two pedals are used - gas and brake.
Types of finished products
VAZ 2114 owners know very well that the manufacturer does not provide for the installation of an armrest. It wasn't even on the list of options when this model was released.
However, this accessory has more than enough advantages, which has forced many companies to start producing armrests. This made it possible to compensate for the lack of such a useful element in cars of domestic manufacturers.
The models on the market can be divided into two main categories:
- Universal. They are suitable for installation inside almost any car interior from various manufacturers;
- Model. They are created for specific models of a specific automaker.
Plus they can be divided depending on the design:
- With bar;
- No bar.
A gadget with a bar includes internal space under the lid. It is divided into sections allowing you to store all kinds of small items.
As you know, the driver always has a lot of little things in his car, from a box of matches to spare spark plugs, service station business cards and other nonsense. What is most surprising is that this nonsense may be needed at any time. And you can’t think of a better place for storage than an armrest with a bar.
Armrest – luxury or necessity?
The driver's seat in a car should be comfortable and ergonomic. Car armrests are one of the necessary components of this comfort. When the hand rests on the armrest, it relaxes (the load is removed from the muscles of the shoulder and elbow group). The overall load on the spine and back muscles is reduced (you can give your neck a more comfortable position, and even tilt your head back onto the headrest). As a result, driver fatigue is reduced (especially on long trips).
Universal armrests have additional convenient devices and functions that make the trip even more comfortable:
- box (box) for small items - now you can always place the same documents for vehicles, as well as other useful and necessary things at hand;
- space for a small bottle of water or a glass – not all armrests provide space;
- components, several departments of boxing - not all;
- a sliding mechanism that allows you to move their upper support cushion to a position convenient for the hand or to open access to the box and cup holder - not for everyone;
- suitability in size and mounting method for installation in many car models;
- buttons and other electronic controls for some electrical devices of the car - common;
- other.
The following requirements are imposed on the design and quality of factory armrests. First of all, they must be safe and comply with the standards developed by the United Nations Economic Commission for Europe (UNECE). When developing them, it is necessary to follow rules that take into account the anatomy of people of different heights; they were convenient for both those with a height of 140 cm and those with a height of 190 cm. The factory armrest must withstand loads of 110–120 kg; recline so as not to interfere with the use of the handbrake, high-speed steering, or the use of seat belts; have a sufficiently soft supporting surface under your hand. Its appearance should be in harmony with the interior of the car.
Wrapping process
To cover the product, we will again need patterns from graph paper. We hope you haven't thrown them away yet. You will also need approximately a linear meter of the selected covering material, high-quality glue, nylon threads, and a good hair dryer. First, we will discuss in more detail which materials and tools are best to choose.
The most obvious material for covering interior elements is leather. You can choose either genuine leather or eco-leather. The main thing is that the material is really of high quality and does not crack in the cold. It is best to buy specialized leather for cars. It is unlikely that a material intended for furniture will be suitable. After all, furniture is usually used in comfortable home conditions. And the car will be exposed to both direct sunlight and severe frosts.
Owners of the VAZ 2107 also often choose Alcantara as upholstery. Its cost is approximately the same as that of genuine leather. Cheaper materials are usually of poor quality. Alcantara is good because its velvety surface is pleasant to the touch and protects your elbow from fogging. It is easy to clean from dirt and easily withstands temperature changes. It is easy to use in the process of pulling interior elements. You can even purchase Alcantara with a self-adhesive base, which will make working with it much easier. Glue is a very important material for further work. Moment glue is not suitable for the armrest. Over time, it will cause the skin to swell and peel away from the body. It is best to use special glue for auto leather.
To make the glove compartment look nice from the inside, you can use an ordinary carpet. It is inexpensive, scratch-resistant and does not tear. This is very practical considering what you will be storing inside the product.
So, let's move on to the description of the tightening process itself.
- Using a graph paper pattern, transfer the contours of the armrest parts to the wrong side of the facing material. It is necessary to take into account that for the lid you will have to add a few millimeters, which is due to the foam rubber applied to it. For other parts, it is better to remove two millimeters in order to tighten the upholstery and fit it as tightly as possible.
- Apply glue to one edge of the piece and carefully glue it to the body. Glue each subsequent side of the part after a few minutes to allow the glue to dry.
- Preheat the material using a hair dryer. If you are using leather, you can soak it in warm water for 15 minutes. It will be more difficult to work with such material, but in the end you will get a more accurate result.
- Fold the edges of the material inward and cut off the excess.
- The material needs to be pulled as tightly as possible - otherwise it will dangle carelessly.
Additional accessories
Decorative and protective door sill covers made of stainless steel are also available for your car. Cost - from 880 rubles per set (4 pcs.). Go to the overlays page
The armrest between the front seats is one of the most common elements of interior tuning of a modern car, the main purpose of which is to create additional comfort for the driver while driving. This is achieved by removing the static load from the elbow joint of the right hand, which is often under tension when periodically changing gears.
Mechanical box for dummies. 9 important details
Pros and cons of manual transmission
A beginner who has purchased a car with a manual transmission needs to become familiar with the important nuances in handling the transmission and understand some points. Let's start in order. What are the transfers for? In order to choose which one and under what conditions will be best for use in the situation you require (weather conditions, quality of road surface, etc.)
Important! Mastering gear placement. An important point is the synchronous pressing of the clutch pedal while simultaneously switching gears
1. Start the engine. Scheme: “neutral” - clutch - engine start. And nothing else.
2. Correct use of the clutch. Squeeze strictly until the end and no more than 2 seconds. We take care of the car.
3. Commendable coordination and smooth operations. Clutch. Speed (for example, first). We release the clutch (slowly, of course), while just as slowly taking on the gas.
4. "Downshifting"
Simply put, when reducing speed, it is important to lower the gears, just as they were raised during acceleration.
5. Reverse. It is never, under any circumstances, recommended to engage reverse gear until the car has stopped.
Important manual transmission details
6. We park. The engine is stopped, the clutch is depressed, first gear is engaged, the handbrake is in the working position. It's simple.
Incomprehensible, difficult and boring? More practice! Only under the condition of constant and continuous driving will the described principles and subtleties be not just a set of rules or laws, but something natural and understandable.
Tips for mechanical dummies
For inexperienced drivers who have cars with a manual transmission, one important piece of advice can be given - use the clutch only for its intended purpose:
- when starting to move from a standstill;
- if necessary, switch to a higher or lower gear while driving;
- when the car comes to a complete stop, to move the manual transmission lever to the neutral position and then apply the parking brake.
Under no circumstances should you attempt to use the clutch to stop the machine. Engine braking is much more effective and safer than uncontrolled driving with locked wheels.
If the novice driver is a woman
Difficulties in choosing a first car for a woman are due to her lack of awareness in this area and the excessive rationality inherent in the entire fair half. What does a woman value in her first vehicle?
- Ease of control. This automatically excludes Mini cars from the list of potential purchases. Despite the universal love of women, these “babies” are too “responsive” to any vibrations of the steering wheel, which significantly complicates control.
- Modern and healthy filling. A car for a novice woman should have many useful “helpers”: ABS, emergency braking system, parking sensors and an automatic transmission. Its advantages are mentioned above.
- Small dimensions. The size of the car should minimize the difficulties of parking and provide comfortable accommodation for children, girlfriends and numerous purchases.
Nuances
When choosing training in a manual car, the following advantages can be noted:
- The driver's license you receive will not have any restrictions, unlike the license for an automatic transmission; you will be able to drive a car with any type of transmission.
- The acquired skills will allow you to control the ride yourself, the dynamics of acceleration and braking will be completely in your hands. You will be able to choose your driving style yourself, rather than adapting to the operation of the automatic transmission. If necessary, you can lower the gear, putting more load on the engine, but increasing torque, this is important, for example, when driving up a steep hill or if the car is spinning in the mud.
- Obtaining an expanded number of practical skills that can be useful in an extreme situation.
An inexperienced driver who has never driven a car will find it much easier to understand the design, which has only two pedals, i.e. with automatic transmission. He will not have to learn how to perform a complex shift exercise, and there will be no jerking when the clutch is not fully depressed. The car will not stall at a crucial moment if a beginner suddenly releases the pedal. On hills, the automatic machine does not roll back, because it is enough to release the brake and press the gas. At this time, there is no need to change gear, which forces you to drop the pedal; you need to have time to squeeze the clutch. In other words, the procedure included in the exam is much simpler if you perform it with an automatic transmission.
However, despite the great ease of studying for a license with an automatic transmission, it makes sense to enroll in driving courses for a vehicle with a manual transmission if in the future there is a chance that a citizen will need to get behind the wheel of a car with a manual transmission. Classic situations - buying a car with a manual transmission, the need to move the vehicle, the lack of vehicles with automatic transmission in a company providing vehicle rental services.
How to make this part for your car with your own hands
First of all, select the material from which the body will be made, as well as the fabric for subsequent upholstery. Their thickness affects the dimensions of the future product. Next, you need to make all the necessary measurements, and only after that start constructing the drawing.
We will talk about the choice of fabric for covering a little later, but we will dwell on the material for the armrest itself in more detail.
Material selection
Wood-based material is best suited for the armrest body. It can be a chipboard, fiberboard or ordinary plywood. If the proposed design does not have curves, then your choice is unlimited. Otherwise, the only material that will suit you is plywood, since only it can be bent by holding it over steam for some time or soaking it in hot water.
To bend the plywood, soak it in a bath of hot water
Consider the thickness of the board: it should not be less than 0.8 cm or thicker than 1.5 cm. The ideal option, which will be strong enough but not particularly bulky, is plywood 1 cm thick. To cover the lid you will need ordinary foam rubber.
Don't forget to prepare the accompanying tools: meter tape, graph paper, and an electric jigsaw for cutting the board into parts.
Measurements for the future drawing
The manufacture of an armrest must begin by measuring the necessary parameters. To do this, arm yourself with a meter tape, a pen and a sheet of paper where you will write down all the data received.
- Measure the distance between the front seats.
- Holding the gear shift lever with your right (or left, depending on the location of the steering wheel) hand, determine the most comfortable height for the future armrest.
- Measure the distance from the handbrake to the back of the seats.
- To prevent the window sill from interfering with fastening your seat belts, measure the distance between their buckles.
- If you plan to install the armrest in such a way that it will be partially located above the handbrake handle, then move it to the on position, and then measure the dimensions and height of the rise.
- Measure the area where your product will be attached.
measure the distance between the seats to find out the size of the future armrest
Element design
Having made all the necessary measurements, begin drawing up a drawing of the future armrest. Be careful: even small errors can lead to your product not being installed in its place or interfering with the operation of other elements of the car.
- When creating a project, draw a diagram of the armrest taking into account all sizes and proportions. For more accuracy, draw the part from both the side, front and back. Don't forget to label the lengths of the sides: it will be easier for you to transfer the markings to the material.
- Make a drawing for the upper part of the armrest - the future cover.
- Consider how to attach the lid: will it tilt or bend. Depending on this, determine the location of the grooves or other fasteners.
- If the part is not strictly rectangular in shape, carefully work out the bends.
- Determine in advance the lengths of the screws that will be used in the work. If their sizes differ in different parts of the product, indicate this on the diagram.
- Decide how the armrest itself will be installed: using special fasteners or tightly fixed between the seats. If necessary, add grooves to the diagram at the bottom of the structure.
using the data obtained from measurements, build a diagram of the future armrest
After the drawing is ready, it needs to be transferred to graph paper (it can be purchased at any store selling sewing supplies) with strict adherence to all parameters. Be extremely careful: this pattern will serve as a model for making an armrest in the future.
Deciding on the mounting method
Think about the mounting method. Car armrests can be placed tightly between the seats or fixed using special fasteners.
If you decide to stick with tight fixation, you will need to prepare grooves in the lower part of the structure that correspond to the parts in the area of the intended installation location. You immediately need to decide on the upholstery material and take its thickness into account when marking the project.
Making your own fasteners is not an easy task, but the result is worth your effort and time spent on this process. The elements of the armrest in its lower part must be tied to the structural elements of the interior of the car or to pre-created fasteners.
Registration of a car at State Services
The State Services portal allows transaction participants to pre-register for an appointment with the traffic police. To take advantage of the system's capabilities, you must:
- Log in to your personal account on the State Services Portal. To do this, a citizen must have an account. If it is missing, you need to get it.
- You need to click on the Car Registration item.
- From the available list of actions, you need to select Registration of documents when purchasing, leasing or changing information about the owner.
- Fill out the form. Here you will need to provide information about the owners and the car. Additionally, you need to indicate the traffic police department convenient for visiting and the date of the visit.
- Submit your application. You can track its status in your personal account. Notification of processing results will be sent through the communication channel specified during the registration process.
Installing an armrest on a VAZ 2114 with your own hands
VAZ cars are wonderful because they can be easily and cheaply upgraded, tuned and other changes. Moreover, most of the work can be done with your own hands.
Drivers who spend a lot of time behind the wheel want to feel maximum comfort and convenience. And if, when driving along narrow streets or in heavy traffic, both hands are kept on the steering wheel, then in calmer situations the right hand is removed. And where to? On an armrest that doesn't exist?
Indeed, the armrest on the VAZ 2114 will not be a superfluous element that will have a positive effect on the ergonomics of the car. Today we will talk in our material about what they are, how to make an armrest with your own hands or install a ready-made structure.
Is it needed at all?
It seems that since you are reading this article, then you personally really need it. Or maybe you don’t really need it, but you really want it. Why not fulfill this simple human desire?
Moreover, this thing is very useful. Many drivers note that having a good armrest greatly eases the load on the back and arm muscles, especially if the car has a manual transmission. If you consider yourself to be a reasonable, sane driver, then your seven will have just such a box.
Video instruction
Sources
- https://autochainik.ru/mekhanicheskaya-korobka-peredach.html
- https://pdd-helper.ru/kak-nauchitsya-ezdit-na-mehanike/
- https://AkppGid.ru/mkpp/mkpp.html
- https://DaciaClubmd.ru/mexanicheskaya-kpp/
- https://auto-self.ru/prednaznachenie-i-raspolozhenie-pedaley-v-mashine/
- https://autoleek.ru/korobka-peredach/mkpp/kak-upravlyat-mkpp.html
- https://mashinapro.ru/813-kak-tormozit-na-mehanike.html
- https://reedr.ru/auto/kak-pravilno-tormozit-na-mehanike-s-vyzhatym-stsepleniem-ili-net/
- https://AvtoMotoSpec.ru/obuchenie-vozhdeniyu/kak-pravilno-tormozit-na-mexanike.html
- https://dtp.help/kak-nauchitsya-vodit-na-mehanike.html
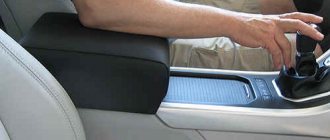
Instructions for installing the armrest on a VAZ - 2114
The front (middle) armrest is installed on the driver's seat using two existing mounting points. During the installation process, it is necessary to replace the standard M6x10 bolt with an M6x20 bolt. Keys for 10 and 17 are used
- Move the driver's seat forward.
- From the rear seat side, use a 17 key to unscrew the M11x70 bolt by about 8-10 mm (the bolt securing the seat belt bracket to the seat).
- Move the driver's seat as far back as possible.
- Unscrew and remove the M6x10 bolt and washer (installed 60 mm above the M11 bolt).
- Move the driver's seat forward.
- Place the groove of the armrest bracket onto the M11 bolt, observing the sequence: M11 bolt head, seat belt bracket, armrest bracket.
- Move the armrest bracket to a vertical position.
- Move the driver's seat as far back as possible (all the way).
- Install the previously removed washer in its original place, align the 6 mm hole in the armrest bracket with the hole in the seat where the M6x11 bolt was previously located. Attach the armrest to the seat through this hole, use an M6x20 bolt for this.
- Tighten the M6x20 bolt.
- Tighten the M11 bolt.
What is the first thing you pay attention to when purchasing a new car? Technical characteristics, engine power, gas tank volume and fuel consumption? Or maybe the appearance of bumpers, spoilers, headlight shape or body color? No matter how beautiful your car looks from the outside, you will spend most of your time in its interior. So taking care of the car’s interior is not a whim, but a completely necessary condition when buying a new iron horse
And if everything is more or less clear with the seat upholstery and the thickness of the steering wheel, then what about such a mysterious element as the armrest? Is he needed or not? And if you still need it, then how to make it and install it in a car that initially does not have an armrest in the basic configuration? Is it possible to create everything with your own hands or is it better not to suffer and order the work from a master?
Material selection
To make the element, it is better to use MDF sheets (8 mm) and solid oak. But other materials can also be used. You can make the product entirely from wood, MDF or plastic.
Fabric, natural or artificial leather, Alcantara are suitable for finishing. Usually velor or artificial leather is used, as these materials are cheap and durable. They are non-staining and do not require serious care. It is advisable to stick a piece of foam rubber onto the cover before covering it. This will make it comfortable and soft. The inside of the part can be finished with carpet or similar material.
Creating a Project
So, the measurements have been recorded and checked, it’s time to create a paper prototype of the future design. Don’t be lazy and make several options that will reflect the car armrest from different angles. Transfer all dimensions to each drawing and make sure they are completely consistent.
Now you can start marking the parts and finely drawing each element that will make up the future design
We pay special attention to the following points:
- we indicate the dimensions on each element, if it is figured, then we determine the radius;
- we mark the attachment points, choose the method of connecting one element to another and indicate the length of the screws, if any;
- calculate the distance that remains to the edge;
- for the top part, which will serve as a support and a cover at the same time, you will need to mark the location of the mount with tilt-and-turn functionality (you can make a sliding top, but it will be a little more complicated).
Design process, drawings and diagrams
After the measurements are taken, you can begin drawing the future product. You need to be extremely careful: a small mistake can cause the armrest to not fit into place or interfere with the normal functioning of other elements of the car.
You can use ready-made sketches and diagrams. But even in this case, you need to adhere to the following tips:
- You need to depict the product from all sides: side view, front view, rear view, top view. Indicate all dimensions on the drawing; these notes will be useful to you when performing work.
- The drawing must be made separately for the armrest cover.
- You also need to figure out in advance how the lid will be attached - should it bend or fold down. This will affect where the mortises and other fasteners will go.
- Decide right away how long the screws you will need. Indicate their dimensions directly on the drawing.
- Determine how you will install the finished product - either simply secure it tightly between the seats, or use special fasteners. The diagram should show the grooves of the lower part of the product.
- Apply the finished drawing to special graph paper (you can find it in a sewing store). This will allow you to create a pattern with which you will definitely not be mistaken with the dimensions when making the armrest.
Taking measurements
Here you need to show maximum care and concentration. The accuracy of measuring the distances and dimensions of the space for the future armrest will affect the parameters of the finished structure and its location in the cabin. It is necessary to carry out these actions only in your car, because in two cars of the same brand there may be discrepancies in the interiors.
All the data that you obtain must be written down, preferably immediately on a sketch of the future product. Thus, the measurements will not be confused and will be recorded clearly, accurately and without errors. You will need to measure the following parameters:
- at what distance from each other are the front seats;
- find out the distance at which the position of the driver’s hand is most comfortable (sit in the car, grab the steering wheel with one hand, and bring the other to a relaxed state and place it in its usual position);
- turn on the handbrake and measure the distance from it to the back surface of the backrest on the seat (the comfort of rear seat passengers cannot be ignored);
- Take into account the distance between the seat belt latch mechanism.
Make a visual comparison of the location of the future structure and its dimensions, stopping at the handbrake. I'm interested in the relative position of the handbrake and armrest. If the last element extends into the territory of the handbrake, then at the stage of taking dimensions it will be necessary to measure the lifting height of the brake lever.
Measure seven times
Before you start drawing a sketch, you need to figure out what type of armrest you are interested in. Decide whether it will extend onto the handbrake, how far you can extend the box towards the rear sofa, whether you will make it stationary or removable, whether you will divide the internal volume into compartments. Based on all the data, measurements are made:
- distances between the front seats;
- the height of the armrest from the floor at the back and from the console at the front - so that, if necessary, the wall can be extended at the back for a more harmonious appearance. You can determine the comfort level by sitting behind the wheel and holding your hand alternately: either the steering wheel or the gear knob;
- the distance between the seat belt anchorages on the driver's and passenger's seats;
- the lifting height of the handbrake if it is partially hidden in the box;
- distance to the gear shift lever.
Based on the obtained numbers, a mock-up is made from cardboard and installed in place of the future armrest. You can even ride with it to check whether it is comfortable in your hand and whether the box does not interfere with the operation of the controls or the comfort of passengers.
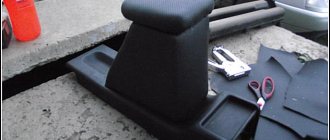
installation of armrest vaz 2114
The installation process depends on what model of stand you are using. If you made it yourself, the structure is quite simply installed between the seats and stands directly on the floor. In the case of using products with fastening systems, there are other options. For example: installation of a product with a rod type of fastening. In this case, to work you will need:
- regular screwdriver;
- keys to "17" and "10".
The installation process involves connecting the armrest mount (bar eye) using the security lock bolt. In this case, the standard fastening bolt is changed to a more suitable length. For ease of operation, it is recommended to remove the center console in the area of the handbrake lever. On average, all work takes 30 -50 minutes.
Didn't find the information you are looking for? on our forum.
Manufacturing
This work is quite simple for those who have held a jigsaw at least once in their life. If all the measurements were made correctly and you have made a good drawing of the future product, then all you have to do is follow these steps:
- Cut out all the details on graph paper, thereby creating patterns.
- Attach the patterns to the plywood and use a pencil to draw the outlines of the future parts on it.
- Using a jigsaw, cut out the parts from plywood.
- To make it easier to make curves, use hot water or steam to soften the plywood.
- Now it's time to fasten the individual parts with self-tapping screws. It is better not to use glue - the connection is unlikely to be of high quality.
- If you wish, divide the internal space of the product with partitions, thereby creating several compartments.
- Glue a piece of foam rubber onto the top of the lid, which will create a soft and comfortable feeling for your elbow.