This article describes all injector sensors on VAZ family cars. The article is generalized, since all sensors installed on cars of the Volzhsky Automobile Plant are identical to each other and even interchangeable.
After studying the article, you can easily determine the location of the sensor, understand its symptoms of malfunction, and also learn about its purpose. This material only talks about sensors on fuel-injected cars, since there are negligible numbers of engine control sensors in carburetor versions, and besides, there are fewer and fewer carburetor cars.
Engine control system sensors
Here we will talk about three VAZ engines: 21116, 21126 and 21127. The first of them is 8-valve, and all of them are standardly installed in cars of the following families: “Kalina-2”, “Granta”, “Priora”. The Kalina uses an electronic gas pedal, which means that the throttle unit here is controlled by an electric drive. The design of the sensor that registers the throttle position has also changed with the transition to the new generation. These and other features related to the design of motors are discussed further.
Idle speed control
To regulate idle speed on Lada cars, an idle speed regulator (IAC) is used. It is an electric motor operating on direct current and a voltage of 12 V. The IAC has a worm gear, which is very unreliable and often fails. The role of the sensor is to open or close the idle speed channel. The IAC is only involved when the engine is idling and the throttle valve is closed. In modern Ladas, starting from 2012, the sensor was no longer used due to the transition to an electronic throttle unit.
Location
The idle speed control is located on the throttle body and is attached to the body with two screws. Between the regulator and the throttle body there is a rubber sealing ring, which very often wears out and begins to leak air.
Symptoms of a problem
If the sensor breaks down, the idle speed begins to drop to low values until the engine stops. Most often, the IAC becomes contaminated, after which it ceases to perform its functions.
All engine sensors 21116, 21126, 21127
Each sensor is equipped with a connector fixed to its body:
The second contact of the sensor is the housing itself
The smooth operation of the engine is ensured by a set of elements:
- The air flow sensor (AFS) is part of the intake system. Not used on engines 21127. The part is designated as 11180-1130010;
- Two throttle position sensors - variable resistors, built into the throttle pipe;
- The antifreeze temperature sensor is a thermistor with a screw fastening, screwed into the thermostat housing. Catalog number – 21120-3851010;
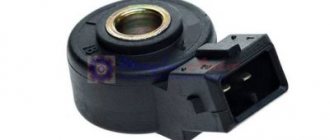
- The knock sensor is a piezoelectric element with two leads, mounted on the cylinder block body. Catalog number – 21120-3855020;
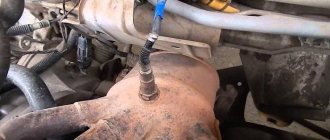
- Two oxygen sensors (OS), diagnostic and control, are equipped with a screw mount and are screwed into the exhaust pipe housing. 21074-3850010 is the designation of each module;
- The speed sensor is an electronic module, mounted on the top of the gearbox housing. Catalog designation – 21700-3843010;
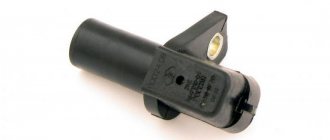
- The crankshaft position sensor (CPS) is an electronic module mounted on the oil pump housing. Designated as 21120-3847010;
- The phase sensor is an electronic module designated 21120-3706040. 21116 is not used in the engine design;
- Oil pressure sensor - has a screw mount, designated as 11180-3829010.
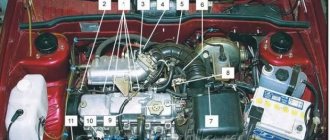
The element indicated under number “9” will be installed at different points depending on the configuration (see photo). The third figure shows where sensor “8” is attached:
The design of the resonant intake system uses a separate sensor that measures air temperature and pressure. The element is designated as 21800-1413010:
Engine air pressure and temperature sensor 21127
The design of the throttle valve modules was not considered. The bug has been corrected below.
For different Kalina-2 engines, their own module, unique in design, is suitable, containing an electrically driven throttle valve:
- 21126-1148010 – the element is intended for internal combustion engine 21126;
- 21127-1148010 – part of the engine 21127 design;
- 21116-1148010 – part of the intake tract of the 8-valve engine (21116).
The module body is made of light alloys and is equipped with a connector to which the contacts of the sensors and the electric motor are connected.
Engine throttle assembly 21126
If necessary, it is better to replace the module as an assembly rather than try to repair it.
When manipulating electrical equipment, you need to disconnect the negative terminal from the battery. The requirement also applies to the operation of replacing sensors.
Smart choice
The Lada Kalina 8 valve has certain differences from the 16 valve engine. However, automotive specialists sometimes install a mechanism with 8 valves to 16, and the engine works correctly.
The main differences between similar system elements:
- form;
- connector size.
The Kalina 8 cl phase sensor may be distinguished by the absence of a special slot required for the signal disk. This product cannot be installed on an engine with sixteen valves. It operates with a pin mounted on the camshaft (at the very end).
To avoid situations of inconsistency, purchase a mechanism according to the characteristics of the engine. No need to pay attention to the manufacturer's markings. The spare part number according to the VAZ catalog (Granta, Largus, Kalina, Priora) will always be the same:
- engine with eight valves - 21110370604000;
- 16-valve – 21120370604000.
Definition of failure
The device is located close to the cylinder head, on the power unit. It is easy to understand the first signs of poor functioning of the mechanism, especially for an experienced car enthusiast.
Here are the main criteria for recognizing a breakdown:
- a light comes on and goes out, designed to constantly monitor the engine while turning the ignition key in the car;
- “Check engine” lights up on the dashboard after the starter makes three to four revolutions and the engine comes into action. The sensor will be triggered if the electronic control unit does not receive the necessary information and has to use data from the DPKV;
- engine dynamics become worse - the vehicle slowly picks up speed (this is easy to notice when driving downhill). In this case, there are three reasons for the problem. The first - the camshaft sensor is broken, the second - the mass air flow sensor is broken, the third - the compression is reduced;
- high fuel consumption - this “symptom” is not very accurate and has a number of possible causes. You shouldn’t take it as a separate criterion for a problem, but you can use it as one of several.
If the mechanism fails, the “Check engine” will light up, and the system will display error “P0340”. Such a moment means a 100% malfunction. If this happens, you need to check the device. After a detailed diagnosis, it is recommended to replace the faulty parts.
Troubleshooting
The sensor that determines the angle of rotation is a variable resistor with 3 terminals. The thermistor, as well as the piezoelectric element, are equipped with two contacts. The crankshaft position sensor consists of a solenoid and a magnet. But speed and phase sensors contain electronics in their design.
Note that failure of the phase sensor does not lead to breakdown or shutdown of the engine. The same can be said about the speed meter.
Each of the two oxygen sensors is a complex electronic device. But the reliability of their circuits can be considered high. Hall effect sensors, used for speed and phase control, fail more often than the oxygen analyzer.
Oxygen sensor for engines 21116, 26, 27
A variable resistor used in any design is duplicated. If the indicators obtained from two “horseshoes” differ, then the Check lamp turns on.
All errors, including breaks and short circuits of sensor contacts, are constantly monitored by the ECU.
Let's say the Check Engine light doesn't come on. If you feel that the power has decreased and the dynamics have deteriorated, try replacing one of the elements:
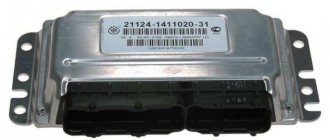
The ECU on Kalina is filled with antifreeze - what to do?
After the block filled with antifreeze has been removed, its initial inspection should be carried out. For these purposes, it is necessary to remove 4 screws using a star screwdriver. Then you should slowly remove the control board for a visual inspection. The most common failure is the burnout of the ignition coil output switch. In this case, repair will not help.
As a result of such a malfunction, the Lada Kalina starts working on only 2 cylinders, and sometimes refuses to start at all. You can cope with a similar problem in a stationary workshop. There they will remove the damaged element, wash and dry it. The second most common problem is board burnout. It is not difficult to detect such a defect: the characteristic blackening of the board will leave no doubt.
Is it possible to repair the ECU in this case? The answer to this question can only be given by a service center, but experience shows that repairs will not help here. A complete replacement is required. It happens that sometimes the brain circuitry is slightly damaged. If this happens, then the car owner can get off easy. To restore the car to working order, you will need some minor repairs:
- wipe the block with a dry cloth;
- rinse with WD-40 several times and blow it out with a compressor;
- rinse several times in alcohol and blow again with a compressor;
- dry well, otherwise the Lada Kalina will not move;
- drying takes at least 1-2 hours.
Engine control system sensors
Here we will talk about three VAZ engines: 21116, 21126 and 21127. The first of them is 8-valve, and all of them are standardly installed in cars of the following families: “Kalina-2”, “Granta”, “Priora”. The Kalina uses an electronic gas pedal, which means that the throttle unit here is controlled by an electric drive. The design of the sensor that registers the throttle position has also changed with the transition to the new generation. These and other features related to the design of motors are discussed further.
All engine sensors 21116, 21126, 21127
Each sensor is equipped with a connector fixed to its body:
The second contact of the sensor is the housing itself
The smooth operation of the engine is ensured by a set of elements:
- The air flow sensor (AFS) is part of the intake system. Not used on engines 21127. The part is designated as 11180-1130010;
- Two throttle position sensors - variable resistors, built into the throttle pipe;
- The antifreeze temperature sensor is a thermistor with a screw fastening, screwed into the thermostat housing. Catalog number – 21120-3851010;
- The knock sensor is a piezoelectric element with two leads, mounted on the cylinder block body. Catalog number – 21120-3855020;
- Two oxygen sensors (OS), diagnostic and control, are equipped with a screw mount and are screwed into the exhaust pipe housing. 21074-3850010 is the designation of each module;
- The speed sensor is an electronic module, mounted on the top of the gearbox housing. Catalog designation – 21700-3843010;
- The crankshaft position sensor (CPS) is an electronic module mounted on the oil pump housing. Designated as 21120-3847010;
- The phase sensor is an electronic module designated 21120-3706040. 21116 is not used in the engine design;
- Oil pressure sensor - has a screw mount, designated as 11180-3829010.
Connection diagram of sensors to the ECU
Let's look at the ECU module connector to understand exactly how the pins are numbered in it:
ECU M74: module with different firmware suitable for different internal combustion engines
The purpose of the terminals of section “1” is given below:
Modern motors are equipped with such a useful element of the on-board control system as a phase sensor. It is located on the left side of the Lada Kalina engine head with 16 valves and is designed to determine the angle of rotation of the camshaft at a given moment. Information from the sensor is sent to the ECU, where it is processed, after which the controller performs control or corrective actions. Without the presence of such a sensor, it is almost impossible to achieve proper operation of the engine in the Lada Kalina 16 valves, because the valve timing will not be correctly adjusted.
After receiving information from the sensor, the control function of the ECU is reduced to setting the correct ignition timing and timely supply of the required volume of fuel to each cylinder individually in Lada Kalina 16 valves. All this functionality ensures smooth, stable operation of the engine at different speeds and when using fuel of different quality.
Smart choice
The Lada Kalina 8 valve has certain differences from the 16 valve engine. However, automotive specialists sometimes install a mechanism with 8 valves to 16, and the engine works correctly.
The main differences between similar system elements:
- form;
- connector size.
The Kalina 8 cl phase sensor may be distinguished by the absence of a special slot required for the signal disk. This product cannot be installed on an engine with sixteen valves. It operates with a pin mounted on the camshaft (at the very end).
To avoid situations of inconsistency, purchase a mechanism according to the characteristics of the engine. No need to pay attention to the manufacturer's markings. The spare part number according to the VAZ catalog (Granta, Largus, Kalina, Priora) will always be the same:
- engine with eight valves - 21110370604000;
- 16-valve – 21120370604000.
Definition of failure
The device is located close to the cylinder head, on the power unit. It is easy to understand the first signs of poor functioning of the mechanism, especially for an experienced car enthusiast.
Here are the main criteria for recognizing a breakdown:
- a light comes on and goes out, designed to constantly monitor the engine while turning the ignition key in the car;
- “Check engine” lights up on the dashboard after the starter makes three to four revolutions and the engine comes into action. The sensor will be triggered if the electronic control unit does not receive the necessary information and has to use data from the DPKV;
- engine dynamics become worse - the vehicle slowly picks up speed (this is easy to notice when driving downhill). In this case, there are three reasons for the problem. The first - the camshaft sensor is broken, the second - the mass air flow sensor is broken, the third - the compression is reduced;
- high fuel consumption - this “symptom” is not very accurate and has a number of possible causes. You shouldn’t take it as a separate criterion for a problem, but you can use it as one of several.
If the mechanism fails, the “Check engine” will light up, and the system will display error “P0340”. Such a moment means a 100% malfunction. If this happens, you need to check the device. After a detailed diagnosis, it is recommended to replace the faulty parts.
Troubleshooting
The sensor that determines the angle of rotation is a variable resistor with 3 terminals. The thermistor, as well as the piezoelectric element, are equipped with two contacts. The crankshaft position sensor consists of a solenoid and a magnet. But speed and phase sensors contain electronics in their design.
Note that failure of the phase sensor does not lead to breakdown or shutdown of the engine. The same can be said about the speed meter.
Each of the two oxygen sensors is a complex electronic device. But the reliability of their circuits can be considered high. Hall effect sensors, used for speed and phase control, fail more often than the oxygen analyzer.
Oxygen sensor for engines 21116, 26, 27
A variable resistor used in any design is duplicated. If the indicators obtained from two “horseshoes” differ, then the Check lamp turns on.
All errors, including breaks and short circuits of sensor contacts, are constantly monitored by the ECU.
Let's say the Check Engine light doesn't come on. If you feel that the power has decreased and the dynamics have deteriorated, try replacing one of the elements:
The main “miscalculations” of VAZ
Of course, no matter how much VAZ praises e-gas, this mechanism also has serious drawbacks. For example, if it fails, this device cannot be repaired. A complete replacement will be required, which will be very expensive. Although today there are “traditional craftsmen” who have adapted to repair the device themselves, this is not always effective - driving with such e-gas is even dangerous.
As for the responsiveness of the car, not everything is clear here either. Many motorists claim that the old Kalinas were much easier to pedal and responded better to pressure. E-gas responds to them with a delay, and this can become a critical problem, especially if you need to quickly avoid a collision or simply quickly overtake.
Thus, the famous e-gas Lada Kalina is not a panacea for poor car handling, but rather another unfinished system in the car that engineers will have to improve.
Continue reading: Interested in Kalina Sport? In the new review, we examined all the technical characteristics of the Lada Kalina Sport. And all the specifications of the Kalina Hatchback are available here.
Source
Checking the phase sensor in Kalina
If you suspect that the functionality of the phase sensor is unsatisfactory, you can check it yourself without the need to visit a service center. For “knowledgeable” owners of Lada Kalina 16 valves, the whole process will not take too much time. However, if you have no experience in this matter, the best solution is to meet with an adequate specialist.
We use a tester for diagnosis. We connect the corresponding cables to terminals “A” and “B”. We start the Lada Kalina 8 valve engine and monitor the moment after it stops. We observe a peculiarity in the behavior of voltage: immediately after stopping the engine, the voltage value should be equal to the on-board value for about 8-10 seconds. If such a phenomenon is present, then the circuit is intact. Otherwise, we are dealing with an open circuit or short circuit.
Let’s say the circuit is intact, but we still don’t see any voltage coming in. The controller may be suspect here. The check is also not too difficult. To do this, connect terminals “A” and “C” to the tester wires. When the ignition is turned on, on-board voltage should be observed. If this does not happen, then we continue the persistent search for the cliff.
Where are the sensors located?
All modern Lada cars (Granta, Kalina, Priora, Vesta, Largus, Niva or Lada XRAY) are equipped with domestic VAZ engines. The location of the sensors on these motors is the same:
Elements of the electronic engine control system of the VAZ 11186/11189: 1* – controller; 2* – crankshaft position sensor; 3* – control oxygen concentration sensor; 4* – diagnostic block; 5* – diagnostic oxygen concentration sensor; 6 – throttle control unit; 7* – vehicle speed sensor; 8* – adsorber purge valve; 9* – gas pedal module; 10* – brake signal switch; 11* – clutch pedal position sensor; 12 – battery; 13 – mass air flow sensor; 14 – coolant temperature sensor; 15 – ignition coil; 16 – knock sensor; 17 – spark plugs; 18* – nozzles. *The item is not visible in the photo.
Location of ECM elements in the vehicle interior (for clarity, without dashboard): 1 – clutch pedal position sensor; 2 – brake signal switch; 3 – gas pedal module; 4 – controller.
Disassembling the steering rack and repairing it when jammed
If steering rack repair is required, it begins with disassembling it. During repairs, a steering rack repair kit is used. Disassembly is carried out in a certain order. First, the adjusting nut is unscrewed, which sometimes requires considerable effort. Then the thrust bushing is removed.
If it is difficult to remove, you can use a mallet to lightly hit the rack body. The side plugs and boot are removed after cutting off the plastic fasteners. For preventative purposes, it is recommended to replace the boot with a new one in any case. The shaft is removed from the rack housing by hitting the body with a mallet.
Steering rack parts: 1 – rack bushing ring; 2 – rack support sleeve; 3 – steering gear housing; 4 – roller bearing; 5 – drive gear; 6 – ball bearing; 7 – retaining ring; 8 – protective washer; 9 – sealing ring; 10 – bearing nut; 11 – lock washer; 12 – boot; 13 – rack; 14 – protective cap; 15 – rack stop; 16 – sealing ring; 17 – retaining ring; 18 – stop nut; 19 – clamp; 20 – protective cover; 21 – inner tie rod end; 22 – connecting plate; 23 – locking plate; 24 – bolt securing the rod to the rack; A - mark on the boot; B - mark on the crankcase
Inside the freed cavity of the housing, a plastic sleeve will become noticeable, which can be removed using a screwdriver. It must be replaced with a new one from the repair kit. All old grease is removed from the cavity of the steering rack housing; the surface is thoroughly cleaned, washed and blown.
New lubricant is applied both inside and outside the housing
Lithol is used for this purpose. Particular attention should be paid to lubricating the gearing areas. All rack parts are inspected and, if necessary, replaced with new ones from the repair kit. If the steering wheel is jammed, it must be removed. This operation for Lada Kalina is carried out as follows
This operation for Lada Kalina is carried out as follows.
First, the airbags are disconnected from the battery, their locks and clamps are loosened. The cushions are released and moved to the side. The two horn wires are disconnected. On the steering wheel mounting shaft, in the place marked with an arrow, a mark is made on the location of the steering wheel before it is removed.
The steering wheel nut is loosened (but not completely unscrewed). When the steering wheel swings from side to side, it is tightened until it stops against the nut. Then you should align the car's wheels and ensure that the steering wheel is straight. The pin is removed and inserted into the switch block below the steering wheel.
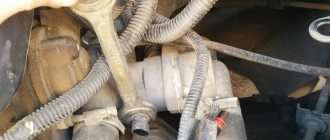
Knock sensor (DS)
Designed to determine the moment of occurrence of high-frequency vibrations of the cylinder block that occur during detonation combustion of fuel. Based on the sensor signal, the electronic engine control unit selects the optimal ignition timing, which allows for the most complete and efficient combustion of the fuel-air mixture in the engine cylinders, as well as automatically adjusting the ignition timing for fuels with different octane numbers. The knock sensor is located on the front wall of the cylinder block between the 2nd and 3rd cylinders.
E-gas: advantages mentioned by the manufacturer
First of all, the e-gas pedal differs in appearance. In addition, the main changes that the manufacturer made by installing this system on Kalina are hidden under the hood. There is an electric motor that drives it, which controls the throttle valve (on older models, control was carried out using an ordinary cable).
AvtoVAZ claims that this innovation makes it possible to reduce fuel consumption, and its supply is somewhat more uniform: when you press the e-gas pedal, a signal is sent to the control unit, resulting in an instant reaction. Kalina becomes more economical and responsive.
How to replace the phase sensor?
Although the replacement itself is a fairly simple procedure, many owners of Lada Kalina 8 valves for some reason trust its specialists. Due to the possibility of various situations arising, including on the road, we consider it advisable to provide an algorithm for replacement.
The “main” tool in our business is the “10” key. It will also be important to find and purchase the right camshaft sensor. The best option is to purchase from an official representative office, since quality will be guaranteed here with appropriate confirmation.
We carry out repairs in the following order:
- We disconnect the power connectors by previously squeezing the plastic clips.
- Unscrew the mounting bolt.
- We remove the camshaft sensor itself.
- In its place we install a new analogue.
- We make a connection.
Replacing the device
Installing a new device is actually quite simple. To do this you will need a minimal set of tools and very little time:
- disconnect the battery;
- compress the spring clamp of the device;
- remove the cable block from the sensor;
- unscrew the fastening screws;
- remove the sensor, install a new one and do all the same manipulations in reverse order.
This is how the rough road sensor is changed on most domestic cars; on foreign cars this process may look a little different.