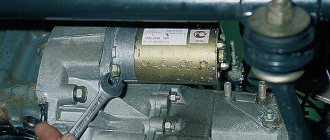
Lada 4x4 (VAZ-21214): Removing the transfer case
We carry out the work on an inspection ditch or overpass.
Disconnect the wire terminal
from the negative terminal of the battery.
Disconnect the wire terminals
from the differential lock warning lamp switch (see “Replacing the differential lock warning lamp switch”, page 175).
Disconnect the wire block
from the speed sensor (see “Removing the speed sensor”, page 121). We disconnect the front and rear driveshafts from the transfer case (see “Removing the driveshaft,” p. 186).
Use a Phillips screwdriver to loosen the clamp.
. and disconnect the ventilation hose from the transfer case fitting.
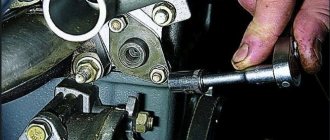
Using a 19mm spanner, unscrew the nut of the bolt securing the elastic coupling to the gearbox flange, holding the bolt with a wrench of the same size.
Similarly, unscrew the nuts of the other two bolts.
We use a clamp (with a diameter of 135 mm) to compress the elastic coupling so that the bolts can be removed.
If there is no long clamp, we use two shorter ones, inserting the tongue of one into the lock of the other.
We remove the bolts one at a time: turn the elastic coupling so that the bolt slides out into the recess located on the left side of the rear gearbox cover. We install an adjustable stop under the transfer case. Mark the position of the two transfer case suspension brackets on the body and unscrew the four nuts securing the brackets (see “Removing the transfer case suspension brackets,” p. 175). Lowering the stop and moving the transfer case back, remove it along with the intermediate shaft.
The transfer case can be removed without the intermediate shaft by disconnecting its attachment to the flange of the transfer case drive shaft (see “Removing the intermediate shaft,” p. 169).
Install the transfer case in reverse order.
After installation, it must be centered. To do this, we hang the front and rear axles of the car. We place supports under the rear axle beam so that the rear axle takes the same position as it is in when the car is on its wheels. We turn on the transfer case, start the engine, engage the direct transmission of the gearbox and increase the engine speed. If vibration occurs in the transfer case, stop the engine and loosen the nuts securing the brackets for its suspension. By moving the transfer case, we try to eliminate its vibration when the engine is running (this may require shims that are installed between the brackets and the body). In this position, we finally tighten the nuts securing the transfer case suspension brackets.
Inside the car, remove the wires from the differential lock warning lamp switch (see here).
We disconnect the flexible speedometer drive shaft from the transfer case, and for the VAZ-21214, also the speed sensor (see here).
We disconnect the front and rear driveshafts from the transfer case (see here).
Using a 19mm spanner, unscrew the nut of the bolt securing the elastic coupling to the gearbox flange, holding the bolt with a wrench of the same size.
Similarly, unscrew the nuts of the other two bolts.
We use a clamp (with a diameter of 135 mm) to compress the elastic coupling so that the bolts can be removed.
If there is no long clamp, we use two shorter ones, inserting the tongue of one into the lock of the other.
We remove the bolts one at a time: turn the elastic coupling so that the bolt slides out into the recess located on the left side of the rear gearbox cover.
The device of the VAZ Niva transfer case
The transfer case is not present in all VAZ passenger cars, but only on cars with two drive axles. In the transmission, the transfer case (TC) is installed at the rear of the gearbox; a rear driveshaft is attached to its shank, which connects the transfer case to the rear axle. The front axle is also driven by the steering wheel; it is connected to the transfer case by a front driveshaft.
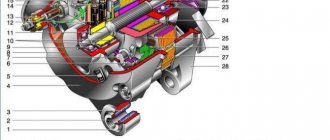
The reduction gear in the Republic of Kazakhstan is designed to obtain high torque, it is used to overcome difficult sections of the road, and helps to cope with off-road conditions. The VAZ Niva transfer case contains the following main parts:
- the body itself;
- front axle drive shaft;
- intermediate shaft;
- drive shaft;
- gears;
- bearings;
- differential housing;
- satellites;
- differential lock clutch;
- gear shift clutch;
- flanges (for connection to cardan shafts);
- oil seals;
- control levers.
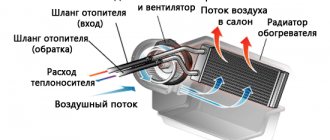
How the distribution box works
- This device is mounted on several brackets to the floor of the car body. The parts in the box consist of aluminum alloy, which are connected to each other by nuts and studs.
- The upper part of the crankcase is equipped with a special hatch, which is closed with a steel cover. There are cardboard gaskets in the space between the crankcase and the cover.
- All the shafts in it are sealed with cuffs, which are made of rubber-metal material. Rubber rings also seal the following elements: Differential lock, gear shift fork rod, speed sensor, and drive shaft
- The drive shaft is mounted on a pair of ball bearings, and outer rings are located in the crankcase and in the slots of the front cover.
Transfer case Niva 21213
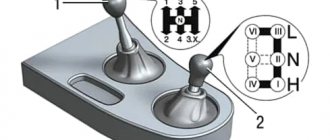
Model VAZ-21213 is an all-terrain passenger car with permanent all-wheel drive and differential lock. Brand 21213 is a restyled version of the first VAZ SUV, VAZ-2121. RK Niva 21213 has three gears:
- the first - with a gear ratio of 1.2;
- the second, lowered – with the number 2.135;
- neutral
21213 is equipped with 4-speed and 5-speed gearboxes, and when the first speed of the transfer case is turned on, the car operates in standard mode, the gear ratios in the transmission are from 5-speed. The checkpoints are as follows:
When you turn on the second position of the transfer case lever (reverse position), the gear ratios change (lower):
On ordinary roads, the transfer case is always in first gear, the transfer case control lever (reduction gear) is pushed forward. The neutral gear of the RK disconnects the transmission, and in this position the car does not drive; there is also a neutral in the gearbox.
How to enable all-wheel drive on a Niva
- 0 0 70k
The answer to this question will be incorrect, since the Niva has a permanent all-wheel drive . Many people confuse the function of the transfer case lever, believing that it turns the front axle on/off, while its function is to lock/unlock the center differential.
Therefore, the function of enabling/disabling all-wheel drive on a Niva can only be implemented by interfering with the vehicle’s design. More details about this in the article.
The Niva driver does not have the ability to disable the drive to the front or rear wheels, as is implemented in modern all-wheel drive vehicles of other brands, but he must know how to use the transfer case.
How to turn on all-wheel drive on a Niva
The Niva has permanent all-wheel drive. What does this mean? What the Niva all-wheel drive scheme means is that it always works - all four wheels constantly receive rotational energy from the engine through the cardans and differentials.
The information that on a Chevrolet Niva and Niva 4x4 you can turn off and turn on all-wheel drive with a lever is a very common myth . This version is sometimes voiced even by managers of Lada dealers - supposedly the transfer case lever connects the front axle, connecting all-wheel drive. In fact, the Niva has permanent all-wheel drive, not plug-in one!
The most common argument in favor of the wrong theory is why, with the transfer case turned off, if you hang one wheel on the Niva, the car will not move? For example, in this video they talk about the “floating” and unstable all-wheel drive of the Niva.
Whether the Niva has permanent or non-permanent all-wheel drive (see from time mark 2.40)
The answer is simple - because this car, in both generations, uses free, non-locking differentials. How it works - read the corresponding material. Therefore, when the wheel is suspended, all the engine power is spent on its rotation, and the other three wheels practically do not rotate.
Malfunctions of VAZ transfer cases
The transfer case on the Niva is a fairly reliable unit; problems with repairs in the mechanism itself arise mainly due to insufficient oil level in the valve - if for some reason the oil leaks out, intensive wear of all parts occurs. Among the frequently occurring malfunctions are:
- vibration in the body at various speeds when the car is moving;
- vibration when the vehicle starts moving;
- noise in the transfer case when the car is slipping or turning;
- difficult upshift or downshift, difficult engagement of the lock.
Vibration
Vibration in the body is the main “disease” of the Niva; it often occurs due to improper alignment of the transfer case. Most often, vibration occurs on VAZ 21213/21214 cars, since the transfer case is mounted only on two supports on the sides of the body; on the Chevrolet Niva, the transfer case is already installed on three supports. But before you start adjusting the position of the transfer case, you should check the condition of other parts of the chassis - vibration can occur for other reasons:
- driveshafts are poorly secured;
- wheels are not balanced;
- there is play in the cardan crosspieces (vibration is especially affected by play in the rear driveshaft crosspieces);
- The vibration comes from the engine itself.
Vibration when starting off on a Niva can also occur for the following reasons:
- the mounting supports of the transfer case have become loose;
- The rubber on the RK supports themselves broke.
Transfer case alignment
Correct installation of the transfer case can be done in several ways. Most often in auto repair shops, repairmen use the following method:
- hang the car on a lift;
- loosen the transfer case;
- start the engine;
- engage the gear and accelerate the car according to the speedometer to the speed at which vibration occurs (often it occurs at speeds from 40 to 80 km/h);
- without using the brakes, reduce the engine speed, then turn off the ignition.
The transfer case itself is centered in place, all that remains is to tighten the fastenings of the supports.
You can also adjust the position of the RC using a wire; we do it as follows:
- loosen all four fastenings of the transfer case supports;
- fasten one end of the wire to the rubber coupling of the propeller shaft;
- we attach another piece of wire to the CV joint, bring the other ends of the wire to each other;
- rotate the shaft; if the transfer case is not centered, the ends of the wire will diverge during rotation;
- the task comes down to installing the transfer case using the selection method so that the ends of the wire practically do not diverge from each other in any position when turning the shaft.
Eliminate vibration with additional fasteners
Installing the third support of the transfer case on VAZ 21213/21214 vehicles allows you to reduce the level of vibration of the transfer case; with this support it is easier to center the transfer case. The part can be purchased at auto stores or made yourself. The finished product comes with three long studs (for model 2121); to install the third support on this machine, you will need to unscrew the short studs from the transfer case housing and install new studs from the kit. We carry out repairs as follows:
- dismantle the front passenger seat in the cabin;
- remove the floor tunnel lining;
- in the cabin we move aside the carpet covering the body amplifier (in front of the handbrake lever);
- remove the transfer case (alternatively, you can simply hang it up, but removing the third support makes it easier to install);
- We attach the bracket of the new support to the body of the RC;
- we install the transfer case in place, center it in the optimal position, and fasten the side supports;
- we combine the third support with the body, drill two holes in the bottom;
- Using washers, bolts and nuts (from the kit) we attach the support to the bottom of the body.
Vibration is eliminated more effectively by installing a subframe under the transfer case. You can also make such a device yourself or buy a finished product at a car store.
In order to install the subframe, the transfer case must be removed. It is more convenient to carry out such work in a pit; we carry out repairs as follows:
- leave the car in neutral gear;
- disconnect the propeller shaft from the transfer case, it is advisable to mark the driveshaft flange and the drive shaft so that during installation, align the driveshaft according to the marks - this way, the occurrence of unnecessary vibrations is eliminated;
- dismantle the muffler mounting bracket;
- remove the gearbox traverse;
- jack up the transfer case, remove the side fastenings of the transfer case;
- We treat the places where the subframe fits to the body with Movil;
- place the subframe on the gearbox studs;
- we mark the attachment points of the subframe on the side members, drill holes, attach bolts to the body;
- we tighten all fastenings, except for the transfer case supports themselves;
- we perform alignment of the steering wheel;
- Finally tighten the transfer case supports.
It should be noted that installing an additional support or subframe on the steering wheel does not always lead to the desired effect; in some cases, vibration only increases.
How to change the oil
If you read the regulations, it is recommended to change the oil in the transfer case every forty-five thousand kilometers. The following tools are required for replacement:
- Key for twelve
- Syringe
- Container where you can drain the waste
Once the tool is ready, we begin replacing:
- We unscrew the oil drain plug and drain the waste
- Screw the drain plug back and unscrew the filler
- Using a syringe, fill in new oil to the required level, and at this point the process can be considered complete.
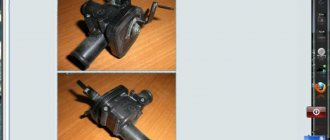
Sometimes you need to replace the transfer case on a Niva Chevrolet car, and to do this you need to dismantle it, to do this you need to do the following:
- We take two keys for thirteen and seventeen, and disconnect the cardan shafts from it
- We disconnect the transfer case from the car interior, cover with handle
- We remove the cover of the lever, which is responsible for switching the drive
- For the existing box suspension, loosen the fastenings
- We disconnect all the wires from the lamp responsible for the differential lock.
- We install the support under the box, unscrew all the nuts that secure the pillow, and remove the transfer case
In order for it to fall into place, you must do all the steps in reverse order.
The transfer case is very noisy; probably every Niva owner faces this problem; this noise is transmitted into the cabin through the levers in it. To get rid of this howling, you can use two methods
- You can buy special silent Niva transfer case levers, from which they will fit, they will cost around 3,000 rubles.
- You can make it yourself and spend significantly less.
To make them yourself, you can take:
- Repair kit for lever from GAZ 31105 from five-speed gearbox
- Two levers from VAZ
- Standard lever
Using a grinder, you need to cut all the elements to the required level, and then use a welding machine to weld it all. This takes about two hours. The essence of this device is that due to the rubber and plastic bushings that are located on the gearbox lever, noise and vibration are dampened. Let's look at the whole principle using an example:
- We remove the lever
- We cut it to the size we need, as in the pictures.
- The lever that changes gears is cut one centimeter above the narrowing
- We saw the GAS lever below the thickening by one and a half centimeters
- We put the resulting elements we need together
- Then we weld the original lever and the GAS lever together
- On the resulting welded part, we put on the existing part from the gearbox
- We weld the upper part of the existing original lever as needed
- We get the design we need
- We prime and paint the resulting elements
- We cut the upper part of the rubber seals, low and high gears
If everything is done correctly, they will be practically indistinguishable from being gratifying. As a result of the actions taken, we get a softer switching on than before, vibration practically disappears, strong noise disappears, and most importantly, you can do this yourself while saving money.
Removing the Niva transfer case
To repair the transfer case on a VAZ 21213 (21214), the unit must first be removed. We carry out removal in the following order:
- in the cabin we dismantle the plastic lining of the gearbox and gearbox levers;
- unscrew the knobs of the transfer case shift levers, remove the casing under them;
- disconnect the speedometer cable, for RK 21214 you will need to additionally disconnect the speed sensor;
- we unscrew the bolts with nuts securing the elastic coupling of the front and rear propeller shafts; in order to remove the bolts, the cardan shafts must be turned - they are removed one at a time in one specific position of the shaft;
- We install a jack (or other support) under the transfer case and mark the places where the side supports of the RC were attached. This is done in order to minimize the alignment of the transfer case during installation;
- unscrew the 4 nuts securing the gearbox to the gearbox;
- unscrew the 4 fastenings of the RC supports to the car body;
- Now all that remains is to dismantle the transfer case.
Instructions
1. Place the gearbox and transfer case in the neutral position, thereby ensuring free rotation of the intermediate shaft. 2. Unscrew the nuts securing the elastic supports of the transfer case on its axles (M10, wrench 17) and the bolt securing the elastic support of the box to its bracket (M10).
3. Unscrew and remove the catalyst thermal protection shield (if there is one) on Niva cars before 2008. Trim as shown in the photo.
4. Unscrew the transfer case supports from the body and remove them from the axles. 5. Unscrew the box support bracket from the body and remove it.
6. Unscrew the elastic support from the gearbox and remove it (later it will be used as a third support for the transfer case).
7. Unscrew the two nuts on the rear cover of the transfer case at the level of fastening the bracket of the third support and cut off the rib located between these nuts, ensuring a tight fit of the bracket to the cover.
On the fields, the year of manufacture is after 2008. Location of the catalyst (as in the photo)
8. Remove the catalyst clamp bracket and cut it off as shown in the photo.
9. Thus, a part of it remains at the place where the bracket is attached.
10. Attach the third support bracket to the transfer case with two nuts.
11. Attach the strips with elastic supports installed on them to the free studs in the body (do not pull the supports to the plates). Before installation, treat the bottom with mastic.