Design and dimensions
Consumables that do not match in size are one of the reasons for rapid breakdown. To prevent troubles, take the choice of a new part more seriously.
Head-on
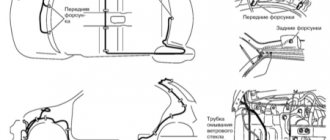
The dimensions of the windshield of the VAZ 2115 are 1400×662 mm. The dimensions of the windshield on the VAZ 2114 and 2113 have the same dimensions, which makes it easier to find a new spare part.
It is multi-component: two glass layers and a film between them, the so-called triplex. This structure prevents fragments from scattering when damaged.
Rear
Cracks or chips on parts are rare. The size of the rear window of the VAZ 2114 is 1210x656 mm.
The parameters need to be known if the driver wants to tint the car.
Lateral
The front left side glass is 858 mm wide and 528 mm long. Consult with a salesperson at your auto store before purchasing.
Preparing the installation kit
Before installation, a number of preliminary works need to be done.
| Stages | Actions |
| First of all, try on the new windshield. | If the fit is not tight, eliminate minor discrepancies in the geometry with light blows of a rubber hammer. If you use a regular steel hammer for straightening, be very careful; strike through a piece of thick rubber or elastic polymer material. |
| After eliminating geometric discrepancies, the frame should be inspected for corrosion. | Treat areas with traces of corrosion with a rust modifier and prime. |
| Prepare the sealant. | Apply a thin layer of sealant to the well-cleaned and dried surface of the internal (glass) groove. Do not use quick-drying sealants. Throughout the entire process of installation and shrinkage, which lasts two to three days, the sealant must maintain viscosity. |
| Install the seal on the new glass. | Generously lubricate the outer (frame) groove with liquid sealant. Use the groove closest to the car interior; this is where the edge of the frame should fit. |
To install glass with a seal into the frame, you will need 4.5 meters of durable nylon cord. The length is determined by the size of the windshield. You need to add 50–70 cm to the perimeter of the frame. The size of the rear window and the size of the side glass are taken into account in the same way. The cord should have a slippery surface and a diameter of 4 mm.
It should be placed in the outer groove of the seal, starting from the middle of the cord and from the center of the top of the frame groove. The cord should be laid symmetrically to the right and left from the center of the upper groove, down along the left and right edges of the element and along the lower edge of the part from the edges to the center. In the middle of the lower groove, the mounting cord should overlap, one end over the other.
The cord should have free ends that should not be tucked into the groove; they are needed during installation.
How to choose
Don't buy cheap copies. Products with a suspiciously low price are either made of low-quality materials or are sold as disassembled parts. An inexpensive consumable will require replacement after just six months of use.
It is advisable to find an original spare part. It will definitely fit the car, and the quality will be higher than that of its analogue.
Inspect the part carefully. The surface must be smooth, without scratches, even and transparent. The reflection must be clear and clear. If it is cloudy, do not rush to shell out money.
Check markings, manufacturer and type. Information must be clearly written. Blurred markings are one of the main signs of a fake.
The price of consumables ranges from 1000 to 3000 rubles.
Economy segment
Xyg (China) - the best Chinese parts on the market. Pass ultraviolet rays. The material is not of the best quality: poor visibility, the image is distorted. Weak structure. This consumable will have to be changed twice a year. Overall, the price is reasonable.
Causes and consequences of damage
Driving on poor quality roads in Russia forces car owners to look for a new windshield at least once every year and a half. Even a very small pebble flying from under the wheels of a car can lead to damage to the part.
There are two types of damage:
- Chips. If only a chip appears on the surface, the driver is lucky. This means that the first layer is damaged; it is not necessary to install a new spare part.
- Cracks. You can't hesitate. At any moment, glass can crumble into pieces due to a hole in the road, and this will lead to an accident.
What can you do
If the driver fails to change it in time, there are several popular tips:
- Using a glass cutter, make perpendicular cuts 0.5 cm long along the edges of the “web”.
- Drill small holes with a thin diamond drill bit. The work requires accuracy, patience and attention.
- “Weld” the crack. It's better to contact specialists. Without experience it will be difficult.
Replacement
There are two options for replacing the windshield on a VAZ 2114:
How to remove
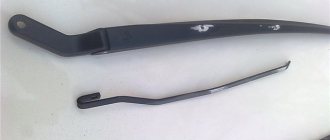
The work begins with the fact that we remove all unnecessary things. Side trims, wipers - this interferes with dismantling. Now we remove the old glass: starting from the top corner, squeeze it out along with the rubber. It is advisable to have someone help. If you pry the seal with a flat screwdriver from the inside, it will be easier to remove the headband.
You need to work with gloves, taking safety precautions.
Clean the grooves. The replacement now needs to be replaced with a seal. If the rubber is cracked, it is also advisable to replace it.
How to start repairing the windshield frame
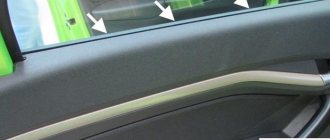
Repairing the windshield frame must be carried out in a closed and dry room without drafts. The car needs to be washed thoroughly first and given time to dry. Prepare the tools and materials necessary for repairs. Then remove from the windshield all devices that will interfere with operation. These include the blades and wiper panel, as well as other elements. After this, you can begin to dismantle the windshield frame.
The procedure for dismantling is as follows:
- Prepare wooden or foam supports approximately 5 cm thick, which will be placed between the removable top and the body of the car. This will provide access to the top frame mounting bolts on the front of the car.
- Select wrenches with heads 10 and 12, as well as two containers for removable plugs, bolts, nuts and other small parts that will be needed during assembly. One container is intended for elements of the middle and rear parts of the machine, the second - for the front part.
Inside the car:
- Remove the right and left trims along the sides, which will free access to the internal hidden mounting bolts, four on each side.
- Remove the plastic covers covering the rear corner bolts of the removable top. For each corner there are two bolts that are connected by special metal corners.
- Remove the plastic plugs on the center arch of the overhead console. They cover the four top mounting bolts.
- Open all the clips and plugs that cover the bolts on the front of the car connecting the windshield frame to the removable plastic top. The moldings and trims of the lower section of the frame can be left untouched.
- Unscrew all exposed bolts inside the machine.
On the outer surface of the car body:
- On both sides, carefully remove the plastic moldings covering the fastening bolts and the hinged covers of the windshield frame.
- Remove all bolts from the outside of the car, starting from the rear.
- Carefully lift the removable top of the body, placing prepared foam or wooden blocks into the gap formed above the sides.
- Unscrew the hinge fastening bolts.
- To remove the windshield frame, carefully move it to the side. Considering the dimensions and weight, it is better to do this with an assistant.
How to put
During installation you will have to resort to outside help. The glass is inserted into the lower groove, and only then carefully around the entire perimeter. As you insert the windshield, pull out the cord to fit the seal tightly and efficiently.
Be careful when pulling the rope at bends! In the side parts it slides with difficulty and can tear; press harder from the outside of the car.
It is advisable to fix the rubber with glue-sealant, and attach the glass to the roof and sides with tape overnight.
Replacing the rear window of a VAZ is carried out in the same way. If you installed a windshield, you can install this, although removing the rear window is a more difficult task. To insert the rear window, ask a friend for help, as you will have to pull the rope and press on the consumable at the same time.
Windshield frame - logbook Lada 2115 2006 on DRIVE2
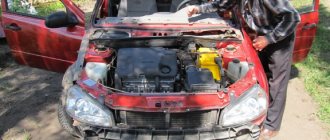
A few letters and photos. I fought with the frame, because there was rot in the left pillar and it was not possible to fix it without removing the glass, I pulled the glass out, and found more rot underneath it, and even through it.
At first I wanted to get away with a repair insert, but they are not the same shape as I need, it feels like they are being bent with a hammer on the knee. I found the bottom of the frame to be very similar to the factory.
I wanted to completely change the bottom of the frame, change the right corner anyway, and near the left there is a small area of corrosion, although the corner itself, oddly enough, is in good condition, then I changed my mind, since the frame still didn’t suit me completely. In general, I eliminated the rot on the left, and I melted the holes by welding, cleaned them and removed them with putty.
Next is the right side. I cut off part of the rack and treated it with anti-rust and primer.
removed part of the frame
after anti-rust treatment
I exposed and welded the repair insert, then puttyed and primed it.
Pay for goods by credit card, using QIWI, Yandex.Money or WebMoney and save on your purchase from 4%, avoiding postal and bank commissions
This product was chosen by 10 customers
The repair part of the wind window frame on the right (large) for the VAZ 2108-21099 is original and serves to replace the standard one that has become unusable.
(Product type may differ from that shown in the image)
Production: Tolyatti
Weight, kg: 0.2 Dimensions, cm: 24 x 21 x 6 Volume, m3: 0.00302
Conclusion
Replacing damaged glass is not difficult, although it will require some skill. This is easy to do with your own hands using tools. It is advisable to have someone help you; it will be inconvenient to carry out the installation alone.
Home » Repair » VAZ 2113 – 2115 »
The windshield on the 2114 has a size of 1400x662mm, it is standard for the model range from model 8 to model 15. The windshield has a three-layer structure, also called triplex. It consists of two layers of glass and a transparent film in the middle, which prevents the glass from shattering upon impact.
There are cases that require windshield replacement. The main reason is the condition of our roads. From an oncoming or overtaking car, a small pebble may fly from under their wheels and damage the glass.
Main types of damage:
- chips;
- cracks.
If a chip appears, that is, only the outer side of the triplex is damaged, problems usually do not arise. But when a crack appears, you need to take action, otherwise over time the windshield may fall out, which can easily lead to an accident or accident. And it will be difficult to obtain a diagnostic card.
What you can do:
- in case of small chips, continue to operate the car;
- If there is a crack, take temporary measures yourself or replace the glass.
Temporary measures:
- Using a glass cutter, half a centimeter cuts are made perpendicularly along the edges of the crack;
- Using the finest diamond drill, holes are drilled along its edges. The crack will not spread further for some time;
- contacting a specialized service, where the crack can be “welded” so that it will not be visible.
But in any case, the integrity of the triplex has already been compromised and after some time the glass will have to be replaced.
Repair of car glass frames
- Glass dismantling
- Glass frame repair technology
What is the cause of rust on glass frames?
Practice has shown that there are a number of objective prerequisites that cause corrosion of the frames in which car windows are attached. But all of them are somehow related to violations of installation technology in production or during replacement. The most common causes of rust on these body parts are:
- Poor quality processing of the frame metal in production, lack of corrosion protection. Unfortunately, especially for domestic vehicles, this problem is very relevant.
- The seals have become unusable.
- The edges of the glued glass are not sealed sufficiently.
- The drain is clogged or broken, causing water to stagnate around the edges of the seal and seep into the metal.
- Unprofessional glass replacement - damage to protective coatings during dismantling, untreated and unprotected metal.
And only after all these reasons does the frame become damaged during accidents or impacts. Therefore, when purchasing a car, especially a used one, do not be lazy, bend the seals, look at the condition of the metal frame. By the way, this method allows you to determine whether the car has been repainted or not. In most cases, it is in these areas that visible marks remain, especially if you painted it hastily without removing the glass.
Solving the problem without dismantling the glazing
This option is possible if only areas that are not directly adjacent to the glass are damaged. That is, we will talk about local repairs or elimination of rust manifestations that are insignificant in area and depth. If we talk about completely restoring the frame, this method will not work. But there are many other situations in which it can be used, for example, if urgent painting is necessary before selling.
The advantage of this technology is that it reduces repair time and reduces its cost. The gain is ensured by reducing the volume of reinforcement work. It is for these reasons that people come to us with such orders. But we repeat once again, if the frame is significantly damaged, we will not take such a step. There is no point in making a semblance of repairs, because a serious problem cannot be solved in this way.
Repairing the frame without removing the glass is the main problem that needs to be solved
Several times we had to change the frames after they were repaired by self-taught craftsmen literally a year ago. And as conversations with car owners showed, the putty and painting work was carried out without dismantling the glass. What is the reason why the frame practically rotted after ten months? It's simple - non-compliance with repair technology. The main areas of rust are hidden under the rubber band. Unscrewing and holding it in some cases is not easy. Therefore, only the area adjacent to the seal was cleaned and treated. This was visible even at the border between the putty and paint.
This approach to repair is unacceptable. Therefore, we proceed in a slightly different way, which guarantees a high degree of protection of the frame metal from corrosion.
We provide maximum access to the metal under the rubber band
It is best to remove the sealing rubber completely. Yes, this will slightly increase the duration of the repair, but will provide access to all surfaces of the frame, which are most often prone to rust. But this is not the only method that can be applied in such a situation. There is a simpler and faster solution. The essence of the technology is as follows:
- The rigidity of the seal is ensured by installing a special lock. To be able to easily bend the rubber, it will have to be removed. After this, the frame becomes plastic and you can safely work with it. Similar locking connectors are installed on most domestic cars and budget foreign cars.
- To fix the elastic in a raised position, we use a wire or rope of a suitable diameter. We simply insert it under the seal along the very edge of the metal. In this position, you can safely process almost the entire surface of the frame.
- To avoid damaging the rubber, cover it with masking tape. Moreover, it is necessary to protect both the inner and outer sides of the seal.
At this point we complete the preparatory stage and you can proceed directly to the repair of the glass frame.
Basic repair operations
The quality of any body repair and the durability of the paintwork depend primarily on surface preparation. Left a couple of “saffron milk caps”? — Prepare for repeated costs in a few months. Especially when it comes to glass frames. After all, dirt often gets under the seal, which worsens the tightness and opens the way for water. Therefore, we carry out each stage of work with extreme care and thoroughness.
- We clean the surface from traces of rust. Since we are talking about local repairs for minor damage, all areas of corrosion can be removed manually. You will only have to use a grinder with circles or brushes in extreme cases. When using power tools, be careful not to damage the seal. We achieve a metallic shine over the entire visible surface of the frame.
- Thoroughly blow off the treated areas and degrease. Only after this do we prime.
- We putty the entire treated surface. If there are deep dents, then the putty will have to be applied in several layers, allowing each layer to dry.
- The frame must be sanded before painting. In some cases, you will have to putty and sand several times. Only on a perfectly painted surface will the paint adhere as it should. Therefore, at this stage we take our time and do everything conscientiously.
- A few words about painting. The main problem is painting the upper part of the frame adjacent to the roof. If you have a built-in hatch, then the task is somewhat simplified. You can paint it before it and make a smooth transition to match the color of the main part. If there is no hatch, then most likely the entire roof will need to be repainted. Therefore, work to prepare for painting must also be done on its surface.
The duration of repair depends on the extent of damage. Considering that the service is equipped with drying equipment, on average it will take one day to clean and paint the glass frame.
Other damage to the frame that can be repaired without removing the glass
Without removing the windshield, if necessary, you can also repair such a problematic segment of the glass frame as the beaks (the lower elements of the frame pillars). On almost all VAZ models, and on budget foreign cars too, these areas rot almost completely if you don’t immediately pay attention to the signs that appear. In this case, you will have to change the part. We carry out repairs in the following sequence:
- We cut out the element damaged by rust as much as possible.
- The remaining areas with minor damage are thoroughly cleaned.
- To prevent further spread of corrosion, we treat the internal cleaned surfaces with acid primer.
- We try on the new segment in place, adjust the dimensions and configuration taking into account the resulting cutout line.
- We weld the new element by spot welding. We clean the resulting seam and the areas adjacent to it.
- We prime, at this stage it is also worth using acidic primer.
- We putty, clean and paint, everything is standard with a guarantee of color matching.
In some cases, a drainage device helps, which will prevent moisture from accumulating inside the beak. If necessary, we will resolve this issue.
Overhaul of glass frame
If the degree of damage is above average, then it will not be possible to repair the frame without dismantling the glass. And this will affect the total cost of frame repair. We guarantee that we will not damage the windshield during disassembly. Otherwise, we will purchase the same glass at our own expense.
Overhaul of the frame is advisable when the surface of the body element is damaged by 40–50%. If the metal has rotted over most of it, it is advisable to replace individual elements (stands, top, bottom) completely. In most cases, such repairs will not help with serious damage resulting from accidents. Of course, we will try to restore the geometry of the frame, but this is not possible in all cases. And the strength of the elongated frame will decrease. And this can cause problems when installing a new windshield.
Glass dismantling
If you have special tools and some experience, you can remove the glued glass in an hour or even less. And we can do it. We work according to the following scheme:
- Carefully remove the outer seal around the entire perimeter of the glass.
- We dismantle wipers, moldings, and other plastic elements that can be placed in further work.
- Be sure to cover the dashboard and front seats with film.
- We remove the visors, decorative trims on the front pillars, and remove the internal seal. Don’t forget to turn off and remove the devices that are installed on the windshield (radar detector, recorder).
- We cut out the glass along the entire contour and remove it using suction cups.
We do everything quickly and accurately, you can see for yourself. Interior elements and exterior body parts will remain intact and intact.
Glass frame repair technology
We can repair almost any damage without removing the frame itself. If such a need is still evident, then think about completely replacing this body part.
It will not take much time to completely repair the part. In most cases we can do it in a day. Repair and restoration, in addition to reinforcement work, includes the following operations:
- We remove the old sealant and first clean the surface from rust.
- We assess the extent of damage and determine which areas will need to be replaced.
- If necessary and possible, we correct the geometry of the frame.
- We cut out the selected segments and clean the remaining parts of the frame to a metallic shine.
- We prepare repair inserts from metal of appropriate thickness. We try on, trim, install.
- We weld the seams using spot welding. By the way, the service is equipped with modern welding equipment, so we carry out work of any level of complexity, including non-ferrous metals.
- We carry out preparation and painting using traditional technology. The only caveat is that to improve adhesion and protect against corrosion, in this case we use acidic primer.
We install glass and seal it in accordance with the manufacturer's requirements. We provide a guarantee of reliability. You can be sure that the glass will not burst due to deformation and will not leak along the edge.
Replacing the windshield frame
In some cases, replacing individual elements of the glazing frame will help. It is quite acceptable to weld new sides or bottom. But it is worth considering the fact that such spare parts are not produced separately. Therefore, you will have to be content with parts from disassembly. Of course, the service center is ready to perform this amount of work, but we still recommend not saving on metal, but replacing the frame completely. Moreover, the price of the issue is not so high.
The main difficulty is associated with dismantling the part. Different cars have different mounting schemes for the glass frame. Therefore, you will have to unscrew, cut, and even partially disassemble the body. If we talk about domestic cars, for example, the UAZ Hunter, then the procedure follows the following scheme:
- First of all, we remove the glass, dismantle the hood, and remove trim elements both inside and outside the cabin.
- We unscrew the frame from the hinges and the roof of the car. On some cars you will have to drill out weld points.
- You can't just pull the part out; you'll have to partially disassemble the roof as well. Unscrew the front mounting bolts to the body. The rear ones just need to be significantly weakened. There will be enough free movement, and the roof of the car will not move off during the work.
- To remove the glass frame, you will have to lift the roof by 7–10 cm.
- We also move the part itself upward until we remove it from the hinges.
- Then we push the bottom of the frame out onto the street and we can assume that it has been removed.
Before installing a new part, we carefully check the condition of the exposed metal. If necessary, we clean, weld, prepare for painting and paint. Additional anti-corrosion treatment will not hurt either. The frame should only be placed in a prepared opening on which there are no traces of saffron milk caps.
We install the prepared part in the reverse order. Does not contain any pitfalls and installation of glass. Everything is standard.
Door glass frame repair
Damage to the glass frame on doors is also common. Driving with the window open, dirt and water getting in do their job. Therefore, this element often rots even faster than on the windshield. The technology of body repair in this case is similar, but there are some nuances, namely:
- To reduce the amount of reinforcement work, all operations are performed without dismantling the door. But the disassembly itself will have to be done completely. Otherwise, there is a risk of damage to parts of window regulators, handles, locks, and built-in acoustics. We remove the glass and other parts, for which we will also have to dismantle the casing.
- The door glass frame is secured with sealant. But in some cases, welding and additional fasteners are used, it all depends on the type of machine. The frame will have to be removed only in case of replacement; restoration is carried out locally.
- We inspect the prepared door, identify and cut out the most affected segments. We do not regret and do not leave the slightest areas that are affected by corrosion. Otherwise, the effect of the repair will be short-term.
- We clean off the rust, digest the metal, having previously prepared and adjusted the repair inserts. We sand the seams and surface. We carry out the full range of painting works.
In principle, the technology is standard, but we would like to draw attention to the reverse installation of glass, especially on the trunk door. The fact is that the rigidity of this part of the body is insufficient, and constant opening and closing adds load. Therefore, the surface of the frame must be adjusted perfectly. Keep an eye on the geometry of the product if you are changing metal in large segments. When installing glass, maximum care and attention must be taken. For us, this is a matter of technology, so there will be no problems at this stage.
Our capabilities for repairing glass frames or why you should entrust this work to us
We won’t say much, just give the facts:
- The service is equipped with all the necessary equipment for body repair.
- We are trying to reduce the amount of reinforcement work, which is why we offer a normal cost of repairs, which does not exceed the average for Moscow.
- We work with suppliers who quickly find any components. You will not have to wait long for the delivery of the required frame or individual structural elements, seals and other components.
- We pay special attention to corrosion protection. Therefore, after repairs, you will forget about problems for the next few years.
- We use paint and varnish coatings that are resistant to any impact. We'll select paint to match and try to get by with local painting.
- And of course, we provide a guarantee on the work performed.
The only request is to sign up for the service in advance. This will make it possible to plan our working hours and organize the supply of components. We can even give you an estimated cost based on a photograph. We will tell you the final price after a detailed inspection. And rest assured, she will not grow up by the time the work is completed.
Fill out the application or call us now. This will shorten the overall repair time for the glass frame.
How to choose glass
Before choosing it, you should pay attention to the following criteria:
- price. Don't chase cheapness;
- buy the original, not an analogue or from disassembly;
- the surface must be smooth, even, transparent and reflective without distortion;
- look at the markings, determine the manufacturer and type of glass.
A windshield is not that expensive, you can find not very expensive ones up to 1000 rubles, there are also expensive Olimpia or BOR glasses, the price for them reaches 3000 rubles.
Windshield replacement
There are also options. Either a car service or yourself. If you have at least a little experience in carrying out repairs and a friend who is ready to help, the independent method is much cheaper.
Sequence of actions when replacing the windshield on a VAZ 2114:
- Get out the old glass. To do this, carefully squeeze it out, starting from any corner. The seal should come out along with the glass; if difficulties arise, you need to help with a screwdriver. The glass will most likely crack, so you should work with gloves and follow safety precautions.
- Clean the glass opening and seal from dirt. If the seal is already cracked, purchase a new one.
- You can apply lubricant to the seal to make installation easier.
- Place the seal on the glass.
- From the inside, under the seal, insert a thin nylon cord around the entire perimeter, its ends should be at the bottom in the middle.
- Together with an assistant, insert the glass into the opening, carefully and gently pressing it. The ends of the cord must be inside the car.
- One comrade presses the glass against the opening, the second, inside the car, carefully pulls out the cord from under the seal, which during this procedure enters the side of the opening. You need to be especially careful when pulling out the cord from the corners.
Replacing the windshield frame - logbook Lada 2114 Graphite beauty 2005 on DRIVE2
There are pockets of deep corrosion in the corners of the frame.
Initially I wanted to just replace the corners, but after a detailed study I came to the conclusion that it was easier to replace the entire frame. This is the picture on the corners.
These are the culprits of the constant stagnation of dirt and other nonsense; corrosion develops very well in them.
This is what new palms look like.
So I sawed a hole in it.
amplifier on the windshield frame.
remains of an old frame
manufacturing part of the drain.
this is what it looks like
all rust was repeatedly treated with a converter, and the top was covered with reactive primer.
we put on the wings, even out the gaps as much as possible
scald with embedded amplifier
Got rid of the seam completely.
this is how it happened, the primer was applied
Mileage: 177777 km
The result of the work
That's it, the glass has been replaced. As a result, the car can be used immediately without worrying about the windshield cracking completely.
If it takes car service specialists no more than 30 minutes, then if you work independently, it will take a little more time. The task can be simplified by the use of special devices in the form of two handles with suction cups, with the help of which it is much more convenient to place the glass.
Content
Sometimes, as a result of an accident or a simple hit by a stone, the windshield of a car is severely damaged and completely fails. You can solve the situation that has arisen, despite the complexity that may seem at first glance, with your own hands. Today we will talk about how to correctly replace the windshield of a VAZ 2114, as well as which glass is better to choose.
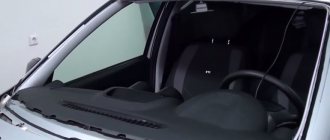
Replacing the windshield of a VAZ 2114
Main characteristics of the VAZ windshield
Windshields installed on VAZ cars are a three-layer composite material - triplex, in which a transparent film is placed between two layers of special glass. This design has a huge number of advantages over conventional monolithic glass, and the main one is the absence of scattering of fragments upon destruction - in the event of an accident, the glass cracks, but does not crumble into pieces.
Windshield VAZ 2114
The size of the windshield of the VAZ 2114 is 662 * 1400 mm, which is the standard size for all VAZs, from the G8 to the 15th model. This fact greatly simplifies the search for the right replacement glass.
Types of damage
There are 2 main types of damage to car windshields: chips and cracks. Chips are small, most often located at the edges, areas of destruction of one of the triplex glasses (usually the outer one). You can operate a car even if there are a large number of chips without urgently replacing the glass.
VAZ 2114 windshield chipped
In turn, cracks are through-cut damage that has a longitudinal or branched shape. They can appear even from a small pebble, but, regardless of their size, they pose a serious threat. Thus, over time, cracks in the glass can increase, gradually occupying an increasingly larger area, which can ultimately lead to a weakening of the glass surface and its complete loss.
Considering that this can happen even while driving, it is worth understanding that the only solution when cracks appear should be to replace the windshield (and, if necessary, replace the rear window of the VAZ 2114).
Crack in the windshield of a VAZ 2114
It is worth noting that in some cases (for example, when the crack occupies a small area), temporary measures can be taken to prevent its increase, which will allow you to use the car for some time without replacing the glass.
Such measures include:
- drawing 5 mm lines using a glass cutter in front of all ends of the crack;
- drilling small holes in front of each end of the crack using a pobedit or diamond drill;
- contacting a car service to seal (seal) the crack.
All of the above measures should be temporary, because even if the crack stops spreading or is not visible at all (as a result of sealing), the surface of the glass will still remain damaged, as well as the risk of it falling out over time.
Required Tools
First you need to select a new canvas. Craftsmen recommend choosing double glass with a polymer layer or single-layer tempered stalinite. Required equipment and related materials:
- nylon cord - about 5 meters;
- rubber hammer;
- slotted screwdriver;
- sealant;
- anti-corrosion agent and primer.
Preparation involves choosing a comfortable room for work; you also need to select equipment, purchase new glass and dismantle the old fragment.
You can put the old seal on the glass or purchase a new element to make the job easier.
Glass replacement
Before you can replace it, you will need to purchase new glass.
When choosing it, you should definitely pay attention to such points as:
- Manufacturer. You should purchase only original domestically produced glass. It is better to refrain from buying all kinds of analogues (even if they are praised by salespeople in a car store).
- Availability of markings. If the glass is branded, then basic information (manufacturer, dimensions, etc.) will be indicated on it. If there are no identification marks on the glass, then you should not purchase it.
- Surface. It should be smooth, even, have a smooth curvature and uniform transparency over the entire area.
- Price. It is best to buy glass in the middle price category - around 2,000 rubles. It is not worth saving by buying the cheapest, since in this case a new replacement may soon be required.
New windshield for VAZ 2114
After the new glass has been purchased, you can begin replacing it, having first dismantled the broken one. To do this, it is usually enough to squeeze it from the inside out, gently pressing with your hands (you should start from one, any corner, gradually moving to all the others).
If the squeezing method does not bring success, then before removing the windshield on the VAZ 2114, it should be picked up using a thick slotted screwdriver and gently pressed out. After this, the glass will be removed without much difficulty.
Removing the windshield of a VAZ 2114
Installing a new windshield is carried out in the following order:
- Remove the remnants of the old seal and clean the glass seat.
- Apply lubricant to the surface of the new seal.
- Place the seal on the new windshield, placing a thin nylon thread between it and the glass. It should go around the entire perimeter of the glass, and exit in the lower middle part.
Lace under the windshield seal VAZ 2114 Together with an assistant, insert the new glass into place and align it. Also, together with an assistant, remove the nylon thread from under the seal, while holding the glass.
Once the thread is removed, the glass replacement can be considered complete.
At the end of the conversation, it is worth noting that the use of adhesives or sealants when installing glass is not at all necessary, since in case of repeated replacement they can make it very difficult to dismantle the broken glass.
Windshield frame VAZ 2109, 2114, 2115 2108-5201012
Pickup from a warehouse in Yekaterinburg
Address: st. Martovskaya, 8a (Chkalovsky district, Elizavet m-on) — see address on the map, contacts and opening hours
Important. Before receiving the product, check its availability by phone or place an order on our website.
Delivery by courier in Yekaterinburg and nearby cities
- Payment in cash upon receipt of goods
- The cost of delivery within the city and nearby cities is 100-250 rubles
- Free delivery throughout Yekaterinburg for orders over 10,000 rubles.
- Please check with the RusAvto manager for delivery times and costs.
For minimum order and delivery costs, see the Delivery section.
| Minimum order | Cost of delivery | Free delivery from | |
| Ekaterinburg | 1000 | 150 | 6000 |
| Upper Pyshma | 3000 | 200 | 10000 |
| Berezovsky | 3000 | 200 | 10000 |
| Aramil | 3000 | 200 | 10000 |
| Revda | 5000 | 400 | 17000 |
| Pervouralsk | 5000 | 400 | 17000 |
| Polevskoy | 7000 | 500 | 26000 |
| Sysert | 7000 | 500 | 26000 |
| Novouralsk | 10000 | 600 | 34000 |
| Nevyansk | 12000 | 700 | 37000 |
| * does not apply to large spare parts and special goods. price |
Delivery by Russian Post
- Prepayment 30% of the cost of the goods (Cashless payment on invoice)
- The balance of the amount is cash on delivery upon receipt of your goods at the post office.
- Delivery services are paid by the recipient according to the current tariffs of Russian Post.
Why do we ask for partial payment in advance before shipping? In our practice, there have been cases when goods sent by cash on delivery remained for a long time in the recipient’s post office and were not picked up. We were forced to pay for storage and incur additional costs for returning unclaimed goods to our warehouse.
- Cashless payment - 100% prepayment (to the bank account of our organization using the specified bank details).
- Delivery services are paid by the recipient at current rates
- We work with KIT, RATEK, Business Lines, PEK and TK Energia.
- Cashless payment - 100% prepayment (to the bank account of our organization using the specified bank details).
- Delivery services are paid by the recipient at current rates
- We work with KIT, RATEK, Business Lines, PEK and TK Energia.