The side mirrors of the Lada Vesta car are removed for replacement, repair or modifications. The process is not complicated, but it has certain features that it is better to know about in advance so as not to break anything. Before starting work, do not forget to disconnect the negative terminal of the battery.
Procedure for removing the exterior mirror:
- Remove the trim from the door pillar in the passenger compartment (snap off the upper clamp No. 1 and disengage the two lower ones No. 2).
- We disconnect the blocks with wires by pressing the latches.
- Remove the three mirror mounting screws (10mm wrench or TorxT20).
How to disassemble a mirror:
- rotate the mirror element to its maximum lateral position.
- Carefully unclip the mirror element through the resulting gap and remove it from the housing (using a flat-head screwdriver).
- The plastic cover is held in place by clips and can be removed without removing the mirror element (pry it off with a screwdriver).
The process of disassembling the mirror can be studied in more detail using the instructions “Repairing the gear motor for adjusting the position of the mirror element on an assembled car.” The archive is available to site users:
To download files you need to log in to the site.
The process is also shown in the video:
Owners of a Lada Vesta with black (unpainted) mirrors and handles are faced with the choice of replacing the standard mirror trims with painted ones or installing tuning trims.
This choice is due to the difficulty of removing the lining itself. Unlike the mirror covers of the Priora or Grants, West's mirror covers are held on by 5 tongues, not 4. And with simple removal, one is sure to break.
We have prepared video instructions on completely disassembling the Lada Vesta electric mirror and replacing the turn signal.
- The mirror element is removed. To do this, use a special spatula or screwdriver to pry up and release 6-8 tabs securing the mirror element.
- The mirror cover is removed. To do this, press out 3 of the 5 fastening tabs from the inside of the mirror.
- The turn signal is removed - it is fixed with 2 tabs. Disconnect the turn signal wires. We connect a new LED turn signal.
- Putting everything back together
How to remove and disassemble the rear view mirror on Lada Vesta and XRAY
Side mirrors of Lada Vesta and XRAY cars are removed for replacement, repair or modifications. The process is not complicated, but it has certain features that it is better to know about in advance so as not to break anything. Before starting work, do not forget to disconnect the negative terminal of the battery.
Features of side mirrors
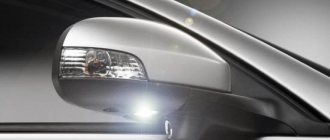
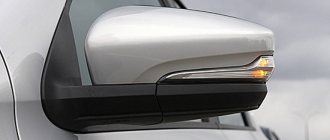
- Good review . As mentioned earlier, in terms of visibility, the side mirrors on Vesta are ahead of the mirrors of such models as Polo, Logan, Rio and Fiesta. There are no complaints about the location of the mirrors themselves.
- Turn signal repeater . All trim levels have turn signal repeaters built into the side mirrors. But the repeater itself has certain disadvantages, which we will discuss below.
- Heating and electric drive . Even the simplest car equipment has the function of heating the side mirrors and electrically adjustable ones.
- Folding . Mirrors can be folded, but only manually. Both mirrors have clear locking positions and even a protective spring that will prevent the mirror from breaking if it accidentally hits an obstacle when reversing.
Lada Vesta
Procedure for removing the exterior mirror:
- Remove the trim from the door pillar in the passenger compartment (snap off the upper clamp No. 1 and disengage the two lower ones No. 2).
- We disconnect the blocks with wires by pressing the latches.
- Remove the three mirror mounting screws (10mm wrench or TorxT20).
How to disassemble a mirror:
- rotate the mirror element to its maximum lateral position.
- Carefully unclip the mirror element through the resulting gap and remove it from the housing (using a flat-head screwdriver).
- The plastic cover is held in place by clips and can be removed without removing the mirror element (pry it off with a screwdriver).
The process of disassembling the mirror can be studied in more detail using the instructions “Repairing the gear motor for adjusting the position of the mirror element on an assembled car.” The archive is available to site users:
_x000D_ To download files you need to log in to the site
The process is also shown in the video:
The door does not open from the inside - what to do?
If everything opens normally from the outside, but it cannot be opened from the inside, then check the position of the “child lock” lever. This mechanism is designed to prevent children sitting in the rear seats from opening the door. Moreover, this does not depend on whether the car is moving or not. The door opens from the outside without any problems.
To disable the child lock, you need to find its lever, located next to the main locking mechanism. To unlock it, it must be moved to another position. Each door handle has its own lock; to fully unlock it, you need to disable the mechanism on each specific door. It cannot be disabled if the lock is enabled and the battery is discharged or disconnected.
Lada XRAY
Removing mirrors . The side mirror trim is combined with the door trim, so we remove it first. Then we disconnect the block with wires (No. 1) and unscrew the screws securing the mirror No. 2 (a “10” wrench or TorxT20).
To disassemble the outside mirror :
- remove the mirror element (catch onto the edge of the mirror and unclip the latches), the heating wires do not need to be disconnected, but simply leave the mirror hanging on them;
- remove the mirror cover (press the clips inside the housing and move the cover to the side).
This process was discussed in detail when replacing turn signal lamps.
Let us recall that earlier we looked at the features of Vesta’s mirrors, as well as ways to combat the whistling of mirrors.
Categories of products that may be of interest to you based on the article “How to remove and disassemble the rear view mirror on Lada Vesta and XRAY”:
Reviews
| № | Positive |
| 1. | Stepan , 44 years old (www.otzovik.com): there are no complaints about the ZZV, fixation and visibility are good. |
| 2. | Fedor , 40 years old (www.zr.ru): I have the maximum configuration, ZZV along with two light and rain sensors. |
| 3. | Vladimir , 22 years old (www.autobann.su): the car is three years old, hasn’t touched the ZZV, holds up perfectly. |
| 4. | Sergey , 33 years old (www.lada-vesta.net): in two years, I replaced the light sensor once, where the mirror is, since the original one failed. The service station installed a new one under warranty. |
| 5. | Semyon , 43 years old (www.otzovik.com): I think that the car is assembled with high quality, there are no comments. |
| 6. | Svyatoslav , 44 years old (www.zr.ru): my positive review of the Lada Vesta in general, two years, no comments. |
| 7. | Mikhailovich , 20 years old (www.autobann.su): I won’t praise too much, but the quality of visibility is good. |
| 8. | Anatoly , 43 years old (lada-vesta.net): three years of the car without any comments. |
| 9. | Gennadievich , 39 years old (www.otzovik.com): the ZZV began to rattle on the paving stones, I pressed it down a little, it holds up perfectly. |
| 10. | Dmitrievich , 43 years old (www.zr.ru): the car is in its second year, everything is original, no comments. |
| 11. | Konstantin , 35 years old (www.autobann.su): I join the numerous positive reviews. |
| Negative | |
| 12. | Victor , 44 years old (www.zr.ru): on uneven surfaces the air defense system constantly vibrates. I contacted the service station and they couldn't help. |
| 13. | Alexey , 37 years old (otzovik.com): after the winter, the ZZV is knocking, no matter what I did, it doesn’t help. |
| 14. | Stepan Ignatievich , 46 years old (www.autobann.su): instead of a domestic mirror, immediately buy a second generation Renault Megane. |
Related link:
Suspension device of Lada Vesta.
Other (accessories) Lada Vesta
Products from the Dustershop77 range on the topic of the article:
| Name | Manufacturer | Price | Availability | Add to cart |
| DC495 | Discount card (Dusterclubs.ru, Dustershop77.ru) | 700 / 500 rub. Discount: 500 rub. | >10 | |
| DC1024-V117 | Windshield and roof edge seal | Duster-Guard | 700 / 500 rub. Discount: 300 rub. | >10 |
| DC959 | Seal under the hood of Duster / Terrano / Kaptur / Arcana, etc. | 800 / 500 rub. Discount: 400 rub. | >10 | |
| DC511-94520 | Cloth with adhesion activator 3M 94520 | Original | 400 / 200 rub. Discount: 150 rub. | >10 |
| DC020 | Set of door, hood and trunk seals | 6500 / 4500 rub. Discount: 3900 rub. | >10 | |
| DC694 | Keyhole plug (lock cylinder) | Original | 500 / 450 rub. Discount: 400 rub. | 3 |
| DC534-263216 | Teroson adhesive-sealant for installing glass, spoilers and other body kit (cylinder) | Original | 1500 / 1000 rub. Discount: 900 rub. | 8 |
| DC152 | 3M adhesive tape for installing plastic parts 6mm x 5m | Original | 500 / 400 rub. Discount: 300 rub. | >10 |
| DC1768 | Keyhole plug (lock cylinder) analog A2107660056 color black | Analogue | 200 / 100 rub. Discount: 50 rub. | >10 |
| DC155 | Wide 3M tape 12mm x 5m | Comfort | 1000 / 700 rub. Discount: 500 rub. | >10 |
| DC1556 | Door seal instead of the standard one (price for 1 doorway) front=rear, left=right | 900 / 650 rub. Discount: 550 rub. | 6 | |
| DC877 | Keychain Renault (rhombus) original | Original | 700 / 400 rub. Discount: 300 rub. | 5 |
| DC1769 | Keyhole plug (lock cylinder) analogue A2107660056 white | Analogue | 200 / 100 rub. Discount: 50 rub. | >10 |
| DC1727 | Door seal RKI-19 (2 pcs.) | 1200 / 900 rub. Discount: 800 rub. | >10 | |
| DC099 | Frames for numbers are anti-vandal (chrome color) | 2000 / 1400 rub. Discount: 1000 rub. | 9 | |
| DC1004 | Door edge protection (rubber) 7.5m | China | 2500 / 2300 rub. Discount: 1800 rub. | 5 |
| DC1732-106233 | Seat belt extension extension Renault Duster, etc. (Autostandart) | 1000 / 900 rub. Discount: 700 rub. | 6 | |
| V090 | Trim filter mesh LADA Vesta | ArmAuto | 1000 / 450 rub. Discount: 400 rub. | 8 |
| DC163-02 | Engine compartment insulation - car blanket 140x90cm | 2500 / 2000 rub. Discount: 1700 rub. | 5 | |
| DC2086 | Sealing gasket for license plate (self-adhesive 2 pcs.) | Original | 400 / 300 rub. Discount: 250 rub. | 4 |
| DC980-749329187R | Ring for securing cargo in the trunk original 749329187R | Original | 700 / 600 rub. Discount: 500 rub. | 7 |
| DC1726 | Door seal instead of the standard one (price for 1 doorway) front=rear, left=right (Lada, Renault) | 1200 / 900 rub. Discount: 700 rub. | 7 | |
| DC2110 | Rubber seal on the frill along the windshield Duster 2021- | 1100 / 600 rub. Discount: 300 rub. | 3 | |
| DC100 | Frames for numbers are anti-vandal (black) | 2000 / 1500 rub. Discount: 1000 rub. | 3 | |
| DC1626 | Silicone frame for numbers (black) (1 piece) | 900 / 600 rub. Discount: 450 rub. | 9 | |
| DC1357 | ABRO MASTERS silicone gasket sealant (up to +260°C) (85g) transparent | Original | 300 / 200 rub. Discount: 150 rub. | >10 |
| DC509-PU8590 | Adhesive-Sealant Teroson PU 8590 kit for installing glass, spoilers and other body kits | Original | 2500 / 1900 rub. Discount: 1600 rub. | 1 |
| DC1130 | Scale model Renault Duster 1/43 | Original | 1900 / 1300 rub. Discount: 1000 rub. | 3 |
| DC1744-8201531497 | Original ring for securing cargo in the trunk with bolt 8201531497 (set of 2 pieces) | Original | 1000 / 900 rub. Discount: 700 rub. | 3 |
| DC1866-CR2032 | CR2032 battery for Duster, Logan, Largus, Terrano, Vesta, X-Ray, Captur, Arcana, etc. key (interchangeable with CR2016, CR2018, CR2025) | Analogue | 100 / 70 rub. Discount: 50 rub. | 3 |
| DC098 | Frames for numbers are anti-vandal (white) | 2000 / 1400 rub. Discount: 1000 rub. | 5 | |
| DC2097 | Seat belt extension extension Renault Duster, etc. | 800 / 500 rub. Discount: 300 rub. | 7 | |
| V114-1420501 / LVE112802 | Radiator grill LADA Vesta (Luxe, Exclusive) | Pt GROUP | 9900 / 8600 rub. Discount: 5100 rub. | 1 |
| DC1266-8200257684 | Duster 10 - wing turn signal (L=R) original 8200257684 | Original | 800 / 600 rub. Discount: 500 rub. | 4 |
| V132 | Wheel hub caps for LADA Vesta (4 pcs) | 800 / 600 rub. Discount: 300 rub. | >10 | |
| V131-ULAVES011 | Pneumatic hood stop Lada Vesta 2015-2017 (Auto-stop) | Analogue | 2900 / 2700 rub. Discount: 2500 rub. | 1 |
| DC2111 | Universal rubber seal on the edge of the frill | 200 / 150 rub. Discount: 90 rub. | >10 | |
| V115-1430501-LVE112801 | Radiator grille LADA Vesta (Classic, Comfort) | Pt GROUP | 12000 / 10300 rub. Discount: 6600 rub. | 1 |
| DC925-80486 | Metal car hanger | 1500 / 1200 rub. Discount: 900 rub. | 3 | |
| DC1141 | Caulking gun | 350 / 250 rub. Discount: 200 rub. | 3 | |
| DC2162 | Car soundproofing kit (for 2 doors) | 2000 / 1600 rub. Discount: 1400 rub. | 3 | |
| V116-1500505 | Radiator grille LADA Xray | Pt GROUP | 7500 / 7000 rub. Discount: 4900 rub. | 1 |
| DC177-8200733848-BLACK | Internal handle left original 8200733848 black | Original | 1200 / 800 rub. Discount: 700 rub. | 2 |
| DC1502 | Handle (Renault logo) original | Original | 700 / 600 rub. Discount: 500 rub. | 2 |
| DC1990-7711821301 | Original Renault phone holder with glass mount magnetic 7711821301 | Original | 2100 / 1500 rub. Discount: 1100 rub. | 2 |
| DC1715-489702120R | Steering column adjustment knob Renault Duster, Logan, Sandero, Lada Vesta, X-Ray original 489702120R | Original | 1500 / 1300 rub. Discount: 1000 rub. | 1 |
| DC1503 | Black mug 330 ml, soft touch coating Renault original | Original | 1500 / 1300 rub. Discount: 1200 rub. | 1 |
| DC1620 | Arcana pillow original | Original | 2200 / 1700 rub. Discount: 1500 rub. | 1 |
| DC1932-8450007707 | Driver's door handle mat Vesta 8450007707 original | Original | 120 / 80 rub. Discount: 60 rub. | 2 |
| DC1992-7711821302 | Original Renault phone holder with glass mount, sliding 7711821302 | Original | 2100 / 1700 rub. Discount: 1400 rub. | 3 |
| DC2380-7711821369 | Reno red mug 360ml. original 7711821369 | Original | 1500 / 1300 rub. Discount: 1100 rub. | 1 |
| DC1196 | Rubber (tire) ink aerosol 520 ml | 500 / 400 rub. Discount: 300 rub. | 2 | |
| DC1618 | Red mug 360 ml, original soft touch coating Arcana | Original | 1500 / 1300 rub. Discount: 1200 rub. | 1 |
| DC1724 | Thread locker IMG red | Original | 800 / 400 rub. Discount: 300 rub. | 2 |
| DC1619 | Black mug 360 ml, original soft touch coating Arcana | Original | 1500 / 1300 rub. Discount: 1200 rub. | 1 |
| DC1961-8450007268 | Mat for the central niche of the Vesta tunnel 8450007268 original | Original | 250 / 150 rub. Discount: 100 rub. | 1 |
| DC1989-7711821299 | Holder for tablet Duster, Terrano, Kaptur, Arcana, etc. 7711821299 original | Original | 2200 / 1800 rub. Discount: 1500 rub. | 2 |
| DC2165-8200194580 | Duster 2011 - wing turn signal (L=R) original 8200194580 | Original | 550 / 400 rub. Discount: 300 rub. | 1 |
| DC1926-8450039478 | Plug for rear left outer door handle Vesta 8450039478 original | Original | 100 / 70 rub. Discount: 50 rub. | 2 |
| DC1401 | Clock for car interior (black type2) | Analogue | 1000 / 700 rub. Discount: 600 rub. | 0 |
| V089 | LADA Vesta windshield drain | ArmAuto | 700 / 550 rub. Discount: 550 rub. | 0 |
| DC1376 | Car interior clock (black type1) | Analogue | 800 / 600 rub. Discount: 500 rub. | 0 |
| DC2018-7701423330 | Mastic sealant for door cards original 7701423330 | Original | 1200 / 800 rub. Discount: 700 rub. | 0 |
| DC1402 | Car interior clock (white) | Analogue | 800 / 600 rub. Discount: 500 rub. | 0 |
| DC1140 | Masking tape 50mm x 50m | 500 / 300 rub. Discount: 250 rub. | 0 | |
| DC1991-7711821300 | Original Renault phone holder with magnetic deflector mount 7711821300 | Original | 1500 / 1000 rub. Discount: 800 rub. | 0 |
| DC540 | Deflector for the air duct in the cabin from Renault Captur, suitable for Duster, Logan, Sandero, Largus (chrome) | Original | 1200 / 900 rub. Discount: 700 rub. | 0 |
| DC101 | Sealant for installing spoilers and other body kits | 1500 Discount: 1500 rub. | 0 | |
| DC539 | Deflector for the air duct in the cabin from Renault Captur, suitable for Duster, Logan, Sandero, Largus (orange) | Original | 1000 / 800 rub. Discount: 600 rub. | 0 |
| DC189 | Renault badge | Original | 100 Discount: 100 rub. | 0 |
Seals
The seals from the manufacturer fit quite tightly in all places except the gap between the front and rear doors. This can be corrected by installing the RKI-19 seal, article number - 000017504293020.
Before installing it, the trailing edge must be cleaned and degreased. Before installation, it is recommended to warm up the seal for a couple of minutes at a temperature of 40 - 50 degrees. This is done to give it elasticity. Then, in an area of 5 - 7 cm, peel off the protective tape and fix the seal to the upper edge of the door flange. Then, removing the protective tape in areas of 5 - 10 cm, glue it along its entire length, avoiding stretching the material.
Moldings
Initially, this is a decorative function. There is no point in disputing the installation of parts to improve the appearance, since it depends on the preferences and taste of the car owner.
The manufacturer claims the protective function of the moldings. It is believed that door moldings installed along the lower edge serve as additional protection for the car's paintwork. The buffer and shock-absorbing function of the moldings is also indicated. If, when opening, the door hits an obstacle, then they will protect the metal from damage and the appearance of dents.
Another issue that must be considered before installing moldings is moisture drainage. Since they are hollow inside, condensation begins to accumulate underneath them over time. And although there are small cuts on the back side for its removal, their number and size are clearly not enough for this, which leads to the formation of areas with metal corrosion under the moldings.
If, however, it was decided to install these elements, then you can do it yourself. To do this, the surface of the part is thoroughly washed and dried. Then degreasing is carried out with anti-silicone and the activator, which is included in the delivery set, is applied to the gluing site. Next, remove the protective film from the mounting tape located on the back side. And carefully glue the moldings. If it is necessary to strengthen the fastening, then glass glue or sealant is used for this.
Dismantling process
You can limit yourself to a minimum set of tools; the main rule of work is caution and precision in the application of effort. Excessive load should be avoided, as it can aggravate the problem and cause new damage and deformation.
Excessive load should be avoided, as it can aggravate the problem and cause new damage and deformation.
To begin with, you need to disconnect the mirror directly (the procedure is not necessary), for which you remove the lock located on the pillar on the interior side. First, the upper fastener is loosened, and then the two lower ones.
After this, the screws holding the mirror are unscrewed and the wires that provide electrical control of the mirror are disconnected.
For heated mirrors, the wires responsible for supplying electricity to the heating device are also removed. They must first be disconnected from the heating coil. For subsequent connections, soldering is used.
The next set of actions looks like this:
The mirror element is retracted to its extreme position, which creates a small gap.
A flat-head screwdriver is inserted into the gap, and with light force the fixing parts are moved to the side.
- The latches are located around the entire perimeter, which needs to be taken into account.
- The mirror element is removed and replaced with a new, undamaged analogue.
After the new mirror sheet is installed, assembly is carried out in the reverse order.
When assembling the case, you need to take into account not only the location of the clamps, but also focus on 4 guide elements, which must coincide with the corresponding holes.
Installation is not particularly difficult; the main point is also to control the force, not to put too much pressure on the structure, eliminating deformations and cracks.
If the mirror has a mechanical drive, then when dismantling and installing it is necessary to work carefully with all mechanisms. The electric drive is supplied with power through wires located in a special block.
When dismantling, the block is carefully pulled out, and when reassembled, it is installed in its original place without much effort. On average, such work takes about half an hour if we are talking about the simplest modification of the mirror.
The presence of additional elements, heating and electric drive, slightly increases this time.