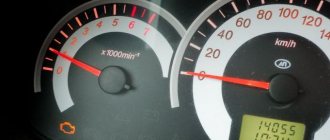
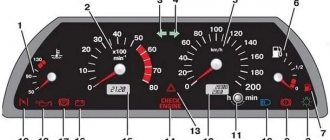
Designation of dashboard indicators Priora 1
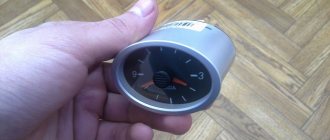
- Tachometer (shows the number of crankshaft revolutions per 1 minute at the current moment);
- Electronic brake unit malfunction lamp (if such a lamp lights up on your car, you must move with extreme caution to the nearest service station). During normal operation, it lights up when the ignition is turned on, and goes out when the engine is started;
- Charging the battery. When the ignition is turned on, it lights up, and when the engine starts, it should go out. If the lamp lights up while the engine is running, this indicates a problem with the generator;
- Lamp indicator of the left turn signal on. When the turn is on, it blinks green with a characteristic “squeaking” sound;
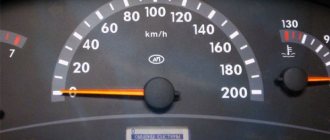
- Speedometer, shows the speed of the car in real time;
- Low oil pressure lamp in the internal combustion engine. During normal operation, it lights up when the ignition is turned on; after starting, it should go out within 3 seconds. If the lamp lights up when the engine is running, this indicates a problem with the internal combustion engine;
- Indicator lamp that the right turn signal is on. When the turn is on, it blinks green with a characteristic “squeaking” sound;
- Handbrake indicator. Lights up when the handbrake is pulled;
- Coolant temperature gauge. The operating coolant temperature of the Priora internal combustion engine is 85°C;
- Level sensor for remaining fuel in the tank. The fuel tank of the Priora has a volume of 43 liters;
- Minimum fuel remaining indicator. Lights up when there is less than 10 liters of gasoline in the tank;
- Odometer control button. A short press switches the daily mileage to full, and a long press resets the daily mileage;
- EUR failure indicator. Lights up when the ignition is turned on for 2 seconds, in other cases it indicates a breakdown in the EUR;
- The hazard warning lamp flashes together with the turn signals;
- High beam indicator;
- Low beam and headlight indicator;
- The SRS (airbag) malfunction indicator lights up for a couple of seconds when the ignition is turned on;
- Immobilizer indicator;
- Screen for daily and total vehicle mileage;
- The seat belt not fastened indicator lights up when the driver of the car is not fastened;
- The indicator of low brake fluid level in the system lights up when the car ignition is turned on for a few seconds, after which it goes out;
- Front passenger airbag deactivation indicator;
- ABS fault indicator;
- The “Check Engine” light comes on when the ignition is turned on and goes out when the engine starts. In other cases, it indicates a malfunction in the internal combustion engine;
Symbols on the on-board computer
The instrument panel on the dashboard can provide a lot of diagnostic data.
The on-board computer display will help determine the breakdown, depending on the number:
- The on-board network is damaged due to increased current caused by a short circuit.
- There is a problem with the fuel sensor.
- Overheating of the cooling system or a malfunction in the sensor.
- The external thermometer is broken. Please note that until 2012 they were optional.
- The engine has overheated, you need to let it cool down.
- The engine oil level has dropped significantly.
- Brake system problems.
- There is a problem with the battery, it may simply be low.
The letter “E” may also appear on the screen. She talks about the firmware crashing.
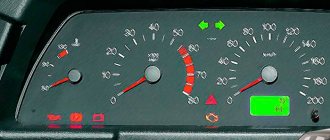
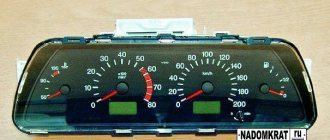
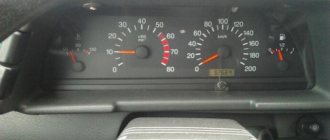
Designation of dashboard indicators Priora 2
- Tachometer (shows the number of crankshaft revolutions per 1 minute at the current moment);
- Parking brake warning light;
- Turn signal indicator;
- ABS failure indicator;
- Battery discharge indicator;
- Brake system failure indicator;
- Indicator for minimum oil pressure in the internal combustion engine;
- Alarm;
- EUR breakdown;
- Driver's seat belt warning light;
- Check Engine (check engine);
- Airbag malfunction;
- Turn indicator;
- Pedal adjustment;
- ESC activation indicator;
- Opened door;
- Gearbox failure;
- Low tire pressure;
- Button for switching daily mileage to main;
- Immobilizer activation;
- ESC shutdown indicator;
- Fuel reserve;
- LCD screen with information;
- Inclusion of dimensions;
- Turning on the low beam;
- Turning on the high beam;
- Fuel level sensor;
- Coolant temperature sensor;
- Reserve;
- Speedometer;
- Start-stop;
- Reserve;
- Turn on cruise control;
- Speed limiter activation;
- Turning on the rear PTFs;
INSTALLATION
Replacing the old instrument panel without CAN with a dashboard with navigation without CAN (2170-3801010-50) is carried out without modifications. We remove the old panel and install a new one in its place, insert the connector with wires, connect the antenna (we fix it on the roof) and, if necessary, change the right steering column switch.
If the old instrument cluster without navigation, but with CAN, and instead of it it is planned to install a new dashboard with navigation with CAN (2170-3801010-60), then you need to rearrange contacts 10-11 to 28-29 (if after connecting it still does not work, change 28 and 29 places). See the pinout of the instrument cluster (it was posted earlier).
After installing the new instrument panel, the mileage will be reset to zero.
Navigation in the instrument panel runs on Windows CE 6.0 along with Navitel software. It is possible to update the software and download navigation maps from a USB card via a special USB input. Operating the car will become much more pleasant, the only drawback is the high price.
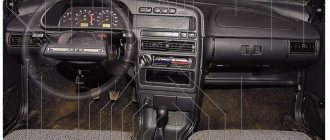
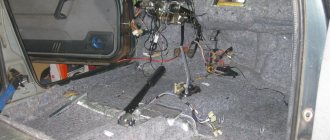
How to remove the instrument panel
To remove the instrument panel, you only need one Phillips screwdriver. After which you can start withdrawing.
- Remove the fuse box cover by turning the three fasteners from the bottom and pulling them out;
- Then unscrew the 4 screws securing the decorative cover of the instrument panel;
- Unscrew the two bolts securing the instrument panel to the dashboard;
- Tilt the dashboard and disconnect the connector;
REQUIRED
The Itelma instrument panel with navigation can be of two types (externally they are no different):
- 2170-3801010-50 without CAN bus;
- 2170-3801010-60 from CAN bus.
They are not interchangeable, so before purchasing, you should determine whether your vehicle uses a CAN bus or not.
For Priora:
- until 06.2012, cars were produced without a CAN bus;
- remove the instrument cluster and look at the article number or at the block with wires (see pinout of connectors below).
For Kalina (VAZ 1117, 1118, 1119) - all cars without a CAN bus.
Additionally you will need:
- Right steering column switch with joystick (catalog number: 1118-3709340-20);
- Antenna (for roof installation): 1118-7903074.
You can also buy ready-made kits (device + antenna + switch):
- for Lada Priora - 2170-3801010-55;
- for Lada Kalina 1 - 1118-3801010-55.
Air and fuel system problem codes
P0030 means that the sensor cable, which is responsible for heating the oxygen, has broken. The break is located before the exhaust gas neutralization system. If the cable of the same sensor is shorted to ground, then code P0031 occurs. If the circuit after the neutralizer is broken, the number 6 will appear at the end of the code. Code P0112 is a weak signal from the sensor that is responsible for the air temperature; if there is a strong signal, then code P0113 appears.
If there are problems with a weak throttle signal, then the code P0122 appears, and a strong one - P0123. If there is a problem with the oxygen device, then error P 0130 appears. With P0133, the response to the mixture comes slowly; if error P0134 occurs, the device does not work.
If there is a lot of air in the fuel, then the code is 0171, and if it is 72, there is a lot of gasoline in the mixture. Code P0201-P0204 indicates damage to the injectors and their cables. If there is a code 0217, then the engine is heating up; if it is 0230, there is a malfunction in the fuel pump. With codes from P0261 to P0272, problems need to be looked for in the injectors.
Error codes Lada Priora decoding table
To check the error codes of the Lada Priore, you need to press any button that controls the on-board computer, after which the available version of the program will be displayed on the indicator. After such actions, you need to press any of the buttons again and see what error the indicator gave. When any code is displayed on the first or second line, it means that this error is present in the car.
To decipher the error code on the Lada Priora 2014, you only need to know the designation of the numbers and letters displayed on the indicator.
Source
Instructions for replacing the tidy yourself
The procedure for removing, disassembling and replacing the control panel can be carried out on your own; there is nothing complicated about it.
- First of all, turn off the ignition, and then disconnect the battery from the power supply.
- For greater convenience, you should remove the steering column cover, and also dismantle the steering wheel itself.
- After this, using a screwdriver, you need to unscrew the two screws that secure the upper part of the tidy.
- Next, two more screws are unscrewed, only now from the bottom.
- There are two more screws on the sides of the control panel; they also need to be unscrewed.
- After this, you can pull the tidy towards you, but do not remove it completely. Since wires are connected to the device, you need to disconnect the connectors on the back side, and then release the latch.
- The PP is removed and replaced with a new one. Assembly steps are carried out in reverse order.
Other manufacturers
For your VAZ-2170, you can consider analogs to the standard BC that will meet your requirements:
- BC STATE x1 – 1400 – 1500 rubles. Looks like a small button. Placed instead of a plug. The display occupies more than 70% of the front area, and under it there are two small mode switching buttons. Will show all the necessary information on errors, consumption, speed.
- State Matrix - about 3,500 rubles. Beautiful display, full functionality, but no GPS navigation.
- Unicomp About 4,200 rubles. A full-fledged computer that will show and do everything you need.
AVTOVAZ cars
YOUR ATTENTION!
. . . . . . . . . . 3
VEHICLE DESCRIPTION
. . . . . . . 5
Operation of the remote control system. . . . . . . . . . . . . . . . . . . .
Seats. . . . . . . . . . . . . . . . . . . . . . . 12 Adjusting the steering wheel position. . . . . . . . . . . . . . . . . . . . . . . . 14 Seat belts and airbags. . 15 Airbag. 16 Interior equipment. . . . . . . . . . . 18 Headlights. . . . . . . . . . . . . . . . . . . . 21 Hood. . . . . . . . . . . . . . . . . . . . . . . . . 21 Trunk lid. . . . . . . . . . . . . 22 Fuel tank plug. . . . . . . . . 22
CONTROLS AND INSTRUMENTS. . . . . . . . . . . . . . . . . . . . . 23
Dashboard . . . . . . . . . . . . . . . 23 Instrument cluster. . . . . . . . . . 25 Liquid crystal display. . . . . . . . . . . . . . . . . . . . . . . . . . . 28 Lighting control module 28 Light signaling switch. . . . . . . . . . . . . . . . . . . . . . . . . 31 Wiper switch 32 Ignition switch. . . . . . . . . 32 Gear shift lever. . . . 33
INTERIOR VENTILATION CONTROL. . . . . . . . . . . . . . . . . . . . . . . . 33
Interior ventilation and control. 33 Heating switches. . . . . . . . 33
VEHICLE OPERATION
. . . 39
INSTALLING LICENSE PLATES. . 39
BASICS OF SAFE VEHICLE OPERATION. . . . . . . . . . . . 39
Precautions when operating the vehicle. . . . . . . . . . 39 Operating a new car
Preparing the car for movement. . . . . . . . . . . . . . . . . . . . . . . . . . . 42 The driver's position behind the wheel. . . . . . 42 Starting the engine. . . . . . . . . . . . . . . . . 42 Starting the engine in the cold season. . . . . . . . . . . . . . . . . . . . . . . . . . 43 Features of operating a vehicle with a fuel injection system 43 Features of operating a vehicle with an electromechanical power steering . . . . . . 44
VEHICLE MOVEMENT. . . . . . . . 45
Movement in winter. . . . . . . . . . . . . . . 46 Driving in mountainous areas. . . 47
BRAKING AND PARKING. . . . . . . . 47
Anti-lock braking system. . . . . . . . . . . . . . . . . . . . . . . . . 48
TOWING THE CAR. . . . 49
MAINTENANCE AND
CURRENT CAR REPAIR
50
Engine lubrication system. . . . . . 50 Gearbox. . . . . . . . . . . . . . . 50 Engine cooling system. . 51 Brake system. . . . . . . . . . . . . 51 Window washing and cleaning system. 52 Battery. . . . . . . . 53 Tires and wheels. . . . . . . . . . . . . . . . . 54 Replacing the remote control battery. . . . . 55 Replacing fuses 56 Mounting block. . . . . . . . . . . . . . . 57 Replacing lamps. . . . . . . . . . . . . . . . . . . 57 Body. . . . . . . . . . . . . . . . . . . . . . . . . 60 Car storage. . . . . . . . . . . 62
Basic parameters and dimensions. 64 Passport details. . . . . . . . . . . . 67
1. Fuels and lubricants,
approved and recommended for operation of the LADA PRIORA car with engines
delhi 21126. . . . . . . . . . . . . . . . . . 69
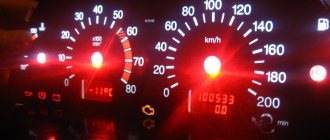
Tachometer, speedometer, on-board computer indicators, light bulbs - all these components are located on the Lada instrument panel. The “tidy” is designed to display the current state of various Lada Priora systems. An experienced motorist will immediately notice that one of the components requires repair; a certain icon will inform him about this. If you are a novice driver, then it will be useful for you to study the Lada Priora dashboard. This material provides a detailed description of each element of the tidy.
Possible faults
The instrument cluster does not always tell the truth, and sometimes its readings can mislead the driver - they may seem absurd. For each common malfunction, a brief commentary will be given on the possibility of eliminating them:
- The fault lamp does not light up (check the lamp);
- the lamp is on - check the sensor, reset the error via the diagnostic connector.
If none of the above measures help resolve the problem, carefully inspect the wiring - damage to it may cause the light bulb to activate or deactivate.
Video “Control unit error 1602”
In this video, the author talks about the power failure error on the ECU of a VAZ Priora car.
Error codes - malfunctions of the electric power steering ESD on the Lada Priora VAZ 2170 2171 2172 (Lada Priora)
The first character means the following:
- B – code is intended for body systems, i.e. AIRbags, central locking, electric windows
- C - code is intended for the chassis system, namely the Priora chassis
- P - code is intended for the engine and its operation and / or automatic gearbox (automatic transmission);
- U - code is intended for interaction between electronic units of Lada Priora