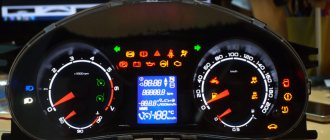
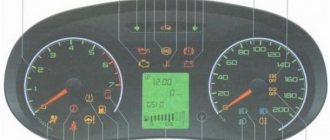
Drivers are notified of the presence of malfunctions in various vehicle systems using icons on the instrument panel. It is not always possible to decipher the meaning of such burning icons intuitively, since not all car enthusiasts are well versed in cars. In addition, on different cars, the graphic designation of the same icon may differ. It is worth noting that not every light on the panel only indicates a critical malfunction. The indication of light bulbs under the icons is divided into 3 groups by color:
- Red icons indicate danger, and if any symbol lights up in this color, you should pay attention to the signal from the on-board computer in order to take measures to quickly resolve the malfunction. Sometimes they are not so critical, and it is possible to continue driving the car when such an icon on the panel is on, but sometimes it is not worth it.
- Yellow indicators warn of a malfunction or the need to take some action to drive the car or service it.
- The green lamps of the symbols inform about the vehicle’s service functions and their activity.
We will present a list of the most frequently asked questions and an explanation of the icons and indicators that light up on the instrument panel.
There are many badges with a car silhouette emblem. Depending on additional elements, this indicator may have different meanings.
When such an indicator lights up ( a car with a key ), it informs about malfunctions in the engine (often a malfunction of a sensor) or the electronic part of the transmission. To find out the exact cause, you will need to perform diagnostics.
A red car with a lock lights up , which means that problems have arisen in the operation of the standard anti-theft system and it will be impossible to start the car, but if this icon blinks when the car is locked, then everything is normal - the car is locked.
A yellow vehicle indicator with an exclamation mark notifies the driver of a hybrid vehicle that there is a problem with the electric drive. Resetting the error by disconnecting the battery terminal will not solve the problem - diagnostics are needed.
the open door icon lit when a door or trunk lid is open, but if all the doors are closed and the light on one or four doors continues to shine, then often the problem should be looked for in the door terminals (wire contacts).
The slippery road icon begins to flash when the stability control system detects a section of slippery road and is activated to prevent slipping by reducing engine power and braking the slipping wheel. There is no need to worry in such a situation. But when a key, a triangle, or a crossed out skid icon appears near such an indicator, the stabilization system is faulty.
The wrench icon pops up on the display when it’s time to perform vehicle maintenance. It is an information indicator and is reset after maintenance.
Warning icons on the panel
The steering wheel icon can light up in two colors. If the yellow steering wheel is on, then adaptation is required, and when a red image of the steering wheel with an exclamation mark appears, you should already be concerned about the failure of the power steering or power steering system. When the red steering wheel lights up, your steering wheel will probably become very difficult to turn.
The immobilizer icon usually blinks if the car is locked; in this case, the indicator of a red car with a white key signals the operation of the anti-theft system. But there are 3 main reasons if the immo light is constantly on: the immobilizer is not activated, if the tag on the key is not read or the anti-theft system is faulty.
The handbrake icon lights up not only when the handbrake lever is activated (raised), but also in cases where the brake pads are worn out or the brake fluid needs to be topped up/replaced. On a car with an electronic handbrake, the parking brake light may come on due to a glitch in the limit switch or sensor.
The coolant icon has several options and depending on which one is lit, draw conclusions about the problem accordingly. One red lamp with a thermometer scale indicates an increased temperature in the engine cooling system, but a yellow expansion tank with waves indicates a low coolant level in the system. But it is worth considering that the coolant lamp does not always light up at a low level; perhaps there is simply a glitch in the sensor or float in the expansion tank.
The washer icon indicates a low fluid level in the windshield washer reservoir. Such an indicator lights up not only when the level actually decreases, but also if the level sensor is clogged (the sensor contacts become coated due to poor-quality liquid), giving a false signal. On some vehicles, the level sensor is triggered when the washer fluid does not meet specifications.
The ASR icon is an Anti-Spin Regulation indicator. The electronic unit of this system works in tandem with ABS sensors. When such a light is constantly on, it means the ASR is not working. On different cars, such an icon may look different, but often in the form of an exclamation mark in a triangle with an arrow around it or the inscription itself, or in the form of a car on a slippery road.
The catalyst icon often lights up when the catalytic element overheats and is quite often accompanied by a sharp drop in engine power. Such overheating can occur not only due to poor cell throughput, but also if problems arise in the ignition system. When the catalyst fails, high fuel consumption will be added to the burning light.
The exhaust gases icon , according to information from the manual, indicates a malfunction in the exhaust gas purification system, but, as a rule, such a light starts to light after poor refueling or the presence of an error in the lambda probe sensor. The system registers misfires of the mixture, as a result of which the content of harmful substances in the exhaust gases increases and, as a result, the “exhaust gases” light comes on on the dashboard. The problem is not critical, but diagnostics are worth doing to find out the cause.
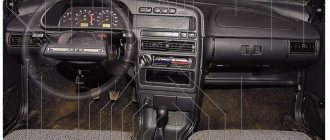
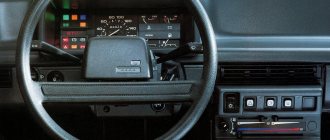
About controls that do not touch the dashboard
The main elements include the following attributes of the driver's seat:
- clutch pedal;
- pedal drive brakes;
- accelerator pedal;
- of course, the steering wheel.
The central part of the panel also has additional “organs”:
- levers and regulators that control the heating and ventilation modes of the interior;
- climate system activation organ;
- Lada Kalina stern glass heating button;
- mechanism for opening and removing the ashtray.
Why the check light is on on the Lada Kalina: causes and methods of troubleshooting
Many Lada Kalina owners have encountered such a common effect as “Check Engine”. The very concept of this indicator means that there are problems in the engine. But these are the ones that are not always clear to the average car enthusiast.
"Check Engine" - the show of intuition begins
Many Kalinovites, when the check signal comes on, begin to panic and immediately go to a car service center. But not everything is as bad as it seems at first glance, and the reason may lie on the surface. So, let's look at why the check engine light is on on the Lada Kalina and the reasons for the mysterious effect:
- Failure of one of the power unit sensors.
- Throttle.
- Injectors.
- Fuel pump and filter.
- Air filter.
- Spark plugs and high-voltage wires.
- Petrol.
- ECU.
Troubleshooting methods
Now that all the causes have been identified, we can begin to consider troubleshooting. But, before we begin, it is worth noting that a car enthusiast needs to have an idea of the design features of the engine if he wants to fix the problem himself. Otherwise, go directly to a car service center, in order to avoid other problems that, due to lack of experience, car enthusiasts usually create for themselves.
Sensors
Often, the reason why the check light on Kalina may come on is the failure of one of the sensors. Possible ones that are worth checking right away include: mass air flow sensor, idle speed control, crankshaft position sensor, oxygen sensor and coolant temperature sensor.
You can determine the cause by going through each sensor separately and using a tester to check their functionality.
But, there is a simpler and more effective way to determine the malfunction of a particular sensor, namely connecting to the electronic engine control unit. Here you can look at the errors and, by deciphering them, determine where the problem is.
Throttle
A clogged throttle valve can often cause the check engine light to come on because not enough air is supplied to the power unit. The solution to the problem is cleaning. This process can be carried out using carburetor cleaning fluid or VD-40 fluid.
How to check the sensor
Since the cause of error 4 on the Lada Kalina is not always the failure of the controller, you need to learn how to diagnose it. First of all, inspect the wiring; if there are no breaks in it, then you need to move on to checking the sensor itself. Follow the instructions:
- Turn off the ignition and disconnect the wire connector from the coolant sensor. For the convenience of motorists, the block is marked “AB”.
- Place the probes of the electronic tester on contact B of this block and on engine ground. If the power circuit is not broken, the tester will show a voltage of 4.8 to 5.2 V. Otherwise, you need to check the power circuit.
- If the device shows sufficient voltage in the circuit, then you need to check the controller itself. To do this, place the tester probes on contact A and engine ground. Switch it to resistance measurement mode. If the circuit is grounded, the device will show a resistance of less than 1 ohm.
- The following measurements should be carried out on a warm and slightly cooled engine. The probes of the device are placed on the contacts of the sensor itself to measure its resistance. It is also important to know the temperature of the coolant; the hotter it is, the lower the resistance should be. The maximum resistance is achieved at negative temperatures, and at 100 degrees it is minimal - 180 Ohms.
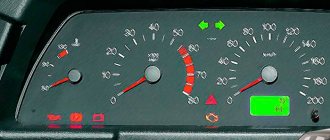
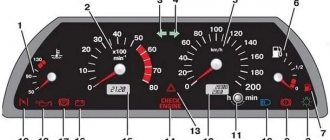
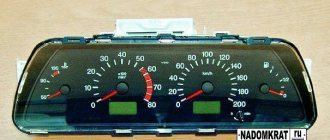
About tuning the instrument cluster
The instrument panel in the LADA Kalina car is covered with a cover, which is made in the form of an overlay on the adjacent area of the panel. If there is a need to dismantle the trim, then this is not at all difficult to do, and then the instrument cluster can be easily changed.
The instrument panel can be upgraded by changing its exterior.
Important! The combination of instruments that the manufacturer uses in the LADA Kalina is identical to those installed on the VAZ 2118 and VAZ 2119 modifications.
There is a very popular variant of the combination “GF 618” on sale. The functionality of this product is implemented using diode technology, in addition to which the interface contains a route controller. Many owners get tired of the standard dashboard and are haunted by the thought of tuning the LADA Kalina. Alternatively, you can take your time purchasing a fancy diode combination, the cost of which can easily shock you.
Do-it-yourself upgrades are also available to most enthusiasts. Among the simplest transformative measures is the purchase of an inexpensive overlay, which can be ordered in many online stores.
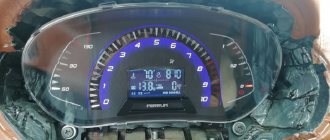
If we look at the instrument panel, Kalina presents a coherent design that combines the main indicators of the vehicle’s performance. There is not a single car that does not have such informative signs. Knowing the Kalina instrument cluster allows you to determine what condition the car is in.
Error codes
Self-diagnosis mode displays certain codes. Due to the simplicity of the design of the diagnostic unit, digital values only indicate the area where the fault occurs. The most popular encodings:
- 2 – there is a short circuit in the on-board network with a critical increase in voltage;
- 3 – open circuit or malfunction of the float in the gas tank;
- 4-5 – error or breakdown of the antifreeze or ambient temperature sensor, respectively;
- 6 – the motor is very overheated;
- 7 – too low oil pressure in the engine boat;
- 8 – the brake system is not working properly;
- 9 – the battery is faulty or severely discharged;
- E – standard error of the firmware data package;
- 0 – no errors – all on-board systems are operational.
Specialization : Graduated from the State Automobile University, worked for 20 years at GAZ-56, now I drive a Zhiguli.
Source
Why you should know the pinout
But before you start this kind of upgrade, you need to understand which wire leads where. The pinout of the instrument panel of a VAZ-2110 car is a very important point when “tuning”. Without this, you risk simply getting confused in a fairly large number of wires, buttons and various sensors. The pinout will be useful in any case - both when making minor improvements and when completely replacing the instrument panel.
The process of installation and dismantling itself is quite labor-intensive, but if you know the correct sequence of actions, then there is nothing particularly difficult about it.
For these works you will need a minimum set of tools - a screwdriver and pliers.
For those who are doing this for the first time, it is best to stock up on self-adhesive pieces of paper, like those on which prices are written in stores, and a pen. With their help, at the time of disassembly, you will indicate, firstly, the sequence of dismantling the parts, and secondly, which wire is connected where. At first glance, this may seem time-consuming, but in fact, for beginners, such markings will help them put the panel back together faster.
At the same time, before starting work, it is best to stock up on a pinout diagram - at least conditional. After all, during the work process you need not to confuse anything and correctly understand each wire and connection during the reassembly process. It is worth noting one very important point. By and large, understanding the pinout of the panel of the “tenth” family will not be difficult even for a beginner.
But you need to remember that there are certain differences here, depending on the plant where the car was manufactured and the year of its manufacture. For example, the instrument panel may be an old model, with a mechanical odometer. If the odometer is electronic, then this is a newer version. Accordingly, there are certain differences in pinout between these panels.
List of required materials and tools
The designers have developed a clear dismantling scheme; the instrument panel can be removed using a Phillips screwdriver. Tip type PH (standard), number “1” or “2”. Rod length 50-150 mm. There are no deep mounting units in the Kalina dashboard mounting scheme; all screws are located in the visible area.
It is not recommended to use a screwdriver to install the shield. The reason is that it is difficult to adjust the fastener pressure, and the panel may be damaged.
Additional materials and tools:
- lighting devices (flashlight, portable lamp), since the light in the cabin will not work;
- pliers or thin-nose pliers for replacing light bulbs;
- WD-40 or equivalent for “stuck” screws;
- a clean rag to clean the hidden elements of the shield from dust.
Before starting work, you need to warm up the interior to room temperature. This makes polymer components more ductile and reduces the risk of chips and cracks.
This is a minimum of accessories; the list can expand if you need to remove the entire front panel of the car. Most of the elements are fixed with latches. The glove box has a removable lid held in place by hinges and 4 latches. No tools are needed to dismantle it.