The VAZ car cannot boast of a good torpedo. In addition, in cold or hot weather, the plastic begins to burst and the corners of the panel often peel off. In this article we will learn how to remove cracks in a VAZ torpedo. The torpedo consists of 3 parts: an upper lining, a central part and a lower plastic lining. There are 2 reasons why the corner of the panel comes off:
- or the screws that attach the top trim to the panel have come loose
- or the soft part of the panel has moved away from the iron part of the top cover
In the first case, you will have to remove the dashboard, since it will not be possible to tighten the top trim without removing it. If the lining is well screwed, and only the soft part of the corner has come off from the iron body, there are several solutions to this problem.
Due to excess stress, the corner of the panel evenly moves away from the iron base. On the other side of the corner there is some semblance of foam rubber; over time it crumbles and turns into dust, so it is not always possible to glue the corner of the panel. Although if you try, you can stick it on, but it will stick not to the iron part, but to the plastic air deflector.
The second method is to mask the gap that is created after peeling off the corner of the panel. You can close the gap with wire. We lay the wire inside the gap using a screwdriver.
It turns out that the peeling corner of the panel will have no gap and will no longer attract attention to itself. For the place of the wire, you can take the headlight seal from the VAZ 2108. In this case, we can return the corner to its place. In order to stick the corner in place, we use polyurethane foam.
Thanks to the foam, the casing will stick to the iron body, but before that it is necessary to degrease it first. Next, we apply foam inside and use a damp cloth to remove excess foam that has fallen onto the floor or into the tunnel. We press the corners with a paper clip; there is no need to immediately remove the foam around the corners, since it will only be smeared at this step. We wait until it dries and carefully remove the remains with a stationery knife.
As soon as the foam dries, we paint over it with a marker. At the beginning, it seems that the foam is bursting and will not hold anything. But those motorists who used this method say that the corners of the panel will no longer come out. Now let's move on to repairing cracks on the VAZ 2110 torpedo.
You can repair the torpedo trim using plastic glue, or by tightening the panel trim with leather. The first option is the simplest, since you do not need to remove the trim during repairs. You can remove a crack from the panel using epoxy.
Cosmofen and cold welding also performed well. In order for the crack not to stand out against the general background, you can repaint it; the second method is to re-tighten the panel, in this case we use leather or vinyl leather. Before covering, cracks must be puttied. If the problem is a peeled corner of the panel, then repairing it is very simple. It is much more difficult if the panel is cracked, since it is impossible to completely hide the cracks without removing the panel. If it comes to repairing the panel, then you can replace it with a Euro-overlay.
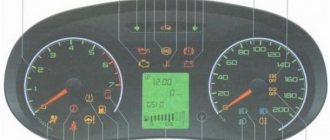
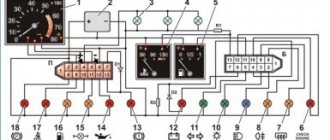
Dashboard diagram
The VAZ 2109 panel is made of a special energy-absorbing material. It consists of an overlay and, in fact, the panel itself.
It is made of plastic. Its thickness is 3 mm. The overlay is essentially reinforced with a special metal frame. It has a reliable energy-absorbing layer made of polyurethane foam. On the outside it is lined with a special decorative film. The car can be equipped with low and high VAZ 2109 panels, as well as a “European panel”.
The high panel of the VAZ 2109, like the low one, has certain features that should be taken into account when installing them. The installation method and the high panel are almost identical, since the mounting points, as well as the connections of the air ducts of the automobile ventilation and heating system, are the same. The differences concern only the wiring harness connections. (The diagram of the VAZ 2109 instrument panel is shown in the photo below; follow the link to read even more about it).
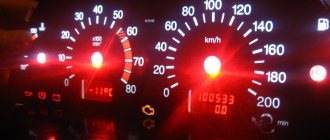
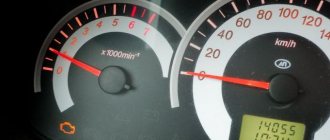
Instrument cluster and icon designations
1 – knob for resetting the daily mileage. 2 – signaling device for turning on high beam headlights; 3 – signaling device for turning on external lighting; 4, 6 – turn signal indicators; 5 – battery charge indicator; 7 – emergency engine oil pressure indicator; 8 – fuel level indicator in the fuel tank; 9 – “Check engine” indicator; 10 – parking brake activation indicator;
How to do easy tuning of the VAZ-2109 dashboard with your own hands
During the modernization of the interior of the domestic “nine”, tuning its “tidy” becomes a truly indispensable element. Beautiful modifications can be done with your own hands. To do this, you will need to make a new dial on a computer using special design programs and printing the picture on a printer.
However, first you need to clearly think through the appearance of the dials for the car's tachometer and speedometer, as well as for all the sensors that remain. Once the dials are printed, they need to be laminated, and then you can start removing the instrument panel.
To dismantle it correctly, you must first remove the steering wheel pads and also mark the steering position relative to the shaft. Then carefully unscrew the fastening nut.
Next, you can remove the steering wheel and unscrew the screws that are located in the area of the car lower casing. After this, you will have to disassemble the steering column. When the instrument panel is removed, you should unscrew the arrows from the old speedometer and tachometer. Subsequently, they will be attached to the updated dials.
When tuning a VAZ 2109 with your own hands, you can also repaint the dials and hands in bright colors. Regular spray paint cans are suitable for this. At the same time, it is better to make the dial a rich black color.
You can make it matte using special products. In this case, the arrows need to be painted in bright pink or original red-burgundy tones. After the painted plates of the machine dial have dried, they are completed with an old or pre-prepared scale and removed hands.
Step-by-step tuning steps
Before dismantling the VAZ 21099 panel, you will need to remove the terminals from the power supply by hand. Then the decorative steering wheel trim is removed. The nut should be unscrewed so that its end is flush with the similar element of the steering column shaft. You can’t turn it away right away. Then tuning the VAZ 21099 panel involves removing the steering wheel.
After unscrewing the 6 screws that secure the lower casing, you will need to remove it. The ignition switch trim is removed. The next step involves loosening the bolt that secures the base of the switches. The last element is removed from the shaft, and 2 blocks with the corresponding wires are disconnected.
In this case, you will need to label the washer and wiper switches. The block with wires is disconnected from the corresponding levers and direction indicators. The choke should be pulled out so that a draft occurs. At the same time, the handle of the first unit is pulled towards itself. Then the bolts securing the console trim are removed from the panel and the trim itself is removed.
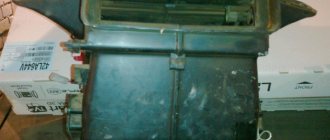
The cigarette lighter cartridge and ashtray are pulled out of the socket. The VAZ torpedo is equipped with a heater fan that will need to be removed. To do this, it is recommended to use a screwdriver. The block and two wires are disconnected from the fan switch. They illuminate the europanel.
Tuning instrument panel
You also need to disconnect the handles for the hydraulic headlight adjustment and the light switch. After unscrewing the nuts, the corresponding switch is pushed inside the panel. The side nozzles are removed with a screwdriver. The high panel provides for turning away the bolts for fixing the linings. The last elements are located on both sides of the torpedo.
Subsequent tuning is carried out taking into account the removal of the radio socket. Existing audio equipment is pre-dismantled. Then, using a screwdriver, the latches are removed and the cover is raised. The block and wires are disconnected from the cigarette lighter. A similar step is carried out in relation to the backlight and alarm switch.
Beautiful modifications to the VAZ 2109 panel
Every driver of a domestic car wants to make the instrument panel of his VAZ-2109 as bright and original as possible. Here is one of the options for how beautifully you can modify this element of the machine.
You will need a soldering iron. Next you need to buy numbers and a scale panel. It is important that they are translucent from the inside. You should also purchase an ultraviolet lamp. It is powered by 12 volts. Therefore, nothing needs to be changed.
You will also need a fluorescent marker or paint. It will change color if exposed to ultraviolet light. This technique is often used in modern nightclubs. You will also need ordinary light bulbs with sockets, like those in the “tidy”. There is no need to change the LEDs; they will remain in place. Everything you need is there, you can get started.
First you need to remove the plastic, then the dashboard. Also, don't forget about the black plastic that surrounds the glass. We disassemble the standard insert, as well as the arrows. Most often, there are no holes in the new insert. Therefore, you will have to do them. For the arrows, the holes will be needed wider than in the standard trim. Otherwise, the arrows will start to stick.
Next you need to dismantle the lighting that is installed. The work should be done carefully so that the plastic is not damaged. We take out the board with the light bulbs. We install a neon light bulb instead of the usual ones, and stick a plastic protection on top. It used to have factory bulbs screwed in. Don't forget about the control unit for the new neon light bulb. Be careful not to reverse the polarity at all times.
If this happens, nothing will shine. Next you need to screw in the instrument lighting bulbs. This should be done in parallel to the neon lamp. We lay the wiring from the inside; first, for this you need to make holes in the partitions.
Let's check if everything is correct. The light bulbs inside should be adjusted. Next we put on the overlay and seal it. After these steps, all we have to do is paint the hands with a purchased fluorescent marker or paint. It is advisable to repeat painting after 10 minutes. After this, the arrows can be installed in their place. This completes the tuning.
Check the work, otherwise you will have to disassemble everything. If there are no problems, you can assemble everything in strictly reverse order. After such tuning, the interior of the VAZ 2109 will be equipped with a colorful panel like good foreign cars. If desired, you can use fluorescent paint to paint the dashboard trim in the place where the needle reaches its limit. It looks very nice.
Problems when paying with bank cards
Professional repair and painting of car dashboards TsAO, ZAO, YuAo, Yuzao, Yuvao
Sometimes difficulties may arise when paying with Visa / MasterCard bank cards. The most common of them:
- There is a restriction on the card for paying for online purchases
- A plastic card is not intended for making payments online.
- The plastic card is not activated for making payments online.
- There are not enough funds on the plastic card.
In order to solve these problems, you need to call or write to the technical support of the bank where you are served. Bank specialists will help you resolve them and make payments.
That's basically it. The entire process of paying for a book in PDF format on car repair on our website takes 1-2 minutes.
If you still have any questions, you can ask them using the feedback form, or write us an email at [email protected]
How to change the backlight of the VAZ 2109 panel
During a trip, an experienced driver carefully looks not only at the road, but also at the dashboard. This is necessary to monitor the corresponding readings of the sensors that are responsible for the operation of the vehicle. It should be noted that its illumination should not tire or strain the eyes.
The manufacturer equipped new cars with pale green or yellow backlighting. It has a certain effect on the eyes - after a certain period of time they get tired. In this situation, it is better to replace the factory instrument lighting. For such tuning you will need a set of diodes, a soldering iron, screwdrivers with attachments, gloves, and iron pliers. Then we need to choose the color of the backlight. There are many possible options, it all depends on your imagination.
However, as always in any work, this process has its own nuances. It is recommended to install a soft white backlight if you use the car every day or for long trips. It will not tire your eyes. However, if you rarely use the car, then it is better to install light bulbs of a different, most varied color. Now let's start the installation.
First you need to completely remove the dashboard and disassemble the dashboard. To do this, unscrew the screws holding the dashboard to the body. You can find out their number by studying the car's operating instructions. It is possible that you can remove the panel if you disconnect only the trim and release the steering column all the way down.
Then we need to unscrew the bolts that are located at the bottom of the trim. Using a screwdriver and a flat socket, pry up the instrument cluster and remove it. You should be especially careful because you can accidentally damage the glass. After that, unscrew the bolts on the back side. We disconnect the glass, and then the plastic gasket.
There is no need to touch the arrows; you should work carefully, because you can accidentally hit them or knock them down. If this happens, you will have to set them again and, what is even more difficult, adjust the sensors. When examining the back of the light bulb, you can see the location of all lighting fixtures, including LEDs.
We outline them with a marker and unsolder them from the microcircuit. We check new light elements with an adapter or battery. It is better to use LEDs because they will consume a small amount of energy and also have a long service life. Then you need to inspect the metal antennae of the diodes so that they are intact. Otherwise the diode will not light up. We insert both antennae of the diode into the hole in the microcircuit that remains after soldering the previous light bulbs. We solder the antennae on the back side of the circuit.
We mount the remaining diodes in the same way. Reassembly must be done in reverse order. After starting the car, turn on the low beam. Thus, we check how the installed LEDs function.
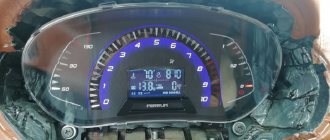
Good afternoon Surely everyone knows the terrible rattle of a torpedo on nines, especially the so-called “high” (21083) panel. I bring to your attention a small manual on sizing. So, the main source of squeaks and rattles is the instrument panel (below in the photo):
Downloading a book
Cooling fan sensor: device, malfunctions and repairs
After successfully completing the payment (by any method) and returning to the KrutilVertel store from the payment system website, you will be taken to the successful payment page:
The book you purchased will be in your personal account, from where you can always download it.
Please note that after making the payment, you need to return back from the payment system website to the KrutilVertel website. If for some reason you did not return back to the site and closed the payment system tab with a message about the successful completion of the payment, please let us know - we will send you a letter indicating access to download the book
If for some reason you did not return back to the site and closed the payment system tab with a message about the successful completion of the payment, please let us know - we will send you a letter indicating access to download the book.
Trunk
Tuning the trunk of a VAZ 2109 is not the most creative activity, and given the fact that no one will see it anyway, it’s worth thinking only about the practical side of the issue. Firstly, as already mentioned above, a subwoofer and an amplifier will coexist perfectly in the trunk. Secondly, you can reupholster it on leather, faux leather, material with an interesting color, or simply on something more resistant to external influences. And finally, you can organize LED lighting, which will be extremely useful at night.
Seats
By replacing or upgrading the seats, you will have done almost half of the entire job of upgrading the interior. Just as for external tuning it is sometimes enough to install beautiful wheels, so for internal tuning it’s worth starting with the seats.
There are three main ways to add something interesting to your chairs:
- Use covers;
- Cover with leather or other material;
- Buy new seats.
Covers are the simplest and most versatile way to modify the interior of your VAZ 2109 without capital investments and with minimal installation costs.
Example of original cases
Cases
When purchasing and installing seat covers, be sure to pay attention to a few key points.
- Fasteners. The fastening systems used for current cases come in a wide variety - through cords, adhesive tapes, hooks, and braid. But all of them are far from perfect and are not capable of reliably and effectively fixing the pillow in its proper place. Over time, the fabric will stretch, the fasteners will lose their quality, and you will have to tighten the covers every time. The situation is exactly the same with the back row. To avoid this situation, sew the cover onto the edge of your seat trim.
- The backs of the front covers. They are put on separately, pulled over the chair. But the problem is that over time the backs become twisted. The defect is eliminated by sewing to the ends of the seat. The back of the rear seat has a folding lever, and there are grip holes on the back side. Therefore, be sure to choose covers with slots or make them yourself. Plus, we advise you to unscrew the decorative protection and attach the edges of the cover to the stiffeners. Putting the unit back together is not difficult.
- Cover maker. The VAZ 2109 car has been around for quite a long time. During this time, accessory manufacturers were able to study in detail all the strengths and weaknesses of the model’s interior, its features, and key nuances. Therefore, we advise you to choose trusted studios that have proven themselves well in the accessories market.
- Price issue. It is stupid to purchase consumer goods that will become unusable after just one season of use. But it’s not entirely reasonable to purchase sets of covers costing 10-15 thousand rubles. Today, eco-leather is considered the best option.
- Foam inserts. Many people use cases that have shaping inserts. They transform the shape of the seats, creating the effect of completely different chairs. Yes, lateral support will improve, but this will cause great harm to your health. Foam inserts create a greenhouse effect, which is why such inserts are harmful for car owners who spend a lot of time driving.