Published: 10/20/2020
- What to choose: antifreeze or antifreeze
- Setting the handbrake on the Lada Kalina
- How to replace a handbrake cable
- How to check the condition of the unit, and what are the causes of breakdowns?
- Where is
- Adjusting the handbrake - Lada Kalina Blog
- Dismissal at the initiative of the employer
- Are there any differences in the lift on a station wagon and a hatchback?
- Setting up the handbrake on Kalina hatchbacks and station wagons
- Setting up the handbrake on Kalina hatchbacks and station wagons
- Checking the condition and cause of the handbrake failure
- Replacing the cable
- How to understand that the handbrake needs adjustment
- Correct exit procedure, example
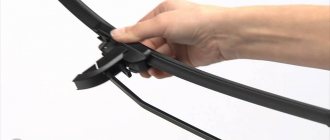
- How to replace the cabin filter on Lada Kalina
- CSS Grid
- How many liters of coolant are in the Lada Priora cooling system
- Let's sum it up
What to choose: antifreeze or antifreeze
Both antifreeze and antifreeze are coolants. At the same time, antifreeze is the international name denoting coolants for cooling systems of internal combustion engines.
Antifreeze is also an analogue of antifreeze; it was developed back in Soviet times. It is noteworthy that the name TOSOL is not patented. As a result, today antifreeze manufacturers are actively producing products called TOSOL. Such a liquid today has nothing in common with the old Soviet development and is still the same antifreeze. It turns out that this is antifreeze, only domestically produced.
At the same time, TOSOL is traditionally used in domestic cars; it is poured at the factory during the manufacture of new cars. However, if you need to switch from it to antifreeze, no problems arise.
The main thing is to avoid mixing different types of coolants, and also to use products in the cooling system whose properties meet the tolerances of the car manufacturer itself.
Assembly occurs in reverse order.
After installing the brake drums, you need to adjust the travel of the parking brake lever.
You must have with you:
- socket wrench with ratchet 10;
- extension;
- 2 open-end wrench for 13;
- WD-40 – 1 bottle.
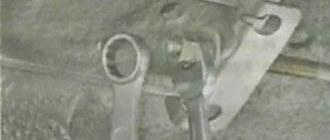
To begin with, the car is installed on the pit. Next, use a 10 key to disconnect the metal protection. Then, to get to the adjustment mechanism, you need to disconnect the rubber ring from the front muffler mount and slide the casing. Now, to raise the handbrake, use a 13 key to screw in the internal screw, while listening to the number of clicks. Upon completion of the adjustment, the position is fixed, and the second screw is tightened to 13.
We hope our article was useful to you!
Setting the handbrake on the Lada Kalina
Operating the Lada Kalina requires regular tensioning or loosening of the cable. Most often you have to resort to the first option - this is due to wear on the brake pads. You can determine that you need tension by the number of clicks when you apply the parking brake. In normal condition there should be from two to four. If you hear more sounds, it's time to work on the brakes.
Procedure
Before starting work, prepare the place where you will do it. The best option is a garage with a pit or a lift. If you don't have one, you can use a jack and lift the rear of the car. The elements necessary to adjust the parking brake are located under the protective cover. It is located between the tensioner and the muffler pipe. The protection will need to be removed.
These nuts need to be unscrewed first.
- We find the fastening nuts - there are 4 of them (see photo). Lubricate them with WD-40 and wait about 5 minutes. If you do not wait, there is a risk of damage to the studs.
- Unscrew the nuts. The most convenient way to do this is with a ratchet.
- Remove the muffler hook from the rubber band. This must be done from the side that is located near the front of the car. This way you can easily remove the metal casing.
- Move the guard until the parking brake adjustment mechanism appears in front of you.
- To tighten the cable, use a 13mm wrench. Find the nut located near the plate and tighten it. You also need to find the outer nut and tighten it, and fix the first one. Do you need to weaken this element of the system? The steps are the same, only in reverse order. Get ready for difficulties - you will have to frequently change the position of the key due to the inconvenient arrangement of the elements.
Unscrew the nuts holding the protection
Upon completion of the process, check how well the lever is tensioned. Remember, you want to get two to four clicks!
The moment of loosening the handbrake is covered in more detail in the video; the principle of operation does not change.
Removing elements of the parking brake system
We show the work of replacing the cable using the example of the left cable.
We unscrew the locknut and the adjusting nut from the parking brake lever rod (see “Adjusting the parking brake”). Remove the cable equalizer from the parking brake lever rod.
We take out the front ends of the cables from the equalizer and remove it.
Remove the end of the left cable sheath from the bracket. Disconnect the rear end of the left cable from the manual brake pad drive lever (see “Replacing the rear wheel brake pads”).
We remove the cable tip from the hole in the brake shield.
Use a 10mm wrench to unscrew the nut. . and remove the bracket securing the cable sheath to the rear suspension beam.
We remove the cable sheath from the holder on the rear suspension beam mounting bracket.
Use a screwdriver to bend the bracket.
. and remove the cable from the holder on the body.
We remove the left parking brake cable from behind the protective screen of the fuel lines. Similarly, remove the right parking cable cable. We install the cables in the following order. We mount one of the cables in the reverse order and insert its front end into the cable equalizer. We insert the parking brake lever rod into the hole in the equalizer and tighten the adjusting nut several turns. To install another cable, we recommend making a device from a metal tube about 300 mm long and a hole with a diameter of 15-16 mm. At one end of the tube we drill a hole and cut a thread in it for a screw (M4-M6).
Cable installation tool
We secure the cable in the holders on the body and the rear suspension beam mounting bracket.
We put the tube on the rear end of the cable and fix the cable sheath on the end with a screw.
Using a rod (you can use a wrench from a set of socket heads) we press on the tip of the cable, compressing its spring. In this case, the front end of the cable will come out of the sheath and can be inserted into the equalizer. We carry out further installation of the cable in the reverse order. After replacing the cables, we adjust the parking brake. To remove the parking brake lever, unscrew the locknut and the adjusting nut from the parking brake lever rod (see “Adjusting the parking brake”). Remove the cable equalizer from the parking brake lever rod (see above). Remove the parking brake lever trim (see “Removing the floor tunnel trim”).
Using a 13mm socket, unscrew the two bolts securing the parking brake lever bracket to the floor tunnel.
Remove the bracket with the parking brake warning switch.
Remove the parking brake lever with bracket and rod assembly, pulling the rod through the rubber sealing boot.
Use a screwdriver to pry off the fixing bracket of the thrust axis. . and take it off
Remove the axle and rod from the parking brake lever. Install the parking brake lever in reverse order. We adjust the parking brake (see “Adjusting the parking brake”).
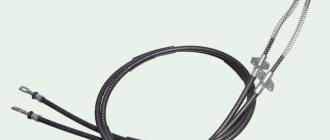
How to replace a handbrake cable
If the problem with a non-functioning handbrake cannot be solved by simply tightening it, you will most likely have to replace the cable, which may simply stretch too much - this is especially true for products that are not of the highest quality. Also, conduct an external inspection of the left and right cables for wear and damage, as there may be a rupture. If there is a reason for replacement, then you need to prepare the appropriate tool and get to work.
To remove old handbrake cables and install new analogues, you will need the following devices:
- wrench head for “7” and “10” (preferably with a ratchet);
- two open-end wrenches at “13”;
- flat blade screwdriver;
- pliers;
- any penetrating lubricant (eg WD-40).
Before starting repair work, it is necessary to install the rear of the car in a suspended state so that the rear wheels can spin freely. Then remove both brake drums - without this operation replacement is impossible.
So, Kalina looks like this:
- First, disconnect the muffler heat shield and move the muffler pipe to the side as indicated above in the instructions for adjusting the handbrake.
- Once you have access to the adjustment mechanism, use two 13mm wrenches to unscrew both nuts on the central rod.
- Now remove the cables from the equalizer bar and brackets located on the left and right of the bottom. If they have soured in the seat, pre-treat them with a penetrating lubricant.
- Next, use a screwdriver to remove the brake pad drive lever and use pliers to disconnect the cable tip from it.
- Pulling the cable out of the hole in the brake drum housing is not so easy - first you need to treat this place with penetrating lubricant. Wait a while and pull out the cable, loosening it a little first.
This is how both cables are dismantled. Once complete, prepare a new kit and install it in the reverse order of removal. Finally, don't forget to adjust the cable tension.
4 years ago
Welcome!
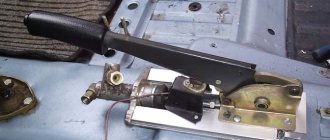
Over time, the handbrake cable stretches and there comes a point when it simply cannot hold the brake pads at the rear.
This cable runs from the parking brake, which runs under the underbody, to the rear brake pads to which it is attached. By lifting the handbrake, you set the rear pads in motion, coming into contact with the walls of the brake drum, hence friction occurs. The pads are tightly pressed against the drum, preventing it from moving, limiting the movement of the rear wheels. When the cable is loosened, the brake pads are not attracted to the drum, friction occurs with less force, which means that the handbrake holds the car less and less each time.
Note!
To adjust the parking brake cable, you will need the following tools: a socket wrench, a socket extension, a basic set of wrenches, and a lubricant like WD-40.
Cable location
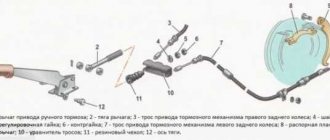
On classic cars VAZ 2106, 2107, etc. two cables were installed, but the rear one was one whole and went to both rear wheels at once. In Kalina it is a little different, here each cable leads to a separate rear wheel (indicated by a red arrow in the diagram), they are combined due to the leveling bar (blue arrow). By adjusting this bar you will adjust the handbrake.
When to adjust?
In case of strong pulling, wear of the rear pads. A high-quality cable lasts much longer and stretches to a shorter length.
Have you ever noticed how many clicks the handbrake makes when lifting? A tightened handbrake must perform around 2-4 clicks, and in everyday driving, when the cable has already stretched a little, 2-8 clicks, no more. If the specified amount is exceeded, immediately adjust the cable, otherwise the handbrake will no longer keep the car stationary.
Tension
So, having understood the diagram, you can begin the procedure of tightening the handbrake cables.
Stretch
The tensioning procedure is as follows.
- Place the car on an overpass or pit. If you don’t have a garage and you have the opportunity or desire to carry out the procedure at a service station, use a jack. The rear of the car is raised on a jack. The most extreme option is a curb onto which the car is driven and all you have to do is crawl under it.
- Engage the gearbox in first gear and put the car on the handbrake by pulling the lever up.
- The ideal number of handbrake clicks is from 2 to 5. If there are fewer or more clicks, it is easier to take appropriate measures to tension the cable.
- If there are less than 2 clicks, then the cable will need to be lengthened. If there are more than five clicks, then the cables are shortened.
- Lengthening the cable means relaxing it. To do this, unscrew the locknut. When tightening the cable, the locknut must be tightened in reverse.
- Before you start looking for the required nut on the bottom of the car, release the handbrake lever all the way.
- Take a 13mm wrench under the car and head down.
- Find the handbrake cable equalizer. This is the same element from which the main handbrake cable is divided into two cables.
- In some cases, it is simply not possible to gain access to the equalizer, since the muffler holders made of rubber are in the way. In such a situation, it is better to remove them. This is not difficult to do, but working with the handbrake will be much easier.
- Now there are two nuts in front of you. One is a simple nut and the other is a lock nut. Having two keys in your hands, fix the nut with the first one, and with the second one begin to unscrew or tighten the locking nut. Be careful that the nut does not start to turn.
- Taking into account the condition of the handbrake and the need to loosen or tighten the lever, turn the locknut in the appropriate direction. Remember what is the optimal number of clicks.
- Tighten or unscrew the locknut to obtain the required degree of tension.
Examination
But if you twisted the nuts there, this is not a guarantee that the handbrake now works perfectly. This needs to be clearly verified.
To do this, it is enough to go through a successive stage of verification activities.
If the check shows that the handbrake still does not hold, even if the cable was tensioned exactly according to the instructions, the handbrake is probably simply worn out and the cable needs to be replaced.
Signs that replacement is needed
It is not uncommon for the VAZ 2114 handbrake cable to rust, as a result of which it breaks or weakens so much that no tightening can restore its previous functionality.
At the first sign of cable wear, you should consider replacing it. This problem may manifest itself as follows:
- The handbrake is not able to withstand the required traction;
- Drum brakes overheat;
- When you pull the parking brake lever, the cable does not respond to your actions;
- The cable sheath is seriously worn.
How to check the condition of the unit, and what are the causes of breakdowns?
If you feel that the parking brake system on your Lada Kalina is insufficiently effective, then the first action will be to check the degree of tension of the cable; the handbrake cable should be well tensioned. To do this, pull the lever towards you and count the clicks made by the ratchet mechanism. On a correctly adjusted unit there should be from 2 to 4 such clicks. If these limits are not met, then you will need to know how to tighten the handbrake when the number of clicks is exceeded or loosen when there are less than the designated minimum. Quite often, the need for loosening appears after replacing the pads or cable drive.
There are also frequent cases when the parking drive is not able to cope with its functions, which may be due to excessive wear of the pads or the unsuitability of the cable for further use, and in this case the parking brake cable must be replaced.
During an external inspection, it is possible to reliably determine whether the cable is stretched or broken. This case involves no alternative replacement.
What can cause the Lada Kalina handbrake to not work correctly? Several reasons can have a negative impact on this, including the following.
- Driving with the lever not fully released. This situation leads to premature wear of the pads, which implies a subsequent need for tightening the cable.
- Damage to the Lada Kalina cable drive under the influence of mechanical factors. Due to the external location of the cable branches (under the bottom), they are prone to rapid wear, especially if the casing is damaged. The problem can only be solved by replacement.
- Malfunction of the ratchet assembly. This is where disassembly and subsequent replacement of worn-out elements comes to the rescue.
All indicated breakdowns can be repaired manually. In our material we will look at the technology of tightening the cable or the sequence of actions when replacing it.
How to troubleshoot
You can determine that there is something wrong with the parking brake system in the Lada Kalina by placing the car on an incline with the handbrake and observing. If the car starts to roll, it means a check is needed. And only then can you decide whether the system simply needs adjustment or whether specific parts need to be replaced.
You should also pay attention to the sound of the brake drum rubbing against the pads from the rear wheels while driving. They shouldn't exist.
Malfunctions may occur due to:
- wear of parts, for example, drum brakes, the surface of which wears off and needs periodic replacement;
- Also, if the handbrake is in the raised position while driving, this wears down the pads very quickly.
Another reason is changing the necessary elements without subsequently adjusting the handbrake.
Adjusting the handbrake - Lada Kalina Blog
Handbrake adjustment
Adjusting the handbrake on Kalina involves either tensioning or loosening the cable. In most cases, it is necessary to tighten the brakes, since over time the rear pads wear out more and more, and thus the number of clicks when applying the parking brake increases. As written in many repair and operation manuals, the normal lever travel is from 2 to 4 clicks until the wheels are completely locked.
At the moment, my Kalina has covered more than 40,000 km and the rear wheels lock only at 6 or even 7 clicks, which indicates decent wear on the pads and the need to adjust the handbrake. Below is a list of the necessary tools that will be needed to complete this work:
- Ratchet with 10mm head
- Short extension
- Two open-end wrenches for 13
- WD-40 lubricant is highly recommended
for adjusting the handbrake cable
If you have any questions or it didn’t open for unforeseen reasons, below is a photo report of the operation performed.
- Firstly, this work is best done on a pit or a lift, but if there is none, then you can simply lift the rear of the car higher and crawl under it.
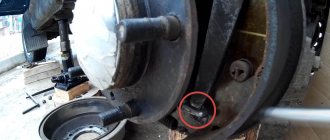
- To get to the adjustment mechanism, you will first need to unscrew the metal casing, a kind of protection that is located between the muffler pipe and the tensioner. Its location is clearly shown in the photo below:
Next, unscrew the 4 fastening nuts, which are indicated in the photo above. To do this, it is most convenient to use a ratchet and a 10mm socket.
Before unscrewing the nuts, be sure to spray them with a lubricant such as WD-40 and wait at least 5 minutes, otherwise the studs may tear out of the body alive even with little force.
After this has been dealt with, it is necessary to remove the muffler hook from the rubber band, on the side that is closer to the front of the car, so that it is convenient to move forward the same metal casing that we unscrewed.
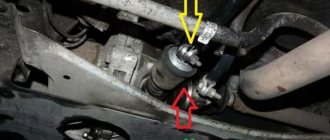
And then we move the metal casing to the right until the handbrake adjustment mechanism becomes accessible. This is what it looks like, as shown in the photo below:
To tighten the cable, you need to tighten the nut closest to the plate with a 13mm wrench, and then tighten the outer one too and fix the first one. It's very inconvenient to do all this. because the muffler always gets in the way and you have to turn it almost a millimeter at a time, constantly moving the key to the desired position.
After you have made at least a couple of revolutions, check the tension of the lever. And if the working stroke is from 2 to 4 clicks, then everything is fine and you can stop working, putting everything in its place.
Attention! Do not make much effort when you put back the same plate that is located between the exhaust pipe and the tensioner, since the studs are held in the body very weakly and can again break out (which happened to my Kalina). Apply force, even less than average, because there are still groovers installed there that will not allow the nuts to unscrew!
If the studs are torn out then they are frozen, this is of course “good”, but it is better to install screw rivets
Installation is easy: M6 bolt length = height of the rivet + height of the small support bearing + thickness of two washers and a nut 6, screwed on like this: screw the nut onto the bolt until it stops, then the washer then the support bearing, again the washer and finally screw the rivet until the bolt exits by 1 mm ..Two 10mm wrenches, hold the bolt with one and unscrew the nut counterclockwise with the other, the rivet will be crimped and you have a complete thread in thin metal. the price of a rivet is about 10 rubles. Bearing 20 rub. And you don’t need to buy a riveter, which costs about 5,000 rubles. It’s better to use a hardened bolt, washers and nut. Good luck. And don’t forget to practice first)))
If the studs are torn out and frozen, this is of course “good”, but it is better to install screw rivets. Installation is easy: M6 bolt length = height of the rivet + height of the small support bearing + thickness of two washers and a nut 6, screwed on like this: screw the nut onto the bolt until it stops, then the washer then the support bearing, again the washer and finally screw the rivet until the bolt exits by 1 mm ..Two 10mm wrenches, hold the bolt with one and unscrew the nut counterclockwise with the other, the rivet will be crimped and you have a complete thread in thin metal. the price of a rivet is about 10 rubles. Bearing 20 rub. And you don’t need to buy a riveter, which costs about 5,000 rubles. It’s better to use a hardened bolt, washers and nut. Good luck. And don’t forget to practice first)))
Tell me how you got out of the situation when the pin that was attached to the body broke?
to be honest, no way! Now everything is held on by 3 bolts, it seems to be normal, it holds tightly, nothing rattles. I didn't bother. in short
https://ladakalinablog.ru
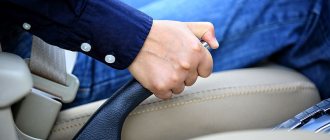
Pull up the handbrake
But if you really know how to tighten the handbrake on a Lada Granta standard, this procedure will not take you much time and effort. The only thing that is required for its implementation is a jack or an inspection hole, because access to adjustable components and assemblies occurs from below and you will have to work under the car. To tighten (adjust) the handbrake you will need 3 tools:
- two open-end wrenches for 13, one of them is preferably a socket one;
- one key head for 8;
- a faithful assistant (although in desperate situations you can get by alone).
The process of directly adjusting the manual braking system of a Lada Granta car is carried out in nine main stages:
- We lower the handbrake lever inside the car.
- We climb under the car, unscrew the rubber cushions (brackets) from the resonator, and remove the muffler from its attachment to the body.
- We remove the protective screen of the parking brake adjustment mechanism. To do this, use a socket wrench to unscrew the 4 nuts from the fastening bolts.
- We remove the protective screen or move it to the side behind the muffler - in this case, the necessary space for work is also quite enough. In this case, the muffler can be pulled back with something, for example, by pushing a block of wood under it.
- We take two 13mm wrenches - the first one is to slightly loosen the locknut, holding the adjusting nut. Then vice versa - hold it, and secondly turn (also loosening) the adjusting nut.
- Actually, we adjust the hand brake as follows: tighten the handbrake cable, for which we tighten the adjusting nut (move the key clockwise).
- Next, you should check the travel of the handbrake lever - this is why you need a partner, or you will have to do it yourself. The lock nut can be tightened when the handbrake stroke is 2-4 clicks (see above).
- Then we test the operation of the parking brake mechanism as a whole. To do this, lift the rear wheels and check how freely they rotate when the handbrake is lowered and how completely they lock when fully raised (in this case they should not rotate at all!).
- If the handbrake is working properly, tighten the locknut and replace the protective screen and muffler. The handbrake adjustment is complete!
As the mileage and life of the vehicle increases, the handbrake becomes less and less adjustable. It happens that even after adjustment, the manual braking system does not work properly and does not “hold” the car. This indicates that the wear on the brake pads is too high or the cable stretch is irreversible.
Tools:
- Ratchet wrench
- Extension
- 10 mm head
- 13 mm high head
- Open-end wrench 13 mm
Parts and consumables:
Aerosol lubricant type WD-40
Notes:
The parking brake should hold the vehicle on a 23% grade. The full travel of the parking brake lever should be from 2 to 4 teeth (clicks) of the lever ratchet device.
1. To adjust the parking brake, place the vehicle on an inspection ditch or overpass and lower the parking brake lever.
2. Using a 10 mm socket, unscrew the four nuts securing the rear heat shield of the additional muffler, having previously treated them with WD-40 lubricant.
3. Remove the rubber cushion from the front suspension bracket of the additional muffler.
4. Slide the heat shield forward to expose the parking brake adjustment assembly.
5. Holding the adjusting nut of the cable end with a 13 mm wrench, use a socket of the same size to unscrew the lock nut.
6. Turn the adjusting nut clockwise to tighten the cables.
Note:
It is convenient to adjust the tension of the cables with a high head with a ratchet and an extension. In this case, do not unscrew the lock nut completely, but, aligning its edges with the edges of the adjusting nut, put on a 13 mm high socket and rotate both nuts at once.
7. Use the locknut to secure the adjusting nut. When the lever is lowered, the suspended rear wheels should rotate freely.
The article is missing:
Photos of parts and consumables
Adjusting the handbrake lever on the Lada Grant is necessary if its stroke is more than 6 clicks. The optimal stroke is 2-4 clicks, but during operation it is allowed to increase its stroke to 8 clicks.
An increase in the travel of the parking brake lever occurs for several reasons, the main ones being stretching of the handbrake cable and wear of the brake pads.
Setting up the handbrake on Kalina hatchbacks and station wagons
After making sure that all components of the brake system are normal, you can begin adjusting. Goal: to ensure that the rear wheels are completely locked with 2–4 clicks of the lever lock.
- If the blocking occurs faster, you need to lengthen the cable a little and check again.
- If you have to expect five or more clicks, you should shorten it, selecting the desired length experimentally.
This work can be done independently, without an assistant, but you will need an overpass or inspection hole. You will also need:
- two 13mm wrenches (open-end and socket);
- wrench with extension and heads for 10 and 13;
- liquid key type product (WD-40).
Tools needed for setup - gallery
The procedure is simple:
After placing the car on the overpass, engage first or second gear. Place wheel chocks or bricks under the front wheels. Treat all threaded connections with WD-40 10-15 minutes before starting work. This will make it easier to unscrew the nuts without damaging the threads. Lower the handbrake lever.
Remove the muffler from the rubber pads.
To adjust the handbrake you need to remove the muffler from the rubber pads
Unscrew the four bolts of the protective screen (10mm head) and remove it.
You should unscrew the protective screen from the four mounting points. Under it there is a parking brake rod, an equalizer, and two brake cables (left and right).
Under the protective screen there is a handbrake rod for Kalina
Loosen the additional nut on the rod with a 13-mm spanner, holding the main one with an open-end wrench. To make adjustments you will need the main nut on the rod. If you need to shorten the cable and, accordingly, achieve earlier wheel locking, the nut should be tightened; If necessary, increase the length by unscrewing.
After every 3–5 turns of the nut, check the operation of the handbrake, ensuring that complete locking occurs with 2–4 clicks of the latch. With the rear wheels hanging, check the brakes. When the handbrake is raised, the wheels should be blocked, and when lowered, they should rotate smoothly without touching the pads. If everything is ok, tighten the locknut. Reinstall the protective shield and muffler
Tighten the nuts on the fasteners carefully, otherwise the threads may be stripped. Check the parking brake on a 25% grade. If the car rolls away, the cable needs to be replaced.
The design of the parking brake and the procedure for adjusting it are similar for all models of the Kalina 1 (sedan, hatchback, station wagon) and Kalina 2 (hatchback and station wagon) family. The Kalina 2 Sport stands apart, having more modern disc brakes at the rear instead of drum brakes. You need to check the pads of a Kalina Sport car like this:
- Raise the car with a jack and remove the wheel.
- Check to see if wear is even across the entire visible part of the disc. If not, you should go to a car repair shop, where they will carry out detailed diagnostics.
- Inspect the brake pads through the inspection hole. If installed parts appear thinner than new, replacement is required.
How to troubleshoot
You can determine that there is something wrong with the parking brake system in the Lada Kalina by placing the car on an incline with the handbrake and observing. If the car starts to roll, it means a check is needed. And only then can you decide whether the system simply needs adjustment or whether specific parts need to be replaced.
You should also pay attention to the sound of the brake drum rubbing against the pads from the rear wheels while driving. They shouldn't exist.
Malfunctions may occur due to:
- wear of parts, for example, drum brakes, the surface of which wears off and needs periodic replacement;
- Also, if the handbrake is in the raised position while driving, this wears down the pads very quickly.
Another reason is changing the necessary elements without subsequently adjusting the handbrake.
Setting up the handbrake on Kalina hatchbacks and station wagons
After making sure that all components of the brake system are normal, you can begin adjusting. Goal: to ensure that the rear wheels are completely locked with 2–4 clicks of the lever lock.
- If the blocking occurs faster, you need to lengthen the cable a little and check again.
- If you have to expect five or more clicks, you should shorten it, selecting the desired length experimentally.
This work can be done independently, without an assistant, but you will need an overpass or inspection hole. You will also need:
- two 13mm wrenches (open-end and socket);
- wrench with extension and heads for 10 and 13;
- liquid key type product (WD-40).
Tools needed for setup - gallery
Open-end wrench for 13 Socket wrench for 13 Wrench with extension and heads for 10 and 13 Liquid wrench WD-40
The procedure is simple:
After placing the car on the overpass, engage first or second gear. Place wheel chocks or bricks under the front wheels. Treat all threaded connections with WD-40 10-15 minutes before starting work. This will make it easier to unscrew the nuts without damaging the threads. Lower the handbrake lever. Remove the muffler from the rubber pads. To adjust the handbrake you need to remove the muffler from the rubber pads
Unscrew the four bolts of the protective screen (10mm head) and remove it. You should unscrew the protective screen from the four mounting points. Under it there is a parking brake rod, an equalizer, and two brake cables (left and right).
Under the protective screen there is a handbrake rod for Kalina
Loosen the additional nut on the rod with a 13 mm spanner, holding the main one with an open-end wrench. To make adjustments you will need the main nut on the rod. If you need to shorten the cable and, accordingly, achieve earlier wheel locking, the nut should be tightened; If necessary, increase the length by unscrewing. After every 3–5 turns of the nut, check the operation of the handbrake, ensuring that complete locking occurs with 2–4 clicks of the latch. With the rear wheels hanging, check the brakes. When the handbrake is raised, the wheels should be blocked, and when lowered, they should rotate smoothly without touching the pads. If everything is ok, tighten the locknut. Reinstall the protective shield and muffler
Tighten the nuts on the fasteners carefully, otherwise the threads may be stripped. Check the parking brake on a 25% grade. If the car rolls away, the cable needs to be replaced. The parking brake design and the procedure for adjusting it are the same for all models of the Kalina 1 family (sedan, hatchback, station wagon) and Kalina 2 (hatchback and station wagon)
The Kalina 2 Sport stands apart, having more modern disc brakes at the rear instead of drum brakes. You need to check the pads of a Kalina Sport car like this:
The design of the parking brake and the procedure for adjusting it are similar for all models of the Kalina 1 (sedan, hatchback, station wagon) and Kalina 2 (hatchback and station wagon) family. The Kalina 2 Sport stands apart, having more modern disc brakes at the rear instead of drum brakes. You need to check the pads of a Kalina Sport car like this:
- Raise the car with a jack and remove the wheel.
- Check to see if wear is even across the entire visible part of the disc. If not, you should go to a car repair shop, where they will carry out detailed diagnostics.
- Inspect the brake pads through the inspection hole. If installed parts appear thinner than new, replacement is required.
Tool for the job
Any work related to the repair and maintenance of a car, as a rule, requires the use of a certain set of tools, and tensioning the handbrake on Kalina is no exception to the general rules. Tools:
- keys No. 10 and No. 13;
- head with extension No. 13;
- ratchet.
This is interesting: Design, purpose and 6 signs of a malfunction of the front wheel hub of a car
Of course, you can get by with the minimum, for example, two open-end wrenches, but such a tool will not be very convenient to work with, and it will not speed things up.
Of course, you can simply jack up the car and place it on trestles or blocks. This, however, is not entirely safe, and working this way is not very convenient. The best solutions are:
- Inspection ditch.
- Lift.
- Overpass.
In order to tighten the handbrake on Kalina, you need to drive the car onto an overpass or inspection ditch (the car owner hardly has a lift). Further sequence of actions:
- Engage first gear and fully release the parking brake.
- While under the car, you first need to use a 10mm wrench to unscrew all four bolts that secure the protective cover of the device.
- To make it more convenient to work, you need to remove the rubber suspension from the muffler mounting hook - a “carrot” in driver’s slang.
- The protective cover must be moved forward, providing access to the adjustment unit, which serves to tighten the handbrake on Kalina. At service stations, mechanics use a special long wrench with a swivel joint so as not to remove the muffler from the suspension and speed up the whole process.
- Then you need to fix the adjusting nut with an open-end wrench No. 13. Next, use a 13mm head to unscrew the locknut, which ensures reliable fixation of the adjustment. By turning the adjusting nut in the direction of tightening, tighten the cable. From time to time you need to check the number of clicks of the tensioner ratchet. Having brought the number of such to four or five, it is worth checking the handbrake in action.
- Having jacked up the rear wheels, you need to turn each one in turn. In this case, the brake drums should rotate freely, slightly touching the brake drum - this will be audible - and when tightening the cable, it is not possible to completely rotate the wheels by hand. Or you can try, by lowering the rear wheels and removing the jack, to move the car with a taut cable - all these methods have already been described above.
It is possible that you will still have to tighten the handbrake on the Lada Kalina or, conversely, loosen it in order to achieve the correct adjustment.
If everything is in order, then you need to tighten the locknut with the head, while holding the adjusting nut so that the adjustment does not go astray.
After this, the casing is put in place.
When tightening the nuts securing the casing, this should be done without excessive fanaticism, so as not to tear off the studs that are attached to the bottom of the body. They are spot welded and may not withstand too much force.
Before tightening the nuts, you should not forget that you need to place one locking washer under each of them - this will prevent self-unscrewing.
In order for the work to go faster, easier and not have to endlessly crawl out of the inspection ditch, transferring to the inside of the car to check the cable tension by counting the clicks, it is advisable to have a partner who will help in this simple task.
This is interesting: How long does it take for drunk alcohol to be eliminated from the body or 4 ways to speed up the process
It happens that, despite the correct actions, it is not possible to adjust the parking brake. Possible reasons in this case are the following:
- wear of the brake pads of the rear wheels;
- wear of the brake drums of the rear wheels;
- extreme wear of the cable or its jamming.
In order to understand the reason, you need to jack up the rear wheels again, putting the car in first gear.
After removing the drums, make sure that the brake pads and drums are in good condition or not. The thickness of the linings should be at least four millimeters, and the wear of the drums should not be excessive.
If everything is fine here, then the handbrake cable will need to be replaced.
Checking the condition and cause of the handbrake failure
If the parking brake on your car begins to work insufficiently, you first need to check the degree of tension of its cable. To do this, simply pull the handbrake lever towards you and count the clicks of the ratchet mechanism. So, for a normally adjusted system, the number of clicks should be from two to four. If their number is greater than normal, the cable will need to be tightened, and if the number is smaller, the degree of tension will have to be reduced. By the way, the need to loosen the handbrake usually arises when replacing the brake pads and the cable itself.
Sometimes it happens that the parking brake does not cope with its function at all, and the likely reason for this is worn out pads or a cable that is unsuitable for further use. If, during an external inspection, you find that the handbrake cable is too stretched, damaged or completely broken, in this case it will have to be replaced. We will tell you how to do this further.
What could cause the handbrake to not work correctly? The problem can occur for various reasons and here are some of the most common:
- Driving a car “on the handbrake” - if the driver does not fully lower the lever once, the brake pads begin to wear out much faster. As a result, the cable has to be tightened.
- Mechanical damage to the cable - given that the cables are located under the car and are constantly exposed to aggressive environmental influences, they can wear out quite intensively and even break. The problem is solved by replacing the cable on the Lada Kalina.
- Failure of the ratchet mechanism - the malfunction is eliminated by disassembling and replacing worn parts.
You can fix each of these breakdowns with your own hands in a garage. But in this article we will only talk about how to tighten the handbrake cable on Kalina or, if necessary, replace it.
Adjust or change?
To determine whether the parking brake can be adjusted or whether it is better to install a new one, remember how long ago you replaced the brake pads and drums on the rear. On average, replacing rear pads is necessary every 50–80 thousand km, but the frequency also depends on driving style. If the pads are worn too much, the parking brake will not be effective (as will the braking system of the car as a whole) . Inspect the pads: if their thickness is less than 1.5 mm, urgent replacement is needed. Also, try opening the pads manually with a screwdriver. They should be separated without excessive force.
If the thickness is within acceptable limits, pay attention to the brake drum. Measure its diameter with a caliper. If the value is above 20 cm, the drum must be replaced with a new one.
If you notice scuffs, cracks, or severe corrosion on the pads or drum, replace the damaged parts. It is not recommended for an inexperienced motorist to try to restore components.
If all the inspected components of the car are in order, but the parking brake still does not work, the problem lies in the cable. If it breaks, the handbrake will lift without any effort - in this case, the part definitely requires replacement. You can tighten the cable with your own hands, but if it is already raised to the maximum and tightening is impossible, you should go for a replacement.
There is another sign that it’s time to adjust the parking brake: when you tighten the handbrake, you hear less than two or more than four clicks of the lock. During operation, the number of clicks can be increased to six.
Replacing the cable
It is clear that before changing the cable, you need to purchase a new one. The original of this element is desirable, and not a cheap counterfeit, which abounds in the modern automobile market. A cheap cable may not be exactly the same length and, moreover, of poor quality, which will lead to its rapid wear - that is, stretching.
In order not to turn your leisure time into an eternal repair of the car’s brake system, you need to make the right purchase in a specialized store. How to change the cable:
- Secure the front wheels with chocks to prevent them from rolling away.
- Jack up the rear wheels and install the rear axle of the car on trestles.
- Using a size 7 wrench, unscrew the two screws securing the brake drums.
- Turning both screws over and screwing them back in place will help remove the drums. Having removed them, you need to do a thorough inspection of not only the pads and drums, but also the working brake cylinder: it should not leak and have intact boots. Pistons in good condition move freely without jamming.
- The hand brake cover is removed. It needs to be unscrewed again.
- Remove the muffler mount and move the casing forward.
- Unscrew the nut and locknut completely and remove the bar.
- Knock the pressed cables out of their seats.
- Remove the fuel line protection cover by unscrewing the three nuts.
- Install a new cable.
- Next, the pads are installed in place along with the spacer bar and the upper return spring. When installing the pads, you need to make sure that their upper ends fit into the slots in the brake cylinder.
- The lower return spring is put on.
- The drum of each wheel is put in place and screwed on.
The wheels are installed in place. The cable tension is adjusted.
Often, poor parking brake performance occurs due to uneven distribution of load on the rear drums. Often, a break in the handbrake braid allows moisture to get inside the cable braid, which leads to increased corrosion and jamming of the latter. To prevent this from happening, you need to periodically inspect it and, if necessary, restore damaged insulation.
A working handbrake can also be useful in the event of a failure of the main brake system. Of course, braking with the parking brake will not give the same effect, but if necessary, it will at least somehow slow down the car and help avoid an accident.
Accident-free driving and good luck on the roads!
conclusions
Heavily worn parking brake cable
The cable on the Lada Kalina must be tightened every 40,000 km in accordance with the service data. But, as practice shows, this can be done earlier. For example, one or two trips with the handbrake and the cable will have to be tightened, and in the worst case, replaced.
Lada Kalina is equipped with a classic version of a cable-driven parking brake. The parking brake allows you to lock the vehicle in a stationary position on a flat surface or slope. The hand brake can be used during emergency braking. The “handbrake” is able to replace the foot brake if the latter fails. In this article, we will tell you how to tighten the handbrake on Kalina. Read more: M 11 new tariffs
How to understand that the handbrake needs adjustment
Component diagnostics should be performed approximately once a month. If you use your car actively, check the handbrake every 30,000 km. The process of studying the condition is not difficult, so it can be carried out more often, at the slightest sign of a malfunction.
Self-diagnosis is performed in two ways.
- Raise the car up a steep slope and tighten the lever as tight as possible. Did the car remain motionless? The handbrake is fine. If it doesn't stop, apply the brake fully. Is the car still moving? The brake needs urgent repair or adjustment.
- Pull the handbrake all the way and engage first gear. Smoothly lower the clutch pedal. If everything is fine with this part of the car, the engine will stall. If there is a malfunction, the car will move slowly.
This is what the parking brake cable looks like. It is this that often needs adjustment or replacement.
Signs of a parking brake problem
When the handbrake breaks down, the problems manifest themselves as follows:
- the car does not maintain a fixed position on a flat or inclined horizontal plane, rolls forward or backward;
- The handbrake control lever cannot be set to its original or working position.
You can check for breakdowns in the parking brake system without trying to secure the car with the handbrake on a slope. You need to start the engine, engage first gear and move the parking brake handle to the extreme working position. Now you need to gradually release the clutch pedal; if the engine stalls, the handbrake is working; if the car starts to move slowly, there is a problem with the described unit.
Malfunctions force you to tighten the brake cable or change it. Cables are usually sold in sets of 2 pieces. The price of the kit for Kalina does not exceed 500 rubles. It is believed that if a car rolls down on a slope of 25%, then the cable needs to be replaced with a new one.
Correct exit procedure, example
If, when putting Kalina on the handbrake, the red indicator lamp (P) does not light up on the dashboard, most likely the handbrake limit switch is faulty and needs to be replaced. Although this problem does not happen often, it does occur for some owners. So let’s look at the procedure for replacing this part below, in detail with photographs.
First, we raise the lever up so that it does not interfere with us. Then unscrew the three screws with a Phillips screwdriver that secure the plastic cover:
After that, we remove this cover by simply moving it back, and now we have access to all the necessary construction:
Now you can directly begin removing the “frog” or the so-called Kalina handbrake limit switch; here you will need to unscrew just one small screw, again with a Phillips screwdriver, only with a slightly smaller blade:
After the bolt has been unscrewed, you can remove the end switch from its seat, turning it a little, since it is curved. Now we bend the plastic latch and disconnect the plug with the power wires, as shown in the photo below:
Reporting a malfunction
The battery icon lights up if the voltage in the on-board network drops; often this problem is associated with a lack of battery charge from the generator, so it can also be called the “alternator icon”. On vehicles with a hybrid engine, this indicator is supplemented by the inscription “MAIN” at the bottom.
The oil icon, also known as a red oil can, indicates a drop in the oil level in the car engine. This icon lights up when you start the engine, and does not go out after a few seconds or may light up while driving. This fact indicates problems in the lubrication system or a drop in oil level or pressure. The oil icon on the panel may have a droplet or waves at the bottom; on some cars the indicator is supplemented with the inscription min, senso, oil level (yellow inscriptions) or simply the letters L and H (characterizing low and high oil levels).
The airbag icon can light up in several ways: either the red inscription SRS and AIRBAG, or “a red man wearing a seat belt,” with a circle in front of him. When one of these airbag icons lights up on the panel, the on-board computer notifies you of a malfunction in the passive safety system, and in the event of an accident, the airbags will not deploy. Read the article on the website for the reasons why the airbag sign lights up and how to fix the problem.
The exclamation mark icon may look different and its meaning will accordingly be different. So, for example, when the red (!) light is on in the circle, this indicates a malfunction of the brake system and it is advisable not to continue driving until the cause of its occurrence is determined. They can be very different: the handbrake is up, the brake pads are worn out, or the brake fluid level has dropped. A low level is precisely what poses a danger, because the reason may not only be in heavily worn pads, as a result of which, when you press the pedal, the fluid disperses throughout the system, and the float gives a signal about a low level, the brake hose may be damaged somewhere, and this is much more serious. Although, very often the exclamation mark lights up if the float (level sensor) is faulty or shorted, and then it simply lies. On some cars, the exclamation mark is accompanied by the words “BRAKE”, but this does not change the essence of the problem.
An exclamation mark can also light up in the form of an “attention” sign, both on a red and yellow background. When the yellow “attention” sign lights up, it informs about a malfunction in the electronic stabilization system, and if it is on a red background, it simply warns the driver about something, and, as a rule, explanatory text is displayed on the dashboard display or combined with other informative text designation
How many liters of coolant are in the Lada Priora cooling system
Before replacing, it is necessary to determine how much antifreeze to fill. According to the passport, the empty system on the Priora contains about 7.84 liters of liquid. However, when replacing, some of the liquid cannot be drained, as a result of which about 6-6.5 liters are often sufficient for replacement.
Taking into account the fact that antifreeze or antifreeze is often sold in the form of a concentrate, the general rule is:
- mixing the concentrate in a ratio of 50:50 (50% antifreeze and 50% water);
- mixing in a ratio of 60:40 (60% antifreeze and 40% water);
These proportions make it possible to obtain the freezing point of the coolant at around -30 or -35 degrees Celsius, which is quite enough for most regions.
It turns out that for replacement you need to purchase 4 liters of concentrate and 4 liters of distilled water. Ready-made antifreeze for Priora will be obtained with a small reserve. This reserve must be drained into an airtight container and stored, since the liquid will be useful for refilling in the future.
Let's sum it up
The assembly process, after the cable has been replaced, does not present any particular difficulties, so it does not make much sense. The sequence of actions itself is the reverse of the dismantling procedure. Before installing the ends of the cable branches into the mounting holes on the brake shields of the Lada Kalina, do not forget to clean these openings from any dirt accumulations. This will make it much easier to insert the tips. After completing the assembly procedure, it is necessary to adjust the unit, remembering to achieve the required number of clicks on the lever and check the operation of the handbrake under road conditions.
Removing and installing the cable
- First of all, the car is prepared for work.
- Next, the brake drum shields and protective screen are dismantled and the lock nut is unscrewed.
- Afterwards, the adjusting screw is removed from the rod and the equalizer is removed from the cables.
- On the left rear wheel there is a brake mechanism, from which you need to remove the cable earring with a slotted screwdriver.
- Then, using a 10 mm spanner, unscrew the nut of the handle securing the cable to the left arm of the rear suspension, after which it can be carefully disconnected.
- The second element is removed by analogy.