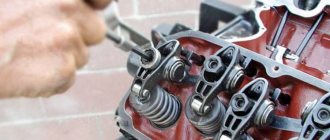
Despite the simple design of the engine valves and oil seals, these elements perform important work, without which the normal functioning of the power unit is impossible. The efficiency of the engine directly depends on the correct operation of the valves: power, toxicity, fuel consumption. Therefore, their integrity, like the adjustment of gaps, is very important.
- Adjusting valves on a VAZ 2105
When and why is valve adjustment necessary - Adjustment Tools
- Adjustment procedure
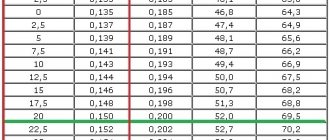
Table: adjusting the thermal clearance of VAZ 2105 valves
- Video: adjusting valves using the example of a VAZ 2105 with a belt drive
- What are valve seals used for?
Video: replacing oil seals on classic VAZ models
- Replacing the valve cover gasket on a VAZ 2105
Purpose of valves in the VAZ 2105 engine
In the VAZ 2105 engine, as in any other internal combustion engine, valves are an important element of the gas distribution mechanism. On the “five”, the power unit uses 8 valves: for each cylinder there are 2 valves, the main purpose of which is the correct distribution of gases. By means of clans, a mixture of fuel and air is supplied to the combustion chamber through the intake manifold and exhaust gases are discharged through the exhaust system. If a breakdown occurs with any valve, the operation of the gas distribution mechanism, as well as the entire engine as a whole, is disrupted.
Valves located in the cylinder head ensure the supply of the fuel-air mixture to the combustion chamber and exhaust gas removal
Necessary tool
If you know the sequence of work and have the necessary tools, adjusting the VAZ-2105 valves with your own hands is not difficult. As for the tool, you will need:
- Special key for turning the crankshaft;
- Open-end and socket wrenches (for 8, 10, 13, 17);
- Flat screwdriver;
- Probe with a thickness of 0.15 mm;
- To perform the work, you will need a special wide probe, designed specifically for adjusting valves on VAZ cars.
Timing marks on the injection VAZ 2107
The gas distribution mechanism and its drive of the seven engine produced by the Volzhsky Automobile Plant remained the same - chain. Extraction and excessive wear of the timing chain on the VAZ 2107 power unit by the injector-type power supply system leads to:
- difficulty starting the engine;
- unstable operation in all modes, especially at idle;
- a sharp increase in fuel consumption;
- formation of carbon deposits on valve seats;
- Damage to the injection control system sensors and catalytic converter may occur.
In order to avoid the negative consequences of weakening or stretching the chain drive of the VAZ 2107 car engine, it is necessary to carry out routine maintenance in a timely manner. The list of maintenance operations for the power unit with the injector power system is determined by the service book. The condition of the timing chain and the gaps between the camshaft cams and valve levers is monitored every 30 thousand km.
On warranty VAZ 2107 with an injector-type power system, such work is best carried out at an authorized auto repair center. If malfunctions occur due to the fault of the car plant, they will be eliminated at the expense of the manufacturer. At the end of this period, maintenance of the timing belt and other vehicle systems can be performed independently.
Let's get down to business
Adjusting the gaps with a lever
The procedure for adjusting the VAZ 2105 valves is as follows. When the crankshaft and camshaft rotation angle is 0 degrees, the sixth and eighth valves are adjusted to the third and fourth cylinders. The next turn of the crankshaft by 180 degrees and the camshaft by 90 degrees on the second and fourth cylinders - the fourth and seventh are adjusted. Then, at 360 and 180 degrees, the first and third valves are adjusted to the first and second cylinders. Finally, at 540 crankshaft degrees and 270 camshaft degrees, the fifth and second valves are adjusted to the third and first cylinders.
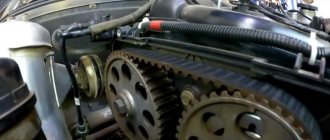
First you need to tighten the chain. To do this, the valve cover is removed and marks are set, and the counting of the holes must begin from the camshaft sprocket. When working, it is advisable to use a VAZ wrench and washers for adjustment. The piston of the fourth cylinder must be set to the TDC position. As soon as one pair is adjusted, the engine must be turned half a turn and the same operations must be carried out with the second. The mark on the sprocket and on the cover are aligned, as well as the mark on the pulley with the marks on the chain cover on the drive. The valve timing will then be set correctly. We adjust the phase as necessary until the marks coincide. After installing the piston 4 of the cylinder at TDC 8 and 6, the valves will be closed.
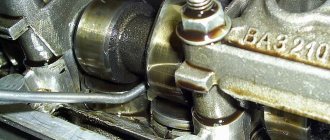
We tighten the camshaft drive chain. The locknut on the adjusting post is released with the lower wrench, after which the tension is changed with the upper wrench. The feeler gauge should fit tightly into the small gap between valve cam 8 and the lever. Then the locknut is tightened, but without overtightening. Then valve 6 is adjusted. You will need a key to turn the crankshaft 180 degrees, but if you don’t have a tool, you can roll the car until the marks match.
Then valves 4 and 7 are adjusted. How to adjust them better? The distributor slider will best show how the camshaft turns. If you take the sprocket hole between the two sides of the bed as a guide, you can also trace the position of the crankshaft. If after one turn the hole is not visible, then you need to focus on the slider.
At the end, you need to check the condition of the sealing gasket between the head and the head cover and reassemble the parts. At the end, the valve cover is installed, and this is where the independent adjustment of the valves of the VAZ 2105 car ends.
You will have to adjust the valves if the gas distribution system has been repaired before. Also, adjustment should be done when a characteristic irregular knocking sound with a metallic echo appears emanating from the cylinder head.
In addition to the usual tools, you will have to use a feeler gauge and a wrench specially designed for adjusting valves, which allows you to turn the engine crankshaft.
After removing the cover from the cylinder head, it is necessary to bring the piston of the fourth cylinder to top dead center. To do this, there are marks on the cover on the camshaft sprocket and the drive cover. Also check the marks on the crankshaft pulley and camshaft chain cover. At this moment, valves 6 and 8 should be closed. Now you will need a feeler gauge that will show the distance from the cam to the valve lever 8. The gap is adjusted with a special bolt.
The clearance of valve 6 is also adjusted, after which the crankshaft is rotated and valves 4 and 7 are adjusted.
After completing the adjustment, be sure to check the cylinder block cover gasket, which should be firmly in place.
This is a rather complicated procedure, which is best carried out under the guidance of a more experienced technician and be sure to use instructions that will help you avoid further engine malfunctions.
Timing marks on a VAZ 2107 car injector
Both on the carburetor engine of the VAZ 2107 car and on the injection engine, the gas distribution mechanism along with the drive remained the same, that is, chain. With excessive wear and stretching of the chain, a number of the following negative consequences are observed:
- Problem starting the engine.
- Significant increase in fuel mixture consumption.
- The appearance of carbon deposits on valve seats.
- Abnormal motor operation in all modes.
- Malfunction of the injection control sensor.
To avoid such negative consequences, it is necessary to carry out preventive work in a timely manner. We will learn more about how to set timing marks on a VAZ 2107 Lada family car with an injector power system.
Getting started and disassembling
Before starting work related to adjusting the thermal clearances of the valves, it is necessary to prepare the engine, tools and related materials.
Secure the car with the handbrake and move the gearbox to neutral. For safety reasons and to prevent independent movement, additionally install shoes under the wheels. Open the hood and check the engine temperature, which should be approximately 20 degrees to carry out the valve adjustment process.
As an exception, there is a correction table for valve clearances depending on engine temperature, but given the unpredictable deformations of the metal structure, we recommend adjusting at the temperature specified in the manufacturer's instructions. It is at a temperature of 20 degrees that the metal structure is in a stable state, without noticeable thermal linear expansion or contraction (negative temperatures).
Before disassembling parts and assemblies to provide access to the valve regulation operation, turn off the power to the on-board electrical network of the machine by disconnecting the negative terminal of the battery.
Further operations for preparing the gas distribution mechanism of a carburetor engine differ from those of an injection engine.
On a carburetor engine:
- Unfasten the retaining spring latches of the air filter housing cover or unscrew the wing nut;
- Remove the cover and put the air filter element aside;
- Using an “8” socket or an open-end wrench, unscrew the four nuts holding the air filter housing on the top of the carburetor and move it to the side, separating it from the crankcase ventilation pipe;
- Remove the carburetor choke drive cable by partially unscrewing the half-clamp holding the cable sheath and the cable rod clamp;
- Using a slotted screwdriver, unfasten the plastic ends of the accelerator pedal drive on the carburetor and, by removing the locking ring from the drive axis mounted on the valve cover, remove the rod.
On an injection engine:
- Remove the limiter (in the form of a bracket) for spontaneous release of the cable from the throttle linkage groove.
- Turn the throttle linkage counterclockwise and pull the cable tip to the side;
- Unscrew the two bolts holding the accelerator cable assembly bracket with a 10mm head;
- If there is an adsorber, remove the connector on the purge valve;
- Loosen the clamps on the air duct and gas ventilation pipes, unscrew with a “10” head the bolt securing the plastic sleeve of the pipes on the valve cover and remove them;
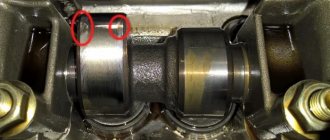
Using a “10” socket, unscrew the eight bolts securing the valve cover and remove it from the block head. Inspect the parts of the gas distribution mechanism for damage and the condition of the springs.
All valve train parts
1 - valve;
2 - retaining ring; 3 - guide sleeve; 4 — oil deflector cap; 5 — support washer of the outer spring; 6 — support washer of the internal spring; 7 — internal spring; 8 — outer spring; 9 — spring plate; 10 - crackers; 11 — valve drive lever; 12 — lever spring; 13 — adjusting bolt; 14 — lock nut of the adjusting bolt; 15 — bushing of the adjusting bolt; 16 — locking plate of the lever spring. vote
Article rating
Blog of Valery Imenov
My notes. I'm not a blogger or a writer, but sometimes I want to share some information with the world or comment and express my point of view.
Thursday, June 9, 2016
How to set valve overlap in a classic VAZ engine
| Split timing gears VAZ classic |
| Fan set of styli |
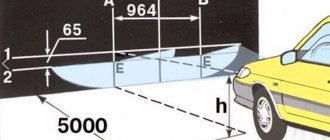
- 1. We align the crankshaft exactly according to the mark; the mark on the standard camshaft sprocket will be located near the boss on the RV housing.
| Marks corresponding to the position of the crankshaft at TDC (injector) |
| Valve clearance setting |
- 4. Rotate the crankshaft again, aligning it with the mark; the mark on the camshaft sprocket will again be located near the tide on the RV housing.
- 5. We check the gaps on both valves of the 1st cylinder using feeler gauges of different thicknesses; for example, we get gaps of 0.1mm inlet and 0.3mm exhaust.
- 6. By minimally rotating the crankshaft a few degrees in both directions, we ensure that the gap on both valves becomes the same - 0.2 mm, this is the valve overlap point.
- 7. Loosen the screws on the split gear, now its outer part can be moved by rotating together with the crankshaft, while the camshaft will remain motionless. In this position, we set the crankshaft as accurately as possible according to the mark at TDC or, if necessary, shift it to set it ahead or behind. During these manipulations, the camshaft must remain motionless at the previously determined overlap moment.
- 8. After tightening the screws on the split gear, rotate the crankshaft 1 turn and adjust the valves, bringing the valve clearance to factory recommendations.
| An easy way to adjust a split gear based on valve overlap |
| Tuning camshaft Estonian+ |
:
The problem with RV 21213 is that there are different heights of the intake and exhaust cams.
Execution Sequence
Remove the air filter cover, remove the filter and unscrew the four nuts securing the air filter housing to the carburetor. Remove the air filter housing and cover the carburetor with a clean, lint-free cloth.
Disconnect the throttle linkages and the carburetor choke cable. Remove the timing belt protective cover. To make it easier to crank the engine, you can also remove the spark plugs.
Set the piston of cylinder 1 to TDC. To do this, you need to align the mark located on the crankshaft pulley and the long mark on the front engine cover. In this case, the mark on the camshaft pulley and the ebb on the valve cover must also align. If these marks are not aligned, turn the crankshaft one more revolution.
On the 03 engine, the 4th cylinder is installed on the compression stroke.
Unscrew the 8 nuts and remove the top cylinder head cover. The cover gasket must be replaced, regardless of its condition, to avoid oil leakage.
When installing 1 cylinder at TDC, the clearance of valves 1 and 3 is checked and adjusted. To do this, insert the feeler gauge between the rocker arm and the camshaft cam; the feeler gauge should fit tightly, with slight pinching.
If the dipstick dangles or does not fit in, loosen the locknut with a 17 wrench, holding the adjusting bolt with a 13 wrench. Then rotate the adjusting bolt to set the desired gap.
After adjustment, rotate the crankshaft 180 degrees and adjust valves 5 and 2. Rotate the crankshaft another 180 degrees and adjust valves 8 and 6.
Rotate the crankshaft 180 degrees again and set valve clearances 4 and 7.
The sequence for adjusting engine valves 03 is shown in the table.
The correct adjustment must be carefully checked several times. If the adjustment is carried out correctly, the knocking of valves on a warm engine should completely disappear.
A feature of VAZ cars belonging to the “Classic” category, namely the VAZ-2101-2107 model, is the use of power plants that are structurally very similar. The engines of these models differ mainly in some technical characteristics. Thanks to this, many perform maintenance and repair work themselves.
For stable operation of the power unit of these cars, periodic adjustment of the valves is required. It is worth noting that this operation for VAZ “Classic” engines is performed by adjusting the gap between the valve drive lever and the camshaft cam. Since on the “Classic” this operation is performed the same way for different models, let’s consider the sequence of work using the example of one model – VAZ-2105
The adjustment can be carried out both on a cold engine and on a warm one; for this, a 0.15 or 0.20 mm probe is used, respectively.
But for more precise adjustment of the valves, work must be carried out on a cold engine.
How to adjust the gap between the valve and the cylinder block?
- We use a probe with a thickness of 0.15 (mm). It should fit under the valve with a slight tension (neither strong nor weak). If the dipstick falls into the gap or, on the contrary, does not fit, then from this moment the adjustment of the valves on the VAZ 2105 begins.
- We loosen the lower lock nut with one key, and with the second key we turn the valve stroke screw (up or down, depending on the result of checking with the feeler gauge).
- Tighten the locknut without much fanaticism.
- We do a control check with a feeler gauge at 0.15 (mm).
I hope the instructions are clear and understandable.
Additional Information
After adjustment, we assemble all the engine elements into place (valve covers, timing belt cover, air filter housing).
We make a test drive and listen to the sound. At this point, independent maintenance of timing valves can be considered successfully completed.
Please note that the VAZ 2105 is a classic of the bygone Soviet automobile industry. The classic line also includes the VAZ 2101, VAZ 2102, VAZ 2103, VAZ 2104 and VAZ 2106. Starting with the VAZ 2107, cars use an injection system for preparing the combustible mixture. That is, seven is no longer a classic. The procedure for adjusting valves 2105, as well as 2101, 2102, 2103, 2104 and 2106, is completely the same. That is, the classics are configured according to the same principle.
Starting from the VAZ 2107, you need to configure the timing in a different way. Valve adjustment on the VAZ 2107 is carried out at a more subtle level. Only a properly qualified car mechanic can handle this work. Without solid experience in handling vehicles, it’s better not to go into the timing belt of VAZs, starting with the seven. It’s easier to take the car to the nearest service station.
I hope the article on how to adjust valves on a VAZ 2105 was useful. Have smooth roads and fewer breakdowns.
Video on the topic: Do-it-yourself valve adjustment on a Zhiguli
Adjustment device
Do-it-yourself adjustment of VAZ 2105 valves is carried out in the same way as on cars of other models, for example, 2107 or 2109. You need to stock up on 0.15 and 0.2 mm feeler gauges. The work can be carried out on a cold or even hot engine, but the first option is preferable.
In this case, the gas distribution phases will work more accurately, and gasoline will burn more efficiently. If the adjustment is carried out on time, the engine will run cleaner, there will be no knocking, and the service life of the VAZ 2105 valves will increase. All operations can be performed with your own hands.
Many car owners know how to adjust valves. It is necessary to set the gaps correctly. If they are less than normal, they may burn out. The valve tries to seat itself in the head seat, but the gap located between the drive lever and the cam prevents it from doing so. Gases break through from the chamber, and if their temperature exceeds 2000 K, they burn out the edge of the exhaust valve and quickly seat the seals. As a result, the oil becomes clogged.
Engine valves need to be adjusted constantly. It is advisable to do this every 15 thousand kilometers, so as not to spend money on repairing your VAZ 2105 later.
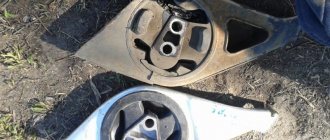
Valve stem seals
Oil seals, which are also called valve seals, primarily prevent oil from penetrating into the combustion chamber of the engine. Like other parts of the power unit, the caps wear out over time, which affects their efficiency. As a result of wear, the oil seals begin to leak oil. This leads to increased lubricant consumption and other typical problems.
What are valve seals used for?
The timing mechanism uses two types of valves: intake and exhaust. The top of the valve stem is in constant contact with the camshaft, which causes a mist of engine oil to form. The reverse side of the intake valve is located in the area where there is a suspension of fuel droplets, and the exhaust element is located in the area of hot exhaust gases.
The camshaft cannot operate without a constant supply of lubricant. However, oil getting inside the cylinder is an undesirable process. It was precisely in order to prevent the penetration of lubricant into the combustion chamber that valve stem seals were created. The design of the oil seal is such that with its help, during the reciprocating movement of the valve, oil is removed from the stem.
Which valve stem seals to install on a VAZ 2105
If it is necessary to replace valve seals on the “five”, a related question arises - which caps to choose so that they last as long as possible? Based on the experience of many motorists, preference should be given to manufacturers such as Elring, Victor Reinz and Corteco.
What causes wear on oil seals?
To understand the possible consequences of operating an engine with worn valve seals, it is worth considering the signs of their failure. It is necessary to think about the fact that the caps have become unusable and require replacement in the following cases:
- blue smoke when starting the engine, and disappears as it warms up;
- carbon deposits on spark plugs;
- increased oil consumption.
The first sign indicates that a worn cap allows oil to pass through when cold, and after the engine warms up as a result of expansion, the part is able to perform its functions. The appearance of carbon deposits can be associated not only with valve seals, so you will need to perform engine diagnostics to accurately determine the problem. It is worth considering that the average service life of the cuffs is about 70–80 thousand km. If after such a run signs of wear appear, then the likelihood that the problem lies with them increases.
Some car owners do not attach much importance to the signs of faulty sealing elements and, in fact, in vain. Despite the fact that the car still drives and no noticeable problems arise, serious problems with the engine are possible in the future. Take oil consumption, for example. When it increases, the engine becomes “oil starved,” which leads to premature wear of parts, after which major repairs are required. In addition, motor lubricant is not that cheap. If you need to constantly add oil, this will not have the best effect on your budget.
If oil constantly enters the combustion chamber, the spark plugs fail prematurely, which negatively affects the operation of the power unit. In addition, carbon deposits form not only on spark plugs, but also on valves, pistons, and cylinder walls. What does this mean? The most common problem is burnt out valves. From this we can conclude that wear of the cuffs can lead to serious consequences and considerable financial costs. Therefore, if signs of wear on the seals are detected, do not delay replacing them.