For experienced drivers, systematically adjusting valves becomes a habit - this procedure has such a strong impact on the efficiency of the engine. It is the motor valves that play the leading role:
- in precise regulation of the supply of air-fuel mixture;
- in timely and complete evacuation of exhaust gases from the cylinders.
The slightest dissonance in these processes will inevitably lead to failures in the operation of hub transport systems and their costly repairs. In addition to the obvious loss of power, increased fuel consumption and exhaust toxicity, a car enthusiast may face a complete loss of engine functionality!
That’s why timely and competent checking of the valves’ performance status is the main way to avoid their radical destruction, leading to irreparable wear of the engine and its systems.
How often should the gaps be adjusted and what size should they be?
Valve adjustment intervals are not defined. They depend on many factors: car and engine make, operating mode, mileage, etc. For each engine, the automaker indicates their value in the technical documentation or on its official website.
As an example, here is a table of clearances established for HONDA GX engines
The gaps are small. They do not exceed tenths of one millimeter. Usually they range from 0.09-0.4mm. They are determined using a probe. As a rule, these are sets with increments of five hundredths of a millimeter. It should be borne in mind that the clearances on the intake valves are usually smaller than on the exhaust valves. This is explained by the fact that the latter heat up much more, therefore the gaps in them are larger.
As for the frequency of inspection, there are average intervals accepted by the practice of operation and maintenance of engines. For screw adjustment, an interval is taken every 10-40 thousand km, and for adjustment using washers and pushers - 20-100 thousand. Check intervals depend on many circumstances, for example, when the engine operates under heavy loads and in extreme conditions, it is better to make adjustments more often .
How to properly break in an engine after a major overhaul: recommendations
Perhaps, when running in a repaired engine, you need to follow the same rules as when operating a new, recently purchased car. The engine oil must be mineral oil, otherwise the break-in period will double. And in general, before the first start, it doesn’t hurt to measure the compression - it will become clear what to expect from the “new” engine. In general, after a major overhaul, only a specialist can properly break in the engine. But using standard rules, you can carry out this process yourself, even with some difficulties...
It happens that after the capital, white smoke comes out of the chimney. Let's look at the video.
Before the start
When releasing a new car, the manufacturer could pour “mineral water” or “semi-synthetic” into the engine. The same should be used during break-in. Do you want to remove the coating layer in the cylinders? Then you can immediately fill in synthetics, “hydrocracking” and the like.
Viscosity of “synthetic” and “mineral” at 100 C
If the pressure is reduced, the running-in is stopped immediately. By the way, before the start you can check the oil level on the dipstick.
The lamp with the “oil can” should go out 5-6 seconds after starting the engine.
First launch after capital
Keeping the engine at “warm-up” speed for a long time is not at all advisable. The optimal range would be 1500-2500 rpm. And, by the way, try to avoid flooding the spark plugs with fuel.
Lamp "Insufficient oil pressure"
So, in order to break in the engine after a major overhaul, you need to start it. And turn it off almost immediately! Our goal is to ensure that the oil can goes out.
Launch number two
After the first start-stop, check the following:
- Are there any fuel leaks - the smell of gasoline may appear under the hood or near the sofa;
- Oil should not leak either - look at the road surface under the engine.
We carry out the next start, bring the temperature to maximum, and turn off the ignition again. We are looking for leaks a second time.
Tips for proper engine break-in
Firstly, let’s discard attempts to use the ECO mode with an automatic transmission: in order to save fuel, the transmission will engage high gears as early as possible! Sport mode, on the contrary, can be used, but there won’t be much difference with or without it. We are not going to spin the engine above 2500 rpm.
Let it be better “Sport”
A lean mixture is not needed during break-in. So it’s better not to use the ECO mode with a manual transmission either... In general, after a major overhaul, running in the engine will be easy: you need to do everything that you would do after buying a new car with the same engine.
The break-in period is usually 2000-2500 km.
What not to do
- Do not open the throttle even 1/2 – the gas pedal should move in the range of 0-50%;
- Acceleration will be slow: bring the gas to 50%, wait for a constant speed to be established, then engage the next gear;
- Don't use cruise control!
- If extraneous noise appears, overheating begins, or one of the light bulbs lights up, there is no need to despair. It will be enough to turn off the engine, cool it a little and continue the trip again.
Case from practice
The engine “smoke” after repair, and the mechanic says something about grinding in the valves, about changes in the properties of the oil and that all problems will go away on their own... Such statements must be answered with the question: can a new car “smoke”? If oil is consumed, it means the valves are not ground in. But it’s not a fact that they will get used to it after the first “thousand”.
This shouldn't happen
As for oils, everything is clear: even on engines where only synthetics are suitable, during break-in they use material without modifiers. We are talking about break-in oils. And nothing should smoke when using them.
Ideally, everything looks like this:
- Replaced (rebuilt, repaired) the engine;
- When they started it, it “smoked”, and even a lot;
- The engine ran for 20 minutes, and the revolutions could reach up to 3000. And the problem gradually disappeared.
Anything else will be a “deviation from the norm.” And perhaps this deviation is caused by some defect.
Another smoking engine on video
Adjustment with washers
In cases where adjustment should be carried out not with a screw, but with a washer, which is typical for most front-wheel drive cars, the operations are similar to adjusting VAZ valves. Those. the crankshaft is rotated until the marks coincide. The gap is selected using a washer with the appropriate marking.
Depending on the need to increase or decrease the gap, a washer of a certain size is selected. If there is no marking, then a caliper or micrometer is used.
Is it necessary and why to adjust the valves on a car? Details + video: What are pushers
| Adjusting valves in a car: just the important things. Valve adjustment: why it is needed and how often it needs to be done Determining the dynamic characteristics of the control object without self-leveling Let's consider a system with conventional pushers, which are now very popular on many cars; it is this system that needs adjustment at a certain interval. They also easily compress when impacted, and also stubbornly continue to strive in all directions equally, obeying Pascal’s law, which means they are not in a hurry to move to where they are asked. |
| How often do you need to adjust valves - Auto repair school Before cleaning the VAZ 2107 carburetor and further tuning it, you must clearly understand that you should not disassemble those elements that normally perform their functions. At this point, the adjustment of the VAZ 2107 carburetor can be considered complete, now I hope you will not have any problems with how to adjust the carburetor with your own hands. |
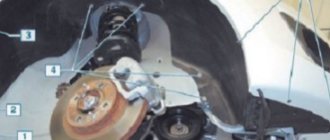
- after installing a new ball joint
- when replacing the steering rack or steering tip
- after replacing and installing a new CV joint
The main signs of incorrect work • In this case, the valve does not open completely, the exhaust gases do not have time to fully escape, hence the loss of engine power.
Consequences of untimely adjustment
It is known that untimely carrying out any operation to repair and maintain a car entails certain consequences, which can be, in one case, mild, and in another, fatal for the power unit. So, let's look at the main ones:
- Worn parts and assemblies of the cylinder head, namely the gas distribution mechanism.
- Wear of camshafts.
- Partial or complete destruction of pushers.
- In a separate case, it leads to a timing belt break and corresponding consequences, such as replacing the timing belt. The valves on the VAZ-2114 do not bend!
Consequences of incorrect thermal clearance
It happens that on a particularly cold day, when the engine is not warmed up, extraneous noise appears: a quiet clicking of metal. Normally, the sound gradually stops as the engine warms up.
If the clicking continues in this state, this is a signal that the thermal gap of one or all valves at once is too large. Such a defect is fraught with not only an unpleasant sound! The valves are forced to remain open for too short a time, which leads to:
- to interruptions in engine operation;
- to a decrease in efficiency;
- to problems starting the engine.
In the worst case, detonation combustion can destroy the engine.
A gap that is smaller than necessary is still a big “evil” for the engine! Heating the cylinder to operating temperature (600-900 degrees Celsius!) expands the metal, eliminating the too small gap.
As a result, efficiency decreases, fuel consumption increases, and the conical chamfers on the valves/seats begin to burn out.
Screw adjustment procedure
In order to explain how valves are adjusted, you can turn to the classics and consider adjusting the valves of the VAZ2107.
Typically, the need to regulate valves arises when there is a sharp drop in the power of the internal combustion engine and the appearance of characteristic metallic knocks at low or high speeds. Allow the engine to cool before starting the activity. All work must be carried out on a cold internal combustion engine. The valves in the power unit of this model are opened by transmitting pressure to the lever rod, which is moved by the camshaft's eccentric cam. The gap that is subject to regulation is the gap formed between the cam in the place opposite the eccentric and the lever itself.
When carrying out work, follow the table.
Direct adjustment begins with setting the piston of the fourth cylinder to TDC. This is a state of compression. At this point both valves are closed. Then the crankshaft is rotated until the mark on the sprocket meets the mark on the body. For control, a 0.15mm probe and two keys are used - 13 and 17.
Work order:
– the probe is inserted into the space between the cam and valve lever No. 6 in turn; – if it is inserted with force, then this is normal; – if it dangles or, on the contrary, gets stuck or it is impossible to push it in at all, then adjustment is required; – decreasing or increasing the size of the gap is carried out by fixing the adjusting bolt, releasing the lock nut and turning the bolt. In this way, valves No. 6 and 8 will be adjusted.
The same manipulations are carried out for each valve by turning the crankshaft each time at an angle of 180° from the previous point, which corresponds to turning the camshaft by 90°. At each such turn, the following valves are measured and, if necessary, adjusted:
– 180° – №№4, 7; – 360° – №№1, 3; – 540° – №№5,2.
The regulation procedure is observed in strict sequence. If it is violated, then all settings of the gas distribution system will be lost. If you have sufficient skills, adjusting the valves yourself does not cause any difficulties. The issue price is 0 rubles.
What types of adjustments are there?
Automatic gap setting
Most modern cars are equipped with hydraulic compensators. These are devices that are responsible for maintaining the thermal gap by using engine oil pressure. The hydraulic compensators themselves do not require any adjustments. The main thing is to ensure that they are not clogged with dirt and are always in working order. You must understand that if the malfunction of this device was not detected in a timely manner, then it is assumed that the gap adjustments could have gone wrong, so it is better to check them and, if necessary, restore them.
Adjustment with screws
A method of adjustment using special screws without using any additional parts, and in the vast majority of cases, disassembling the cylinder head is not required.
Adjustment with washers and pushers
A common, but rather complex method of adjusting gaps. The problem is that in order to set a new gap, the pusher must be removed and a new one of the appropriate size installed in its place. This may require disassembly and removal of the camshaft.
How does a camshaft work?
If we compare the operation of the camshaft with the speed of a Kalashnikov assault rifle, then the speed of the latter’s shots will be 10 times less. The crankshaft produces 6,000 or more revolutions per minute, with one working cycle consisting of two revolutions, ensuring the intake and release of the air-fuel mixture.
Thus, the frequency of opening and closing of each valve (intake and exhaust) in one minute is at least 3000 times. Moreover, the frequency of the so-called “dead spots” of the valves (i.e., when they occupy their extreme positions in the cylinders) is even greater - 6,000.
Whenever manipulating the crankshaft, valves and cylinders, it is necessary to take into account even hundredths of a second of engine operation, which significantly affects its operational capabilities and durability.
What happens if there are small valve clearances? – Adjustment with feeler gauge
More precise adjustment of the VAZ 2107 valves is achieved on a cold engine, but in the summer, as a rule, the engine cools down for a very long time, or if there is not enough time, then this operation can be performed with a feeler gauge at 0. In general terms, the design of the gas distribution mechanism and the procedure for adjusting the valve clearance on diesel engine is the same as on a gasoline engine.
| Manufacturer | Detail number* | Part name |
| CTR | CEKD16L | |
| CTR | CEKD16R | Steering end for CHEVROLET LACCETTI |
| CTR | CEM14 | Steering end for MITSUBISHI SPACE STAR |
| DELPHI | Steering rod for MERCEDES-BENZ 190 | |
| DELPHI | Right steering wheel end for OPEL, VAUXHALL | |
| DELPHI | Tie rod for VW Passat | |
| DELPHI | Steering rod for SEAT, VW | |
| DELPHI | Tie rod end for BMW 3, Z3 | |
| DELPHI | Tie Rod End for PEUGEOT 306 | |
| DELPHI | Steering rod for VOLVO | |
| DELPHI | Tie rod for CITROEN, PEUGEOT | |
| DELPHI | Tie rod for FORD TRANSIT | |
| DELPHI | Tie rod for VOLVO | |
| DELPHI | Tie rod for FORD MONDEO | |
| DELPHI | Tie rod FORD ESCORT, ORION, VERONA | |
| DELPHI | Tie rod FORD COURIER, FIESTA, KA | |
| DELPHI | Front tie rod end for OPEL, SAAB, VAUXHALL | |
| DELPHI | Tie rod VOLVO 440, 460, 480 | |
| DELPHI |
Preparatory work
So, the engine is cooled down, and the car itself is placed on a flat surface and immobilized. You can start working:
- Remove the carburetor air filter cover and remove the filter;
- We unscrew the filter mounting bolts and remove it, having first disconnected the pipes going to it;
- We remove the cable for manual control of the air damper (choke) and disconnect the throttle linkage;
- Unscrew the bolts securing the valve cover and dismantle it;
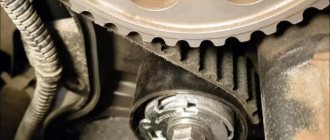
- Check the chain tension (it must be normal, otherwise you will have to adjust the tension first);
- Remove the distributor cap.
Now you need to set the TDC of the piston in the 4th cylinder and the marks on the knees will help with this. camshaft drive shaft and cover. shaft, as well as on the camshaft gear and its cover.
To do this, you can use a key of appropriate size, which you need to rotate the knees. shaft for the drive pulley bolt. Or use one of the drive wheels. To do this, you need to hang it with a jack, engage 4th gear and slowly turn the raised wheel. In this case, the transmission will ensure rotation of the crankshaft. But with the second method, you will need an assistant, since it will be difficult to check the coincidence of the marks.
Negative consequences of advanced tuning
Increasing the power of a car by installing a new camshaft with expanded characteristics not only transforms the valve timing, but in proportion to the increased power reduces fuel efficiency and even increases the rate of engine wear!
That is why a radical change of the camshaft is the lot of those vehicles for which, for the sake of speed, it is possible to sacrifice environmental friendliness, efficiency and service life.
or call back 7 (921) 932-25-54
Conclusions about previous valve adjustments
What conclusions can be drawn from the above observations?
Firstly , the previous valve adjustment was done quite well.
Secondly , stable wear indicates proper operation of the gas distribution mechanism (GRM).
Thirdly , it becomes clear why on cars with gas-cylinder equipment (LPG) installed, it is recommended to adjust the thermal clearances of the valves after 10,000 km, and not after 30,000 (as in the case of operating a car on gasoline).
The fact is that sagging of exhaust valves in engines running on gas occurs on average three times faster than in engines running on gasoline. If they are not adjusted in time, there is a high probability of the exhaust valve burning out.
Valve sagging
Whether I was successful or not became apparent when it came time to re-adjust the valves. So, that time has come. At the time of this adjustment, Grant's mileage was just over 25,000 km. What happened to the valves 10,000 km after the previous adjustment? Let's find out.
After measuring the valve clearances before adjusting, I recorded them in a small table.
The first column lists the valves in order of priority.
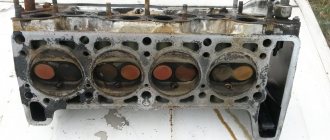
The exhaust valves are highlighted in red, and the intake valves are highlighted in blue. You can observe a similar circuit directly on the engine.
In the second column I entered the nominal size of the gaps or the size recommended by the manufacturer.
Here is the official letter from AVTOVAZ number 44-12, which specifies the clearances for the intake and exhaust valves. It is these gaps that I display on my Grant.
I will add that the above clearances are relevant for engines 21116 and 11186 with a lightweight connecting rod and piston group (OSHPG).
The next column contains the actual gaps that formed over 10,000 km. mileage since the previous adjustment.
Notice what has changed? Only the exhaust valve clearances have changed.
As you can see, over 10,000 km, the valve subsidence amounted to 5 hectares per exhaust valve.