The starter in a car is designed to temporarily rotate the crankshaft until the engine starts. In good condition, the motor will seize within 2–3 turns.
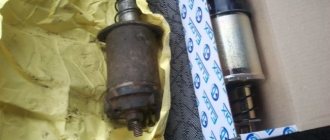
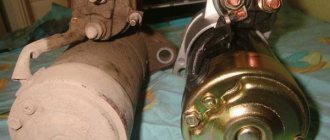
The design of the starter is simple, and the principle of operation is intuitive. The main modules of the “starting device”: traction relay, drive system, electric motor.
Of all the units installed on a car, the starter is the most energy-intensive. At the engine starting stage, the mechanism consumes current up to 400 - 450 Amperes.
Design
The Kalina starter is an electric machine operating on direct current, powered by a battery. During operation, the starter consumes a large amount of current and, if malfunctioning, can often discharge the battery.
The main parts of the starter: armature, rotor, bendix, brushes, retractors. Failure of one of the elements leads to failure of the starter.
General diagram of VAZ-1117, VAZ-1118, VAZ-1119
1 — right headlight; 2 — engine compartment lamp switch; 3 — sound signal, 4 — Lada Kalina starter; 5 - battery; 6 - generator; 7 — windshield wiper electric motor; 8 — left headlight; 9 — power window switch of the right front door (passenger); 10 — power window motor of the right front door; 11 — right front door lock; 12 — connection block to the right front column; 13 — windshield washer motor; 14 — air temperature sensor; 15 — connection block to the injection system wiring harness; 16 — left front door lock; 17 — brake fluid level sensor; 18 — connection block to the left front column; 19 — right front door power window switch (driver); 20 — left front door power window switch; 21 — door lock switch in the switch block; 22 — electric window motor of the right front door; 23 — mounting block; 24 — immobilizer; 25 — power accessories control unit; 26 — instrument cluster; 27 — right side turn signal; 28 — glove compartment lighting lamp ; 29 — glove compartment lamp switch; 30 — brake light switch; 31 — ignition switch; 32 — lighting control module; 33 — steering column switch; 34 — left side direction indicator; 35 — connection block to the right rear column; 36 — rear door lock; 37 — rear window heating switch; 38 — reverse lock switch; 39 — alarm switch; 40 — heater motor switch; 41 - additional resistor; 42 — heater electric motor; 43 — block is connected to the left rear column; 44 — electric fuel pump with fuel level sensor; 45 — reverse lamp switch; 46 — handbrake sensor; 47 — cigarette lighter; 48 — reverse lock; 49 — connection block to the radio device; 50 — backlight lamps for heater control levers; 51 — Kalina illuminator; 52 — control unit for electromechanical power steering; 53 — interior lighting unit; 54 — right rear light; 55 — trunk locking motor; 56 — switch in the trunk lock; 57 — license plate lights; 58 - additional brake signal; 59 — rear window heating element; 60 — trunk lighting; 61 - left rear light
Elements of the instrument panel harness connection diagram
1, 3, 4, 5 — blocks of the tidy wire bundle to the front harness; 2, 8 - the same for the rear “pigtail” of wires; 6, 7, 9, 10 - continuation of the direction to the assembly unit; 11 — power supply for the lighting control device; 12 — set of instruments; 13 — toggle switch for the electric motor of the stove; 14 — power supply to the air supply box; 15 — ignition switch Lada Kalina; 16 — immobilizer block; 17 — block of the dashboard wiring harness to the ignition system wire bundle; 18 — cigarette lighter power supply; 19 — alarm switch; 20 — rear window heating switch; 21 — brake light switch; 22 — alarm light breaker; 23 — adjustment of computer modes ; 24 — windshield wiper control; 25 — VAZ horn switch ; 26, 27 — heating and ventilation control lighting lamps; 28 — glove box lighting; 29 — power supply to the on/off button in the glove compartment; 30, 31 — pinout for the standard radio; 32 — power supply to the electric motor of the stove; 33 — heater resistor network; 34 - electric amplifier control unit.
Principle of operation
When voltage is applied to the starter by turning the key in the car's ignition switch, current flows simultaneously to the solenoid relay and the starter itself. The starter begins to rotate, and at this moment the solenoid relay moves the moving part of the bendix to the engine flywheel, thereby starting to rotate the engine by the crown on the flywheel, after which the engine starts, the ignition key is released, the current on the starter and solenoid relay disappears, thereby stopping the starter and moving the bendix away from the flywheel.
How to make a start button instead of an ignition key in a car with your own hands
In older cars, often the wires from the starter itself are connected directly to contacts inside the contact group, which close when the ignition key is turned. When the starter is activated, a very large amount of energy is consumed, which means a large current flows (the contacts strike a spark). Over time, a burnt deposit forms on the contacts or they completely burn out, no longer providing reliable contact. Newer vehicles have a separate relay that closes the starter contacts when the ignition key is turned.
Symptoms of a problem
The starter is not a very complex mechanism and has a small number of parts that fail. Most often, problems with the starter arise due to the following breakdowns:
- The contact brushes are worn out - this happens due to prolonged use of the starter on the car and most often occurs around 100,000 km. mileage This procedure can be easily corrected by replacing the brushes.
- Failure of the solenoid relay - the solenoid relay is one of the weakest parts of the starter and fails at different times, regardless of anything. With such a breakdown, the starter rotates, but does not engage the flywheel.
- Bendix failure - Bendix is a mechanism reminiscent of an overrunning clutch that rotates in one direction, but jams in the other.
- Broken stator or armature winding.
All reasons except a winding break are easily corrected by replacing the elements with new ones, but if a winding break occurs, it is better to replace the starter with a new one.
Installing a start-stop button instead of the ignition switch
It is clear that the first point is more like an imitation of a start-stop button, but for adherents of this idea there is a completely reasonable justification. The button takes on the functions of an additional service mechanism, which is especially valuable in city driving conditions. At the same time, the lock is less likely to break, and the home-grown start-stop may well “earn extra money” as an additional anti-theft feature.
The first start-stop option is simple, but tasteful
The start-stop button can be made from two relays for the rear fog lights, No. 22.3777. A set of two pieces, with a backlit button, will cost about four hundred rubles. You can throw in any diode you find; there are no large currents there.
How to start a car without a starter
If the starter on your car is faulty or the battery is dead, then the car can be started in other ways.
You can try to start the car from a tow, from a hill, etc. turning on the ignition and second gear, this method is relevant for both a dead battery and a broken starter. These manipulations can only be performed with a manual transmission.
If the starter rotates but does not turn the engine, then the solenoid relay is most likely faulty. With such a malfunction, the engine can be started quite simply, just turn on the ignition and bridge the contacts on the solenoid relay, as shown in the picture, and the engine will start.
Prices for the original Lada Kalina starter can reach or even exceed 4,000 rubles. There are a large number of analogues on the market at prices starting from 2000 rubles, but the quality of such parts leaves much to be desired.
Scheme of Lada Kalina VAZ-1117, VAZ-1118, VAZ-1119
Complete information on the electrical equipment of the Lada Kalina car, including the following modifications: VAZ 1118 - 5-door sedan (2004 to 2011), VAZ 1119 - hatchback (since 2006) and VAZ 1117 - station wagon. Also reviewed is the Lada Kalina Sport, a sporty version of the hatchback produced since 2008. There are diagrams of all blocks, including the location of relays and fuses, which allows you to carry out minor repairs of auto electronics and replace burnt-out elements yourself. At the end of the reference book there is a link to a PDF album of schemes.
Replacement
To replace the starter, you need to prepare a special tool that will be needed during the work process.
Required tool:
- Screwdrivers, flat and Phillips;
- Ratchet with heads for “13” and “15” mm;
- Open-end wrenches for “10” and “13” mm;
Step-by-step replacement instructions
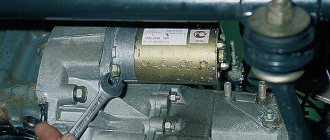
- We turn off the power from the solenoid relay; to do this, unscrew the power cable with a key and disconnect the connector.
- Using a ratchet and an extension, unscrew the bolts securing the starter to the gearbox housing.
We perform assembly in reverse order.
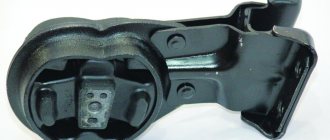
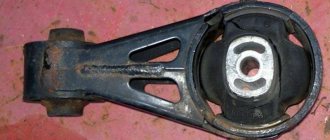
Starter repair in a Lada Kalina car
In most situations, disassembling a unit in the Lada Kalina model for the purpose of repair is carried out to replace such elements as:
- brush holder in combination with brushes;
- traction relay;
- drive components.
Naturally, repair procedures are carried out on a removed device. How to remove it correctly?
Let's sort it out.
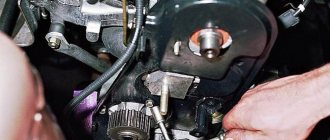
- We take the spike at “13” and unscrew the nut that secures the lower contact bolt of the traction relay, after which we remove the wire tip.
- Using a screwdriver (Phillips), we “defeat” a pair of screws holding the retractor relay block. We remove the element.
- We remove the spring along with the armature from the front cover of the relay.
- Disconnect the housing from the front cover. Here you will need to unscrew a couple of tightening bolts (key set to “8”).
- From the released housing we remove the armature together with the brush holder and the end cover.
- This cover is removed by unscrewing two screws with a screwdriver. The bearing seat contains a wavy spring washer.
- The brush holder itself must also be dismantled, after which the brushes are removed.
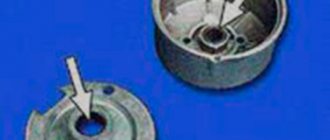
- We move on to the planetary gearbox, from which we remove the cover.
- Now we remove the three satellites and the rubber plug.
- We press the end of the drive shaft with our finger, and then remove the drive assembly located in the front cover.
- We arm ourselves with two screwdrivers, with which we open the eyelet present on the support, and then remove the drive lever.
- We use a wooden block against which we rest the end of the ring gear.
- We apply the grips of the open-end wrench (size - “13”) to the ring that limits the travel of the drive gear. We hit it with a hammer, forcing the ring to compress in this way.
- The locking ring must also be removed. We use a flat screwdriver.
- Next, we dismantle the gear travel limit washer.
- We remove the overrunning clutch assembly with the drive gear.
- Using a screwdriver, remove the retaining ring from the corresponding groove on the shaft.
- We also remove the washer.
- We pay attention to the ring gear in the planetary gearbox, which we pull off the drive shaft.
- We proceed to dismantling the bearing. To do this, we use the previously designated metal plates. We insert them between the bearing itself and the armature commutator, and then rest it on a vice. Use a hammer to carefully impact the end of the shaft (a drift will be required) until the bearing is completely pressed.
This completes the disassembly procedure.
Next, we inspect the commutator and armature winding. There should be no charring here. If it is present, then use fine sandpaper to “correct the situation.” When the burning is intense, there is no alternative to changing the anchor.
If we find scratches or material coating on the shaft journal, we also use “all-conquering” sandpaper, after which we polish the treated areas.
We arm ourselves with an ohmmeter to check the short circuit between the core and the windings. We pay attention to the ends of the windings - their soldering to the lamellas must not be damaged. Blackening of the winding or separation of varnish insulation from its surface is not allowed.
If the brushes are worn out, then replace the holder assembly.
The assembly of the starter assembly is carried out according to the reverse algorithm of actions.
Starter for viburnum 8 valves which is better
This product completes the line of starters for VAZ, and we are pleased to announce that from now on we offer a full range of starters for VAZ and GAZ cars!
| LSt 0118 2111-3708010-10 (5702.3708-10, 5121.3708) |
for VAZ 2113-2115, 1117-1119 "Kalina" with 8-valve engine (reinforced gearbox)
Specifications:
Starter starting speed, rpm 2800 Crankshaft starting speed, rpm 200 Rated voltage, V 14.6 Rated power, kW 1.55
StartVOLT starters are superior to analogues in the number of successful engine starts and in reducing energy consumption by 30-50%!
Achieved by increasing the number of stator poles to 6 units: MAGNETIC5 technology
Unique design advantages of all StartVOLT starters:
Current collection brushes
• in current collection brushes, which are used in the starter, bronze-graphite is used as a material - a more durable and reliable material compared to graphite).
Gearbox
• the planetary mechanism is made entirely of metal (unlike analogues, which are made of plastic). • hardened steel with increased wear resistance is used, which directly affects the life of the starter. • the design of the planetary gearbox housing has been improved in order to reduce friction losses and improve the balancing of the gearbox-shaft pair.
Bendix
• heat-treated steel with increased wear resistance is used. • the overrunning clutch has an original design that ensures its increased wear resistance.
Solenoid relay
• by increasing the area of copper contacts, the reliability of the relay increases and power losses are reduced.
The design of StartVOLT starters is patented by the Federal Service for Intellectual Property, Patents and Trademarks of the Russian Federation (“ROSPATENT”) Utility model patent No. 102691 dated November 15, 2010. Recommended retail price – 2,700 rubles.
Lada Kalina which engine is better: 8 or 16 valve, poll
The debate regarding which engine is better began a long time ago and has not subsided to this day. And answering this question is much more difficult than it seems at first glance.
The fact is that both 8 and 16 valve engines have certain advantages. The main difference between these motors is the engine block head. One camshaft can be installed here (in the case of an 8-valve engine) or two (for a 16-valve version).
And to better understand the issue, let's look at the characteristics of both engines in more detail.
Features of the 8-valve engine
A regular 8-valve engine, tested and easily repaired both in the service and in garage conditions.
Each cylinder has two valves, for intake and exhaust respectively. For a standard four-cylinder engine there will be 8 such valves.
The advantages of such a motor are as follows:
- Simplicity of design . 8-valve engines are time-tested. Compared to its 16-valve counterpart, there are fewer mechanical parts, and accordingly, repairs and maintenance will be cheaper. In addition, the absence of hydraulic compensators contributes to simplifying the design. Mechanical pushers are installed here, which are also cheap to replace and repair.
- The engine is undemanding to the quality of oil . You can use semi-synthetic lubricant.
- You can use 92 gasoline without loss of power.
- Compact dimensions , since there is only one shaft at the top. Accordingly, it will be easier to get to the starter, generator and attachments.
The old 8-valve engine is not plug-in (if the valve belt breaks, the valves do not meet the pistons). It's a pity that VAZ stopped producing it in 2012.
The disadvantages of such motors include:
- Low power . Since intake and exhaust are slower than with a 16-valve engine, it will not be possible to achieve similar speeds here.
- Increased fuel consumption . Again attributed to the slow intake-exhaust cycle.
- Relatively high noise level . This is especially true at speed. In addition, mechanical pushers require periodic adjustment. As a result of wear, gaps appear on them, causing additional noise and reducing efficiency.
- The need to adjust valve clearances more frequently .
This is necessary to prevent overspending. Adjusting valves, in principle, is not a particularly complicated procedure, but it requires the presence of the necessary equipment and “heels”, which you usually don’t have in your garage.
Features of the 16-valve engine
The design of this engine is more complex, because there are two camshafts on its head.
Two camshafts significantly complicate the engine design.
Accordingly, there are two more valves here - 4 pieces for each cylinder. Thus, there are two valves for intake and exhaust. But what does such a design achieve in practice?
Let's consider the advantages of a 16-valve engine:
- High power . Thanks to twice the number of valves, the engine receives more fuel mixture. In addition, the process of its removal is also accelerated, which helps to increase efficiency. Accordingly, acceleration dynamics and speed increase.
- Less fuel consumption . The presence of hydraulic compensators reduces noise and provides better clamping of the valve to the shaft. Accordingly, power increases and fuel consumption decreases. In addition, the engine accelerates faster and, accordingly, works less at high speeds.
- Environmental friendliness . Ensures more accurate timing operation.
- Less noise . Achieved by design features and the presence of hydraulic compensators.
- No valve adjustment is required , since this is carried out by hydraulic compensators in “ automatic mode ”.
The disadvantages of such engines include:
A significant disadvantage of the 16-valve VAZ engine is the bending of the valves when the timing belt breaks.
- Demanding on fuel quality . Only high-quality high-octane fuels should be used in 16-valve engines. 92 will do, but it must be of good quality from a proven gas station.
- More complex design, which contributes to higher prices for maintenance and repairs . If something breaks here, the cost of troubleshooting will be twice as high compared to the 8-valve version.
- Requirements for motor oil . Determined by the presence of hydraulic compensators . It is advisable to use synthetics.
- Dimensions . The taller and wider head makes repair and maintenance somewhat more difficult.
16-valve 98 hp
They say that 98 horses on a hatchback simply “Tear everyone”. We'll try it soon.
Summing up
It is quite difficult to unequivocally answer the question which engine is better.
If you are interested in power, quick acceleration and quiet driving, then it is better to choose a 16-valve engine. It consumes less gasoline and does not require valve adjustments.
If low maintenance and unpretentiousness are important to you, then your choice is an 8-valve engine . This option is better suited for those motorists who prefer to maintain and repair their car themselves.
Source: https://korean-car.ru/kakoi-dvigatel-luchshe-na-lada-kalina-8-ili-16-klapannyi/
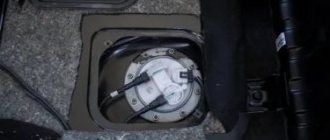
Starter Lada Kalina: where is it located, how to remove, replacement
- Aluminium case;
- Bendix;
- Gearbox;
- Brush unit;
- Core;
- Bushings, springs;
- Bolts;
- Contacts.
After we clearly understand the location of the part, we proceed to dismantle it. We check the availability of a set of tools, rags, additional lighting, lubricants, screwdrivers.
For the convenience of carrying out work, we install the machine on an inspection channel; it can be hung with a hydraulic lift, if available.
- Open the hood, disconnect the terminals to avoid a short circuit on board;
- We unscrew the air filter cover, remove the element, and also dismantle the plastic housing. It is fixed at the bottom with three screws around the perimeter;
- Using a key set to “13”, unscrew the nut from the positive terminal. Remove the terminal;
- Using a “15” wrench, unscrew the three nuts that press the PU to the wall of the block. We remove it through the engine compartment.
https://www..com/watch?v=https:9KbETCP8RI8
Some craftsmen practice removing the starter from under the bottom of the car. As they say, “it’s not for everyone”, depending on who is more comfortable and depending on the design of the technical device.
After dismantling, we install a new control unit and assemble the structure in the reverse order. There is an alternative option: dismantling the faulty starting device, carrying out troubleshooting, and installing it in its original place.
The last method is the most economical, since purchasing a new starter is not always rational and not everyone can afford it. Sometimes it is enough to replace the brushes and the PU is working properly again.
The following elements often fail:
- Brush holder;
- Relay;
- Drive unit.
Let's start disassembling: unscrew the nuts, remove the drive tip. Next, remove the retractor relay, pressure spring, and armature.
We remove the planetary gearbox, three satellites, and a rubber plug. Using a screwdriver, carefully pry up the drive lever (fork) and remove it. Remove the retaining ring and press out the overrunning clutch. We complete the dismantling by removing the bearing.
We proceed to cleaning and washing the components for the convenience of troubleshooting.
- We check the armature winding; there should be no charring on it;
- The surface of the shaft journal should be smooth, without scratches;
- Using an ohmmeter we measure the resistance of the core and windings;
- The ends of the winding must be securely soldered to the lamellas.