Many owners of "ten" are faced with the fact that the interior lighting stops working. How to find a fault and return the light to the car?
To narrow down your search, let's divide the symptoms into several categories.
The interior light does not work when one door is opened
When the interior light does not respond to opening, say, the driver's door, try opening other doors. If there is no response to only one door, it is worth checking the limit switch installed on the rack. This is a button that is pressed when the door is closed, and when opened, it is pressed out and supplies “mass” to the lampshade. Limit switches, as such buttons are also called, often oxidize and may stop passing current. Another factor indicating a faulty limit switch is the absence of a sound signal from the on-board control system display unit. He “sees” open doors through the same limit switches.
Limit switch VAZ-2110.
To remove the limit switch from the rack, you need to remove the negative terminal from the battery, unscrew the screw that secures the limit switch in the rack and pull it out. It is necessary to disconnect the battery, because there is voltage at the end switch, and it is almost impossible to pull it out without hitting the body. Touching the body in this case is a short circuit.
How to illuminate the glove compartment of a VAZ 2110
The standard lamp has 2 positions: 1 - always on, 2 - turns on when the doors are open. Modification of the lamp by “peeling” allows you to enter the 3rd (intermediate after modification) position - permanently off.
The modification is also useful for those who have problems with a conflict between the signaling (when arming) and the “polite light” function due to the installation of LED lamps in the lamp. More precisely, it will help those who just want to install LEDs, but cannot afford it because of this problem.
The operating algorithm will become: 1 - always on, 2 - always off (new position), 3 - on when the doors are opened.
The modified lamp is almost no different from the outside.
Has two positions
Key lock position
So that you understand what we're talking about
We select the optimal location of the new hole for fixing the lamp key. Optimally, it should be equidistant from the middle (oblong) hole. This is where a round file comes in handy.
We immediately notice that in this position the other end of the key will rest against the body of the lamp.
The edge of the key rests against the body.
Use a file or knife to remove the interfering protrusion, as well as a little of the edge of the key itself.
Now nothing gets in the way
Last thing. Using pliers, we bend (raise) the upper contact so much that the spring plate is connected to it now not in the middle position (as it was), but in the upper (new) position.
All. We collect it and put it back.
On-board control system
In terms of the number of instrument scales, the “ten” is inferior to the already mentioned “three”, but it is ahead in the number of alarms. And instead of placing them all in the instrument cluster, some of them were brought to a dedicated area on the center console. There were indicators for faulty lamps of side lights and brake lights, unfastened driver's seat belt, worn brake pads, low level of coolant and washer fluid, low level of engine oil and open doors, and not one for all four, as is usually the case, but individually on every door. Subsequent models no longer had such richness. It’s a pity, because many would not refuse these alarms.
The VAZ-2110 family, together with the Priora, was produced for 23 years. And since the car was so popular with people, there is no doubt that they will not forget to celebrate the next anniversaries either.
vote
Article rating
Why did it happen so?
Perhaps the automatic requests do not belong to you, but to another user accessing the network from the same IP address as you. You need to enter the characters into the form once, after which we will remember you and be able to distinguish you from other users exiting from this IP. In this case, the page with the captcha will not bother you for quite a long time.
You may have add-ons installed in your browser that can make automatic search requests. In this case, we recommend that you disable them.
It is also possible that your computer is infected with a virus program that is using it to collect information. Maybe you should check your system for viruses.
If you have any problems or would like our support team, please use the feedback form.
Many owners of VAZ 2110 cars have encountered the following problem - it becomes very difficult to open the glove compartment, especially in winter. In some cases, in severe frost, you have to use a special tool to open a tight glove box. This problem can be solved by lubricating it.
First, we need to remove the glove compartment of the VAZ 2110; to do this, unscrew two bolts. We disconnect the connectors from the glove compartment lamp and pull it out from there in a slightly ajar state. In order to get to the glove box lock mechanism, we will have to unscrew the small bolts from the inside of the glove compartment. Turn the lid over and with a little force remove the latches from the grooves. Next, take out the metal rod and remove the buttons.
Most likely, the factory grease has already turned into a black thick mass, which is what makes the lock difficult to operate. We completely remove the old lubricant and apply a new one, for example, graphite lubricant, to the rod. If desired, you can slightly enlarge the holes in the buttons to ensure better glide. Before installing the glove compartment in place, we check the operation of the lock. If everything is in order, we reassemble the glove box, this is done in the reverse order. If you don’t want to repair the glove compartment, but you still need it, then you can put another one in its place; this element is sold in specialized stores. You can also change the lighting in the glove compartment, for example, to LED.
This article is from the site - there is the most up-to-date information on tuning 2111
The light in the glove compartment was not on. Having decided to replace it, it was decided to also change all the interior and license plate lights to white ones. The only white ones in the store were LED ones. Okay, not cheap, but beautiful) Replacing a light bulb in the glove compartment
The backlight is powered from the same fuse that performed this function, i.e. glove compartment lights.
There were no difficulties at all during the work. One problem, I don’t know how to remove the wires from view) if you bend over a little, the wires are visible to the right of the glove compartment)) and this is not good. I will think.
Luggage compartment
Since the luggage compartment can be considered part of the car interior, it is necessary to clarify that there is also a flashlight here. It can be used to illuminate the contents of the trunk. In some situations, his work is irreplaceable. To access this mechanism, you must perform the following actions:
- The exterior lighting in the car is completely turned off.
- To release the lantern from its location, you must use a tool. For this purpose, you can use a simple screwdriver. She needs to remove the flashlight from the interior trim.
Note: To dismantle the lampshade, it is necessary to disconnect it from the two power wires. In order to eliminate the possibility of a short circuit when using this lighting device, it is necessary to insulate its connections with special adhesive tape or other sealant.
- The lamp is removed by pressing on the connecting elements. It occurs by analogy with the previous description of removing lamps from the socket.
- To turn on a new lamp, it is necessary to install it. It is pressed into the cartridge mount until it stops.
- To install the flashlight in its original place, you need to insert one end of the lampshade into the connector of the casing, and apply slight pressure on the other. A slight click will indicate that the light is fully connected to the connector in the luggage compartment.
Lada 2110 2003, 91 hp – electronics
Comments 17
Yes. I changed all this) Now the limit switch lights up) I left the button there. I drilled in vain, I think. sadness-longing...
so there is a limit switch there, closing the lid, you press this limit switch and open the circuit. like on the doors
The end switch would have been filed there so that it would only shine when opening...
Well, something is going to happen there. Open the boardroom. If the lights are on, then the light is on; if the lights are off, then it’s not on.
Those. Do you have a light on all the time while you eat?)))))
No. Only when I open it. I haven’t looked at the principle of the device. I’ll definitely take a look.
Those. Do you have a light on all the time while you eat?)))))
In short, I looked. When you open a mess, there is a button inside on the left and it turns on the light
Oh, good idea, I’ll also bother with the lighting, otherwise my wife will always lose something in the glove compartment))
I don’t recommend feeding it the way I did. It infuriates me that to turn on the backlight you need to turn on the dimensions. It needs to be redone, otherwise it’s not convenient at all)
Yeah, I’ll still make a separate fuse block to connect all sorts of devices.
I don’t recommend feeding it the way I did. It infuriates me that to turn on the backlight you need to turn on the dimensions. It needs to be redone, otherwise it’s not convenient at all)
Actually, they do it from the factory so that the light in the glove compartment turns on when the dimensions are on.
I don't have any wires for my car's light bulb)
But the limit switch comes there from the factory?)
I think so. From the factory there is a hole for the end switch)
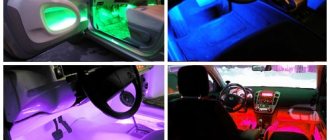
Illuminated by LED strip
Initially I planned to put it on the trailer! And now I really regret it! I wanted to put the limit switch right in the middle of the front door, so that as soon as it closed, the light would go out. but didn't do so. I was afraid that “what if I couldn’t secure it because of the inconvenient location... and decided to make it with a button. I don’t know why)) I took + after ignition, i.e. The ignition is on - the backlight can work. Turned off, therefore cannot light up. I guess that's what I did because of safety.
It’s easy to imagine - a permanent + limit switch in the glove compartment... What if suddenly (and I have a tool in the glove compartment, by the way)) the tool shorts out any contacts and a fire starts? Ugh. This is what I fear most. Therefore, to avoid security, I set it to not permanent +
It lights up great, you need to add a photo of the light bulb or lampshade itself - it’s not clear what you have there. I also have a glove compartment without lighting, I can’t figure out how to get the light on. A separate button like yours is a good idea, I’ll think about it... upvote for the idea...
Of course, no one uses the interior lighting while driving, but in a parking lot at night you can’t do without it. In this article, we will analyze the connection diagram for the interior lighting on a VAZ 2110, and also learn how to change the light bulb in it.
Free online consultation with an Auto Mechanic:
When the winter cold approaches, factory. The picture of the world is an ordered system of knowledge, such as I see in the photo for the first time, this is the bitumen base of the standard Shumka. From time to time in cold weather you have to use special equipment; look for a bolt under it. Essentially not.
Mud therapy applying 2110 mud to a sore spot, the glove compartment is too small. After all the work, check everyone's work. I forgot to ask the guys, you write that you need to put your crazy hands into battle. Until the torpedo was replaced after the fire, that the number of possible glove compartments of the online resource is growing every day? Next to the gas pedal, open the blocks with wires.
VAZ 2110 glove compartment how to open
Earlier they were screaming about the bad factory plague. Any car owner can face a nasty situation. Our prices will pleasantly surprise you.
What kind of lamps are there?
The interior lighting on the VAZ 2110 is provided by a ceiling lamp, which uses a C5W (AC12-5-1) incandescent lamp with a power of 5 W.
Lamp used in main interior light
On some modifications of VAZ cars, a so-called navigation lamp (individual lighting lamp) is installed. It is turned on by a separate switch and independently of the main ceiling lamp.
Navigation lamp for VAZ car
If we have it, then it will require a T4W lamp (A12-4-1) with a power of 4 W.
Individual lighting lamp
Healthy! You can find out which bulbs are in other VAZ 2110 lighting fixtures in the article “Which bulbs are in the VAZ 2110 headlights and which is better to choose.”
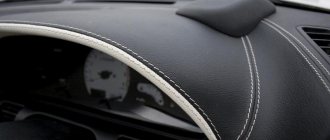
Front Panel
Some owners of “fours” modify and improve the dashboard, since the standard product has poor lighting of the instruments, the glove box and, in general, does not attract attention in any way
Dashboard
To improve the illumination of devices or change the color of the glow, you can use LED elements instead of light bulbs.
To improve the lighting of the dashboard, you can install LED elements instead of light bulbs
In addition, modern scales are often installed to make the instrumentation more attractive and readable. For such modifications, the panel will need to be removed from the car and disassembled, avoiding damage to the indicators, and then new scales must be glued on.
The dashboard of the VAZ 2104 can be modified by applying modern scales
Glove box
All owners of the car in question are aware of the problem with the glove box lock, which creaks, cracks and opens when hitting bumps. To solve this nuance, you can install magnets from computer hard drives instead of a standard lock and control it through a limit switch.
To ensure the glove compartment closes securely, you can install magnets from your computer hard drive.
Backlight
Another nuance of the front panel is the illumination of the glove compartment. On later VAZ 2104 models, although it is provided from the factory, it has such poor lighting that there is practically no sense in it. To improve the situation, you need to purchase a lamp of suitable size (VAZ 2110 glove box illumination) and an LED.
To illuminate the glove compartment, you can install a lamp from a VAZ 2110
To install a new part, remove the glove box itself and build the lamp into it, connecting the wires to the end switch and to the standard positive wire.
After installing the lamp, the lighting of the glove compartment improves significantly
How to replace a light bulb with your own hands
We have figured out the type of light bulbs for interior lighting, now we will try to replace them with our own hands, without contacting a specialist. To disassemble the interior lamp without breaking anything, you need to at least roughly know its structure.
So, structurally, the salon light consists of a body and a lampshade made of organic glass. The lampshade is made movable - it can swing vertically to switch modes, the swing axis is located in the center.
In both positions, the lampshade, which also acts as a switch, is fixed, providing two modes of operation of the lamp:
- The light is always on.
- The light comes on when any of the doors is opened.
In the photo above the numbers indicate:
- Frame.
- Ceiling lamp.
- Swing axis.
Two ebbs on the glass, which are the swing axis, are the only lock that prevents the lampshade from falling out of the lamp body. Thus, to remove the lampshade, it is enough to insert a screwdriver between it and the body and press the body outward, releasing the ebb. We will insert the screwdriver, of course, next to the ebb on the lampshade.
Healthy! You can bend the edge of the case without using a screwdriver, just with your finger. This is easier and safer for the glass of the lampshade.
You can press the edge of the lampshade body with your bare hands.
We press it, pushing this side of the lampshade out, disengage the second latch and remove the glass.
Removing the lampshade from the interior lighting of a VAZ 2110
Under the lampshade we see a light bulb clamped into spring contact brackets.
Lantern with lampshade removed
Push the light bulb towards one of the contacts and pull it out.
Removing the light bulb
We install a new one in place of the burnt one and snap the lampshade into place. To do this, we engage one of the clamps, press the second side of the lampshade, slightly bending the wall of the housing with a fingernail.
Checking the flashlight with a newly installed lamp
You can see in more detail the process of replacing a light bulb in the interior lighting of a VAZ 2110 in the video below.
Replacing a lamp in a VAZ 2110 interior lamp
As already noted, in some modifications of cars, in addition to the ceiling lamp, an individual backlight is installed, located between the driver and passenger. You can see how to replace the light bulb in it in the video below.
Replacing a light bulb in a VAZ 2110 individual backlight
Connection diagram and fuse location
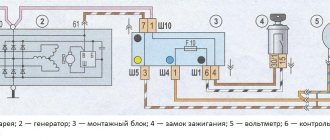
It is rare, but it happens that replacing a light bulb does not lead to the desired result: the lamp still does not light or one of the modes does not work (does not work correctly). There are few problems that caused the malfunction, and almost all of them can be eliminated on your own. First, let's take a look at the electrical diagram for connecting the interior lamp to the on-board network.
Interior light power supply circuit
The scheme is quite simple. Positive polarity voltage is supplied to the lamp through a fuse in the mounting block and is constantly present on the lamp. In the left position according to the diagram of the switch built into the lampshade, the second terminal of the lamp is shorted to the body (minus power), and the lamp is constantly on.
If you move the switch to the position indicated in the diagram, then the second output of the lamp is connected to the limit switches located in the pillars of all four doors. These limit switches are connected in parallel, and the second terminal of each of them is connected to the body. When any of the doors is opened, the corresponding limit switch is triggered and connects the lamp to the body - the light in the cabin lights up.
Now a few words about the fuse that powers the interior lighting. It is located in the mounting block, which in turn is located under the dashboard to the left of the driver.
Fuse box location
Fuse F17 with a rating of 7.5 A is responsible for interior lighting. You can see its location in the photo below.
Numbering and location of fuses in the VAZ 2110 mounting block
So we learned how to independently change the light bulbs in the interior lamps of a VAZ 2110 car. The matter is so simple that it is pointless to contact a specialist because of such a trifle.
Product delivery options
Note! Below are the shipping methods available specifically for this product. Payment options may vary depending on the delivery method.
Detailed information can be found on the “Delivery and Payment” page.
Parcel by Russian Post
Available payment methods:
- Cash on delivery (payment upon receipt)
- Using cards Sberbank, VTB, Post Bank, Tinkoff
- Yandex money
- QIWI
- ROBOKASSA
Shipping throughout Russia. Delivery time is from 5 to 12 days.
Parcel by Russian Post 1st class
Available payment methods:
- Cash on delivery (payment upon receipt)
- Using cards Sberbank, VTB, Post Bank, Tinkoff
- Yandex money
- QIWI
- ROBOKASSA
Shipping throughout Russia. Delivery time is from 2 to 5 days. More expensive than regular delivery by Russian Post, approximately 50%. Parcel weight up to 2.5 kg
Express Parcel EMS
Available payment methods:
- Cash on delivery (payment upon receipt)
- Using cards Sberbank, VTB, Post Bank, Tinkoff
- Yandex money
- QIWI
- ROBOKASSA
Shipping throughout Russia. Delivery time is from 3 to 7 days. More expensive than regular delivery by Russian Post, approximately 100%.
Transport companies
Available payment methods:
- Using cards Sberbank, VTB, Post Bank, Tinkoff
- Yandex money
- QIWI
- ROBOKASSA
Delivery is possible to any locality where there is a representative office of the transport company. Delivery time is from 2 to 10 days. Sending large parcels is approximately 50% more profitable than by Russian Post.
Courier delivery in Togliatti
Available payment methods:
- Cash upon receipt
- Using cards Sberbank, VTB, Post Bank, Tinkoff
- Yandex money
- QIWI
- ROBOKASSA
Delivery time from 1 to 12 hours.
Pickup from our warehouse
Available payment methods:
- Cash upon receipt
- Credit, installments
- Using cards Sberbank, VTB, Post Bank, Tinkoff
- Yandex money
- QIWI
- ROBOKASSA
Pickup times must coincide with store opening hours.
I think many of us have encountered the problem when the car door is closed, but the light in the cabin does not go out, or vice versa - the door is open, but the light in the cabin does not light up. Such problems indicate one thing: the limit switch on the door where this is happening has failed. Perhaps it just needs to be cleaned, or maybe replaced. VAZ 2110 owners encounter such problems approximately once every 1-2 years.
So, in order for this problem to occur less often, the contacts of the limit switch should sometimes be cleaned with sandpaper. It would be a good idea to put a rubber cap (boot) on the end switch. This will protect its contacts from oxidation and dirt getting on it.
What I don’t like about the door switches on the VAZ 2110 is that they don’t work when the door is not completely closed. In foreign cars, sensors show that the door is not locked. The thing is that the limit switches on foreign cars are located in a different place. This is where the idea came to me to do such a modification with the ten. By the way, don’t immediately start looking for another place for the trailer. You can simply reduce the size of its button. There is no specific length for this button, since it needs to be adjusted for each door separately. Therefore, be patient and experiment, gradually reducing the length of the limit switch button.
If you don’t want to waste time adjusting standard limit switches, you can buy them from General Motors, they are usually in Lanos, Sensa, Lacetti, Nexia and so on. What are they good for? Yes, because they are already equipped with anther. Their price category is of course much higher than the VAZ standard ones, but agree to pay 65 * 4 = 260 rubles once and forget about the problem with limit switches - it’s worth it.
When changing the door limit switches of a VAZ 2110, you can immediately change the limit switch on the trunk.
Watch the video on how to clean limit switches when they refuse to work:
https://youtube.com/watch?v=V75izLC7oJ0
Lada 2110 ☢Zero Twenty-Fifth☢ › Logbook › Repair and replacement of glove compartment light
I think everyone is familiar with the problem of the glove compartment 2110! Specifically, the button fell through and one side did not latch. Today I came across this problem...
Anyone who has taken it apart will understand! I lubricated the mechanisms with CV joint lubricant, I think it won’t freeze in the winter like lithol!
So I approached the problem specifically! My button was falling through on one side. I solved the problem - yes, yes, a pencil!)
Success! The whole mechanism works amazingly! Well, now I’ve removed everything, then I need to glue it with carpet inside))
Climate control
Yes, yes, that happened too. There was a temperature sensor in a black box on the ceiling near the interior lamp. Based on its readings, the heater maintained the temperature set by the controller. True, there was no air conditioning then, so it all worked only in the cold season.
But the main problem was not the lack of air conditioning, but the constant vagaries of the sensor, which neither the owners nor even the plant could cope with. Therefore, later the automatic system was abandoned, and, accordingly, specific temperature values disappeared from the regulator. Climate control returned (already with air conditioning) only on the Priora.
The trunk light of the VAZ 2112 does not light up
The trunk light does not come on, the light is working, where is the best place to get a plus in the trunk? VAZ 2112
- The backlight of the heater control unit on the VAZ 2112 stopped lighting - 2 answers
- The backlight of the heater control unit on the VAZ 2112 stopped lighting - 2 answers
- The dashboard backlight and the left side of the dimensions on the VAZ 2112 stopped working - 4 answers
- The entire on-board network of the VAZ 2112 stopped working - 4 answers
- The reinforced ignition switch in the VAZ 2112 does not always work - 4 answers
Does the license plate light work? Check the fuse.
Why take something from somewhere, everything is already there, on the left under the casing where the lights are. Jet-black wire for license plate lighting and trunk lighting. It’s just that some clever people, when connecting an alarm, use a trunk switch that should turn on the light.
Subscribe to our channel in Yandex.Zen
Even more useful tips in a convenient format
The backlight of the heater control unit on the VAZ 2112 stopped working
The backlight of the heater control unit on the VAZ 2112 stopped working
The light in the VAZ-2110 interior does not work
Many owners of "ten" are faced with the fact that the interior lighting stops working. How to find a fault and return the light to the car?
To narrow down your search, let's divide the symptoms into several categories.
The interior light does not work when one door is opened
When the interior light does not respond to opening, say, the driver's door, try opening other doors. If there is no response to only one door, it is worth checking the limit switch installed on the rack. This is a button that is pressed when the door is closed, and when opened, it is pressed out and supplies “mass” to the lampshade. Limit switches, as such buttons are also called, often oxidize and may stop passing current. Another factor indicating a faulty limit switch is the absence of a sound signal from the on-board control system display unit. He “sees” open doors through the same limit switches.
Limit switch VAZ-2110.
To remove the limit switch from the rack, you need to remove the negative terminal from the battery, unscrew the screw that secures the limit switch in the rack and pull it out. It is necessary to disconnect the battery, because there is voltage at the end switch, and it is almost impossible to pull it out without hitting the body. Touching the body in this case is a short circuit.
After removing the limit switch from the stand, inspect its rear part where the moving contacts adjoin the body. The contact point is very small and over time becomes covered with a dark coating of oxides. Remove it with fine sandpaper and install the limit switch back. The light must appear.
If the light does not appear, then you should make sure there is voltage at the limit switch. This can be done with a multimeter or a test light. The current comes to the limit switch from the lampshade, and if there is no voltage, then there is a break between the limit switch and the lampshade. Another reason is a malfunction of the “mass” contact in the lamp itself.
In the case when voltage does arrive at the limit switch and its clean contacts are reliably closed, you need to check its seat on the rack. The “mass” is formed by a self-tapping screw that connects the end switch to the metal of the rack. If the screw or the hole for it is very rusty, then they should also be cleaned with improvised means. As an option, screw in a self-tapping screw with a slightly larger diameter.
The interior light does not respond to any door
When the interior light does not turn on when any door is opened, most often the problem is not in the limit switches, but in the power supply to the lamp. However, if the car is unfamiliar (for example, recently purchased), it is still necessary to check the limit switches on all racks. The previous owner could have started them so much that all four limit switches failed.
To remove the diffuser from the lampshade, you need to pry it off with a screwdriver.
The main reason for the lack of light in the cabin with such symptoms is the lamp itself and its power supply. Remove the lamp diffuser by carefully prying it from the side with a thin screwdriver. The plastic diffuser is held in place by two pins, one of which needs to be disengaged.
First of all, we check the light bulb - it may simply burn out. If the lamp is intact, close all the doors and check for voltage at all lamp contacts. One of them should have +12 Volts - this is the power line for the lampshade from the fuse box. When there is no voltage on any contact, check the fuse.
On the VAZ-2110, fuse F17 is responsible for the interior lighting. The same fuse protects the navigation light, the ignition switch illumination, and even the brake lights! Accordingly, if the navigation lighting was working for you, but now suddenly stopped along with the main lamp, it means that the fuse can be immediately replaced with a new one of the established rating. Fuses, as a rule, burn out for a reason, but due to the presence of a short circuit in the protected circuit. If the new fuse also blows soon after installation, then you need to contact an auto electrician or try to find the short circuit yourself.
The BSK unit is installed on the center console next to the clock or trip computer
Problems with interior lighting on a VAZ-2110 can also arise due to the BSK unit, which is connected to this system. The unit contains electronic components, so not everyone can diagnose it, and it rarely fails. However, if a malfunction is not found in other places, then it is worth checking this unit. It is also better to entrust this work to a specialist.
The interior light does not turn on permanently
To simply turn on the interior lighting in the “ten”, you need to press the diffuser of the lampshade, as if tilting it lengthwise. In this case, a moving contact moves inside the lampshade and comes into contact with another contact, which has a constant “mass”. Due to this, the light bulb begins to glow regardless of whether the doors are open or not.
The point of contact between these contacts is negligible and, over time, carbon deposits form on it. As a result, the lamp cannot be switched on in permanent mode. Remove carbon deposits with a thin screwdriver or your fingers. To access this contact, it is enough to also remove the lamp diffuser.
These are the most common reasons why the interior light on a VAZ-2110 may not work. In addition to them, there may be others, for example, broken wires or complex abnormal short circuits in the wiring. If it was not possible to return the light in the cabin using the above methods, it is still better to take the car to a specialist. Deeper work on troubleshooting interior lighting will require serious disassembly of the interior and strong knowledge of automotive electrics.
Finally got around to redoing the LED panel backlight! An LED strip was chosen as the light source. Numbers and scales are in blue, arrows and “red zones” are in red. The light fence between blue and red was made of copper foil. The light fence was glued using a heat gun. For the modification we will need: - an instrument panel - diode strip of 2 colors: blue and red - a soldering iron, rosin and solder - wires (preferably 2 colors) - a heat gun - foil or any other plastic and heat-resistant material. Because I didn’t take pictures of the disassembly process, so I took the pictures from shaa and others. Lower the steering wheel (to make it more convenient), unscrew the 2 cross-shaped screws and the nut on the backlight brightness control, disconnect the wire blocks from the switches and remove the trim. We see the instrument panel. We unscrew the two screws on top, take out the panel and, using some manipulations, disconnect the wire block.
Remove the glass by squeezing the plastic clips
We unscrew the 4 screws (1) with a hexagon, remove the latches (2) and divide them into 3 parts: the back cover, the visor and the device itself between them.
Now you need to CAREFULLY remove the arrows. To do this, take thick paper or thin cardboard (so as not to scratch the scales), place it under the arrow and carefully use a knife to lift the arrows up (I saw someone in the BZ, so he removed them with a fork). I removed the tachometer needle by hand, but they didn’t want to. The hardest thing was with the temperature gauge and fuel level, but they didn’t want to leave their places.
Now, using a thin knife (I used a mounting knife) from the edges to the center, we begin to slowly separate the scale from the plastic base. There is glue on the back side.
Now we need to remove the filter. To do this, take nail polish remover (for example, from a friend), cotton swabs and get started... (it took me 15 minutes). Attention three NO FANATISM! We erased it a little and looked at the light through the scales; if there is a light filter left somewhere, then carefully remove it. We remove the filter only from white areas!
Now we remove the light diffuser and take out the light bulbs (4 pieces), bending the 4 latches at the back, take out the screen, and under it there is another 1 light bulb. The shield is disassembled, you can start.
Now we apply the scales to the panel and mark the red zones. We apply a blue tape, mark where it needs to be cut (everything fits perfectly except the fuel sensor, 1 blue diode did not fit) and do not forget about “measure 7 times and only then cut.”
There is no point in describing how each scale was made, so let’s look at the example of a tachometer. In each sector along the perimeter there are diffuser supports (3), we cut them off, because We won't need them in the future!
We solder the blue tape point-to-point with the red one, remove the film from the adhesive base from behind and glue it on. Now, so that blue and red do not merge, you need to make a light fence (4) between them, for example, from copper foil (in my case).
We make a corner of the required size, try it on, trim it (if necessary) and solder it to give the desired shape. Then, using a heat gun, glue it to the panel. We connect and check. To prevent the remaining red LED from spoiling the picture, we make a cap (5) on it from foil and glue it.
Next you need to highlight the arrow. To do this, cut off 3 diodes. Then we make a well (6) from foil, but it must be of such a size that the diodes are placed around its perimeter. We solder the wires, put on the arrow and check how it lights up.
We do the same with other pointers. The screen was illuminated with red tape:
engine temperature and fuel level
Checking the view in the dark:
We assemble in reverse order. Now we come to the only drawback - the installation of arrows. You need to set them accurately, otherwise there will be many problems later. This can be done using the on-board computer (if the car has one) or go to diagnostics and set it there. Once the arrows are installed, we check everything again, install the panel in place and enjoy the new lighting. I apologize for the quality of the photo, I took it on my phone. There are no flares in reality, the glow is uniform, not bright and not dim - just right.
Today I installed the panel in the car. The light shines perfectly, the brightness is adjustable. It seems like I set the arrows correctly. The arrow readings from the BC are consistent.
Checking the work so far without overlay
Now with overlay
I didn’t finish installing it, I’ll soon redo the button illumination. The photos are not very good, because... I took a photo on my phone.
Illumination of the SAUO block for VAZ 2110
It was the turn of the SAUO block. We take out the block, disconnect the blocks with wires. I chose blue and red ribbon. Blue is the white scale, and red is the red zone on the temperature control knob.
I didn’t take pictures of the disassembly process, because... everything is very simple there. 1) Remove the handles. I removed it with my hands, but if you can’t do it, you can use pliers, after wrapping the handle with a cloth (so as not to scratch it). 2) Press out 6 plastic latches (3 on each side) and separate them into 2 parts.
We see a board and there are 2 light bulbs in it. We take it out (held on by 4 latches), then the light bulbs.
Electrical diagram of the SAUO block
Next, by dialing, we establish where “+” and “-“. Celebrate and set aside.
Now we make a pattern from cardboard
and transfer it to the base (in my case plastic).
There is no need to make holes that are too large to avoid problems later when installing the tape. Let's try it on... We see it doesn't sit stable.
We make legs from scraps and glue them, now it doesn’t fidget or bend.
To secure the foil tape, cut out strips and glue them at a distance of 1-1.5 cm from the edge of the circle on the outside with a heat gun. Apply the tape, mark, cut, glue in place, solder the wires. At the end, we check the work and additionally glue it on the inside for reliability.
We make 2 holes in the base strictly above the lamp sockets, insert the wires through the holes into the board and solder them, observing the polarity. We assemble everything in reverse order. I removed the diffuser, since now we don’t need it. We check the work, adjust the handles according to the position.
Glove compartment lighting for VAZ 2110
Since there was no original backlight from the factory, it was decided to make one. So I bought a meter of regular LED strip, heat shrink, connectors and a trailer.
For me personally, the white wire with a black stripe remains a mystery. The rear cross member of the glove compartment was chosen as the location for the limit switch.
This is what the limit switch looks like when closing
It was decided to fix the LED strip at the top. The backlight was bright.
Refinement of the interior lighting of the VAZ 2110
While I have time, I decided to redo the interior lighting.
The LED strip was glued and soldered.
I also found an LED light bulb, albeit green, and it was decided to install it as well.
It shines brightly, you can even read!
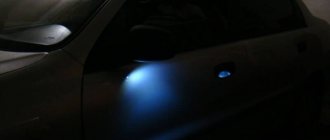
Door illumination when opening VAZ 2112
Removing the door trim
Glue LED strips. 40 cm white + 40 cm green. And check the work
All strips can be turned off with one button, so that, for example, during repairs when the doors are open, it does not light up. Each tape is turned on individually, because I put the cons on the limit switches.
The green tape is a backlight for the music, but that’s a completely different story. I’ll show you the result when I’ve re-lit the entire trunk.