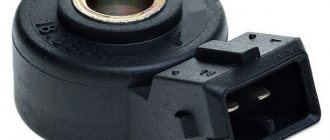
The camshaft position sensor (possible names - camshaft position sensor, phase sensor, Hall sensor) is an electronic device that monitors the technical characteristics of the engine, and is also part of the electronic engine management system.
It is designed to determine the angular position of the camshaft, in accordance with the position of the crankshaft. The information that comes from the DPRV is read by the electronic engine control unit to control fuel injection and ignition. As a rule, the DPRV is functionally connected to the crankshaft speed sensor, which is located on its pulley.
Area of application: modern injection gasoline or diesel internal combustion engines.
Replacing and checking the phase sensor (PPRV) on LADA
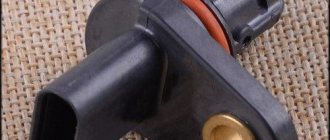
The camshaft position sensor (CPRV, also called a phase sensor) is designed to determine the angular position of the camshaft at each moment of time.
Data from the sensor is sent to the ECU (electronic engine control unit) for the correct operation of the injection and ignition systems. Signs and symptoms of a faulty phase sensor :
- unstable engine operation;
- poor engine starting;
- when you release the gas pedal, the engine stalls;
- increased fuel consumption;
- etc.
Phase sensor errors that are detected during diagnostics:
- P0340 Camshaft position sensor is faulty (Phase sensor error)
- P0342 Camshaft position sensor low signal level
- P0343 Camshaft position sensor high signal level
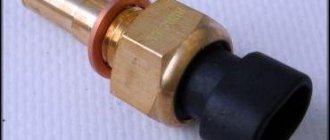
The phase sensor on LADA cars is located:
- on 8-valve engines on the left side of the cylinder head (in the direction of travel).
- on 16-valve engines on the right front part of the engine (it is not visible from above, you can determine the position by looking at the wiring harness).
How to check the phase sensor (using a multimeter in voltmeter mode):
- Remove the block with wires from the sensor by releasing the lock.
- Turn on the ignition.
- We connect the negative probe of the device to ground (to the car body), the other to contact “B” of the connector. The voltage must be at least 12 V (if it is less or is absent, the battery is discharged, the power circuit or the computer is faulty).
- We connect the negative probe of the device to contact “A”, and the other to the positive terminal of the battery. The voltage must be at least 12 V (if it is less or is absent, the battery is discharged, the power circuit or the computer is faulty).
You can check the serviceability of the sensor in the store (so as not to buy a fake) using a key that must be magnetized.
Replacing the phase sensor:
- Disconnect the block with wires.
- On modern engines (on Lada Vesta and XRAY), the bracket for auxiliary units should be removed.
- Unscrew one or two mounting bolts (depending on the engine) using a 10mm wrench.
You can also verify that the phase sensor is working properly by replacing it with a known working one. A common cause of malfunction is poor contact; we clean the contacts from oxides.
Let us remind you that the LADA engine management system has a number of other sensors, each of which performs its own function. We discussed other causes of problems in engine operation earlier.
Source
How to make sure the DPRV is working?
The easiest way to check the camshaft sensor is to connect a car scanner or a computer with an installed program corresponding to the make of the car to the diagnostic connector of the car. If the element is faulty, then after starting the engine the device will display the following error codes:
- P0340 – there is no signal from the camshaft position detector;
- P0341 – valve timing does not coincide with the compression/intake strokes of the cylinder-piston group;
- P0342 – the signal level in the electrical circuit of the DPRV is too low;
- P0343 – the signal level from the meter exceeds the norm;
- P0339 – an intermittent signal is received from the sensor.
Of the best options in terms of price-quality ratio, we can recommend the Scan Tool Pro Black Edition auto scanner.
But since the vast majority of car enthusiasts do not have scanners and laptops with software at their disposal, a more affordable method is used - checking with a digital multimeter. Diagnostics is carried out in 3 stages:
- Visual inspection of the wiring and continuity of the circuit for breaks.
- Measuring the outgoing current at the control contact of the DPRV.
- Testing functionality by approaching a metal object.
At the first stage, you need to ensure the integrity of the wiring and reliable contact of the connecting block. Carefully inspect the supply cables for kinks, cracks and melted insulation. Testing the current-carrying conductors and searching for a break is performed with the same multimeter. Don't forget to clean the connector contacts from oxidation.
After checking the electrical wiring, proceed to diagnosing the camshaft sensor itself. Instead of standard alligator clips on the tester, you need to use wires with needles so that you don’t have to be tricky with connecting to the connecting block. Diagnostic work is carried out in the following order:
- Open the hood and look for the DPRV on the cylinder head. Usually the element is placed on the end of the engine or the side wall of the cylinder head next to it.
- Using the vehicle's electrical diagram or data for a specific sensor model, determine the location of the two power contacts and the third wire going to the controller.
- Turn on the ignition and measure the voltage between the vehicle ground and the control contact of the element (on VAZ cars this is the middle wire, marked “C”). Normal multimeter readings are at least 90% of the supply voltage, that is, 12 * 0.9 = 10.8 V.
- If the obtained values are below normal, the sensor is faulty and must be replaced. Otherwise, perform the third stage of verification.
After connecting the multimeter to the middle contact and ground of the car, turn on the ignition again. Bring a steel object (for example, an open-end wrench) close to the end of the element, monitoring the display readings. A working sensor should respond to the approach of metal with a voltage drop to 0.2–0.4 V.
If checking the camshaft sensor with an iron object does not change the tester readings, the DPRV should definitely be changed. When purchasing a new part, keep one thing in mind: even original spare parts can be sold without a thin O-ring. You will have to find and buy it separately or use an old seal, provided that the material is not cracked or “dull.”
Source
Design, functional features and typical malfunctions of the VAZ 2110 phase sensor
Constant modernization in the field of road transport ensures technical improvement of its internal filling. The functioning of modern technology is impossible without the presence of a variety of measuring, signaling, adjustment and monitoring devices capable of converting the value under study into a signal suitable for use.
The phase sensor (DPRV) on the VAZ 2110 is one of the most critical elements that ensures optimal operation of the internal combustion engine. Its main purpose is to analyze the angular position of the camshaft in a certain time period. The information received from it is needed for the operation of the ignition and fuel injection mechanisms. Having this data, the car ensures coordinated operation of the camshaft, taking into account the placement of the cylinders in the engine, which allows the supply of gasoline to a specific cylinder and ignition of the fuel-air mixture.
Kinds
Depending on the engine modification, the VAZ 2110 camshaft sensor has two types of design:
- Slotted. The sensitive element is U-shaped, and the moving element (mark) of the setting disk passes between its halves.
- Tortsevoy. It has the shape of a cylinder, at the end of which there is a sensitive element for reading the proximity of the mark.
For each type of DPRV, the corresponding type of camshaft pulley is used. For a slotted DPRV, a pulley with teeth and one air gap along the entire circumference is used. When the gap passes, the sensor transmits a corresponding signal. For an end-mounted DPRV, a pulley with one mark or one tooth at the end of the pulley is used. The DPRV reacts when it passes a protruding pulley element.
DPRV on VAZ 2110 8 valves or 16 valves have no functional or design differences.
Purpose of the phase sensor
The device is needed to determine the operating cycles of the electric motor. The camshaft cams cause the movement of the shut-off and control valve mechanism, and the DPRV detects the opening of a specific valve. Such a control system is integral, including a sensitive element and a signal transformation mechanism. The work consists of the device recording the cylindrical phases of intake and exhaust.
For carburetor power units it is not necessary, since the spark arrives at the moment of compression and after exhaust gases are released. The crankshaft sensor serves this purpose.
The device is located in the upper part of the block head near the air-cleaning filter. The features of its work are based on the Hall effect. A DPRV, consisting of a magnet and a semiconductor, detects voltage changes under the influence of an electromagnetic field. With a constant magnetic field, the sensor is indifferent. To change the parameters, a metal element must enter the magnetic zone. In a car, such an element is the teeth on the camshaft in the area controlled by the DPRV.
In order for a car to operate smoothly, it requires periodic diagnostics of systems and mechanisms. If faults are identified when diagnosing the phase sensor, it will need to be checked. A voltmeter is required for surface analysis.
Video with a lecture on Hall sensors
The most common causes of phase sensor failure in a VAZ family car with an engine injection system.
Sensors are classified as measuring instruments; they convert measured physical quantities into electrical signals and display digital data on a display.
The phase sensor is present in all 16-valve engines of the VAZ family; On 8 valves with Euro-3 toxicity standards and with phased, sequentially distributed fuel injection.
It is worth noting that in the period from 2004 to 2005, the mass introduction of phase sensors began on such engines as 2111, 2112, 21114, 21124 with Bosch M7.9.7 and January 7.2 engine control units.
The phase sensor is designed to determine the engine operating cycle and generate a pulse signal. The phase sensor is an integral sensor, i.e. includes a sensitive element and a secondary signal-to-pulse converter. The sensor's sensitive element operates according to the Hall principle, responding to changes in the magnetic field. The secondary element of the sensor contains a bridge circuit, an operational amplifier, and an output stage. The output stage is designed as an open collector.
Malfunctions and replacement of phase sensor
A malfunction of the DPRV is indicated by the fact that the engine starts only as a result of prolonged rotation by the starter (about 10 times), while the power decreases slightly, the dynamics deteriorate, and the car's takeoff run is accompanied by failures. With such signs, you should not delay repairing the phase sensor, since the cost of replacement is low.
An additional confirmation of the malfunction of this device is increased fuel consumption. If the electric motor detects a defect in it, it removes it from the system and begins to function in emergency mode. As a result, fuel begins to be supplied simultaneously to all cylinders without taking into account their location, based on the readings of the crankshaft sensor.
Sometimes when starting the engine, the “check engine” signal is displayed on the panel and shows an error in the phase sensor. This algorithm is considered the norm. Its purpose is that during the process of starting the engine, while the control system is waiting for a command from the DPRV, in the event of its absence, it can switch to the mode of receiving data from the crankshaft sensor. As a result of this, the electric motor starts and error signal No. P0340 turns on, indicating the need to check the VAZ 2110 phase sensor.
To effectively eliminate an error caused by DPRV, it is not necessary to contact a car service for qualified advice. Most often you can do it yourself; the whole process takes no more than 10 minutes.
Its replacement begins by removing power from the battery, as a result of which the memory of the control unit will be reset. If you neglect this stage, the device will continue to function in the same mode as the faulty one. It will begin to work efficiently only after several starts of the electric motor. The necessary tools are a “10” wrench and sealant for insulation.
The next step in replacing the phase sensor on a VAZ 2110 will be to disconnect the wires and remove them using a key. The new device should be coated with a small layer of sealant and wait about 5 minutes before installation. The final step is to install the device in the seat and connect the wires.
Then you need to connect the battery, start the electric motor and check the “check” light signal. If it is not enabled, this indicates that the installation is correct.
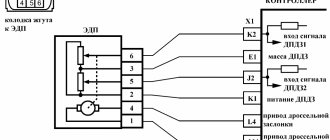
Homemade test stand
Below is a diagram that, once assembled, can be tested. It appears that the sensor could have been left on the engine. But not only the electrical part is important, but also the ability to remove and bring up the steel plate.
So, taking an E battery (12 Volts) and two voltmeters, we assemble the circuit. Next we run the test:
- On the “free sensor”, the voltmeter V1 will show a voltage of 0.4 V (or less);
- If you install a plate from a transformer in the slot, the voltage will change to 10.8-11.5 V.
Plate dimensions: 20x80x0.5mm or larger. If at “step 1” the voltage was higher than specified, the sensor is faulty. At “step 2”, on the contrary, the value should exceed V2*0.89.
We did not come up with the stand layout, but took it from the information letter. On different VAZ-2112 engines, the phase sensor is checked differently (see photo).
Screenshot of the VAZ “65-2003-I” document
For those who don't understand everything
The rectangle shown in the diagram is a resistor. Resistance is 680 Ohms, power is any. The power source can be not only a battery, but also a 12-volt adapter.
Element E can be an LATR with a rectifier. Then, firstly, try not to exceed the voltage, and secondly, connect the ground (pin 1) to the “ground” tap of the LATR.
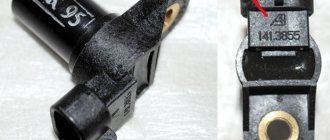
Instead of the numbers 2112-3706040, the article number 21120-3706040 is found. Both designations are correct. You can also find an article with the numbers -00, -01, -02... This is how the manufacturer is designated: 01 and 03 - “SOATE”, 00 - “Autoelectronics”, etc.
Parts with article number 2112-3706040-04
Recently, flexible lead sensors have been launched. The length of the wires is 15 cm. So far there is nothing like this in retail. But the article numbers remained the same - 2112-3706040-XX.
Phase sensor VAZ 2112
The phase sensor (PPV) is one of the most critical elements that ensures optimal operation of the internal combustion engine. Its main purpose is to analyze the angular position of the camshaft in a certain time period. The information received from it is needed for the operation of the ignition and fuel injection mechanisms. Having this data, the car ensures coordinated operation of the camshaft, taking into account the placement of the cylinders in the engine, which allows the supply of gasoline to a specific cylinder and ignition of the fuel-air mixture.
Symptoms of a problem
If you have the following symptoms, then the phase sensor (df) is most likely faulty.
When starting the engine, the starter spins for 3-4 seconds, then the engine starts and the check engine lights up. In this case, during startup, the computer waits for readings from the phase sensor, does not wait and switches to engine operating mode relying on the ignition system (according to DPKV).
Increased gasoline consumption. (Also read: Reasons for high fuel consumption on VAZ)
Self-diagnosis mode failures.
Reduced engine dynamics. (the reason may also be the mass air flow sensor and low engine compression)
Relay and fuse box at the link.
On these engines, the sensor is located at the end, in the rear cover of the timing belt. Replacing the camshaft sensor on a VAZ 2110, VAZ 2112 is not at all complicated: use a “ten” key to unscrew the two bolts and remove it from the cover.
How to check
1. Set the voltage at voltmeter V1 on the power supply unit “E” to 13.5±0.5V, the voltage at contact “B” of the sensor must be at least 0.9.
Changing the oil seal
Below is a step-by-step manual for changing the camshaft oil seal for a VAZ 2110 car. The instructions are relevant for 16- and 8-valve engines. If you notice a new knocking noise coming from the camshaft, then, apparently, you need to disassemble it. Most likely, the knocking will go away after replacing the element. The part itself must be purchased in accordance with the manufacturer's specifications.
As for the characteristics themselves, the component must correspond to the dimensions of the part installed in a given car model. If the specifications are not met, you may have to go to the store for a new oil seal in the midst of repairs.
We change it with our own hands
- First of all, you should dismantle the timing belt of the VAZ 2110.
- Then you will need a "17" wrench. Take the tool and begin to unscrew the screw that secures the toothed disk of the timing pulley. You need to make sure that the pulley does not turn. To do this, you will need to pass a “10” head through the hole in it, which must be put on an extension cord. Engage the nut securing the rear cover of the timing belt drive.
- After this, using a screwdriver, pry up the timing pulley disk and dismantle it. At this moment, be careful: under no circumstances should the toothed disk key be lost. Remove it from its installation location.
- Now, using the same screwdriver, pry up the camshaft oil seal that needs to be replaced and remove it.
- Take a new oil seal and lubricate its edge and installation location with engine fluid. If you do not lubricate the element itself with oil, the knocking may not go away. To install the component you will need a small piece of pipe. The oil seal will need to be pressed in carefully. You will also need a hammer for this.
- Carry out all subsequent assembly in reverse order. Don't forget to align the timing belt correctly.
After completing the repair work, start the engine and check if the knocking noise disappears. If there is no knocking noise, then the whole problem was in the camshaft oil seal.
Actually, this completes the procedure for replacing and eliminating camshaft knock. We strongly advise you not to carry out this work yourself if you do not have enough skills. Incorrect tightening of the timing belt and incorrect alignment of this element to the markings can subsequently cause the belt to break. If this happens while driving, the VAZ 2110 engine valves may bend. As you understand, subsequent repairs will cost a pretty penny.
Malfunctions of the VAZ 2112 phase sensor (16 valves)
The VAZ 2112 16 valve phase sensor, which is known to many car enthusiasts as a “camshaft position sensor,” is an ordinary device that contributes to the normal functioning of the engine in a car. It is installed on all VAZ models with a 16-valve engine. It can also be found on 8-valve engines with Euro-3 emissions standards and phased fuel injection.
The principle of operation of the phase sensor in a system with phased injection
The device transmits a pulse to the engine’s electronic control unit, which controls the amount of fuel supplied and the process of the gasoline injector supplying the cylinder at the moment the intake valve opens.
The phase sensor is used to accurately determine the operating cycles of the motor and clearly generate the corresponding pulse signal. It is located near the cylinder head, which is located on the air filter side of the engine.
Causes of a faulty phase sensor
1. When the engine ignition is turned on, the starter begins to rotate for about 3-4 seconds, after which the engine gradually starts up and the check engine is turned on. In such a situation, at the time of startup, when no readings from the phase sensor reach the electronic control unit (ECU), the system automatically switches to engine operation based on the ignition system indicators (according to the DPKV).
2. The vehicle self-diagnosis mode goes out of order.
3. Begins to increase fuel consumption.
4. The level of engine dynamics decreases. At the moment of acceleration, failures occur.
5. The indicator light with the word “CHECK” starts to light up.
If the phase sensor on the VAZ 2112 malfunctions, the check light comes on and the system displays error P0340 - “Phase sensor error.”
Checking the phase sensor
A device malfunction can only be diagnosed using a diagnostic tool. To complete the check you will need to follow a few simple steps.
Place the upper cylinder of the phase sensor at top dead center, while the sensor responsible for the location of the crankshaft should be directed at the base of the twentieth tooth, counting from the first two missed ones. If in this position nothing happened to its operation and to the pulley, switch the error to the ECU and see, depending on what circumstances it occurs again.
If no such error occurs when the engine is idling, you should check the corresponding connections and all wires. To do this, just move the terminals and wiring, and the occurrence of an error indicates a problematic connection, and not a failure of the sensor itself.
When the error appears 15 seconds after the reset was made, the phase sensor should be replaced with a new one.
Replacing the sensor
To change a non-working sensor you will need:
1. Disconnect the terminal. To do this, carefully unscrew the two bolts using a 10mm wrench.
Advice! Carefully unscrew the bolts so that they do not fall under the car or get into the generator along with the washers.
2. Remove the sensor and inspect it for mechanical damage coming from the camshaft pulley.
3. Remove the protective plastic casing and completely check the entire mechanism. If there are no traces of contact with the pulley, only the sensor should be replaced and reassembled in reverse order.
Correcting the problem in a timely manner will help your vehicle last much longer and protect you from untimely breakdowns while the car is on the road.
Source
Lada 2110 21114 1.6 8V 2007 MT › Logbook › Error P0340 2110 phase sensor DF, DRV
A check was displayed, after connecting the laptop the program showed an error - P0340 for the phase sensor or as it is also called the camshaft sensor. I decided that the sensor had died and replaced it with a Kaluga one purchased on the market. The error went away, I sighed. About a month later, the same situation, again an error in DF. I removed the terminal from it and saw that the positive contact i.e. the middle one has oxidized. I picked up contact cleaning aerosols from the market, treated it, and let it dry for 15 minutes. And since the contacts themselves were already approaching, I decided to press them a little with a screwdriver, somehow it was possible... but not of good quality due to the design of the contact itself. I put the sensor back and decided to observe. I started it, drove about 50 meters, the check light came on, I think everything is repeating itself again, after driving a little more, the car warmed up to operating temperature and the error disappeared, I think miracles! After traveling for a couple of days, the situation is the same. I think DF has given a long life again. I bought a new sensor, again from Kaluga, but in a different market. I installed it, the error went away, but I think I found the problem, as a version - in the oxidized contact, because of this, the sensor died, and the error went away after the engine warmed up, because along with the warming up, both the sensor and the contact warmed up. After riding for three weeks this time, this error came to me again