The standard factory signal is often very weak and is not enough for other road users to notice the car. It is for this reason that a different signal will be installed, which used to be on the Volga car. Before installation, you must make sure that the noise level is no more than 120 dB, because otherwise there will be problems with maintenance. How to make the beep louder? Should you completely replace the standard system or simply install additional signals in the car's engine compartment?
There are several ways to install a signal from the Volga on a VAZ 2112, 2111, 2110. Simply replacing is not an option. The problem is that two wires are connected to the standard sound signal - positive and negative: ground is supplied through the case, and the positive wire gives direct current and in this case it also powers the radiator fan. In order for the new signal from the Volga to work, only one positive wire is needed. The minus is supplied through the body.
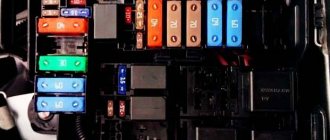
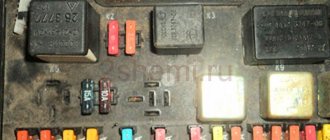
In this case, different current consumptions are also realized here. The standard signal consumes only 5 amperes, and the signal from the Volga consumes 8 amperes. For this reason, you will need to install a 4-pin relay. The relay can be installed in the fuse box or in the engine compartment of the car. To install a relay inside the cabin for operation, you need the sound signal itself, a single-core wire, a wide female terminal, a 4-pin 30 ampere relay and a relay block. The sound signal is much larger than the standard signal, so in this case it is necessary to install it on the bracket so that the standard sound is not lost. It is best to install the relay in a free fuse block cell.
Pin 85 is used to connect a 13-pin relay (signal switch on the steering wheel). If you look at the diagram, it is indicated in gray-black color, but in the photograph it is white. You need to connect the wire of the 87th contact of the relay to the free space. To supply the positive wire, you must first route the wire of the 'Ш5-6' connector to the 30th contact of the relay and, using a jumper, to contact 86. The plus is supplied when the signal is pressed through contact 87. There is no need to use the red-white wire for the signals, but current is supplied to it and in this case it is better to install insulation on it. There are many advantages to this method: the relay is located in the mounting block and moisture or water will not get there, the factory wiring is located in the engine compartment and in this case the wire will be taken separately and not from the fan.
Now we need to consider the case of installing a relay in the engine compartment. There are many differences here from the first option, because all the work will be carried out in the engine compartment. All the same materials are used, only in this case you will also need to purchase: a hanging fuse, 8 pieces of female terminals, a two-meter plastic tube. The horn can be installed wherever it is convenient and you need to connect it according to one of the circuits. In the first scheme, the current is taken from the fuse block through its own fuse, and in the second scheme, the plus must be taken directly from the battery and through a separate 20 ampere fuse. Many people recommend installing the signal according to the second scheme.
The relay must be placed where it will not be exposed to moisture or water. It is best to wrap the relay with insulating tape. Using a size 8 wrench, you need to unscrew the 2 bolts securing the radiator grille and unclip the 2 lower latches, remove the grille completely. We remove the standard sound signal and lay the wiring according to a new diagram. All connections must be carefully insulated, and the wire that connects the wires from the signal must be inserted into the corrugation. We install the relay in the desired position and install the radiator grill back.
Every car must have a working horn. Thanks to the horn, the driver can prevent an emergency situation on the road and avoid a possible collision. But it often happens that the horn refuses to work. For what reasons does the sound signal on the VAZ 2110 not work and how to fix this problem - read below.
Methods for troubleshooting
If the horn circuit is broken and the horn stops working, then there are several options for solving the problem:
- First you need to diagnose the safety device. If this part is burnt out, then you just need to replace it with a new one; the device is located in the mounting block. The replacement process will not take much time; any car enthusiast can cope with this task. If replacing the fuse gave results, but after some time the horn stopped working again, then most likely the reason lies in voltage surges in the on-board network. Overload contributes to accelerated burnout of the fuse element, so you will have to look for the source of the load and solve the problem. To do this, use a multimeter or seek help from an electrician.
- If the horn itself malfunctions, the device must be replaced. If diagnostics by direct connection to the battery do not produce results, then most likely the reason lies in the device itself, which needs to be changed.
- Short circuit. To diagnose, you will need a multimeter and a little experience. Using a tester, you can find a short circuit, but if you have never encountered such a problem before, it is better to seek help from specialists.
- If the clamping contacts or slip ring are worn out, then the failed elements must be replaced. It is not a fact that you will be able to buy new contacts or a ring, so most likely you will have to change the horn assembly.
- Another reason why the horn does not work is oxidation of the internal contacts. Over time, as mentioned above, dirt and deposits accumulate on them, which leads to the obstruction of sound. You can try to disassemble the steering wheel of the car, then clean the internal contacts and assemble the steering wheel (the author of the video is the channel Alexander Amochkin Kolomna AAK).
If you are faced with the problem of a non-working horn, then you will probably be wondering how to replace it:
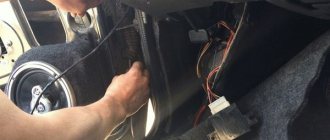
- First of all, you need to remove the steering wheel. To do this, remove the trim and unscrew the bolts that secure the steering wheel.
- After the steering wheel is removed, you can clean the contact tracks, perhaps this will help solve the problem. Make sure that the wire contacts in the column are as clean as possible .
- Unscrew the two screws located under the plastic cover. After dismantling the cover, you will be able to see the contact plate; there is a possibility that the problem lies there. Clean the contacts and check the signal functionality. If the horn does not work, then using a 24mm wrench you will need to unscrew the nut, but you do not need to unscrew it all the way.
- Next, the steering wheel itself must be pulled towards you; this will require some effort. You can try to move the wheel by tapping it from different sides. When you feel that the steering wheel has given way, the nut is unscrewed completely.
- After dismantling the steering wheel, we proceed to removing the horn. There is a module located under the grille of the radiator unit; it must be removed; to do this, unscrew the nut to 13 and disconnect the connector.
- Install a new one, replace the steering wheel and check the operation of the horn.
Self-installation of a signal from the Volga on a VAZ
Most models developed by VAZ, including the VAZ 2108, VAZ 2109 and VAZ 21099, which are still widely used today, are equipped with not very euphonious sound signals, which often confuses the owners of these cars. Meanwhile, nowadays there are quite a lot of quite worthy replacements for the standard VAZ signal and, in particular, the option of installing an excellent sound signal from the Volga can be an excellent alternative.
So, to implement such a not too expensive idea, we will need the following equipment and related materials:
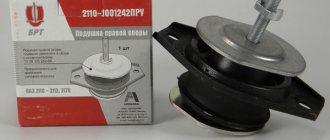
- Conventional “Volgov” dual signals with ground output to the housing;
- Relay type 90.3747 together with a block and mounting flange;
- Set of wide terminals;
- 20A fuse together with mounting block;
- Multi-core insulated wire with a cross-section of at least 2.5 mm. sq.;
- Heat-shrinkable tube or electrical tape;
- A piece of aluminum or steel angle.
Practical implementation of the modification
As always, before working with the car’s electrical circuit, you should disconnect the “negative” power wire terminal from the battery, thereby protecting yourself from accidental short circuits.
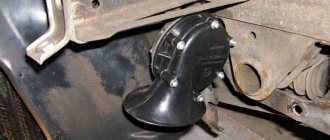
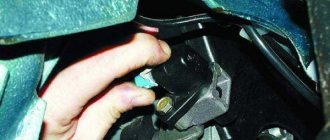
Next, in order to gain access to the standard signal, it is necessary to completely remove the radiator grille, after which it becomes possible to dismantle the sound device (along with the mounting bar). Don't forget to also disconnect the signal ground wire.
Having assessed the installation location of the standard signal, we modify the mounting of the signals from the Volga using a purchased corner on which we drill holes in accordance with the markings at the installation site. If our corner is made of steel, we cover it with a layer of paint to protect it from corrosion. When attaching signals to the corner, we take into account that one of the mounting bolts will serve as a mass, which means it must be of the appropriate length to ensure reliable contact with the metal part of the car body.
We fasten the corner with the new signals using the bolt securing the standard signal (again, remembering the “ground”, you can use a castle washer). If the fastening bolts on the corner interfere with installation (the bolts touch the radiator), we make adjustments by placing washers.
The connection diagram for Volga signals to a VAZ is as follows:
To make a reliable connection, we crimp the ends of the wires used with terminals, and protect all exposed areas with heat-shrinkable tubing or electrical tape.
As for the relay, there is a place for it on the back of the radiator in close proximity to the headlight unit.
We attach the “negative” wire of the relay (pin 86), equipped with a ring terminal for a screw, to the car body through a castle washer (after having previously stripped the metal at the connection point).
We connect the wire from the 30th contact of the relay (going through the fuse) to the “positive” terminal of the battery, in other words, the main power supply for the signal will be supplied directly from the battery.
The sound of new signals can be adjusted using a special bolt on the housing. In addition, the signal sockets should be positioned in such a way that moisture does not accumulate in them, and it would not hurt to protect all bolted connections with lubricant.
It should be noted that the installation of a Volgov signal on a VAZ can be carried out according to a simplified scheme, that is, without the use of an additional relay. In this case, the connection is made using the standard signal power wires, taking into account the fact that the basic signal uses its own relay located in the fuse block. This method is of course simpler and less expensive, but it has certain disadvantages. The fact is that the positive wire feeding the standard signal is too thin for a more powerful “Volgov” device and the voltage drop across it is too significant (the signal will sound weaker than we would like). In addition, the protective fuse in the standard network protects not only the signal circuits, but also the fan, and its 5A rating is clearly not enough (when both devices operate simultaneously, the fuse quickly burns out and, at the same time, the tracks on the circuit board of the fuse box are often damaged).
Tags car signal, tuning VAZ
Similar materials
Is a Volga horn good?
Is it possible to use a signal from the Volga in the “ten”, how to install it and how to connect it yourself? In the VAZ 2110 it is allowed to install a Volga horn, and the latter can be either old or new model. There is no particular difference between these details, except that the tonality will be slightly different. And, of course, the cost. But keep in mind that installation by simply replacing the device will not work.
The bottom line is that two cables are connected to the standard device - one with a negative output, which comes from the button on the steering wheel, and the other with a positive one. The latter is permanently connected; it also powers the ventilation device of the radiator unit. But in Volga devices, only one cable is used - positive, since the mass in this case is supplied through the body, that is, from the attachment to the vehicle body. In addition, you must also take into account that both systems use different current consumers - the standard options require no more than 5 amperes, while the Volga ones require 8 amperes each. The result is 16 amperes (video author - Master Bruce).
Accordingly, to correctly connect a product from Volga to a VAZ 2110, you will need a four-pin relay; you have several options for installing it:
- in the vehicle interior, in the mounting block with fuses;
- in the engine compartment, but in this case, please note that the relay should be securely insulated to prevent moisture from entering.
How to connect the Volga signal
Standard sound signals of LADA cars consume no more than 5A, and Volga horns consume 7A each. In this regard, to connect them it is necessary to use a 4-pin relay. The owners claim that it is not necessary to install an additional relay. The Volga signal connection diagram is universal for all cars:
Before starting work, it is recommended to disconnect the negative terminal from the battery. All wires are laid in corrugation. We place the relay in a place protected from moisture and dirt. The whole process is also shown in the video:
About the guarantee. If you independently modify the car in terms of electrical components, there is a possibility of refusing warranty service for the car. Therefore, the installation of signals from Volga should be carried out at a service center, where after connection they will be ready to provide a document confirming the quality of work. You can also contact an authorized dealer for such modifications.
Are you satisfied with the operation of the standard sound signal on the LADA model? Are you ready to install a Volga horn?
By the way, on Lada Vesta and Xray you can install louder FIAMM sound signals without interfering with the wiring.
Keywords: lada xray safety | safety of Lada Vesta | safety of Lada Largus | safety of Lada Granta | safety of Lada Kalina | safety of Lada Priora | 4x4 safety | Niva safety | universal article
0 0 0 0 0 1
Share on social networks:
The feasibility of self-repair
So does it make sense to repair the horn yourself? If we take into account the recommendations described above, then the repair is advisable only if the car owner is as careful as possible when performing it. After all, during the repair work, there is a high probability that an inexperienced car enthusiast will damage the wiring in the unit or connect the contacts incorrectly. Therefore, if you have never encountered a repair procedure before, it is better to entrust this matter to specialists or simply replace the horn assembly.
Possible malfunctions: signs and causes
There are several signs of a malfunctioning sound signal on a VAZ 2110 or 2112:
- The sound signal has disappeared. The driver presses the steering wheel or the corresponding button located on it, but there is no beep.
- The beep appears and disappears. When the driver presses the steering wheel, the signal may start to work, but then immediately disappears.
There may be several reasons why the horn refuses to function:
- One of the most common reasons is the failure of a safety device. In this case, the integrity of the horn itself will not be compromised, which greatly simplifies the repair procedure.
- Failure of the horn itself. If after replacing the safety device the sound does not appear, you can try to check the functionality of the horn by dismantling it and directly connecting it to the battery. If the device is working, then when connected to the battery it will begin to emit a corresponding signal.
- The reason may also be a short circuit in the vehicle's on-board network.
- Another cause of the problem may be worn out clamping contacts located on the steering column. This problem often occurs in the cars of our compatriots. In any case, the clamping contacts wear out over time due to use; this cannot be prevented. As an option, you can try to increase the service life of the contacts; to do this, they need to be treated with graphite lubricant from time to time.
- Worn slip ring on the steering wheel. As stated above, there is no escape from wear and tear, so sooner or later every car owner will face such a problem. As in the previous case, you can try to increase the service life of the slip ring by applying graphite lubricant to it.
- Oxidation of contacts on the steering wheel. With prolonged use, deposits will begin to accumulate on the internal contacts, which makes it impossible to transmit the impulse to activate the horn.