| The interior of the LADA Priora does not warm up in cold weather, and the windshield and side windows freeze? There is only one reason - the stove does not heat well . The LADA Priora interior heating system performs a number of functions (heats, cools, ventilates the interior); in this article we will look at the heater design separately. |
The car is equipped with a heating and ventilation system, which serves to create the most comfortable conditions for the driver and passengers, regardless of weather conditions. The heating and ventilation system includes:
- heater
- heater fan.
- cabin air temperature sensor.
- air distributor housing.
- air ducts
- deflectors.
The air from the heater enters the air distributor housing and then into the air ducts. Through them, air is supplied to the windshield and side window vents, to the central and side deflectors on the instrument panel, as well as to the feet of the driver and passengers.
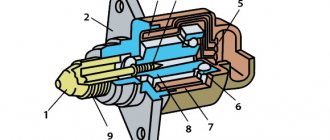
Elements of the heating system LADA Priora
1 — filter cover; 2 — heating and ventilation system filter; 3 — heater housing; 4 — micromotor-reducer of the heater damper; 5 — heater radiator; 6 — additional heater fan resistor; 7 - heater fan
Heater parts: 1 - screw 1/76691/01; 2 — heater radiator 2110-8101060; 3 — left heater casing 2111-8101025; 4 — heater control damper 2110-8101538; 5 — right heater casing 2111-8101024; 6 — air duct housing 2111-8119124 intermediate; 7 — screw 1/76692/01; 8 — lower air intake housing 2111-8119026; 9 — bracket 2108-8101110; 10 — bracket 2111-8119102 right; 11 — screw 2114-5325388; 12 — air filter 2111-8122020; 13 — upper air intake housing 2111-8119025; 14 — filter cover 2111-8119116; 15 — screw 1/76702/01; 16 — screw 1/76691/01; 17 — additional resistor 2123-8118022; 18 — screw 2123-6302332; 19 — screw 2114-5325388; 20 — air supply pipe 2123-8118096; 21 — electric fan 2111-8118020 of the heater; 22 — bracket 2108-8101110; 23 — gear motor 2110-8127200 for the heater damper; 24 - screw 1/76691/01
How to Tell if Your Air Ducts Need Cleaning
There is a simple set of signs that allows the car owner to determine that it is time to clean the air ducts:
- Presence of extraneous sounds. They can occur both when the air conditioner is running and when it is turned off. The sounds may be like whistling, crackling, or just noise.
- Formation of odor in the cabin. This sign is clearly felt; a smell begins to be present in the cabin that you have not smelled before. Ventilating the interior will not help in this case, and the smell begins to intensify when the air conditioner is turned on.
- Occurrence of moisture: in air ducts; air conditioner parts; or drops of such moisture began to leak from the air ducts. The air conditioner needs immediate cleaning.
Video lasts 5:50 minutes
Heater radiator
| The heater radiator is connected by hoses to the engine cooling system. Coolant constantly circulates through the heater radiator. The heater control damper directs outside air to or bypass the heater core. In intermediate positions of the damper, part of the air passes through the radiator, and the rest bypasses the radiator. In the extreme positions of the damper, all air passes through the radiator or bypasses it. |
Pro-sport601 › Blog › New model heater deflector instead of the old 2110
I decided to replace the central deflector of the vertical arm with a horizontal one. Before installation, I went online for information, it says there is nothing complicated with the installation, it’s more difficult to purchase spare parts because... They are difficult to find on store shelves. I bought everything I needed in disassembly; it is usually sold complete with a torpedo. My car is 1998. and if you have an air direction damper 2110-8103033, then you will lose hope of installing a deflector, because this damper does not have a hole for the horizontal lever rod.
This is the shutter
For two days I thought for a long time what to do because... There was no answer to this question on the Internet, well, how the fuck is everything fine with me, as usual, through my ass. I didn’t want to take anything off to change the damper for a new one with a hole, and especially since I also had to find it if I could find it and buy it. After thinking for a long time, I decided to break the system, whatever happens, without removing anything, make a hole for the horizontal lever. honorable In general, I decided to make a hole using a small screwdriver and a lighter, set the tip of the small screwdriver on fire and hold it over the fire for 30 seconds, and here you have a soldering iron))
We burn a hole with a hot screwdriver, pressing firmly on the indicated place, I managed to do this in two attempts by heating the screwdriver
So there was access for the lever, I tried it on and the lever fits perfectly and does not fall off.
We remove everything that is not necessary.
Install the damper direction regulator.
Heater assembly
1 — micromotor-reducer of the heater damper; 2 — heater control damper; 3 — additional heater fan resistor; 4 — blowing hose for the fan motor; 5 — heater fan; 6 — filter cover of the heating and ventilation system
The heater is installed in the engine compartment under the right windshield trim and is attached to the front panel. A filter is installed at the heater inlet to clean the air entering the heating and ventilation system.
A complete guide to removing, installing and repairing air ducts.
Remove the central air duct. To do this you will need: 1. 2 flat screwdrivers (wide and narrow)? my photos (lost) 2 knives were used here 2. tweezers 3. 5-10 minutes of free time 4. Hands growing, from where “MUST”
In order to remove the central air duct, this requires uprooting it from its seats, namely the 6 protrusions with which it is held in the dashboard. Marked in Red
larger protrusions that hold the air duct and
Blue
- smaller ones:
I started disassembling from the upper right corner. To do this, we drive (approx. 2 cm from the edge) a screwdriver between the air duct housing and the torpedo, about 4-5 cm, you can expand the resulting hole and we see the plastic protrusion that holds the air duct. The central one is slightly different from the outer ones, it is a little closer to the front side and smaller. We hold the screwdriver(s) by the protrusions and, acting like a lever, push the corner of the air duct outward. It turns out something like this.
Next, we grab this edge and pull it, at the same time we put the screwdriver behind the protrusion in the left corner and help, we pull out the air duct, pay attention. I found the air duct illumination wire on the left side was shorter than the right.
To remove the lighting power connector(s), you will need a thin flathead screwdriver. We insert it between the father and mother, there is a small protrusion, we move it back a little and pull out the connector.
In order to change a burnt out light bulb, you will need to remove the mating part, i.e. mom with a light bulb
In order to pull it out, we take a thin flat screwdriver and insert it into the hole and, like a lever, push the “mother with the light bulb” up, you will have to apply a little force. Or there is another option, you can use a thick needle and insert it between the light guide and the “female”, in this case the latch bends and the “female” can be pushed up.
Well, that seems to be all.
If you have not yet pulled out the “mother with the light bulb,” then you will not be able to install or remove the light guide system, because The light bulb fits into the hole and therefore gets in the way. Accordingly, all assembly is in reverse order.
Continued (replacing light bulbs).
If you bought the original, then just stupidly change it
Or resolder
- I’m joking for sadomasochists
For this, light bulbs were purchased: 12V 1W for 3 rubles. a piece.
I already had a soldering iron with a thin tip, so I didn’t have to farm anything. Initially, the light bulbs were spot welded to the contacts, so with a thin awl, roughly speaking, I tore off the old light bulb. Then I tinned the light bulb terminals and contacts, just not on the side where the factory welding was (the solder doesn’t stick at all), but on the opposite side, having previously cleaned it. We solder the whole thing and cut off the excess. Now you can put everything together. Now all the backlight works. In the future, you need to resolder the non-working diodes in the dashboard.
Removing the side duct
using the left/driver's side as an example (photos not mine).
We remove the decorative cover at the end of the dashboard; it still covers the fuse box.
insert a flat screwdriver (preferably wide) into the hole and push the deflector out like a lever
then, as with the central deflector, pull out the backlight connector and completely remove
The right deflector can be removed in the same way, but it’s easier to push it out by hand, fortunately there’s enough space.
Dismantling the central air duct.
Why does the stove not heat well?
Author KakSimply!
In the cold winter, good operation of the car heater is very important for a motorist. The temperature outside is negative, but the car is warm and comfortable. However, it happens that the car heating system does not work well. Why does this happen and what can be done to fix this problem?
The most common reason for poor performance of a car heater is air in the cooling system or a malfunction of components such as the radiator or thermostat. In second place is incorrect installation or significant contamination of the filter in the cabin. At the same time, dust and dirt particles can penetrate into the motor, causing interruptions. If the car owner forgot to replace the antifreeze on time or used a low-quality liquid, this can lead to thermostat failure. The cause will be clogging of the radiator from the inside. A clogged radiator is a direct path to contamination of the air conditioner, and, as a result, to poor performance of the stove. Thus, in order for the stove in the car to work well, you need to carefully monitor the condition of the car and regularly carry out preventive checks of all its systems. This must be done without waiting for the onset of cold weather. To check the heating system, you need to open the interior heater tap and warm up the engine.
It is very important to see how tight the faucet and radiator are, and whether the fan is spinning well. It wouldn’t hurt to replace cabin filters, which are usually heavily dirty after a hot summer.
If the car has a climate control system, then its heating system will be more complex: a second radiator and air conditioning are installed in the car. The car heating system is in good condition if at an air temperature of -250C in the car interior, after 15 minutes of warming up, a temperature of +160C is reached. So, caring for a car heater requires constant monitoring of its operation, carrying out preventive maintenance and, if necessary, repairs. This is especially true for cars that have high mileage or a significant production date. It is better to eliminate minor deficiencies than to later change the entire heating system of the car.
Video on the topic
https://youtube.com/watch?v=h5bcpzkn-5I
Why does the stove not heat well?
How to determine thermostat malfunctions?
Thermostats, like all other components, sooner or later fail, so it is very important to know how to replace the thermostat and what signs indicate its failure. Its main malfunction is poor valve operation. If it gets stuck open or works intermittently, this leads to the engine boiling. If the valve, on the contrary, does not open, boiling of the cooling system cannot be avoided.
Thus, you should be wary and check the unit if the following signs occur:
- the arrow indicating the engine temperature falls while driving and rises when stopping;
- the motor takes a very long time to reach the 95 degrees required for efficient operation, but at the same time rapid overheating occurs;
- the lower pipe is cold when the engine is well warmed up, or heats up even if the engine warms up for only a few minutes.
The reasons for this behavior may be simple contamination or corrosion of the part.
The stove is a wide field for activity and creativity
One of the main complaints made by the owners of the domestic “Seven” is the insufficient power of the car’s heater, which is why even at full engine speed it can be quite cold in the cabin, and condensation or an ice crust forms on the windows. Modification of the VAZ-2107 stove is becoming one of the top priorities for a motorist who wants to increase the level of comfort of the car for the driver and passengers, as well as the quality of glass blowing while driving in the cold season.
Optimizing a VAZ stove turns out to be not so difficult if you have simple tools at hand, as well as access to spare parts from the heater of another car of the same brand, for example, a G8 or Nine, which has more power compared to this version of the car. You don’t even need special skills - it’s enough to know the design of the heater and have a standard set of tools and materials.
Device
- Air heating distributor assembly (left and right semi-casings, heated footwells and heated windows, movable damper drive lever (drive by gear motor, five fixed positions);
- Left and right ventilation air ducts connecting the side oval windows in the distributor semi-housings with the side deflectors (manufactured using blowing technology);
- Instrument panel trim (defroster) with guide vanes;
- Heating (blowing) nozzles for side windows (demister);
- Central and side ventilation deflectors;
- Leg heating air duct (front);
- Air ducts for heating the feet of rear passengers left and right.
- Spoiler.
Causes of poor-quality foot airflow
Almost all vehicle owners face the problem when the heater in the driver’s feet does not work on a VAZ-2110. The heating system on domestic cars has significant disadvantages - this is a weak air flow into the driver’s feet and towards the side windows. Often this situation occurs even during normal operation of the heater.
There may be several reasons for this, and all of them are related to the technical features of the heating system design.
The first and main reason why the stove does not heat with the required intensity is poor-quality sealing of the heating system air ducts. The heater ducts are made of plastic and have a large number of slots around the perimeter. As a result, a significant amount of warm air is lost through the holes in the air ducts and a weak flow reaches the final destination.
The second element of the heating system, which requires improvement for better heating of the interior, is the plastic air distribution unit. People also call the driver his Christmas tree. This unit also has slots, which significantly reduces the flow of warm air to the driver's feet, side windows and to the rear seats of the vehicle.
The next detail that causes poor heating of the interior is. Due to its design features, it does not fit tightly to the panel body. As a result, most of the hot air remains in the engine compartment and in the dashboard.
As you can see, the complex reason that the stove is blowing weakly is poor-quality sealing of the VAZ-2110 heater elements and the presence of a large number of cracks in the car’s heating system.
Before you begin to eliminate factory defects in the heater, you need to make sure that it is working properly
In case of problems with the functioning of the stove, it is important to first repair worn-out or damaged parts, and only then upgrade the heating system. Only in this case, modifications to the heating system of the vehicle will give a tangible positive result.
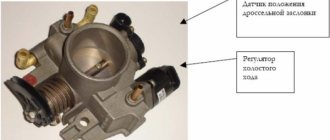
The damper drive does not work
It is impossible to check whether the Priora recirculation valve is working (on cars with the Panasonic climate system) by viewing errors in the operation of the system - the corresponding codes are simply not provided. Therefore, it is necessary to perform the following actions in accordance with the algorithm described in the diagnostic card:
- Use a multimeter to measure the voltage level between ground and contact No. 1 going to the mode switch;
- if the obtained value corresponds to the on-board network voltage, there is an open circuit in the recirculation switch section;
- otherwise, you need to measure the voltage between ground and contact No. 2 of the recirculation button when it is pressed;
- if the measured value is equal to the on-board network voltage, the switch itself is faulty, and then it must be replaced;
- otherwise, use a multimeter to measure the state of the recirculation key;
- if the value is equal to the on-board network voltage, there is an open circuit in the area between the mode activation key and the SAUKU heater controller;
- if not, we proceed to measuring the voltage in the area between ground and contact No. 1 of the damper solenoid valve (the button for turning on the recirculation mode must be pressed);
- if the obtained value corresponds to the voltage of the on-board network, there is a break in the electrical circuit in this area;
- otherwise, there will be an open circuit in the ground circuit of the damper drive valve.
The pinout of the Priora recirculation button is described in detail in the circuit diagram of the Panasonic climate control system. If the recirculation malfunction is caused not by an open circuit or a breakdown of the solenoid valve itself, but by a malfunction of the damper, replacing it can be quite difficult for an unprepared car owner.
If you go to a car service center, it will cost a pretty penny (about 10 thousand rubles), since the technicians will tell you that you need to remove the entire stove, drain the antifreeze, and also remove freon from the air conditioning system. You can do this yourself, and without draining the antifreeze and pumping out the refrigerant. Therefore, it makes sense to describe the procedure for replacing the vacuum drive if the Priora interior air recirculation damper does not work:
- To begin with, you will need an L-shaped screwdriver - it is not sold in stores, but it is not difficult to make by bending any existing one made of a fairly soft metal. We use it to unscrew the lower screw, which is located very inconveniently - there is a hole there large enough to stick your hand through and perform the necessary manipulations;
- the top screw is hidden behind the plastic of the stove body - it needs to be drilled exactly opposite the screw;
- disconnect the damper rod, for which you need to pull it to the left with a little effort;
- now the drive is free, all that remains is to pull it out (pull it a little to the left and press in the direction of the engine compartment - it should fall down), you need to pull it out carefully, since it can cling to surrounding parts;
- the procedure for inserting a new vacuum drive is also quite tedious - first we try to insert the valve into its normal place;
- the second step is to get the drive tube into the hole located in the lower part of the heater;
- put the hose on the valve itself;
- we tighten the screws in the reverse order (you will have to tinker with the bottom one, so you don’t have to tighten it - the valve will be held quite securely even without the bottom screw).
As you can see, you can replace the flap drive of the Priora recirculation system yourself.
Is all this necessary?
The video tag is not supported by your browser.
If the video does not play, try opening the page in a different browser.
In the video you can see the reaction of the deflectors to:
- closing the trunk door
- closing the driver's door
- turning on the 1st speed of the heater fan
- turning on 2nd speed heater fan
- turning on the 3rd speed heater fan
- turning off the heater fan
- restarting the heater fan
- Manufacturer: AVTOVAZ
- Availability: In stock
- Length: 21 cm x Width: 8 cm x Height: 4 cm
- Weight: 0.05 kg
- Product code: 17075
- Catalog number: 11180-8104086-10
- Cash upon receipt (cash on delivery)
- Online payment by bank cards without commission
- Electronic wallets
- According to the organization's account (excluding VAT)
- Post office
- SDEK | DPD | PEC
- Business Line
- Energy | GTD (KIT)
- Baikal Service
- ZhelDorExpedition
- Dispatch from 1 day
- Delivery from 2 days
- Product didn't fit? Easily return it within 14 days
- Read about other store guarantees
Cabin ventilation valve! Give me two! — logbook Lada 2114 ۩ Brugmann™ 2004 on DRIVE2
We continue to improve our favorite car)
Recently I began to notice that when getting out of the car (if you walk around it from behind), there is a smell of gasoline from the left side. I looked into the filler neck compartment and saw that the gasoline vapor separator was cracked along the seam.
There is nothing to do - we need to change...
I bought a separator from OLMI. I went to the market, bought euro pens, finally, black painted ones, several plastic ones for the interior, which were broken a long time ago...
And I saw them - interior ventilation valves from Priora. For a long time now I have been visiting all sorts of foreign car stores, asking about them, but everywhere they are made to order - you have to wait. And then we got caught right away - we take it))) Moreover, you can combine the two processes. To remove the separator, you still have to remove the rear bumper...
Well, here it is the long-awaited Sunday, the weather is warm - I went to the garage...
I drove the car, removed the rear bumper, removed the separator
This is what the filler flap looked like. We urgently clean, sand and paint it glossy black.
We also painted the plastic trim on the B-pillars in matte black.
While everything is drying, mark where the holes for the valves will be. We take a drill and a jigsaw in our hands. We mark and make three holes. That's it - there is no turning back!
We connect the holes with a jigsaw, we get beautiful holes.
Surprisingly, everything fit well and clicked into place. I was afraid that I would have to file it, since the surface is straight, and the valve itself is semicircular (for iron priors). But everything worked out fine, I just applied a little sealant on top and bottom...
I didn’t particularly expect the arrival of power and pathos from the valves, but if all the windows and doors are closed and the heater is turned on to second speed, then the valves do not blow too badly, accordingly the interior is better ventilated, which I am satisfied with)
We rejoice, we insert a new separator. Now there is beauty around him too. We install the rear bumper.
And finally, I managed to screw on one of the new handles... There were no difficulties, the only thing I recommend is to attach a nut to the third stud (the standard handle does not have one) even before inserting the handle into place. Then it is very difficult to reach this pin
Well, at the end, according to tradition, a group photo. Last weekend at the dacha I washed it for five hours without a break... It shines, my soul freezes
That's it. Thanks to all!
Schemes for upgrading the crankcase ventilation system
Schemes for modifying the crankcase ventilation system, as well as a description, are provided by IgorRV.
For LADA cars with manual transmission and AMT (“robot”), scheme No. 1 “Crankcase ventilation scheme with PCV valve for E-GAS and cable throttle” is suitable:
It is necessary to install a PCV valve (article 94580183, price about 400 rubles) from a foreign car into the small crankcase ventilation circuit. When connecting the PCV valve to a small circuit on an E-GAS, use a new hose (petrol-oil-resistant 8 mm without fabric reinforcement). On a cable choke, connect to the receiver, not to the choke.
Read more: Support bearing Toyota Corolla E150
As a result, the valve will shut off the circuits in transient modes, which will allow:
- Accept the load without jerking or dropping engine speed (for example, when the compressor is running, heated windows, seats, etc.).
- Reduce vibration load at idle
- Increase traction from the bottom (noted by owners of automatic transmission with VAZ-21126 engine, manual transmission with VAZ-21227, 21126 and 11186 and AMT with VAZ-21127).
- Get a sharper response to the gas pedal and faster shifts (on AMT). Perhaps due to the fact that the valve does not allow the engine to slow down, maintaining a more optimal switching algorithm.
- Reduce oil consumption through ventilation.
The valve replacement period is 40,000 km.
For LADA cars with automatic transmission (Jatco) and AMT (“robot”), scheme No. 2 is suitable:
Description of scheme No. 2: The pressure reducing valve is connected in series to a large ventilation circle. Thus, it regulates the flow of crankcase gases at high speeds and during transient processes. This allows:
- Exercise full control over the flow of crankcase gases between the small and large circuits.
- Improve engine operating mode.
- Reduce vibration load.
- Reduce oil release into ventilation.
For LADA cars with automatic transmission (Jatco) and AMT (“robot”), scheme No. 3 is suitable:
Description of scheme No. 3: To improve the operation of the braking system and facilitate the process of holding the car on the brakes in mode “D”, an “Ejection Pump” was used. Due to the flow of crankcase gases from the small circuit, the vacuum in the tube leading to the vacuum booster increases. This happens at low speeds, which is very helpful when driving in traffic jams. Keeping your foot on the brake all the time is not very easy, but this pump makes the task easier.
- Getting rid of vibrations, failures, transmission shocks.
- The engine begins to operate more calmly and softly.
- The force on the brake pedal becomes less.
- The air conditioner turns on almost imperceptibly.
- ejection pump (article 10793 VIKA, price 546 rubles);
- pressure reducing valve (article 1117701500 JP GROUP, 422 rubles);
- PCV valve (article 94580183 GENERAL MOTORS, 400 rubles);
- clamps (about 10 pieces, 600 rubles);
- thin, petrol-resistant 8 mm hose 50 cm (100 rubles);
- standard ventilation pipe.
Installation example on video:
By the way, there are other ways to modify the crankcase ventilation system. Are you ready for such modernizations? Let us remind you that modification of the ignition system (installation of capacitor ignition coils in the harness) is also common among owners of LADA cars.