During vehicle operation, the backlight of the vehicle's instrument panel may burn out, causing some of the readings to lose their illumination. There is no need to disassemble the “tidy” for this. This instruction tells you how to change the light bulbs on the dashboard of a Priora or Kalina. The process looks similar on both cars.
You will need : remove the instrument cluster, buy new backlight lamps for the instrument cluster (A12-1.2 W1.2W with a power of 1.2 W).
Procedure:
- Turn the panel with the back side facing you.
- Remove the backlight bulb by turning the socket counterclockwise.
We install the lamp and socket in the reverse order.
The panel can use various sockets, some of which require the use of a soldering iron to install the lamp. In this case, to save time, it is recommended to buy the lamp together with the socket assembly. By the way, you can use LEDs instead of conventional lamps. When installing them, observe the polarity, otherwise it will not burn.
The entire process of replacing lamps in the instrument cluster is also shown in the video:
Let us remind you that the backlight can be modified so that it turns on with the ignition.
Because You are not logged in. To come in.
Because you are not a trusted user (phone number is not verified). Enter and confirm your phone number. Read more about trusts.
Because The topic is archived.
Replacing light bulbs in the dashboard of Lada Kalina
Replacing light bulbs in the dashboard of the Lada Kalina occurs quite rarely. To replace them you will need pliers, a set of new light bulbs and a Phillips screwdriver. Now let's get started.
- We turn off the on-board power to the car by removing the terminal from the negative terminal of the battery.
- If the steering column is adjustable, then move the steering wheel as far down as possible.
- Using a Phillips screwdriver, unscrew the two screws that secure the instrument panel trim.
- There are two spring clips on the lower protrusions of the cladding. We overcome their resistance and remove the lining from under the visor in the instrument panel.
- Using the same Phillips screwdriver, unscrew the two screws that hold the instrument panel.
- We take out the instrument panel from the opening. Disconnect the wire block from it.
- Using pliers, turn the lamp socket counterclockwise. Let's take it out.
- To replace the display backlight lamps, you need to turn the lamp socket using an 8 mm wrench.
- We return the socket with a new lamp to its place. Now turn it clockwise.
- We perform further assembly steps in reverse order.
- We check the functionality. The instrument panel should be evenly illuminated.
Previous posts from the category: KALINA
Replacing brake light bulbs and replacing reverse lights on a Lada Kalina are similar in action.
It is only important to replace the necessary lamp in your socket. On the Lada Kalina, this procedure has several features, which will be discussed in this manual.
Replacing a faulty low beam lamp on a viburnum
Replacing low beam bulbs on a Lada Kalina is one of the simplest procedures. To make access easier, we recommend removing the cabin filter housing from the left side and the windshield washer reservoir from the right side.
Changing the gearbox oil on Kalina
The oil in the Lada Kalina gearbox is changed every 75,000 km. But this figure is dictated by the regulations. In fact, replacement should be done after a shorter mileage interval, and especially if the car often overcomes city traffic jams.
Changing the engine oil on Kalina
Changing the oil in a Lada Kalina - this operation can only be simpler than replacing the lamps. To do this, you will need a 17mm spanner, a container to drain the old oil, and, accordingly, new oil and an oil filter.
Methods for replacing the heater radiator on the Lada Kalina. In fact, there are two options, but in the process of their implementation you can make some changes for convenience.
Preparation
Before you start taking immediate action, you should prepare. You will need the following tools:
- Phillips screwdriver (long and short);
- pliers or narrow-nose pliers;
- set of light bulbs.
It is recommended to purchase a complete set of 5 lamps at once. The dashboard of the Lada Kalina uses baseless incandescent lamps powered by 12 V. The factory backlight is soldered with antennae to the contacts of the sockets, and they cannot be disassembled. Therefore, you need to buy both lamps and new cartridges, otherwise you will have to run to the store again. The short blade screwdriver should be magnetized to prevent the mounting screws from falling under the dashboard during removal.
Dashboard lamps
The dashboard provides the driver with a lot of useful information that allows him to monitor the condition of the car, the driving process, diagnose breakdowns in a timely manner and correct them. So, the panel light comes on for the following reasons:
- The battery is not charging.
- For one reason or another, the handbrake is stuck.
- Not enough fuel in the tank.
- The oil pressure has decreased (which indicates the need to urgently stop the engine to avoid more serious consequences).
- Excess water in the filter. To prevent water from entering the pump, which could lead to damage, you need to drain excess water from the filter.
- The fuel system is malfunctioning.
- There was a failure in the propulsion system and much more.
As you can see, the panel lamps allow you to determine what is wrong in the car; if the lamps themselves fail, then you can miss a very important breakdown, which can even lead to an accident
This is why it is so important not to delay replacement (lamps cannot be repaired)
Today, the car market offers a wide range of lamps for the control panel, ranging from the standard version, which is cheaper but also has average characteristics, to modernized versions that give the panel, and therefore the entire atmosphere of the car, a different, more expressive atmosphere.
Professionals also advise replacing standard lamps with LEDs, which largely decorate the panel.
So, we list several of the currently most popular options suitable for the VAZ 2114.
- LED lamps Sho-Me SM-T5 (blue, white and red). Country of origin: Korea, price: 80 rubles. for a couple.
- High-brightness SMD LED module – 20 rubles.
- LED Sho-me SM-T5-cap-super (white) – 50 rub.
- Halogen lamps from Osram and Philips cost approximately 40-80 rubles apiece.
As you can see, prices for lamps are not high. It is worth noting that replacement takes very little time, which we will talk about later.
Installation of LED lamps
Most modern lighting devices have an LED design. LEDs are economical, consume little energy, and have high brightness. In addition, you can choose a different color shade of the backlight, which will diversify and decorate the dashboard of the Lada Kalina. However, you should remember some features of LED backlighting:
- LEDs are longer than regular light bulbs, so the brightness may be excessive;
- When installing, you must carefully monitor the polarity, otherwise the lamps will not light;
- The brightness control has practically no effect on LED devices.
A significant advantage of LED backlighting is its long service life. Users who install such lamps forget about the need for replacement for several years. The only condition for operation will be the need to cool the ICE devices, since when heated above 80° they lose their brightness and quickly consume their resource.
Reasons for failure of dashboard lamps on VAZ 2114/2115
Few people know, but the dashboard from the Finnish-made VAZ 2109 “Baltika” was much more ergonomic and reliable than the original VAZ 2114. For example, unlike the dashboard of the VAZ 2114, there were no surprises in the form of light bulbs suddenly going out of place. But once a malfunction has occurred, then in order to quickly and correctly replace the lamps, it is necessary to correctly diagnose the breakdown.
The main reasons may be:
- burnt out lamp;
- lamp sensor is faulty;
- the tips of the wires have oxidized or broken;
- the connection density of the contact points between the cartridge and the printed circuit board has been disrupted.
Tips for replacing dashboard lamps on a VAZ 2114
If the lamp fails, you may not take into account important information and the likelihood of engine breakdown or, even worse, an accident increases.
The instrument cluster uses GOST A12-1.2 incandescent lamps, according to the EEC classification W2x4.6d, the lamp power is 1.2 W. In addition to the original lamps, the market offers upgraded versions that have a longer life cycle and high operational reliability. A good replacement for control panel bulbs, according to the advice of many car enthusiasts, are LED lamps, which, in addition to increased reliability, also have a glow that is pleasant to the eye and decorate the panel. Since the bulb bulb is quite fragile, in order to avoid injury to fingers, a non-removable lamp can be removed remove and replace together with the cartridge. When removing, in order not to damage the glass of the instrument panel, it is not allowed to wipe it with solvents. It is necessary to wash the glass with a weak soap solution or polish, for example “Second”.
Already the first owners of Samara-2 understood the sad truth - in order to change ordinary backlight lamps, it is necessary to disassemble half of the interior. And those who were not lucky enough to become the owner of a Europanel should come to terms with this; this photo instruction will show how to replace the lamps of the “native” VAZ 2114 dashboard with your own hands.
For replacement work you will need:
- Phillips screwdriver;
- knife;
- pliers;
- new dashboard lamps.
The instrument lamp for VAZ 2114-15 has article number 210613709500 and costs 36 rubles.
The price is indicated for the summer of 2022 in Moscow and the region.
Using a Phillips screwdriver, unscrew the three screws securing the left screen of the center console.
Don't forget about the bottom screw. Then remove the left screen.
Similarly, on the other side, unscrew the five screws securing the right screen.
We remove the screen.
Then unscrew the self-tapping screw of the instrument panel to the bracket on the left...
... and on the right.
Using a screwdriver, remove the plug to the right of the rear window heater switch.
Using a screwdriver, unscrew the self-tapping screw located under the plug.
Remove the handle from the heater fan switch.
We insert the knife blade between the handle and the lever on the side opposite to the protrusion on the handle.
There is a hole in the handle into which the lever antenna fits. We take out the lever.
We unscrew the four screws of the instrument cluster. Two on the right side...
... two on the left side.
We move the instrument panel back and away from the steering wheel...
... and to the right.
Unscrew the two screws securing the instrument cluster. First on the left side...
... then with the right one.
We disconnect the wiring harness blocks: red - from the red block, white - from the white block. We remove the instrument cluster.
To replace the backlight or control lamp, turn the lamp socket counterclockwise.
We remove the socket together with the lamp from the hole on the instrument cluster board.
By bending the antennae of the lamp wires, we remove the lamp from the socket.
We install a new lamp in the socket.
We connect the wire blocks. We check the functionality of the new lamp and assemble everything in the reverse order.
- https://vaz-2114.info/zamena-lampochek-pribornoj-paneli-vaz-2114/
- https://ladaprofi.ru/vaz-2114/skolko-vsego-lampochek-v-pribornoj-paneli-vaz-2114.html
- https://auto-gl.ru/prostaya-zamena-lampochek-v-pribornoy-paneli-vaz-2114/
- https://m.etlib.ru/report/1386-zamena-lampochek-v-pribornoj-paneli-vaz-2114
Viburnum LCD backlight lamp
Although the problem is not frequent, sometimes it happens that one of the backlight bulbs on the dashboard burns out and needs to be replaced with a new one. Of course, you will have to tinker with this a little, since in order to replace them, you need to completely remove the instrument panel, but this can be done in half an hour. For this job, we only need two Phillips screwdrivers: one with a short blade and the other with a long blade.
- The first step is to completely remove the “board” of your Kalina and remove it from its seat. Read more about this in this article: Removing and installing the instrument panel.
- After which you can start replacing the burnt-out backlight bulbs; they are located on the back side and can be removed quite easily even by hand, but if problems arise during removal, you can use pliers. Install new light bulbs in reverse order.
The main difficulty lies not so much in replacing the lamps itself, but in dismantling the center console itself, since on Kalina it is not very convenient to remove, but if you don’t have any nerves, then you won’t waste much time.
High beam - Type of lamps used - AKG12-55-2 (H1), 55w
Side turn signal - A12-5-2 (W5W), 5w
Turn signal lamp - A12-21-4 (PY21W), 21w Side and fog lamp - P21/4W, 21w,4w
License plate light lamp - A12-5-2 (W5W)
Trunk light bulb - AC12-5-1(C5W), 5w
Interior lamp - AC12-10-1(C10W), 10w (41 mm)
Individual lighting lamp - A12-4-1(T4W), 4w.
Glove box light bulb-AS12-5-1(C5W), 5w Length 36 mm
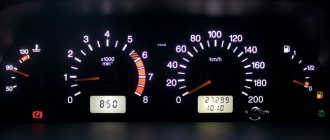
Instrument cluster illumination lamp with socket, cigarette lighter, backlight - A12-1.2 (W1.2W), 1w, 2w
LEDs are superior to incandescent lamps in terms of specific light output per watt of power and service life. Also, incandescent lamps usually fail not because the filament burns out, but because of exposure to strong vibrations, especially given the quality of our roads. LEDs are completely immune to this kind of influence, which gives them a serious advantage when used in cars. LEDs have polarity, so if after installation the diode does not light up, you need to change the polarity of its power supply by simply turning the LED over.
I plan to finish this post, so if you have something to share, write in the comments. It’s also interesting who tried to install LEDs instead of incandescent lamps where.
Hello, what kind of light bulbs are used in the dashboard of the Lada Kalina?
- Large current consumption in the parking lot in Kalina - 2 answers
- Fuel indicator needle goes off scale in Kalina - 1 answer
- The red triangle with an exclamation mark is on Lada Kalina - 4 answers
- The speedometer needle falls while driving and the power steering switches off - 4 answers
- Electrical appliances on Kalina are triggered randomly - 3 answers
(A12-1.2 W1, 2W power 1.2 W)
Subscribe
to our channel in
Index.Zen
Even more useful tips in a convenient format
The fuel indicator arrow goes off scale in Kalina
High current consumption in the parking lot in Kalina
Source
Making an optitron
I'm trying to clean the filter at the edge of the scale. The peculiarity of these scales is that they are designed for the use of ordinary light bulbs, so they have an additional layer of dark filter (dots) applied to them, which ensures uniform illumination (closer to the light bulb, darker). A yellow filter is also visible under the white scattering layer. I would leave the yellow one, but removing black and white without affecting the yellow is unrealistic.
This is what it looks like in the light. Despite the white backlight, the numbers are still yellow thanks to the yellow filter, so you will have to remove it, although I didn’t want to.
Illuminated fuel and temperature gauges. I was afraid that there would not be enough three LEDs for the scale, but it turned out to be in vain - the scale is illuminated evenly, the gradient is not noticeable to the eye. Yes! As a result, only 3 tracks remained.
Rear temperature and fuel gauges. The light filter has been partially removed in the right places.
Ready-made temperature and fuel scales.
I remove the light filter on the tachometer. I use nail polish remover and pieces of cotton pads (we take everything from my wife/mother/sister’s arsenal). The technology is as follows: soak the pieces in liquid and apply to the area for a minute. While we are making the next one, the previous one soaks and the coating can be easily removed with a fingernail. Carefully! The front side is very sensitive to solvents, especially alcohol!
Installing tachometer backlight. Hot glue from a “gun” serves as supports and at the same time fasteners. The downside is that in this version the tachometer is not removable.
Finished tachometer scale.
"Combined" lighting. LED tachometer, regular speedometer. The temperature scale and fuel gauge are double backlit. Here the photo does not convey the effect quite correctly.
Speedometer backlight board. The main difficulty, it turned out, was precisely here. Due to the built-in odometer, the speedometer device is very bulky and there is very little space left for illumination. As a result of trimming and pointing, very little remained of the scarf.
Rear speedometer backlight board. I had to restore the path this way
I'm installing the speedometer light. Two lights didn’t fit, so I moved them to the side surface
I turn on the speedometer light and check it. Between the tachometer and speedometer, the common plus and minus are brought out into the T10 socket; a protective diode and a common current-limiting resistor (all from the same lamp) are also installed in it, plugged into the standard socket from under the backlight lamp.
Finished speedometer scale
Complete tidy. Currently in finished condition.
Advertisements on NN.RU – Auto
A specialized company for converting trucks into tow trucks invites you to install a tow truck platform on.
A specialized company for the conversion of trucks produces extensions for man man, iveco and iveco truck tractors.
With us you can not only extend the frame to fit a body of 5.1 m, 6.2 m, 7.5 m, 9 m for Maz Zubrenok, Maz, Kamaz, Ural, Zil, Mitsubishi, Nissan.
The company offers you to upgrade the Fiat Ducato Fiat Ducato basic version for a solution.
Imagine, you wake up in the morning, open the curtains, bright sunlight bursts into your apartment, and outside the window is a stunningly beautiful landscape.
Airborne Forces Day in Nizhny Novgorod went well, fun and peacefully, contrary to firmly rooted stereotypes. Our paratroopers in quiet times, like...
Nizhny Novgorod residents were silent for a long time about the Siberian forest fires, but then there was a reaction in our city: people decided to pay attention to it.
Lamps used on Daewoo Nexia
The Daewoo Nexia car is in great demand in different countries. This middle-class sedan model was built in Germany on the basis of the 1984 Opel Cadet. Its production was in five countries, the cars that were blown up in Russia were assembled in Uzbekistan. In our country, the assembly of large components for the Daewoo Nexia has been established. But in 1997, it was decided to stop production assembly, and after that all production was carried out in Uzbekistan.
We can also recommend lamps for low and high beam headlights from such manufacturers as: Osram Night Breaker, Philips X-Treme Vision, Koito Whitebeam osram philips koito lamps An article on our website size of wipers on Daewoo Nexia n150 Nexia lamps n1001 Low and high beam lamp - halogen will be useful lamp H4; power 60/55 watts. Cylindrical in shape, with three electrical contacts. It has two filaments.2 The front fog lamp lamp is a H3 halogen lamp with a power of 55 watts. The lamp is small in size with one wire at the end.3 The reverse and turn signal lamp is a single-pin incandescent lamp PY21W, with a power of 21 watts.
5 The lamp for the interior lighting, glove compartment lighting and trunk lighting is a C10W lamp, 10 watts. Cylindrical in shape, 30 mm long, with two metal contacts at the edges.6 License plate lighting lamp - a small single-contact W5W lamp, 5 watts.
8 The instrument cluster illumination lamp is a small single-pin W3W lamp with a power of 3 watts.
Lamps for Daewoo Nexia n150
Lamps for the front headlight of Daewoo Nexia N150 Headlight Nexia n1501 Front turn lamp - yellow single-pin incandescent lamp PY21W, power 21 watts. 2 Low beam lamp - halogen lamp H7 power 55 watts. Cylindrical in shape, with two contacts.3 Front side lamp - small single-contact W5W lamp, 5 watts.4 Main beam lamp - H1 halogen lamp; power 55 watts. Lamp H1 is smaller. A small glass cylinder at the end where the filament is located.
Lamps for the rear light of Daewoo Nexia N150 Rear light Nexia n1501 Brake signal and side light lamp - two-pin incandescent lamp with a metal base P21/5W, power 21/5 watt.2 Turn signal lamp - yellow single-pin incandescent lamp PY21W, power 21 watt.3 Lamp Reversing light - single-contact incandescent lamp PY21W, 21 watt power. 4 Rear fog light lamp - single-contact incandescent lamp PY21W, 21 watt power.
Replacing the low beam lamp on Nexia
Since on the updated model the headlight unit has become larger in shape and replacing the low beam lamp has become more difficult, we will tell you how to do it quickly. You need to remove the air intakeReplacing the Nexia n150 lampReplacing the Nexia n150 lampNext you need to unscrew the plastic cap that covers the lampReplacing the Nexia n150 lampThen we remove the electrical connector from the lampReplacing the Nexia n150 lampThen you need to remove the metal spring holding the lamp and pull out the lamp itself. Assembly is carried out in reverse order.
How to choose good lamps
It is not enough to replace a faulty element in a car; you also need to select the right spare part. Light bulbs are no exception. The auto parts market offers a large selection of lighting devices from a variety of manufacturers with appropriate quality.
Conventionally, lamps can be divided into three categories:
When it comes to choosing a lamp, we always think of light sources for low beam headlights or PTF. For other luminaires, lamps are selected with much lesser requirements.
Selecting an original light bulb based on the article number is expensive. It’s much easier to go into a store and tell the salesperson about the type of base so that he can give you the right light source.
Why does the instrument panel backlight on the Lada Kalina not light up?
During operation of the Lada Kalina, situations may arise when the dashboard backlight disappears. If this happens, then you need to find the cause of the breakdown as soon as possible and eliminate it. There are several reasons for the backlight to disappear, but they are all related to a malfunction of the car's electrical network.
Removing the instrument panel
In most cases, before establishing the reason for the disappearance of the backlight on the Lada Kalina dashboard, you first need to dismantle it.
To remove the instrument panel you will need the following tools:
- a set of keys;
- Phillips and flathead screwdrivers of different lengths.
The procedure for dismantling the instrument panel on the Lada Kalina:
- Turn off the power to the car. To prevent a short circuit during work, you must first disconnect the negative terminal from the battery. If this is not done, there is a possibility of electrical equipment failure.
- Lower the steering column to its lowest position. This will allow you to gain easier access to the instrument panel.
- Unscrew the two screws securing the cover; this will require a short screwdriver. Then it is carefully pulled out, while it is necessary to overcome the resistance of the spring clamps. It is necessary to shake the pad and gradually pull it towards you.
When the dashboard has been dismantled, you can proceed to diagnostics and search for the reasons that caused its malfunction.
Video: removing the instrument panel
Brightness adjustment lost
One of the very first actions to take when the instrument panel backlight disappears is to check the brightness adjustment. The driver himself or his passenger can change the setting. There is a wheel on the panel with which you can set the brightness of the instrument lighting. If it is turned to minimum, the backlight may glow very weakly or not glow at all. Just turn the wheel and adjust the brightness.
Fuse problems
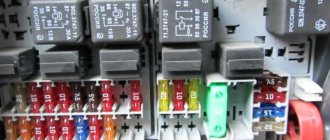
The next step in troubleshooting is to check the fuses. To do this, you need to use the technical documentation of the car and find where the fuse responsible for the instrument lighting is located. The fuse box is located on the left side under the cover with the light switches.
Also, the purpose of the fuses is written on the cover and if you look closely, you can find where which one is located. It is enough to replace the required fuse and if the problem is there, the instrument lighting will start working. On the cover, the fuse responsible for the instrument lighting and interior lighting is designated F7.
In addition, the socket into which the fuse is inserted may become damaged, or a breakdown may occur inside the unit itself. To diagnose, you will have to completely remove the fuse box. If the mounting block fails, it must be replaced.
Wiring problems
One of the most unpleasant options is a malfunction in the car’s electrical wiring, which leads to failure of the instrument panel backlight. This may occur as a result of a broken wire. To identify it, you need to use a multimeter to check the wires responsible for powering the instrument backlight. They can be identified on the car's electrical diagram. Once the break is found, it is removed and isolated.
In addition, the reason may be oxidized contacts of the mounting block or wire blocks. In this case, disconnect the connector near the fuse box and on the dashboard. After this, inspect and, if necessary, clean the contacts.
Problems with light bulbs
It is possible that the instrument panel lighting has disappeared due to failed light bulbs. There are a total of 5 light bulbs on the Lada Kalina dashboard.
Replacing them yourself is easy:
- The dismantled instrument panel is turned over, since the light bulbs are located at the back.
- Take out the light bulbs and check their functionality using a multimeter. The cartridge is turned counterclockwise. If you have difficulty pulling the light bulb out of the socket by hand, you can use pliers.
Video: replacing light bulbs
The board burned out
In some cases, a problem with the dashboard lighting may be due to a faulty control board. Some craftsmen try to restore it with a soldering iron, but this is a complex process and only professionals can do it. Usually, when such an element fails, it is replaced with a new one.
Diagnostics
- Check the panel backlight brightness adjustment slider. It often happens that the brightness adjustment is at a minimum and the backlight is very dim or does not light at all;
- Check the panel hanger fuse. On Kalina, the fuses are located under the cover of the light switch block. In the block you need to check fuse F7, it is responsible for the panel illumination. The fuse location diagram is on the light switch block cover;
- One of the most common problems is a wiring problem that causes the panel backlight to not work. This usually happens when some wire breaks. In this case, only an electrician can help you.
Overexposure of the Lada Kalina instrument panel. — DRIVE2
Hi all. Let's begin the epic. Our experimental device was a Lada Kalina instrument panel from a friend’s car. The green color of the instruments is somehow already starting to bother me, so it is to be demolished, long live the approach to foreign basins) Let's go... What we need: the instrument panel itself, a white and blue LED strip, wires, alcohol or vodka and of course cotton swabs) 1.
We take the shield itself, on the back side we see 10 bolts for a slotted screwdriver, unscrew them.
The test subject himself. 10 slotted bolts.
2.
Removing the back cover we see the board. it also has bolts: the red ones hold the light diffuser on the front side, on which the scales are glued; green ones hold the LCD screen housing. And the screen pressure plate latches are marked in blue.
Board, rear view.
3.
Before unscrewing the bolts in the previous photo, remove the arrows, turn the tacho and speedometer counterclockwise and pull them towards you, temperature and gas clockwise in the same way.
Tacho and speedometer counter-clockwise and up, petrol and tempo clockwise and up.
4.
We unscrew the bolts that were on the board and disconnect everything into components.
light diffuser with scales.
board with LCD screen.
general form.
5.
Peel off the scales from the diffuser, turn the scales over and see a green coating on them in the area of \u200b\u200bthe numbers and divisions. We wash with alcohol and cotton swabs) It’s long and tedious...we wash, we wash, we wash...
green spray. We wash it with alcohol and ear sticks, nevermind)
6.
This is how it should work out. No greenery.
No greenery once.
Two without greens.
7.
Next, we place a white tape on top and a blue tape on the bottom in the housing under the diffuser, and check how it shines.
Check without scales.
Check with scales attached.
8.
As for the screen itself, we remove the latches from the back of the board and unscrew the two bolts that hold the screen body. We remove the polarizing film from the screen with a blade, wipe off the adhesive from the screen and film with alcohol or vodka, and move the screen away for now so as not to break it. The main thing is to REMEMBER HOW THE SCREEN WAS ORIGINALLY POSITIONED IN RELATION TO THE CASE, ON THE TACHOMETER SIDE THE SCREEN HAS A CONVEX, SO PLACE IT BACK!
The screen is cleared of glue and without film.
9.
We take the screen body, glue two strips of LEDs into it and solder the wires.
Housing with LEDs
The wiring is done.
10.
We check everything how the diodes in the case shine and assemble the screen back onto the board. First we put the screen, then the film, if you put the film on the side that we need (and we need the numbers to light up), then the screen will turn black, if it turns gray, then the screen will be the same as it was, but we don’t need that. Then we screw the screen housing and the pressure plate onto the latches.
We put the screen down.
Film with correct position. THE SCREEN WILL BE BLACK!
11.
Let's put everything back together. I connected the register from the LED strips to the lamp terminals on the back side of the panel, and removed the lamps. In terms of polarity, I’ll say this: in the place where the screen backlight lamp stood, the bottom semicircle is a minus, the top is a plus. Check the rest of the bases, you can supply power to these semicircles and look at the others. Or minus on the 19th contact block and plus on the 18th block.
We check how everything is assembled at home on a stool. What could be possible if you fix something without leaving home.
12.
Well, since everything works at home, we go to the car and pray that the display will work. Let's connect...
That's it))))
Everything is working. Get hurt. Let's go to bed happy. (well, personally, because I did it all night and set it exactly at 6 am)))
www.drive2.ru
What causes lamps to burn out in Lada Kalina
There are three reasons why lamps in a car can burn out. And here is each of them:
- Life time. It is worth noting that any lamp is designed for certain operating hours. Once the operating time exceeds its limits, the light source begins to dim, and then the filament melts and the light source stops working. The operating time of the lamp may be affected by the voltage of the on-board network.
- All automotive light sources are designed for a voltage of 12 Volts, but not more than 14.7V. If this parameter is exceeded, the incandescent device begins to operate in overheating mode, which leads to its failure ahead of schedule. Overvoltage can occur due to a breakdown of the voltage regulator relay.
- Quality. A lot depends on the quality of the light source - from illumination to service life. To prevent the lamp from burning out prematurely, try to choose light sources recommended by the manufacturer.
Step-by-step replacement instructions
Replacing light bulbs is not difficult. In order to remove the cartridges, you need to turn them half a turn counterclockwise. Procedure:
- remove the burnt out lamp. You can do it with your bare hands, but more often you carefully grab the cartridge shank with narrow pliers and easily turn it counterclockwise;
- insert a new lamp into the socket;
- install the cartridge into the socket by turning it clockwise.
New Lada: 8 valve engine Lada Kalina characteristics, dynamics, fuel consumption
Advice! Experienced users recommend changing the entire set at once in order to know exactly when to start using it. Having to repeat the entire procedure a week later because a nearby light bulb has burned out will not make anyone happy. In addition, all lamps will have the same brightness, which will provide uniform illumination of the panel. If this option is not suitable, you can arm yourself with a tester and check the lamps for functionality. After this, the burnt-out copies are replaced.
How to install LED sources?
Quite a lot of Lada Kalina owners are fans of tuning. They are leaning towards replacing the standard lamps present in the panel with LED options. These components are significantly brighter than their traditional “competitors,” which radically changes the appearance of the panel, especially in the dark.
For installation, both the diodes themselves, which are to be installed in the mounting sockets for standard lighting components, and diode strips are used. In the second option, the products are glued around the perimeter of the LADA Kalina dashboard.
The following procedure is identical to the algorithm of actions described here. A significant difference is the need to file the tip of the diode before direct installation. This manipulation should be performed with the utmost care to avoid damage to the lighting component itself. Without the specified undercut, the diodes will not be able to provide light scattering, but will begin to direct the light beam to a point.
Tuning and repair of VAZ 2110
Quite often on many foreign cars you can notice the smooth illumination of the dashboard, which is pleasant to the eye. This is what many call polite lighting. What's worse than our VAZs? Why not do this kind of dashboard tuning yourself?
The process of modifying the VAZ 2110 dashboard is quite simple. All you need to do is use the circuit and change the standard 130 kOhm resistance to 51 kOhm.
To give you plenty to choose from, we will show you several ways to tune the VAZ 2110 tidy.
Method 1. When all the light bulbs in the tidy were replaced with LEDs, the process of polite illumination approached.
First, the necessary parts were purchased and the soldering process took place. At the very beginning, I was upset, because for some reason nothing worked, as it later turned out the problem was oxidation, which caused short circuiting of several tracks. I corrected it and decided to place the circuit in a regular telephone socket.
Our positive wire goes to the dashboard backlight button, namely to the wire that goes to the LED strip. That is, the wire that becomes a plus when the side light button is turned on. With this connection, the polite lighting will spread not only to the VAZ instrument panel, but also to all other interior lighting elements connected to the dimensions (buttons, BC, etc.). It was decided to take the input plus behind the dashboard, which receives power when the ignition is turned on.
There is, however, a small problem in this circuit, there is a large number of consumers, and the capacitor was designed only for the backlight of the tidy, so the backlight does not turn on very smoothly, but if you take into account how it was, then this is “heaven and earth”.
Method 2. The connection in this case is as follows: The harness with white block No. 4 already has a permanent plus, but there is no contact for it on the dashboard. I decided to do it myself. In the photo of the VAZ 2110 tidy from the back side, a red wire goes to this contact.
Advice from car enthusiasts and recommendations from experts
If the instrument lighting on the Lada Kalina stops lighting, then you cannot delay fixing the problem. This must be done as soon as possible. In most cases, it will take a maximum of 30–50 minutes to fix the problem.
Actually, a newbie’s question: Kalina started acting strange among relatives (2 years without problems, and then the first frost came out) - after parking for the night (cold, -2 -4), with some probability the starter does not turn on. Symptom: Turn the key to the starter position and nothing happens. In this case, no clattering of the retractor is observed (and no change in the brightness of the tidy bulbs is observed - and when only the retractor winding is turned on, in theory there should be a slight drop in brightness, the current there is decent). The battery is charged, we measured the voltage in the morning - this is definitely not a discharged battery.
He asked in more detail whether the fuel pump turned on (to see if the controller allowed the start of the EBN and the starter relay, respectively). They swear that it seems to be starting. I just can’t personally catch this moment; my car always starts up halfway.
Tell me, what else should I pay attention to when diagnosing the cause? In particular, I am interested in how to more accurately determine that the reason for the starter not starting is the lack of a standard immobilizer command? How can you more accurately determine the cause based on the lights on/off on the dashboard? H.Z., maybe with an ignition switch.
A related problem is that the display on the dashboard stopped showing. The lights are all on, the tidy reacts to “self-diagnosis” (when you turn on the ignition with the collection button pressed, all the indicator arrows start moving back and forth, and the tidy lamps light up). And there is silence on the display. Tell me, is the device powered by one common fuse, or is it powered somehow more cleverly? And could this somehow influence the starter not starting (hard to believe, but still)?
Pavel Berezin
Diagnostics and repair of electronic engine control systems Hang a lamp on the retractor control wire and see if it lights up when the starter is not turned on.
Bugulma
A related problem - the display on the dashboard stopped showing. This happened on a couple of Kalinas. We decided to “distort” the instrument panel connector. If positive comes to the coil of the solenoid relay, then, as an option, the starter brushes are frozen (frozen), and the solenoid relay current passes through them. You can hit the starter with the end of a stick and try to start it.
Gennadiy K
<This happened on a couple of Kalinas. We decided to “distort” the instrument panel connector.
And also by replacing prevs No. 1 and 7 (both on the tidy) with others (replaced transparent ones with opaque ones), although the old ones were intact. Poor contact.
This is a matter of principle. This year, on my Kalina, the EBN sometimes started, sometimes it didn’t. Sometimes the starter turned, sometimes it didn’t. The problem was solved by replacing the battery on the key. The old one was less than 3V, the new one is 3.45V. The problem is gone. Or check the ignition switch - there is simply no contact to the starter.
rv6ham
Or check the ignition switch - there is simply no contact to the starter. At the moment when the starter does not turn, with the ignition on, apply +12V from the battery to the retractor. It will start reliably - the lock is to blame.
Replacing the Dashboard Lights of a VAZ 2109 ~ AUTOTEXNIKA.RU
Repair of a high panel VAZ 2109 So, you have a need to remove the instrument cluster on a VAZ car with a recently appeared high panel.
First, we disconnect the negative cable from the battery. Replacing the ignition switch of a VAZ 2109 - YouTube. Replacing lamps in the dashboard Styling the interior lighting of the VAZ 2110, replacing light bulbs. Replacing the steering rack on a VAZ 2109 - LuxVAZ. Next, we also disconnect the speedometer cable from the corresponding drive located on the gearbox.
Now you can remove the switch that regulates the outdoor lighting by prying it up with a screwdriver. And you can now disconnect the connector from the switch and push it directly into the dashboard trim. Well, to replace the lamp that illuminates the switch, you need to squeeze it with a screwdriver
antenna from the socket. — We continue, removing both the socket and the lamp from the switch. — We remove the lamp from the socket. — We pry it with a screwdriver and take out the emergency light switch. After disconnecting the connector from the switch, you need to push it deep into the
dashboard
.
Now you will need a Phillips screwdriver. With its help, you will unscrew a pair of fastening screws for the dashboard console trim
. Replacing a light bulb in a panel of light bulbs in a panel in the dashboard. Well, we remove the trim. Now we turn to the cigarette lighter, removing the heating element, and also remove the ashtray directly from the socket.
To dismantle instruments, you can use two methods: 1. You can remove from the dashboard
shield. 2. Or remove the panel trim along with the shield.
VAZ 2109 replacing backlight bulbs in the instrument panel
If one or more light bulbs
in the instrument panel have stopped functioning, it is necessary to check the integrity. SO, LET'S REMOVE THE INSTRUMENT
PANEL
PANEL. There are two ways to dismantle the instrument cluster: remove the instrument panel panel or remove the
panel
assembly with the panel.
We remove panel panel.
—Again, using
a screwdriver,
you need to press out 2 spring brackets.
All this is done through the radio socket. - Using the same screwdriver, you need to press out the plastic antennae (two) directly to the dashboard. - Lift the panel, after which you will have to press out the remaining third fastening bracket. - Now we disconnect the connectors from the cigarette lighter, as well as all forms its illumination, after which you need to remove the dashboard panel.—
We attach plastic antennae, as well as spring brackets, to the dashboard trim.— When dismantling the trim together with the shield on both sides of
the panel
, you need to remove the side nozzles of the ventilation system.— Take a Phillips screwdriver to unscrew one self-tapping screw on each side from the side fastening of the cover. — Now you need to unscrew 1 self-tapping screw of the main fastening from the cover, again through the radio socket. After pressing out the antennae of the lower fastening of the shield (lower), you need to remove the cover together with the shield. To replace the lamp illuminating the switch, it is necessary to remove the socket together with the lamp from inside the shield, turning it in the holder.
— Squeeze the “petals” of the cigarette lighter... — Pull it out, and then remove it from the dashboard trim
.— Using a Phillips screwdriver, you need to unscrew both screws directly to the panel. — Now move the combination away from
the dashboard
. Your next action will be to unscrew such an element as the cable union nut on the speedometer.
That is, of course, if you have a car with a carburetor engine. Our task is to disconnect the cable from the speedometer, first unscrewing the nut (cap nut). Well, you can now remove the speedometer drive cable. It comes out through the space in the front panel
. Disconnect the connectors. Replacing light bulbs in the dashboard -. Replacing rear struts (shock absorbers) on VAZ 2110, 2112, 2114, Kalina, Granta, Priora, 2109 and 2108 - Duration: 18:27. And remove the instrument cluster.
Well, assembling and installing the instrument cluster must be done in the reverse order. If you have a Peugeot car, then you will be interested in visiting the Peugeot 207 car owners club. Here you will receive the most important and interesting information on the repair, maintenance and operation of the car. Car news and reviews, new products from the global car market.
Replacing low beam lamps
The standard replacement of the low beam bulb on a Lada Kalina is quite simple. The procedure does not require deep knowledge of auto electrics or the presence of specialized tools.
To perform the procedure correctly, you must prepare all the tools and follow the sequence of actions.
- Place the car on the handbrake and remove the terminals from the battery. It is recommended to drive the car into a well-lit garage or leave it outside, this will make it easier to see small parts and fasteners.
- Remove the plastic block cover. Here you can tighten the element by hand without using tools. In some configurations, the plug can be made of hard rubber (what it depends on is unknown). It is important to consider that the element often dries out and cracks. Therefore, you need to buy it in advance.
Important! You should not completely pull out the latch - it will be extremely difficult to install it in place. The bar simply slides out so that the light bulb can be removed.
- Next, the light bulb itself is pulled out of the socket. You only need to support the emitter by its metal elements; you should not even touch the glass part of the lamp.
- Installation of the new part is carried out in the reverse order. At the same time, it is important to check the reliability of the device. If there is increased vibration, the lamp may fall out of its socket, which may cause an accident.
Replacing a 2nd generation Lada Kalina light bulb is done in the same way. The headlights of the cars are almost identical in terms of design.
Main conclusions
Replacing the light bulbs in the dashboard of the Lada Kalina is not difficult and can easily be done with your own hands. You will need simple steps:
- preparation of necessary tools and lamps;
- dismantling the dashboard;
- removing problematic elements and installing new ones;
- Reassemble the panel in reverse order.
The entire process takes from half an hour for a beginner to 15 minutes for a more experienced user. Please share your tips and replacement methods in the comments.
Source