To carry out repairs to replace the generator on a VAZ-2114, you will need some tools and basic auto repair skills. The generator set is located in front of the engine compartment (on the right side of the vehicle's travel).
Required removal tool
- wrenches for 10, 13, 17 and 19;
- socket wrench 15;
- mount;
- unnecessary rag;
- new generator (see “choosing a generator for a VAZ-2114”).
Algorithm of actions for replacement (with detailed photos)
- First of all, disconnect the battery from the system by removing its terminals.
In this case, it will be more convenient to place the car on a lift or inspection hole. Disconnecting the battery - Then remove the crankcase protection.
Removing the crankcase protection - Loosen the drive belt tensioner.
We loosen the tension mechanism (bolt 1, 2) and disconnect the fastening bolts (bolt 3) - Remove the upper and lower generator set mounting bolts. Next, unscrew the air conditioning compressor mounts (if equipped).
- Remove the drive belt itself.
Dismantling the belt - Remove and hang the air conditioning compressor by its tubes.
- Tighten the bolts holding the generator and disconnect the terminals from the installation. Disconnect the block with the wire Remove the rubber boot and disconnect the wires Unscrew the tension bolt Unscrew the nut of the upper fastening of the generator Take out the tension bar Unscrew the nut of the lower fastening of the generator Remove the spacer sleeve
- After all this, you can pull out the generator set itself and remove it.
Removing the generator - Install the new part after wiping everything free of dirt.
Installing a new generator - Reassemble the entire structure in reverse order. Replacement is complete.
Alternator belt tension on VAZ-2114
Important! When assembling the structure after replacing the generator, do not forget to adjust the tension of the drive belt.
As you can see, checking, selecting and replacing the generator on a VAZ-2114 is simple. All you need is desire and some automotive repair skills. It is worth noting that something as radical as replacement is not always necessary. Sometimes it is enough to take the generator set to an electrician, who can repair the part by replacing and cleaning its individual components.
Signs of a faulty generator diode bridge
The bridge is an electrical circuit of diodes that process signals from alternating current flows into direct current. Problems with the generator directly depend on problems in the diode bridge.
Problems that can completely leave the battery without a charge or charge the battery more than normal ultimately have huge negative consequences with the internal electrical system of the car.
The function of the diode system is not only in the process of converting current pulses, but also in its unipolar transmission from the generator to the battery. Accordingly, if the diode is faulty, the current is directed in both directions, or the current supply is completely stopped. The cause of damage and malfunction of the diode bridge is poor-quality contacts, or as a result of moisture penetration.
To check the diodes, the bridge must be dismantled using fairly light manipulations.
We dismantle the diode bridge of the generator:
- Disconnect the “-” terminal from the surface of the battery and detach the wiring system from the casing.
- Unscrew the wires.
- We remove the rubber cap from the wires + terminal, disconnect the nut securing these wires and remove them from the generator block.
- We remove the plastic casing, having previously unfastened the fastening system.
- Disconnect the mount for the regulator.
- When removing the voltage regulator with brushes, do not forget to unfasten the wire block.
- Use a wrench to remove the bolts securing the bridge.
- Having bent the leads directed to the stator winding, we unscrew the capacitor mount.
- We take out the diode bridge. We unscrew the 2 nuts of the contact bolt, remove the bushings from it, and also remove the bolt from the bridge. That's all, now you can change or check the diode bridge.
- We repeat the installation process in reverse order.
Removing the diode bridge
How does the generator work on a VAZ?
Main details:
- Brush holder with voltage regulator.
- Stator.
- Rotor.
- Fan with pulley.
- Distance ring.
- Bushings.
- Bearings.
How the generator on a VAZ works.
With the help of the stator and the generating part, a 3-phase alternating current is generated, which 6 large diodes change to constant, and the battery is charged.
The generator operates by rotating the crankshaft. The device is located under the hood, on VAZ cars - in the front part. Therefore, it is not difficult to remove the VAZ-2114 and other models generator.
Generator diagnostics
If charging is lost or its level is insufficient, then the battery will receive much less current than necessary. Consequently, one generator will also not be enough to power the entire on-board network and the battery will come to its aid, which will discharge after some time. But even worse is excessively high voltage - it can cause fuses, lamps, ECUs, etc. to blow out. To diagnose the VAZ 2114 generator you will need a multimeter:
- Turn on the ignition and start the engine.
- If there is damage in the power circuit of the rotor winding, you will notice that the lamp on the instrument panel is on.
- The engine must be warmed up to operating temperature and the low beam headlights and radio must be turned on.
- Measure the voltage at the battery terminals. A necessary condition is that the crankshaft speed should be approximately 2500-3000 rpm.
- If the generator is working properly, the voltmeter readings will be about 13 V (an error of 0.1 V can be ignored).
- Turn off the lights and radio, the voltage should increase to 14.7 V. This is the maximum value.
When conducting diagnostics, be sure to pay attention to the sounds the rotor makes. Very often the bearing in the front cover fails.
This is where the maximum load from the belt is applied. Several reasons why the voltage of a VAZ 2114 may drop:
- The alternator belt is loose.
- There is a fault in the voltage regulator.
- Wear of the brush assembly.
- The generator is completely worn out.
Please note that a lit lamp with a battery icon indicates that there is a malfunction in the rotor winding power circuit. Consequently, no current will be generated in the stator windings since there is no rotating magnetic field.
Types of mechanical failures
Failure in the technical part of the generator - wear of the bearings, bending of the pulley (if it is not bent too much, the device will work with a whistling belt), failure of the fasteners.
Attention! Mechanical breakdowns appear after an accident; they rarely occur during operation.
Signs of damage:
- Unnatural noises when the generator is running.
- Voltage drop.
- The car drives faster, then slows down sharply when you press the gas pedal with the same amount of force.
Elimination of a simple breakdown - repair. If several parts fail on a VAZ-2113, 2114, 2115 or other Lada model, replacement is needed.
Types of electrical faults
The problem with the generator is that it stops producing current. The indicator on the dashboard lights up. Electrical faults lead to breakdown:
- The fuse or contacts have blown. Making a replacement is a matter of minutes. With contacts things are different.
- The brushes are worn out. You can change it yourself; you don’t need to buy a new device.
- The regulator relay has failed. You can repair it yourself or contact a professional.
- Diode bridge failure. Cannot be repaired, only replaced. To do this, you need to disassemble the generator; without experience, it is better not to carry out such work; it should be left to the experts.
Diode bridge failure.
- An open circuit in the stator or rotor due to a short circuit. Repairing is more expensive than purchasing a new electrical unit.
Signs to help detect an electrical problem:
- The battery indicator on the dashboard does not go out after starting the power unit or blinks.
- Burnt wire smell coming from under the hood (a serious problem that may not be related to the alternator).
- The appearance of sparks in the housing.
- Voltage drop.
- Constantly recharging the battery.
- The headlights are adjusted, they shine dimly, and when other sources of power consumption are turned on, they almost do not light up.
Generator connection diagram
BEARINGS
The generator on a VAZ 2114 car consists of the following main parts:
- A housing consisting of two aluminum covers (front and back);
- Stator (winding located inside the housing);
- A rotor rotating inside the stator;
- Diode bridge;
- Voltage regulator.
The armature (rotor) rotates in two bearings, which are installed: one in the front cover and one pressed onto the rotor. Both bearings are press-fit and therefore are not that easy to replace.
There are usually two main problems with a generator:
- Charging disappears;
- Noise occurs: whistling, grinding or humming.
If there is a whistling noise under the hood, a worn alternator bearing is often to blame. Due to such a malfunction, charging is not lost, but you still shouldn’t drive with noise, since as a result the generator will jam because the rotor will stop rotating.
Before changing or starting repairs, you need to buy the necessary spare parts. And before purchasing, you need to find out what bearings are on the VAZ 2114 generator. A bearing of brand 180202 (a foreign analogue of 6202-2RS) is installed on the rear of the rotor, and 180302 (an analogue of 6302-2RS) is installed on the front cover. The cost of Russian parts is low - in the range of 50-80 rubles per piece, imported spare parts are noticeably more expensive - from 200-250 rubles. Bearings are often sold as a set, that is, in pairs. Imported analogues are of much higher quality, so when choosing parts it is better to buy brand 6202-2RS and 6302-2RS.
Bearing 6302-2RS
How to remove a generator on a VAZ
On front-wheel drive Lada cars with an injector engine (with the exception of Vesta and Largus), the location of the device is the same. The fastenings are identical.
Removing the generator using the example of a VAZ-2115 with an 8-valve engine
Required tools:
- Keys for 8, 10, 13, 17, 19.
- Puller for convenience.
- Adjustable wrench.
- The head is 27 elongated.
Stages of work:
- Remove the terminal (−) from the battery (must be done before starting any work).
Disconnecting the terminal from the battery
- Unscrew the fastening bolt located below.
- Move the terminal protective cover (on the side) and unscrew the fixing element.
- Remove the top mounting bolt.
- Remove the belt from the pulley.
- Dismantle the device.
On a car with an 8-valve engine, you can do without a pit. The knot is taken from above. If the engine has 16 valves, it will be more difficult to remove.
On classic models (2101, 2105, 2106, 2107 and others), the generator is located under the hood; dismantling differs from front-wheel drive cars. The engine of the “classic” has a different location, which is why some peculiarities arise.
Removing the generator on a VAZ-2107
The same tool is needed. The process is as follows:
- For convenience, drive the car onto the overpass.
- Unscrew the terminal (−) from the battery.
- Remove the battery (you will need a 10mm key).
- Unscrew the top bolt with a 13 or 17 key (it differs on different models).
- Remove the protection from the bottom.
- Remove the belt.
- Remove the wires from the device.
- Bend the terminal protective cover (+) and unscrew it with a 10mm head.
- Using a wrench (19), unscrew the nut securing the stator and the unit mount.
- Remove the nut and remove the device from below.
After removal, you can begin repairing the generator. If key elements of the device fail, it is more economical to purchase a new one.
Purpose of the generator
The electric generator in a car is one of the most important elements, since it is it that ensures uninterrupted operation of the electrical on-board network and charging the battery. All batteries installed in cars are not intended for constant power supply without recharging the main electronic components in the car (this includes: headlights, signal, wipers, music, heater motor, etc.). The generator plays a big role in this connection, converting mechanical energy into electrical energy and charging the electronic battery.
The operating principle of the electric generator is quite simple. Its main task is to generate electricity and supply it to the battery contacts. The generator can only be activated when the engine is running, but in several ways:
- through an individual belt;
- through the common belt of additional units.
An individual belt (or a belt of additional units) is fixed on one side to the generator pulley, and on the other, to the crankshaft or intermediate shaft pulley of the engine. The generator mounting may be different:
- on 2112 it is located below;
- on the “classic” - in the middle;
- on UAZ vehicles the mount is located at the top.
While the engine is running, the crankshaft (or shaft) rotates, which transmits energy through a belt to the electric generator and spins it. The resulting energy is converted into electrical energy and supplied to the battery contacts, thereby maintaining a stable battery voltage and protecting it from discharge and failure.
The battery acts as a kind of storage device that constantly accumulates and supplies electric current to the vehicle’s on-board network. When the engine is not running, the battery does not receive recharge and operates in recoil mode. Many car enthusiasts are familiar with situations when the engine barely turns and the headlights shine quite dimly. In such cases, inexperienced drivers immediately begin to blame the battery or other electronic components of the car. However, the culprit is not always so easy to find, because problems can be with the battery, or with the generator itself or the electrical wiring.
Don't worry ahead of time. If the car is parked outside for a long time and does not start, the battery will spontaneously discharge, and this is absolutely normal. Such problems especially often arise when the car is parked for a long time in winter, when negative temperatures have a negative impact on the condition of the battery.
If the car does not sit idle on the street, but constantly starts and drives, then the above problems (when the engine barely turns) can be caused by the following factors:
- serious problems with electronics (current leaks, poor connections, etc.);
- poor battery condition;
- a crack in the generator mount (often found on VAZ 2107 and 21213);
- malfunctions in the electronic part of the electric generator;
- belt stretching, incorrect installation or loose upper and/or lower fastening of the generator (on the VAZ 2110 and other front-wheel drive VAZs the problem occurs quite often).
Procedure for replacing the generator
If the electrical unit fails and repair is impractical, you must first find a replacement. It is recommended to buy a factory version that will fit the fasteners and terminals. Otherwise, the repair will be accompanied by changing the wires.
Replacement process for VAZ 2109-2115:
- Drive the car onto the overpass.
- Remove engine protection.
- Remove the (−) terminal from the battery.
- Move the protective cover away from the positive one, unscrew the fixing bolt and remove the terminal.
- Remove the wires (secured with a block).
- Remove the upper fastening element.
Upper mounting bolt
- Take off the belt.
- Unscrew the bottom bolt.
Bottom bolt
- Dismantle the device.
- Install a new unit so that the fasteners match.
- Secure with the lower and upper bolts.
- Install the belt (preferably a new one).
- Place the terminal, secure it, and return the protective cover.
Securing the terminals on the generator
- Connect the wire block.
- Adjust tension.
Attention! If you overtighten when adjusting the belt, the bearings will quickly fail. If the tension is weak, there will be no proper grip and the battery will not be able to charge.
To tighten, you need to turn the adjusting screw, which, when moving clockwise, is tightened, and when moved counterclockwise, it is loosened. It's easy to check - you need to gently press the belt so that it bends no more than 15 mm.
Installation of the generator with subsequent adjustment
When installing a generator on a VAZ 2109 (no matter the injector or carburetor) and other models, be sure to check whether the purchased clamps, bolts and nuts fit the installation locations. Also, we must not forget that the mounting holes on old-style electric generators are different from new ones. Therefore, when installing a modern autogenerator on front-wheel drive models of the first generations (08, 09, 99), you should purchase the appropriate fasteners.
The generator mounting mount cannot be taken from Grants or Prioras. You can take a new potassium generator and no additional modifications will be required, but the mounting plates must be type 21082. In addition, you will need to purchase a pulley 2110 and a tensioner type 21082.
The installation process is identical to the removal process. If the standard strips are worn out, they are replaced with new ones; this will require unscrewing several bolts and installing new strips.
When installing the electric generator, start from the bottom fastening plate, tighten (but not completely) the fixing bolt (do not forget to put the bushing), put the belt on the pulley and move to the top. To fix the generator, install the top fastening, but do not screw it all the way. Then the tension bar is inserted. Then tighten the tension bolt, checking the belt tension.
The belt should not bend more than 1-1.5 cm when pressed with a force of 10 kgf. It is quite difficult to maintain these indicators in garage conditions, so you should focus on the gap between the frame and the tension bolt of 15–20 mm. There should be a small gap (15–20 mm) between the tension frame and the screw (from the thread side). Then turn the engine crankshaft two turns with a wrench and monitor the position of the belt and its tension.
If, after checking the engine by turning the key, the gap changes, then the bolts securing the electric generator should be tightened. As soon as, after a control rotation of the crankshaft with a key, the gap remains the same, and the belt bends slightly when you press it, the bolts of the upper and lower fastenings are finally tightened, a control rotation of the crankshaft is performed two turns, the wires are connected to the electric generator and the engine is started.
If, when starting the engine, the belt does not make unwanted noise or whistle, and the charge level is normal, then the installation procedure was completed correctly. If a whistle appears, then most likely the belt is too tight and should be loosened.
Video about tightening and adjusting the belt:
Installation of generator from 2110 to 2109/08/99 – video:
Did you manage to solve your problem using the recommendations from the article?
Yes!
46.11%
No. More answers required. I'll ask in the comments now.
38.34%
Partially. There are still questions. I'll write in the comments now.
15.55%
Voted: 746
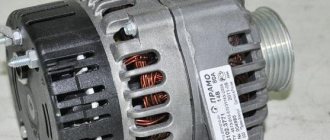
Generator VAZ 2114: purpose and features
All VAZ Samara 2 cars such as 2113, 2114, 2115 are equipped with the same electrical equipment, therefore, the power system for electrical appliances in Samara will be the same. It follows that the generator on all models starting from VAZ 2113-2115 will be identical.
Generator operating principle
A generator is an electrical machine, when the rotor rotates, a magnetic field appears in the stator winding; the magnetic field, according to the law of electromagnetic induction, induces an emf in the rotor. In simple words, initially an alternating voltage appears in the generator, which is removed from the current collector (rings on the rotor) by electric brushes and then, passing through the diode bridge, it is straightened and becomes a constant voltage of 12-14V. This is the long path taken by the electric current necessary to power the vehicle’s on-board network.
Features of the VAZ generator
The VAZ 2114 generator is driven by a poly V-belt from the crankshaft pulley. The generator output voltage is 13-14 Volts. The current that the generator is capable of generating is 80 Amperes, which is quite enough to provide reliable electrical power to the car.
The generator is secured with two bolts at the top and bottom. A special bolt with a washer bent at 90⁰ is installed on top, in which the thread necessary to tension the generator belt is cut. A long bolt with rubber bushings is installed at the bottom, which are designed to reduce vibrations on the generator.
Device
- The generator has two covers, front and rear, which are made of aluminum and have grooves for the generator bearings. By the way, in the back cover the bearing is inserted into a plastic sleeve.
- The generator stator is made of sheets of electrical steel in the grooves of which the winding is laid.
- The rotor is made of electrical steel - cast, inside which the winding is laid.
- The diode bridge is installed on the back cover of the generator. The stator leads are connected to the contacts of the diode bridge.
- The generator has two outputs: the excitation winding and the positive wire for charging the battery.
WHAT IS A GENERATOR?
The VAZ 2114 generator can be imagined as an electric three-phase alternating current machine. It has a built-in rectifier unit that converts alternating current to direct current. The device consists of the following parts:
- Front and back cover made of aluminum alloy. Each of them has slots for installing bearings. On the back cover body there is a battery connection terminal and a connector for supplying voltage to the excitation winding. There is also a capacitor installed on the back cover, which suppresses radio interference; there is a place for installing and fastening the brush assembly;
- Stator core cylinder made of transformer iron. Inside it there are grooves for laying the power windings of the generator. They have leads for connection to the rectifier block. Both covers are attached to the stator with four bolts;
- Excitation winding on the rotor shaft. It is connected with its leads to slip rings made of copper, which are installed on the same shaft. The front of the shaft has a keyway to accommodate the drive pulley;
- The brushes of the VAZ 2114 generator are a non-separable unit combined with an electronic relay controller. The relay in a metal case is riveted to the brush holder;
- A block of power and additional diodes is attached to the back cover from the inside. It contains six power and three additional diodes. To cool semiconductor devices, they are mounted on horseshoe-shaped aluminum alloy plates.
Generator set design
SOME OF ITS TECHNICAL CHARACTERISTICS
The generating set provides the following parameters:
- The excitation winding is powered by an adjustable voltage from 13.2V to 14.7V;
- The current strength of the voltage generated by the generator is 80 A;
- The belt deflection should not exceed 8 mm with a load of 10 kg.
The generator is installed on the engine on its left side in the direction of travel of the machine. The rotor rotates right, which it receives using a drive belt from the engine crankshaft.
Signs of generator failure
One of the main signs of a generator malfunction is the lack of battery charging. There may be several reasons for the battery not charging:
- Belt break;
- Wear of current collecting brushes;
- Damage to the diode bridge;
- Damage to the stator winding;
- Collector wear;
Also, signs of a generator malfunction include insufficient voltage to charge the battery, that is, when the engine is running, the generator does not produce the necessary voltage that can charge the battery.
Electrical breakdowns
You can understand that an electrical breakdown has occurred in the generator by the following indicators:
- the charge voltage has decreased;
- the charge voltage has increased;
- The generator stopped charging altogether.
If you don’t have a multimeter at hand, you can determine the malfunction using the following parameters:
- The battery sensor blinks or is constantly on;
- the headlights began to shine quite dimly, even when the engine was running;
- wipers work much slower than before;
- The electrolyte in the battery is boiling, while the headlights are shining very brightly.
It should be understood that you can superficially check the operation of the generator without removing it. But if such a check does not bring the necessary results, then dismantling the generator simply cannot be done.
Diagnostics
If such signs of generator malfunction occur, it is necessary to diagnose and repair the generator.
Before starting repairs, it is necessary to carry out diagnostics and exclude trivial breakdowns, such as a fuse and loose battery and generator terminals.
If the battery is not charged, it is necessary to check the integrity of the fuse numbered F16; this fuse is responsible for the excitation winding of the generator. If the field winding fuse fails, the generator will not produce voltage.
If the charge is in progress, but the voltage at the generator output is negligible, then it is necessary to check the tightness of the terminals on the battery and the tightness of the positive contact on the generator.
If the diagnostics show that the fuse is intact and the terminals are sufficiently tightened, then you should begin repairing the generator.
Removing the generator
To carry out the work, it is necessary to prepare the tools that will be needed during the work.
Tool:
- 10mm wrench;
- 13mm key 2 pcs.;
Step-by-step instructions for removing the VAZ 2114 generator
- Before starting work, it is necessary to remove the negative terminal of the battery to protect against short circuits when working with the generator.
- Loosen the generator mounting nut with a 13mm wrench;
- Loosen the belt tensioner with a 10mm wrench;
- Remove the belt from the generator pulley;
- Unscrew the nut of the positive wire of the generator and disconnect the excitation winding chip;
- Unscrew the nut and remove the upper bolt of the generator;
- Unscrew the long bolt securing the generator, which is located at the bottom. When removing it, do not lose the rubber bushings;
- Remove the generator;
Tools required for repairs
To work you need to prepare the following tool:
- socket head with ratchet 8;
- key to 13;
- a regular flat screwdriver.
The price for replacing generator brushes without removal and with removal on VAZ 2113, 2114 and 2115 as of November 8, 2019 varies from 500 to 600 rubles. Inexpensive, but why pay? Independent work is quite advisable, it is not complicated, does not require special skills, and at the same time you can inspect the condition of the generator and adjacent components.
Step-by-step instructions for disassembling the generator
1 - Pulley; 2.4 - Thrust washer; 3 - Front cover; 5 - Rotor; 6 - Stator; 7 - Back cover; 8 - Plastic cover; 9 - Diode bridge; 10 - Brushes;
- Remove the plastic back cover of the generator (8);
- Unscrew the brushes, remove the chip from the diode bridge and take them out (10);
- Unscrew the capacitor from the generator housing;
- Unscrew the bolts holding the stator winding to the diode bridge;
- We bend the leads of the stator winding and take out the diode bridge (9);
- Unscrew the 4 bolts securing the rear cover of the generator and use a puller to remove it (7);
- We clamp the generator rotor (5) through a rag (be careful not to split the armature) into a yew and unscrew the pulley (1);
- Remove the pulley and use a puller to remove the front cover of the generator (3);
- The disassembly process is complete;
Diagnostics after disassembly
After the VAZ 2114 generator has been disassembled, it is necessary to diagnose it.
- Inspect the condition of the slip rings on the rotor;
- Bearing condition;
- Length of brushes;
- Stator winding integrity;
- Integrity of the diode bridge;
If any damage occurs, the parts must be replaced.
We hope our article was useful to you.
On domestic brands of cars with front-wheel drive, the generator is installed deep in the left corner. The part is quite large and easy to notice. The generator ensures stable operation of all vehicle systems and also maintains battery functionality for a long time. A malfunction of the device is often manifested by a blinking light on the instrument panel and the need to frequently recharge the battery. Knowing how to remove the generator on a VAZ-2114 is necessary so that the process of replacing the part is as quick and simple as possible.
You may also be interested in our expert’s article, in which he talks in detail about how to remove the instrument panel on a VAZ-2114.
Problems with the brush assembly of the VAZ 2114
The operation of the brush assembly depends on the brushes themselves and the electronic regulator, popularly called “chocolate” and “tablet”. Replacing the brushes of the VAZ 2114 generator can be done without dismantling the generator, but this is not very convenient.
To test the brush assembly you will need a regulated power supply and a 12 volt light bulb. Connect the power supply to the + and – of the regulator, and the light bulb to the brush - it should light up, and when the input voltage increases to 15 volts, it will go out. If it continues to burn at 16 volts, change the electronic regulator.
As for the VAZ 2114 brushes, their wear can be diagnosed by the following signs:
- lack of battery charge;
- low voltage on-board network;
- jumping charge voltage.
When free, the brushes should be more than 5mm long, and if yours is shorter, don’t hesitate to change them. To check the condition of the brushes, they must be moved in the grooves. They should move freely, and if they hang, lubricate them with a drop of oil.
Check the condition of the slip rings for wear. If present, sand the rings with the finest sandpaper. After replacing the brushes, if the problem was in them, the functionality of the generator will be restored immediately.
Features of the generator
The generator starts working immediately after starting the engine. Normally, the device produces a current in the range of 13.2 - 14.5 V. This current strength is enough to operate all the electronics in the car. If a powerful speaker system is installed in the car, then it is possible that the battery life will also be used. The voltage regulator, which is built into the generator, rectifies the current to the desired level and makes the system stable.
If the generator on a VAZ-2114 fails, the voltage drops below the stated parameters, and the car begins to use the battery. Since the part is quite expensive, and most often the cause of generator breakdown is faulty brushes, most often car enthusiasts resort to replacing them.
Problems with the diode post
Checking the serviceability of the diode bridge is quite simple. The fact that it is faulty is indicated by either increased voltage or lack of charge. You should not delay repairs, as this may result in serious problems in the vehicle's electrical network.
But the diode bridge can fail only in the event of a breakdown of the power diodes. They can be replaced if necessary. True, sometimes some problems arise with this. The fact is that finding power diodes is quite difficult. You may have to make an exciting journey through the disassembly of a VAZ-2114, but it is much faster and easier to replace the old diode bridge with a new one.
As you can see, a generator is a necessary part in a car, without which it simply cannot work. If the generator breaks down, you can replace it if you can’t repair it yourself. In addition, replacement of the generator will be required in the following cases:
- improving the car sound system;
- installation of additional vehicle lighting, both inside and outside;
- installing additional outdoor lighting or replacing the old one with a more powerful one.
What you will need to remove the device
Since the generator is bolted on all sides, it is advisable to carry out all work in a garage with a pit. If there is no hole, then for convenience you can use a jack. The VAZ-2114 generator must be disconnected from all wires. To remove the part itself you will need:
- mount;
- keys at 10, 13, 15, 17, 19;
- knob with cap heads;
- rags.
It’s easier to unscrew hard-to-reach nuts with a wrench, but if you don’t have one, you can get by with wrenches. A rag will be needed to wipe the parts. Moisture often accumulates on the belt, and if you do not plan to replace it, it is better to immediately wipe the part with a rag.
How to properly dismantle a generator
Removing the device consists of only eight steps. If you follow the instructions, the part can be removed in just 10 - 15 minutes.
- It is necessary to disconnect the negative terminal from the battery.
- For convenience, it is better to remove the crankcase protection.
- Next, you need to loosen the belt tension. To do this, loosen two bolts that are located on the side of the part.
- After the belt has been loosened, the generator must be slightly moved towards the engine and the rubber part removed.
- Due to the fact that the generator is completely removable, the belt tension bar can be removed.
- The next step is to remove all terminals and pipes from the air conditioner.
- After the generator is disconnected from all pipes, you need to unscrew all the bolts that secure it.
- Since the part at the bottom is attached to a long bolt, which is difficult to unscrew, you can remove the generator along with the hardware, and then unscrew it.
Installation of a new generator occurs in the reverse order and requires care.
We also recommend reading our specialist’s article, which talks about how to remove the generator on a Priora.
It is not advisable to overtighten the fasteners, as this may lead to damage to the integrity of the part.
How to disassemble the 2114 generator yourself
Having removed the generator, you can disassemble it and carefully inspect all its components. This will allow you to find worn/damaged parts and replace them.
For disassembly you will need tools such as open-end wrenches (19 and 10), as well as a Phillips screwdriver.
The disassembly procedure involves sequentially performing the following steps:
- The protective plastic casing on the body is removed. To do this, you need to release the three existing latches.
- The screws that secure the brush assembly are unscrewed using a screwdriver. Then it can be removed from the body.
- The wires coming from the regulator output are disconnected.
- Unscrew the screws (4 pcs.) that secure the rectifier unit. Next, the winding terminals are disconnected, and then the block itself is removed (along with the noise suppressor capacitor).
- Unscrew the tightening screws (4 pcs.) and remove the cover on the side of the slip rings.
- Unscrew the nut that secures the pulley. To do this, it is advisable to clamp the rotor shaft in a vice to prevent it from turning.
- The generator pulley is removed, as well as the thrust washer from the rotor shaft.
- Remove the cover from the rotor.
Belt replacement
Replacing the VAZ-2114 alternator belt through the top consists of only seven steps:
- The first stage involves disconnecting the terminal.
- Next, you need to loosen the two generator mounting bolts to allow the belt to slack.
- At the next stage, the generator must be moved towards the engine, and the belt, if possible, removed from the top.
- When installing a new belt, you must first put it on the pulley and then on the roller. The pulley has larger dimensions, so it is quite easy to distinguish it from the roller (read more about how the generator belt tension roller works).
- Next, you need to return the generator to its place and secure it.
- When adjusting the tension, screw the adjusting bolt clockwise until the belt is in the desired position.
- The last step is to tighten the bolts that hold the generator in place.
The belt is replaced on average every 30 thousand km, but if necessary, the part is changed much earlier. If the belt appears cracked or shows obvious signs of wear. Sometimes an unpleasant whistle when the engine is running reminds you of the need for replacement.
Fastening design
The design of fastening elements for electric generators on AvtoVAZ vehicles varies. Differences in fasteners are caused by the peculiarities of the structure and location of the power unit. For cars of the VAZ classic and Niva family, with a longitudinal engine, the autogenerator is typically located longitudinally, along the block, near the first cylinder. The generator is driven through a belt from the crankshaft pulley. On front-wheel drive models with a transverse engine, the electric generator is located opposite the front right side member in the direction of travel.
The compatibility of the installation grooves on classic and front-wheel drive models differs, but depending on the specific model. The installation locations of the electric generator on classics and the first front-wheel drive cars (08, 09 and 99 families) are the same. However, to install an electric generator from a tens or Chevrolet Niva to a classic, you will need to purchase pulleys, a special strip and a mounting bolt for installing the generator. In other cases, the installation and fastening of generators from 21214 and other Nivas to rear-wheel drive VAZ models does not require additional work.
To install powerful devices from Kalina or Priora, the generator mount for other VAZ models will need to be changed. It is very important to select the appropriate components. For installation on the 08, 09 and 99 family, we select all generator mounts from VAZ (2110, etc.) for an 8-valve head, and not for a 16-valve one.
This nuance is very important, because it directly affects the compatibility and possibility of installing powerful electric generators on older front-wheel drive and rear-wheel drive car models.
The fastener itself is a metal L-shaped structure made of durable steel. The design provides special holes for its combination with the autogenerator itself. In addition, the mounting strip is equipped with a technological cutout into which a screw is inserted to align the device relative to the cylinder block.
The lower mount of the generator is presented in the form of a special metal bracket with technological holes (in the bracket itself and in the counter part of the generator). A bolt passes through these fasteners, which rigidly connects the elements together. This is necessary in order to avoid vibrations and belt slippage during engine operation.
Replacing the brushes of the VAZ-2114 generator
If the generator does not cope with its tasks, then a complete replacement of the part is not always required. Sometimes all it takes is replacing the brushes, which will cost 10–15 times less than a new device. The easiest way to change brushes is when the generator is not removed. To do this, you need to disconnect the terminal and disconnect the wires going to the generator. The brush holder is removed, and the bolts securing it are first unscrewed. Old parts are removed, the seat is cleaned and new brushes are installed in it. On average, brushes are changed every 50 thousand km, but if the protruding part of the parts decreases by less than 5 mm, it is necessary to urgently replace the elements.
Sources used:
- https://carfrance.ru/zamena-generatora-na-vaz/
- https://vaz-2114-lada.ru/2020/09/kak-snyat-i-zamenit-generator/
- https://enginehack.ru/generator-vaz-2114/
- https://motorsguide.ru/system/zamena-generatora-na-vaz-2114
REPLACEMENT
If there is a whistle coming from under the hood, and it turns out that the generator is the cause of the whistle, then it’s time to change the bearing on the VAZ 2114 generator. It is better to change them in pairs, because the second one may soon whistle too.
At a car service center, they will charge approximately 600-700 rubles for the replacement work, plus removal and installation of the generator - approximately the same amount of money. But you can change the bearing on the generator yourself; you only need minimal plumbing skills, tools and care when disassembling and reassembling. Alternatively, you can buy a new assembled generator, but replacing the VAZ 2114 generator bearings will cost much less.
So, let's look at how to change the bearing on a VAZ 2114 generator. To replace it, you will need the following tools:
- Set of combination keys;
- Screwdrivers – slotted and Phillips;
- Puller for pressing out the rear bearing;
- Hammer;
- Vise;
- A drill bit with a diameter of approximately 4 mm and a drill (not needed if the entire front cover is being replaced).
Replacing the generator bearing yourself is done as follows:
- We turn off the engine, remove the battery terminals;
- Loosen the belt tensioner nuts and remove the tension belt;
- We completely dismantle the belt tension bar, disconnect the wires, unscrew the mount and remove the entire device itself.
Then you should disassemble the housing and replace the bearings:
- First, remove the back plastic cover; it snaps into place with three clips;
- We dismantle the brush assembly together with the relay regulator;
- We remove the diode bridge; it is held on by three screws and a pin on the supply terminal. Therefore, in addition to the screws, you also need to unscrew the nut by 10;
- There are three screws on the aluminum back cover. We unscrew them and dismantle the back cover, at the same time the stator winding;
- Next, we proceed to disassemble the front part of the generator. We carefully clamp the rotor in a vice, then unscrew the nut securing the pulley, the pulley can be removed very easily;
- Gently tapping with a hammer, remove the front cover along with the bearing;
- That's it, the main assembly has already been disassembled, all that remains is to compress and press in the bearings.
The rear bearing is pressed from the armature (rotor) with a special puller, but first it is better to move it on the shaft using two screwdrivers so that the puller can engage. The new bearing is hammered into place through a mandrel (you can use a 15mm socket).
According to factory technology, the front cover must be replaced as an assembly, and it is difficult to knock out the bearing from it (it is cored in the housing) without damaging the cover. But you can still remove it; for this you need an electric drill and a 4 mm drill. Using a drill, we drill out the metal at the core points and knock out the bearing. We press the new part into the lid and seal it. We perform the entire assembly in reverse order.
That's all, we figured out how to change bearings on a generator.
Download PDF
Quite often, car enthusiasts wonder how to remove the generator on the VAZ 2114 and 2115. After all, this device tends to fail at the most inopportune moment. It’s no secret that you can’t go far with a non-working generator. The battery will drain quite quickly, which again will not be good for it. Therefore, at the first sign of a malfunction, you should immediately remove this unit. Then it is possible to install a new one, or repair the old one. In most cases, the best option would be to repair the generator; you can do this yourself. You just need to identify the cause of the breakdown.
How to remove the generator on VAZ 2114 and 2115?
Usually asked by people who have obvious problems with this part. Usually, attention is paid to the generating device when the battery is poorly charged. As a rule, the driver notices a light on the panel that lights up. This allows you to quickly resolve the problem. But sometimes the problem manifests itself as an unexpectedly dead battery. At the same time, the lamp does not react at all to low voltage in the network. In this case, be sure to check the performance of the battery; perhaps everything is in order with the generator.
To check, you should not experiment with removing the terminal on a running generator. In this case, a voltage surge occurs, which will damage the car’s electronics. Therefore, to check, arm yourself with a regular multimeter. The test is performed in voltage measurement mode. Start the engine, then let it warm up for a few minutes. This will allow the tension to normalize. After that, we bring the engine speed to 3000, and turn on all electrical appliances: the stove, heated windows, high beams.
Measure the voltage at the battery terminals in this state. The device should not show less than 13.2 V. If the reading is less, then there is definitely a breakdown in the generator. Although sometimes the cause of the malfunction is oxidation of the contacts on the battery. After cleaning, check again. You can check the relay regulator as follows: first measure the voltage under load. After which all devices are turned off. And they take measurements again. With a normal regulator, the readings will not change, or will change within 0.1 V. If the device shows an increase in voltage, then most likely the problem is in the relay.
Assembly is carried out in reverse order. Replacement parts are installed to replace failed parts. Be careful when installing the bearing. Do not hammer it directly with a hammer. A pipe of suitable diameter should be used for this.
Conclusion
. Domestic cars have to be repaired quite often. At the same time, each machine has its own weak points. The question of how to remove a generator on a VAZ 2114 and 2115 is not uncommon among owners of these models. In general, this work is not difficult; after completing it once, you are guaranteed to be able to repeat it.
The generator is responsible for generating current while the car is moving. If the device is faulty, the battery charge is wasted, which requires constant recharging and leads to premature wear. Since it is quite easy to remove the generator on a VAZ-2114, you can replace the part yourself. It is important to follow a certain sequence and not forget about firmly fastening the part.
On domestic brands of cars with front-wheel drive, the generator is installed deep in the left corner. The part is quite large and easy to notice. The generator ensures stable operation of all vehicle systems and also maintains battery functionality for a long time. A malfunction of the device is often manifested by a blinking light on the instrument panel and the need to frequently recharge the battery. Knowing how to remove the generator on a VAZ-2114 is necessary so that the process of replacing the part is as quick and simple as possible.