The generator in a car is included in the list of main attachments and is an important element. Among the main functions, one can highlight the fact that a car generator charges the battery and also powers the on-board network after starting the internal combustion engine.
At the same time, although the general design is similar, the design of the generator may differ slightly in different cars. In any case, it is important to be able to promptly identify possible problems, as well as know how to diagnose and repair the generator if necessary.
Next, we will look at how the generator on the VAZ 2114 is structured and works, what features the generator on this model has, what signs indicate that the 2114 generator is out of order, how to repair the generator, etc.
Car generator for 2114: features
Let's start with the fact that although simple domestic models (for example, VAZ 2107, 2110, 2114, 2115 and many others) do not have a large number of primary and additional on-board electronics, the VAZ 2107 generator or VAZ 2115 generator is of particular importance. The reason is the need to charge the battery and replenish the charge lost by the battery to start the internal combustion engine, as well as the power supply to the on-board network.
The generator or generator set on the VAZ 2114 is a three-phase alternating current electrical installation. The device has a built-in rectifier unit, which converts alternating current into direct current.
The VAZ 2114 generator has the following technical characteristics: the voltage value for powering the excitation winding ranges from 13.2V to 14.7V. The generator produces a current of 80A.
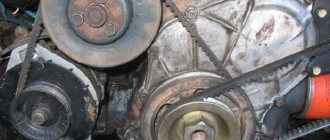
To understand how to remove the 2114 generator (we’ll look at it in more detail below), you must first note that the unit is installed on the engine on the left. The generator is driven from the crankshaft through the generator drive belt. The rotor rotates to the right.
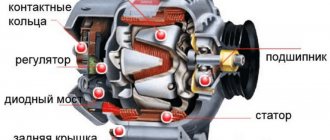
The general structure of the generator includes a number of individual elements:
- a front cover made of aluminum and a rear aluminum cover (the covers have seats for bearings);
- battery connection terminal;
- connector for supplying voltage to the excitation winding;
- capacitor for noise suppression;
- mounting location for the generator brush assembly;
- diode block (6 power diodes and 3 additional) mounted on the inside of the back cover;
- in order for the semiconductors in the generator device to be well cooled, they are installed on special aluminum plates;
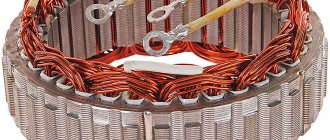
- The stator core cylinder, made of transformer iron, also stands out. The covers are attached to the stator with 4 bolts;
- There are grooves inside the stator into which power windings are placed, having leads for connection to the rectifier block;
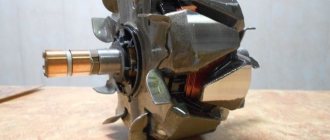
- We also note that the excitation winding with its leads is connected to slip rings mounted on the rotor shaft;
- in front of the rotor shaft there is a special keyway where the drive pulley is located;
- The brush assembly of the VAZ 2114 generator is not dismountable, it is made as one piece with a relay-regulator, which is enclosed in a separate steel case attached to the brush holder (by the way, the brushes are carbon-graphite).
Repair instructions for the VAZ 2114 unit
Disassembling the unit for repair is a sequence of steps:
- By releasing the three latches, remove the protective casing from the housing.
- We make marks of the relative positions of the two covers and the stator to facilitate assembly.
- Having unscrewed the fastening screws, we dismantle the brush assembly.
- Next, you need to disconnect the wires from the regulator terminal.
- We unscrew the fastening bolts and dismantle the diode bridge, while disconnecting the winding terminals.
- After unscrewing the four tie screws, you need to remove the cover from the side where the generator slip rings are located.
- We fix the rotor shaft from turning using a vice and unscrew the pulley mounting nut. Now remove the generator set pulley and washer from the rotor shaft.
- At the last stage, we dismantle the rotor cover of the unit.
Then you can inspect the parts and repair or replace them. The brushes, diode bridge, bearings, three-level voltage regulator and other parts of the generator set may be faulty.
Modern cars are equipped with a large number of electronics, which requires a more powerful generator set for stable operation of the on-board network. Low voltage can affect the operation of the valves. Under heavy load, the generator heats up. In this case, a generator from Priora or Kalina is installed on the VAZ 2114, capable of delivering a current of up to 115 A. It is mounted in the same way as the standard one, only the drive belt pulley needs to be replaced.
The generator is installed on the VAZ 2114 in the reverse order. After installing the unit in its original location, all connectors and wires are connected, and the drive belt is put on. To tension the drive belt with a volume of 1.5 liters, the generator housing is removed from the motor block using a mount. And with a volume of 1.6 liters, the belt is tensioned using a tension screw. The performance of the generator depends on the tension of the belt. If the tension is insufficient, a weak charge is generated, which negatively affects the operation of the on-board network.
Thus, the car’s generator ensures uninterrupted operation of the on-board network and charges the battery. If problems occur with the diode bridge, bearings, brushes or other parts of the generator set, their cause should be identified and repaired or replaced, otherwise problems may arise with the instruments and sensors included in the on-board network.
Symptoms of generator malfunctions, diagnosis and repair
So, problems with the generator are often indicated by the fact that the battery light on the instrument panel lights up. This indicates problems with charging the battery from the generator. Problems can also manifest themselves in the form of a constant discharge of the battery or undercharging of the battery. Also a sign of problems is overcharging the battery (the battery is “boiling”, the electrolyte is boiling away, etc.).
Problems with the generator will also be indicated by dim headlights when the engine is running, voltage surges in the on-board network, and the appearance of extraneous noise in the generator area after starting the internal combustion engine. One way or another, if everything is fine with the battery itself, then you should check the generator.
Briefly, the list of main problems:
- A common problem is the fuse. If it burns out, it needs replacement. It is also important to determine the cause of burnout. To do this, you should check the power circuits, connections of the “zero” to other contacts, etc.
- If the diagnostics do not reveal problems with the wires, terminals and contacts, the generator elements should be checked. Often, the list of main faults includes failure of the generator brushes (severe wear, destruction).
Let us add that if the brushes need to be replaced, then the brush holder also needs to be replaced. In turn, the contact rings do not need to be changed; they just need to be cleaned with a cleaner. Experts also highlight malfunctions of the voltage regulator, breakage or delamination of the generator belt, jammed bearing, etc.
In any case, each of these problems can damage the generator. Moreover, many problems tend to actively progress. Some of the breakdowns, if not repaired in a timely manner, lead to the need to replace the VAZ 2114 generator.
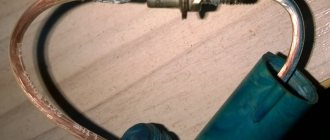
Checking the windings
First you need to visually inspect the windings. If there are no visible defects, you should use a multimeter. First you need to do the following:
- Remove the brush holder.
- Disconnect the voltage regulator.
- Clean the slip rings.
- Diagnose the winding for defects.
The resistance measurement function on the multimeter should be activated. The measurement is taken between the slip rings and the stator. In normal mode, the value will be from 5 to 10 ohms.
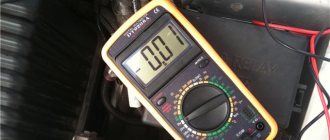
How to test a generator with a multimeter
In practice, an effective way to check a generator is diagnostics using a multimeter. To do this, the engine must be started. Next you need to measure the voltage at the battery terminals. Then you should create a load (turn on energy consumers, for example, headlights and a radio), press the gas pedal, spinning the engine to 2500-3000 rpm.
At this moment you need to measure the voltage at the battery terminals. Normal - the voltmeter will show 13V. If you turn on power consumers, the voltage should increase to 14.7V. If deviations from the norm are visible, certain conclusions can be drawn.
In the event that the generator does not produce the required voltage, the shortage is compensated by the battery and “drains” the battery. If the voltage is high, this is a dangerous situation that can lead to blown lamps, fuses, or failure of the computer.
By the way, experts do not recommend checking the generator without a multimeter by simply removing the “plus” from the battery. Remember, this can damage the vehicle's electronics. If the cause cannot be determined without removing the generator, then dismantling the unit is necessary.
We also note that it is also necessary to evaluate how the generator operates in terms of noise. If extraneous sounds are heard when the rotor rotates, the culprit may well be the generator bearing, which is loaded by the belt and may fail.
Checking the auxiliary diodes
- We connect the probe of the positive terminal of the voltmeter (red probe) to the common bundle of auxiliary diodes (Fig. 1), connect the negative probe (black) to the opposite terminal of any of the auxiliary diodes (Fig. 2).
- We look at the voltmeter readings: a working diode - the readings go to infinity.
- We swap the tester probes and look at the readings of the same diode. A working diode - the readings will be approximately 300-700 Ohms.
- We perform this operation with the two remaining auxiliary diodes.
Removing the generator from the car and disassembling it
It is quite obvious that superficial diagnostic methods do not always allow one to accurately determine the malfunction. Moreover, in order to carry out repairs, the unit in many cases must be removed. At the same time, on some models (for example, the generator on a VAZ 2107) it is easier to remove than on others. As for the more modern VAZ 2114 or VAZ 2115, removing the generator is somewhat more difficult and you need to know certain nuances. Let's figure it out.
- So, the option discussed below allows you not to remove the engine protection. To remove the VAZ 2114 generator, you need to prepare: wrenches 13, 10, open-end wrench 17 x 19, head 15, as well as a pry bar;
- Now you can remove the terminals from the battery, loosen the alternator belt and remove it. Afterwards, the belt tension mechanism is dismantled;
- Then you should disconnect the wires from the generator, disconnect the connector to the voltage winding;
- The generator itself is secured with a nut and a long bolt. First, unscrew the bolts with head 15, on which the bracket is secured to the block;
- Now the device is rotated in a clockwise direction. This will allow you to remove the axis of attachment to the bracket;
- Afterwards you can unscrew the nut (19mm wrench) and remove the nut together with the bushing. Then the axle is knocked out of the bracket with an extension;
- The final step is to remove the generator by pulling it up;
To disassemble the generator, you need open-end wrenches 19 and 10, as well as a Phillips screwdriver. First, remove the protective cover on the case (press 3 latches). The screws securing the brush assembly are unscrewed with a screwdriver. Then you should disconnect the wires from the output of the relay regulator. Next, you need to unscrew the 4 screws securing the rectifier block.
The next step is to disconnect the winding leads and remove the rectifier unit. At the same time, the capacitor is removed, which eliminates radio interference. Next, you need to unscrew the 4 screws holding the case together, after which the cover where the slip rings are located is removed. Next you need to unscrew the nut securing the pulley. To do this, it is better to immediately clamp the rotor shaft in a vice, thereby avoiding rotation.
We also recommend reading the article on how to test a generator diode bridge. From this article you will learn about the main methods of checking a diode bridge, as well as what nuances you should pay attention to as part of such diagnostics of a car generator.
Next, you need to remove the generator pulley and thrust washer from the rotor shaft. Then the cover is removed from the rotor. It is recommended to mark the position of the stator in relation to the covers in advance to simplify assembly.
The result of the work done is the opportunity to inspect the disassembled VAZ 2114 generator and carry out troubleshooting. Upon completion, assembly and installation of the generator on the machine is carried out in the reverse order. If the device is immediately replaced with a new one instead of repaired, then you can immediately proceed to installation.
By the way, replacing a VAZ 2114 generator is not always associated only with malfunctions of the generator set. For example, it may be necessary to replace a generator in a car due to the complex installation of powerful additional equipment (for example, acoustics, amplifiers and subwoofers along with heated seats, etc.)
As for 2114, in this case, many car enthusiasts choose a more powerful 115 Ampere generator (from Lada Priora or VAZ Kalina) instead of an 80 Ampere device. The fact is that in terms of fastening there are no differences. You just need to change the drive belt pulley. Having replaced the specified pulley, all that remains is to install a generator from Priora or Kalina on the VAZ 2114.
Battery overcharge
However, often it is not “undercharging” and “overcharging”. The electrolyte from the battery boils away and the battery also fails; there is nothing good about this either.
The first sign will be white streaks on the top of the battery, which means the electrolyte simply boils and evaporates. That is, the battery is charged, but the generator still “craps” charging it. The relay regulator has most likely failed here.
The check here is also elementary - you need to connect a multimeter or tester (whatever they call it) with the car running, and look at the charge. If it greatly exceeds 14.5 - 14.8 V, but is within the range of 15 - 15.2 V, it means that it is overcharging. We urgently change the relay-regulator, otherwise you will constantly boil your battery, ALSO NOTHING GOOD. It’s trivial that the plates may crumble.
Now let's watch the video version.
That’s all, he told me, exactly the methods without removing it from the car, and of course give it to a good auto electrician for repairs.
This is where I end, sincerely yours, AUTOBLOGGER.
( 91 votes, average: 4.42 out of 5)
Similar news
Engine chip tuning. Advantages and disadvantages. Is it worth doing at all? .
Generator overrunning clutch. What is it and what is it for? Important.
Why does the alternator belt whistle? When cold or under load. .
Source: avto-blogger.ru
Operating principle of an electric generator
The operating algorithm of the generating unit on VAZ cars is as follows:
- when the ignition is activated, the current begins to move to the excitation wires;
- the armature creates an e/m field passing through the stator winding;
- voltage appears at the terminals;
- after the armature reaches a significant rotation speed, the system switches to self-excitation mode;
- The produced alternating current is converted into direct current through a rectifier unit.
- when the crankshaft rotation speed jumps, the voltage regulator is activated (the time interval for activating the excitation wire is adjusted).
Those who want to know how to check the generator on VAZ 2109 cars and newer models of the manufacturer should take into account that the general connection diagram may include a built-in voltmeter and a charge lamp. The latter is located on the dashboard.
Which electric generator should I buy (articles, manufacturers)?
When checking a generator, it sometimes turns out that the device needs to be replaced. To choose the appropriate version of the generating unit for a VAZ, you need to take into account the type of engine (with a carburetor or injector) and the configuration of the internal combustion engine.
It is better to install models of generating units manufactured by VAZ partners. Among the latter, electric generators KZATE 9402.3701 and 372.3701 are distinguished. The first option produces a current of 80 A and is installed on the engines of AvtoVAZ 2111 cars. Devices 372.3701 are less powerful, delivering 55 A.
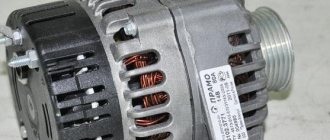
The most popular brands of generators for VAZ internal combustion engines
If you cannot find one of the above parts, you can give preference to compatible generating units. Among the most famous manufacturers of electric generators at VAZ are:
- LKD - the brand is distinguished by the production of devices that are not of the highest standard, but still suitable for use.
- Fenox - the manufacturer stands out for its high-quality assembly of products.
- “Pramo” - generating units of this brand have a different design than models from previous manufacturers, which makes it possible to obtain power up to 100 A;
- “StartVOLT” - devices from this manufacturer are equipped with digital voltage regulators and a pair of additional diodes. The latter help to increase the productivity of the electric generator (up to 120 A).
If you want to save money, you should choose Chinese brands of generators. Domestic manufacturers produce electric generators with an optimal ratio of quality and cost.
Where is the generating unit installed on VAZ vehicles?
To find the generator in AvtoVAZ cars, just lift the hood and inspect the front left corner. The device is located behind the radiator in a rather inaccessible place.
Appearance of the VAZ 2108-2115 generator
To remove the generating unit, specialists often use lifts or dismantle it from the pit. Due to the difficulty of carrying out such operations, it is important to know that you can check the charging of the generator with a multimeter on a VAZ 2110 car and other modifications of the manufacturer without removing the device.